Imagine you are filling out a form or application online or via an app. You need a copy, so you have a record of what you wrote. But the site/app doesn’t offer a way for you to save the form or send it to your inbox. What can you do?
Maybe you want to share your latest creation or score from your favorite iPhone or iPad game (like Minecraft!). Perhaps you want to screen capture for posterity that message that melted your heart, surprised you when you least expected it or destroyed your world.
Or for times when your iPhone is just plain buggy, and you need screenshots to prove to the genius bar (and your friends) that yes, this really did happen.
For all these reasons (and more), we find capturing screenshots is an excellent option to save that moment in time and all the information that the moment holds.
But if you find that you are one of those people like me that manage to get Siri instead of capturing a screenshot when pressing the Sleep/Wake and Home buttons together, this article is an answer for you.
Screenshots are a handy tool for saving a snapshot of whatever is currently on your screen. Whether it’s an interesting article, a game score, or a conversation, you can capture it all with a screenshot. If you’re an iPhone 14 user, here’s a simple guide on how to take a screenshot.
You’ll need to find the Side button, which is on the right side of the iPhone, and the Volume Up button, which is on the left side of the iPhone.
Navigate to the content you want to capture. This could be a webpage, a text message conversation, an app, or anything else that’s displayed on your screen.
Press the Side button and the Volume Up button at the same time. You’ll hear a camera shutter sound (if your sound is enabled), and the screen will flash white for a moment. This indicates that you’ve successfully taken a screenshot.
Immediately after taking the screenshot, a thumbnail of it will appear in the lower-left corner of your screen. If you tap on this thumbnail, you’ll be taken to a screen where you can edit the screenshot. Here, you can crop the image, add text or drawings, and more. Once you’re done editing, tap “Done” in the upper-left corner of the screen. You’ll then have the option to save the screenshot to your Photos, Files, or delete it.
If you want to share the screenshot, you can do so directly from the editing screen by tapping on the Share button in the lower-left corner. This will bring up a variety of sharing options, including messaging, email, and social media.
And there you have it! Taking a screenshot on your iPhone 14 is as simple as that. So the next time you come across something interesting on your screen, remember these steps and capture away!
Please note that the steps may vary slightly based on the specific model of your iPhone and the version of iOS you’re running. Always refer to Apple’s official resources or your device’s user manual for the most accurate instructions.
How to Take a Screen Shot on iPhone 14 with One Hand
Maybe you only have one hand free to take a screenshot, or you simply want a one-tap method to capture screenshots, the good news is Apple is there to help. Using the AssistiveTouch function allows a one-handed opportunity!
Assistive Touch has been around since iOS5, created to allow people who may be at a physical disadvantage an automated replica for the quick gesturing needed to use an iPhone/iPad. AssistiveTouch once set up, gives users quick access to specific commands via an overlay menu that follows your screen to screen.
We will take advantage of AssistiveTouch to give us access to quick and easy screenshots on all our iPhones and iPads.
First, you will need to perform a one-time set-up so that you can use this function on demand.
So let’s get to it!
To Set-Up AssistiveTouch Screenshots Settings
Open the Settings app on your iPhone or iPad.
Scroll down and tap Accessibility.
Under the Physical and Motor section, tap Touch.
Tap AssistiveTouch at the top of the screen.
Tap the toggle next to AssistiveTouch to the On position.
Select Customize Top Level Menu.
Tap the Custom Icon.
Scroll through the list of options and tap Screenshot.
Tap Done in the top right corner.
You should now see a small circular icon on the lower right side of your screen (you can move that icon to any part of the screen by tapping, holding, and dragging).
Now you are all set up to take as many screenshots as you desire with just one hand.
Taking Screenshots Using Assistive Touch
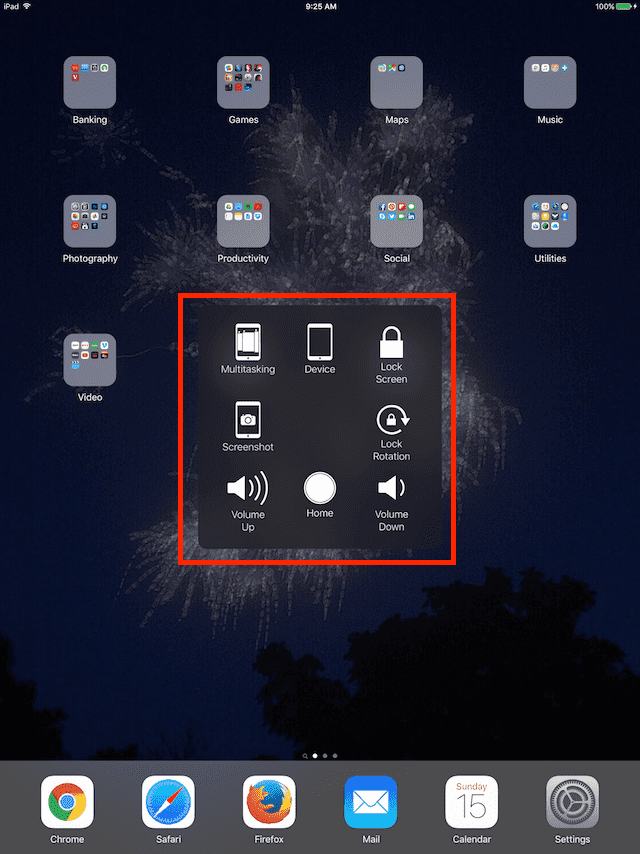
Locate and tap the AssistiveTouch button on your Home Screen.
From the menu that appears, tap Screenshot.
The screen flashes white and makes a camera shutter sound.
That screenshot is saved to your Screenshots album on the Photos app (this album is auto-created; all your screenshots are added to this automatically)
Need Screenshot Alternatives?
Apple includes some custom actions within AssistiveTouch to make things even easier
Open the Settings app on your iPhone or iPad.
Scroll down and tap Accessibility.
Under the Physical and Motor section, tap Touch.
Tap AssistiveTouch at the top of the screen.
Under the Custom Actions section, choose one of the following:
Single-Tap
Double-Tap
Long Press
Select Screenshot from the list of options.
Alternatively, you can tap Create New Gesture… under the Custom Gestures section.
Follow the on-screen steps to create a custom gesture that will be used to take a screenshot.
Tap the Save button in the top right corner.
Want to Get Rid of the AssistiveTouch On-Screen Button?
If you find that the Assistive Touch icon takes up too much room on your screen or if it merely annoys you after a while, you have a couple of options.
Open the Settings app on your iPhone or iPad.
Scroll down and tap Accessibility.
Under the Physical and Motor section, tap Touch.
Tap AssistiveTouch at the top of the screen.
Tap the toggle next to AssistiveTouch to the Off position.
Set Assistive Touch as Your Accessibility Shortcut
Another option is to set AssistiveTouch as a toggle so you can turn it on or off at will by using the Triple-Click Home Button or Triple-Click the Side Button option for your Accessibility Shortcut.
How to Enable AssistiveTouch As Accessibility Shortcut
Open the Settings app on your iPhone or iPad.
Scroll down and tap Accessibility.
Scroll down until you reach the General section.
Tap Accessibility Shortcut from the list of options.
Select AssistiveTouch.
Tap the < Back button in the top left corner to save your changes.
That it! You should now be able to toggle Assistive Touch at will by rapidly clicking the Home or Side button 3 times
AssistiveTouch Has a Lot of Options!
AssistiveTouch also provides one-step access to a bunch of other functions (including HOME, SIRI, CONTROL CENTER, and VOLUME buttons among many others). The Assistive Touch feature allows you to access up to 8 of these functions via that on-screen icon.
Assistive Touch for Users with Broken Hardware
For users with broken hardware such as the volume or home button not working, AssistiveTouch is a phone-saver, allowing these users to take advantage of many iPhone/iPad features they lost when their hardware broke. These include functions like volume up/down, lock screen, lock rotation, and of course the home button.
For all of us iFolks with intact or broken hardware, we get to pick and choose which functions work best for us. Or we can just assign it one function (like Screenshot). This is all about customization, making our iPhone or iPad work best for us whatever our circumstances.
Since the inception of the iPhone and iPad, Apple has invested a lot of effort in developing and enhancing the features available through Accessibility. Apple’s commitment to accessibility is part of its DNA, apparently never looking at the return on investment but considering it “just and right.” Notably, the VoiceOver feature has proven itself very useful for people with impaired vision.
Summary
At AppleToolBox, we love taking screenshots so using AssistiveTouch for capturing our iPhone or iPad screens is mighty handy. Using AssistiveTouch is an easy way to capture your iPhone/iPad’s screen and having the option to toggle it on/off maximizes screen space when needed.
There are always times when capturing our iPhone/iPad’s screen will save the day and that precious thing called INFORMATION. That’s why we at Apple ToolBox think screenshots are totally awesome. And luckily, it’s pretty darn easy to get a screenshot from your iPhone or iPad. In fact, it’s darn easy to get a screenshot from any device—iPhones, iPads, iMacs, and even Androids and Windows.
Screenshots are an excellent way for cross-platform communication. So let’s give this feature a try!
For most of her professional life, Amanda Elizabeth (Liz for short) trained all sorts of folks on how to use media as a tool to tell their own unique stories. She knows a thing or two about teaching others and creating how-to guides!
Her clients include Edutopia, Scribe Video Center, Third Path Institute, Bracket, The Philadelphia Museum of Art, and the Big Picture Alliance.
Elizabeth received her Master of Fine Arts degree in media making from Temple University, where she also taught undergrads as an adjunct faculty member in their department of Film and Media Arts.
I just setup the Accessibility Assist with my iPhone as well as iPad. I have CMT (Charcot Marie Tooth) and this is very helpful for me with my coordination issues! (Press the Home key and Power key at the same time? Really??) Finding and setting this up was like a free upgrade to my devices. Thank you thank you thank you!
Having accidentally broken my arm left me effectively one-handed so I began using dictation/speech2text in iOS 10. But in public I don’t always like to be letting those around me on the bus, the sidewalk, the library know what I’m doing. So this simple intro to Assistive Touch is perfect!! Next I’ll see if I can use my camera similarly – where the shutter button can no longer be just the Home button, which is often inaccessible with one hand!
Never been here to Apple Toolbox before! Great stuff, clearly presented!
I love the assistive touch for schrdenshots & more. I’ve been an iPhone junkie since the 3.
Admittedly, I’ve only been using it for a couple of months; I don’t know how I lived without it. I have tiny hands & lead a busy life, A.T. Helps a lot.
Question: when taking a screenshot it used to stay on the screen for me to edit/send etc. Suddenly, it’s going straight to the camera folder.
I loved being able to instantly work with it. Sometimes I want to edit, send & not save. Please help me fix this!
Hi Leisa, Thanks for stopping by. We love the AT feature on the iPhone as well. What iOS version is your iPhone on? Without the AT enabled on iOS 11,we are able to tap and edit/send etc before it goes to the camera roll.


Compared to Qndroid’s swipe, that’s far too much work.
I just get Siri to take the screenshot.
I just setup the Accessibility Assist with my iPhone as well as iPad. I have CMT (Charcot Marie Tooth) and this is very helpful for me with my coordination issues! (Press the Home key and Power key at the same time? Really??) Finding and setting this up was like a free upgrade to my devices. Thank you thank you thank you!
Having accidentally broken my arm left me effectively one-handed so I began using dictation/speech2text in iOS 10. But in public I don’t always like to be letting those around me on the bus, the sidewalk, the library know what I’m doing. So this simple intro to Assistive Touch is perfect!! Next I’ll see if I can use my camera similarly – where the shutter button can no longer be just the Home button, which is often inaccessible with one hand!
Never been here to Apple Toolbox before! Great stuff, clearly presented!
Hi Bill,
Thanks for the feedback. Sorry about your arm, but glad that assistive touch is helping out!
SK
U can use volume button as a shutter button
I love the assistive touch for schrdenshots & more. I’ve been an iPhone junkie since the 3.
Admittedly, I’ve only been using it for a couple of months; I don’t know how I lived without it. I have tiny hands & lead a busy life, A.T. Helps a lot.
Question: when taking a screenshot it used to stay on the screen for me to edit/send etc. Suddenly, it’s going straight to the camera folder.
I loved being able to instantly work with it. Sometimes I want to edit, send & not save. Please help me fix this!
Hi Leisa, Thanks for stopping by. We love the AT feature on the iPhone as well. What iOS version is your iPhone on? Without the AT enabled on iOS 11,we are able to tap and edit/send etc before it goes to the camera roll.