Recently I needed to look at some of my user library files on my iMac and my MacBook, and I thought it would be easy-peasy to check them all out at once by showing the library folder. Boy, was I wrong! macOS (Catalina, Mojave, High Sierra, and Sierra) make it a lot more tricky to display your user library than ever before…and I had no idea until of course, I needed to see these library files.
Since I figured I would need to go there again, I decided that I want it showing up all the time as a visible folder in my user ‘s home directory. ![]()
In the past with macOS Sierra and El Capitan, I used the Terminal command “chflags nohidden ~/Library” to make my user library permanently visible. But after updating to macOS Sierra (10.12.6) then High Sierra (10.13), Mojave (10.14), and finally macOS Catalina (10.15), this Terminal command no longer appears to work!
Related Articles
- macOS Could Not Be Installed, How-To Fix
- How-To Fix When macOS Needs to Repair Your Library
- Use Your Awesome macOS Utilities Folder Today!
- How-To Factory Reset Your Mac with macOS
Contents
So here’s how I got my user library in macOS to show-up permanently in my user folder.
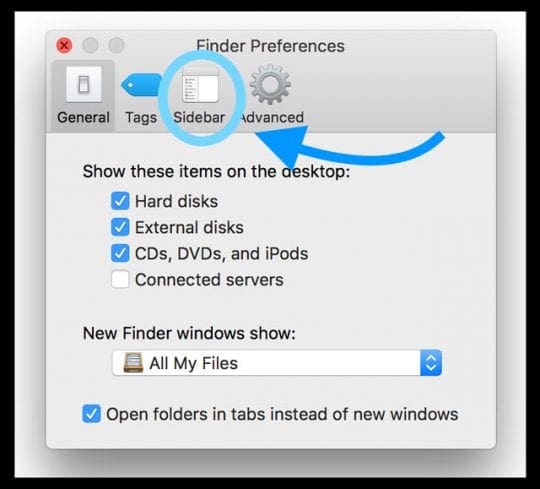
- First, go to Finder and select Finder > Preferences (or use Command+Comma)
- Choose Sidebar from the top list of tabs (General, Tabs, Sidebar, Advanced)

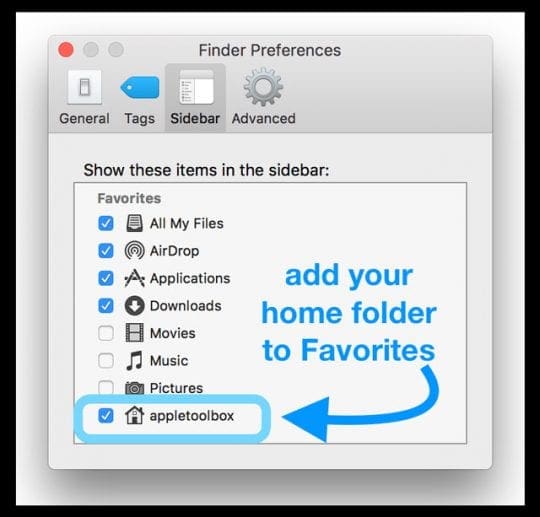
- Under Favorites, tick the checkbox next to your user folder’s name

- Close your Finder Preferences
- Open a New Finder Window (or press Command+N)
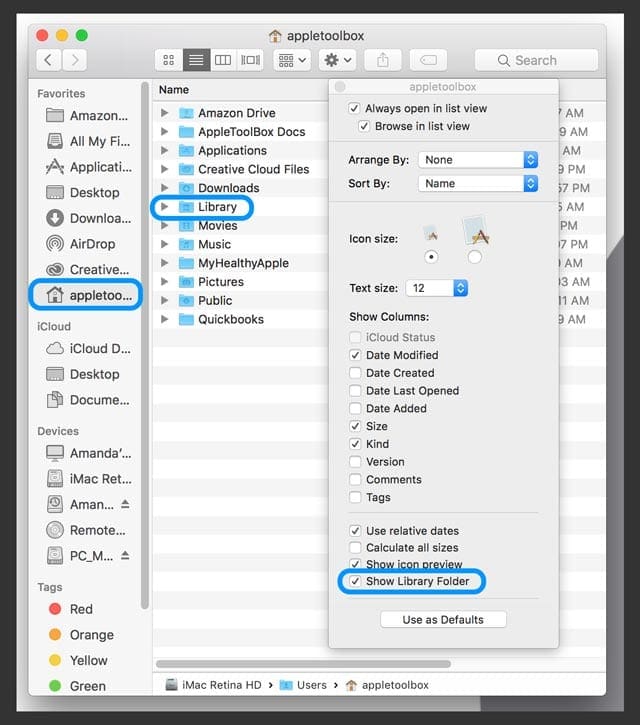
- From the left Sidebar, under Favorites select your Home Folder
- If you don’t see the Sidebar select View > Show Toolbar (or Option+Command+T)
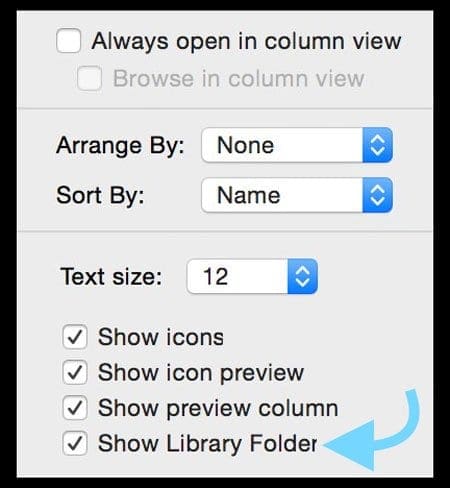
- From the Finder Menu, choose View > Show View Options (or press Command+J)
- In the pop-up menu, select Show Library Folder

- Your user library instantly populates in your user folder
Unhide Folders to See User Library and a Heck of A Lot More!
Another command we can leverage is the Unhide Keystroke of Command+Shift+Period.
This action makes any hidden files or folders visible in your Finder, including the user library and all other hidden files. This command causes any hidden folders and files appear as shaded icons.
These files remain visible until the next time you use the command again or restart/shutdown your Mac. 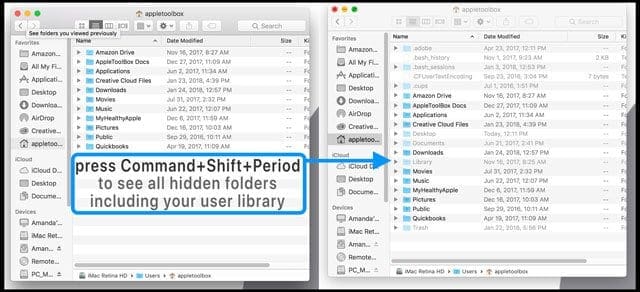
To see all your user folder’s hidden files, open your user folder and press Command+Shift+Period, and all those hidden folders appear in gray.
To hide them, press that same set of keys again.
Show User Library Temporarily
If you only want to take a quick peek at your user library and don’t have a need to have it permanently visible, there’s an easy way to take a look.
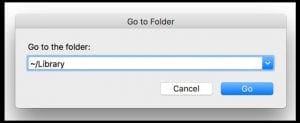
- Go to Finder > Go
- Select Go to Folder (or use Shift+Command+G)
- Type this exactly: ~/Library

- Your user library opens so you can inspect the contents
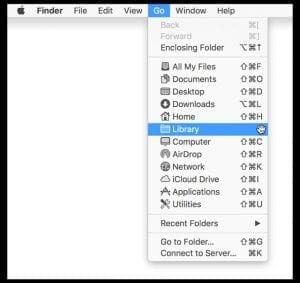
- Go to Finder > Go
- Press the Option Key
- If you release the Option key, the Library option disappears from the menu
- Select Library

- Your user library opens
- Press the Option Key
Add Your User Library To Favorites!
If you decide that you want regular access to your user library folder, another method that works is opening up a temporary library window using one of the above ways and then click and hold the Library icon shown at the bottom Path Bar and drag that library icon to your Favorites column in the sidebar. ![]()
To show the Path Bar, select Finder > View > Show Path Bar (or press Option+Command+P)
To show the Sidebar, select Finder > View > Show Sidebar (or Option+Command+S)
Show User Library in OS X and earlier versions of macOS Sierra
For folks using OS X and some macOS Sierra versions, showing your user library is a bit easier!
Options to Show User Library
- Click on your Users folder, open it in Column view, and select View > Show View Options then check the box for Show Library Folder

- If Library isn’t an option, check that you’re in Column View
- Select your User folder, and press Command+ J. Then check the box for Show Library Folder
- Use the Terminal Command: chflags nohidden ~/Library/ or open ~/Library
- For temporary access to your user library
- Go to Finder > Go and press either the Option key or the Shift key and select library
- Use the keystroke shortcut Command+Shift+L
- To add permanent library access, when in your Library folder, tap and hold the Library icon shown on the top of the Finder window or at the bottom in the Path Bar and drag that icon to your Favorites column in the sidebar
What’s the User Library Anyway? 
Your user library (~/Library) folder contains all your personal user settings, caches, preference files, iOS firmware updates for iTunes, app support files, iMessage and Message archive, and other essential data.
And generally, it’s not to be messed with! Making haphazard changes to your user library often results in BIG problems with your apps and with your Mac’s performance so proceed with caution.
If you’ve ever needed to delete a .plist file to troubleshoot an application, more than likely you’ve visited your user library.
It’s a folder we often access to troubleshoot problems, but it’s also kept hidden for a reason–there’s a lot of information stored there that can potentially cause a lot of damage.
For that reason, Apple decided to hide your user’s Library folder by default in Mac OS X 10.7 and all later Mac OSX and macOS releases.
Reader Tips 
- First, close all open apps
- Open Terminal by going to Macintosh HD> Applications > Utilities >Terminal
- Type in this command into the terminal window: defaults write com.apple.finder AppleShowAllFiles TRUE
- Then, type in killall Finder
- Restart your Finder
- When you want to restore macOS hiding files, open Terminal again and type in: defaults write com.apple.finder AppleShowAllFiles FALSE
- Followed again by killall Finder
- On macOS, you can use SHIFT+COMMAND+THe PERIOD SYMBOL (.) on the keyboard to toggle between showing hidden folders and not showing hidden folders. Command+Shift+period works everywhere but your Desktop
- Use the Terminal command: chflags nohidden ~/Library && xattr -d com.apple.FinderInfo ~/Library
- Go to Finder and select your user/home folder. Then choose EITHER Finder> View> Show View options or use the shortcut Command + J. In the View options, tick the box for Show Library Folder. Then, your user library folder should be visible for your user and home folder
- For Mac OS X, try Finder > View. Press ⌘ J and tick the checkbox Show Library Folder

For most of her professional life, Amanda Elizabeth (Liz for short) trained all sorts of folks on how to use media as a tool to tell their own unique stories. She knows a thing or two about teaching others and creating how-to guides!
Her clients include Edutopia, Scribe Video Center, Third Path Institute, Bracket, The Philadelphia Museum of Art, and the Big Picture Alliance.
Elizabeth received her Master of Fine Arts degree in media making from Temple University, where she also taught undergrads as an adjunct faculty member in their department of Film and Media Arts.








this ONLY works in list view, in column view it does not appear in view options
I need to recover ~/library/preferences/templates from Time Machine. These are hidden.
How do I do this? Does Time Machine always back up all hidden files?
Thanks
Wow! It worked like a charm. Your are an expert. Congrats!
YOU are the ONLY person on the net who figured out the mischievous minds of Apple programmers! I searched and searched. I typed all kinds of code into Terminal. Then you made it so simple! Yet why oh why would Apple ever hide Library folder in our View Options?
I have no idea how many times I’ve had to figures out where are hidden files in Mac OS! Been using Macs since 1988! But this time, they sure made it hard! No reason ANY experienced user should have to spend so much time just to see file! I use Library ALL the time! URGH!
I’m not a programmer. But sometimes I want or need to manually backup or restore emails. Sometimes Adobe puts Photoshop and Lightroom presets into Library, sometimes into Applications folder. Those are just a few of the many reasons some real world users need our user Library access!
WHY Apple treats some of us as if we are ignorant children is a mystery to me. SO much wasted time. Some of us KNOW how to use our computer gear! URGH.
Thank you Elizabeth Jones. Liz, YOU ROCK!!
Thank you, this is an exemplary webpage – useful way beyond any expectation, clear, well presented. This is how to help people. Well done.
Thank you so much!
Unfortunately, while it was very helpful per se, it didn’t resolve my problem. I have a copy of my hard disk on an external disk, and I need to open this library to recover my custom GREPS (Indesign). T
Thanks to your clear explanation, I saw it – but couldn’t open.
Is there a way to do this? If I have to start over… Any help would be highly appreciated – I am no GREP wizard, and all my GREPS were gathered from here and there bit by bit over a long period
Thank you so so so much. I’d have never guessed how to get my mac to display the library folder. Very much appreciated.
winner winner chicken dinner! It worked! Thanks!!
Thanks. A big help in removing Webroot SecureAnywhere.
How would I view any (potentially) hidden files on NON-booted volumes? Or are such unhidden anyway (=what you see is what you’ve got)?
I’m trying to locate a Safari bookmark.plist on a Sierra volume that appears to have irreparably trashed itself. A fresh Sierra install on another partition seems to have imported, and messed with the bookmarks in some peculiar way, and I’m hoping it hasn’t obliterated the original on the older partition.
Hi Dan,
It’s unlikely that a non-bootable drive has a lot of hidden files, especially things like a plist.
But then again, never say never!
Let’s try a terminal command that shows every file and see if that makes a difference in what your drives show.
First, close all apps–yes, everything!
Open Terminal (Applications > Utilities)
Type in this command into the terminal window: defaults write com.apple.finder AppleShowAllFiles TRUE
Then, type in killall Finder to restart your Finder
When you want to restore macOS hiding files, open Terminal again and type in:
defaults write com.apple.finder AppleShowAllFiles FALSE
Followed again by killall Finder
Let us know if this helps,
Sam
Great answer and thanks. I’d have tried that when I saw the reply, but in the interim got a file-viewer app and sure enough found (greyed-out user Library) the Safari file. It was the main thing I wanted to recover: a list of Korean-English vocabulary items tied (in the sidebar bookmarks) to a youTube series, representing hours and hours of research and typing.
Naturally I’m going back up stuff from now on. After decades of fail-proof Apple machines, I’d gotten lazy.
(BTW, the Sierra failure was identical to the now-notorious HIGH Sierra booting glitch that left progress-bars, for hundreds if not thousands, stranded at 100% loaded, but no cigar. No fix, no explanations and not even acknowledgement from Apple.
I’ve absolutely never had anything like it on a Mac. After exploiting a reformatted old partition for a fresh Sierra–downloaded from Apple–it seems to be playing nasty with the old Safari: it won’t let it run, and has mucked with the plists favorites, etc. it copied, and plain won’t load the originals. Can’t import them, and can’t import them into Firefox; the latter insists on importing from the new Safari.)
Thank you so much. This works for Mojave too–gaming is utterly impossible without this. I have no idea why they hide it.
They certainly do not make life easy for us developers… it is probably more security than we need honestly. Thanks for the info on this!
Thank you! Why, why, why does Apple do these things?!
Thanks, it was helpful!
Its very helpful. Thanks