Hiking is a great hobby for many, and few things are better than getting out into the great outdoors. Besides exploring beautiful landscapes, you can also enjoy both fresh air and exercise simultaneously. Moreover, you’ll learn how to better navigate the world around you.
Many users have an Apple Watch to accompany them for all forms of exercise, including hiking. And if you’re one of those, we’ve got some good news; in watchOS 10, you’ve got a whole suite of new features.
In this guide, you’ll find out how to use the new hiking features in watchOS 10. And if you haven’t already seen them, we’ll quickly cover what you can expect after upgrading your device’s software.
Before we look at how you can use the new hiking features in watchOS 10, let’s look at what Apple is actually introducing. To make things easier for you to read, we’ve broken down the best new features into different categories.
Cellular Connection Waypoints
One of the best new features in watchOS 10 is the ability to use cellular connection waypoints. Using a compass, your Apple Watch will determine where on your hike was the last spot where you had a cellular connection.
If you’ve been out on a long hike before, you’ll know that cellular connections can be patchy in more rural areas. With this feature, you can determine when is a good time to check in with others and let them know that you’re safe.
Elevation Views
When you’re out on a hike, it’s needless to say that not every path you choose will be the same height. And if you’re in particularly rugged terrains, the elevation can change quite dramatically in a short period of time.
Once you’ve downloaded watchOS 10, you’ll have access to elevation views based on waypoints. This way, you can decide on where your next path should be – and you can do so based on your current hiking skill level.
Searching for Closeby Trails
When you’re out on a hike, you might decide that you want to be a bit spontaneous. This is especially true if you’re on vacation in an area where you’re spoiled for beautiful natural scenery, such as in the Rocky Mountains or Swiss Alps.
If you’re new to an area, knowing what’s around you is a good idea. And in watchOS 10, you’ll gain access to a feature that lets you pick from different nearby trails that show up.
Enhanced Map (US Only)
Having a better understanding of the terrain around you is partially going to become better with the elevation views feature, but that’s not all that’s coming to watchOS 10 as a hiking feature. If you’re based in the US, you will also have access to a better map.
This map will feature topography with contour lines to show you how the elevation is distributed. On top of that, your Apple Watch will show you the different areas worth exploring around your current locality.
Hill shading, which allows you to see what the terrain looks like where you are, is also available.
Emergency Call Waypoints
Hiking is fun, but some areas are quite dangerous. The weather can change quickly, and accidents can occur if you aren’t careful. Knowing what you’ll do in such a situation is a good idea, though hopefully, you won’t need to implement your plans in this respect.
Tying in with the cellular connection waypoints feature, watchOS 10 will also make it easier for you to determine where your last connection was so that you can make an emergency call if needed.
How to Use the Hiking Features in watchOS 10
Now that you know which hiking features you can expect in watchOS 10, let’s look at how you can use these.
Waypoints and Elevation Views
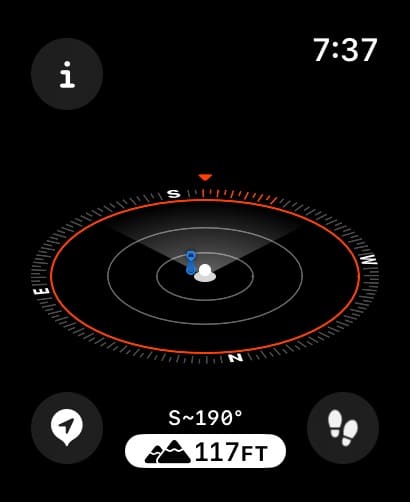
To use cellular connection waypoints on your Apple Watch, you’ll need to open the Compass app on your device. Once there, you’ll see these symbols:
Green cellular logo: Your last cellular connection.
Red SOS logo: Your last emergency call waypoint.
Apple WWDC 2023/YouTube
Your elevation will appear at the bottom of the screen.
Looking for Nearby Trails
To look for nearby trails and points of interest, you should open the Maps app on your Apple Watch. When you’re there:
Tap the search icon and look for the Find Nearby section.
Click on either Trails or Trailheads. Then, when you see a hike you want to try, click on the walking person icon.
Apple WWDC 2023/YouTube
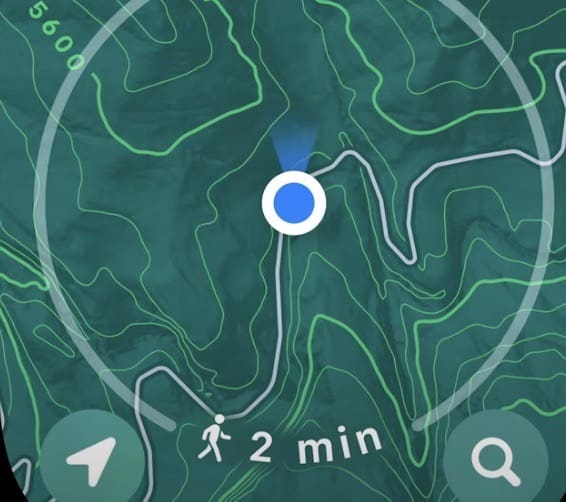
Topographic Maps
If you’re in the US, you simply need to open the Maps app to use the topographic map. It’ll look something similar to what you see below.
Apple WWDC 2023/YouTube
Enjoy the Great Outdoors With Your Apple Watch
If you were a big fan of hiking before, you’ll likely find even more reasons to go and explore the great outdoors with watchOS 10. Apple’s new release is jam-packed with exciting features that will help you navigate your surroundings with greater ease. On top of that, you’ll find it easier to discover hidden gems that you might otherwise have glossed over.
Now that you’ve read this guide, you have the information you need to enjoy your new watchOS 10 hiking features.
Danny has been a professional writer since graduating from university in 2016, but he’s been writing online for over a decade. He has been intrigued by Apple products ever since getting an iPod Shuffle in 2008 and particularly enjoys writing about iPhones and iPads. Danny prides himself on making complex topics easy to understand. In his spare time, he’s a keen photographer.


Write a Comment