For me, my photos and videos are the most precious pieces information on my iPhone. Unlike most music, photos are not replaceable. My photographs are windows into my life—my past and present. They are priceless. If I had to pick and choose what to backup, my photos are #1 on that list.
For this reason, alone, I use Time Machine because it automatically backs up all my files including all my photos from all my iDevices and my computer. I am comforted knowing that if anything happens to my computer, my photos are safely tucked away on my Time Machine backup.
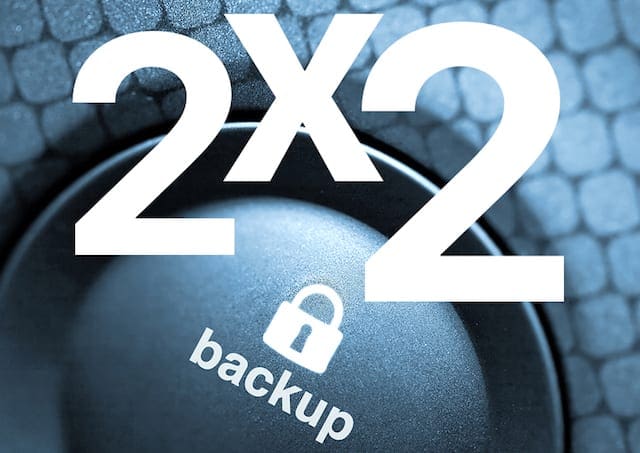
At Apple ToolBox we believe it best to have backups in more than one location, ideally two remote backups (such as cloud backups) and two local backups (such as your local computer and time machine backup on an external drive)—we call this the 2X2 backup rule. For backing up your photos and videos from Apple’s native Photos app, nothing beats the ease and simplicity of using Apple’s iCloud Photo Library.
Your iCloud Photo Library Explained!
Your iCloud Photo Library is a backup AND a photo-sync service. That’s why when you delete a photo in one place, it deletes that photo from all devices using the same Apple ID. But storing all those photos potentially takes up a lot of your iDevice’s Storage. Fortunately, Apple offers some useful storage saving tools to help anyone who’s facing that dreaded Storage Almost Full or Cannot Take Photo messages.
So let’s get to it!
It’s All About the Data (and the Numbers)
Your Apple ID comes with a free 5GB iCloud account. For many of us, this is sufficient to backup our photos, videos, and other information from our iPhones, iPads, and other iDevices. But if you are someone like me, who loves to take a lot of photos, we require more storage. So for us, Apple offers plans starting at USD $.99/month for 50GB, USD $2.99/month for 200 GB, and plans up to 1 TB (that’s probably overkilling unless you are a professional photographer.)
Apple makes it pretty easy for us to backup those photos and videos. Once set, our iDevices and even our computer(s) will automatically back up and sync all our photos across everything. iCloud Photo Library is easy to manage, and you can share and collaborate with others on photo albums.
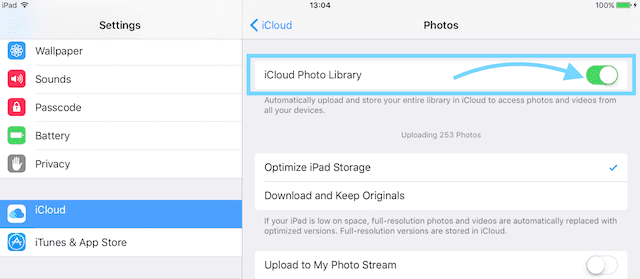
Setting Up iCloud Photo Library on Your iDevice
Open Settings
Tap iCloud
Tap Photos
Turn the iCloud Photo Library On by sliding to the right
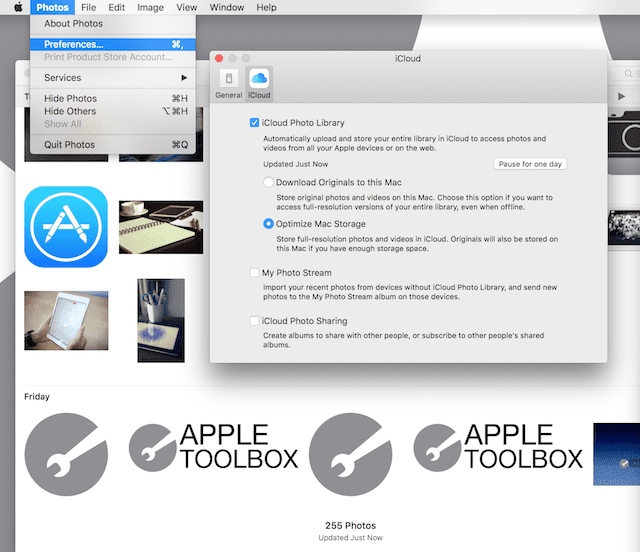
Setting Up iCloud Photo Library on your Mac
Open Photos on your Mac
Go to Photos>Preferences
Click on iCloud tab
Check the box iCloud Photo Library
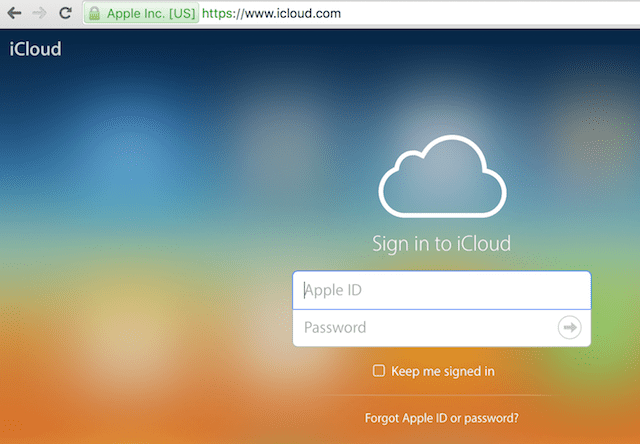
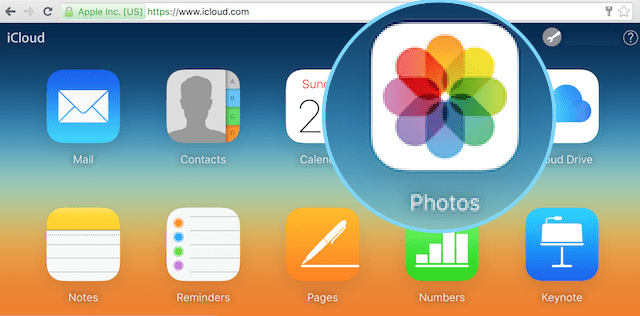
Accessing iCloud Photo Library on the Internet
Open any browser
Go to iCloud.com
Enter your Apple ID and password
Click on the Photos icon
Accessing iCloud Photo Library from Apple TV (from tvOS 9.2 and later)
Go to Settings
Select Accounts
Choose iCloud
Select iCloud Photo Library
Common Messages
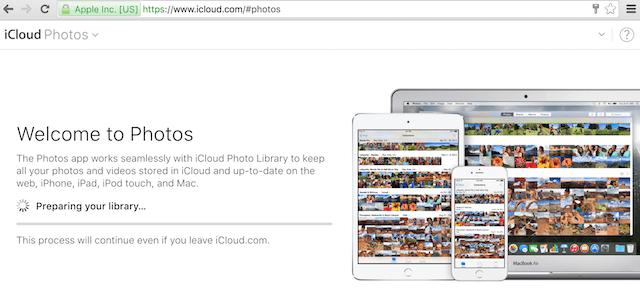
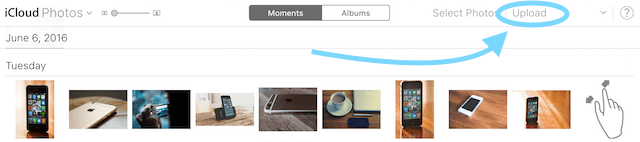
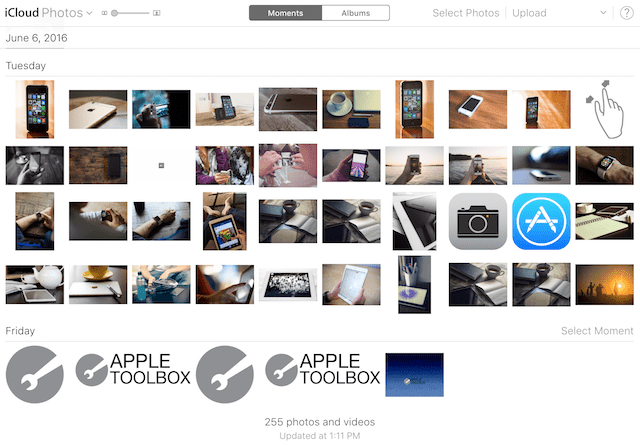
You might see a message that tells you that Photos is “Preparing your library.” If so, be patient, this means your photos are loading. Once all your photos are loaded, you’ll be able to view, organize, email and share them, and even download them. You can also manually upload images to your iCloud Photo Library, just make sure your pictures are in the following formats: JPEG, JPG, PNG, or RAW. Most cameras and phones use these formats, so you probably don’t need to worry that your device is not compatible with the iCloud.
Slow Connection, So Pause for a Day
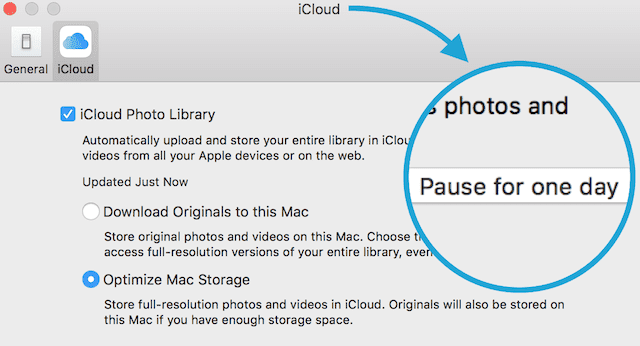
Bear in mind that for your iOS device or your Mac, your photos and videos will upload after you connect to the Internet with Wi-Fi and your battery (if applicable) is charged. If you find your connection is slow, you can pause the upload for one day by doing the following:
On Macs
Click Photos
Select Preferences
Choose iCloud
Click on button Pause for one day
There Are Always Ground Rules
One limitation set by Apple is that no photo or video can be more than 16GB in size—for most of us, heck almost all of us, that’s not going to be an issue. Additionally, iCloud Photo Library accepts the following formats only: JPEG, RAW, PNG, GOF, TIFF, and MP4—that probably covers most of our iDevices and personal cameras, unless they are a professional grade or very old. Your iDevice must run iOS 8.3 or later and your computer must run OS X 10.10.3 or later.
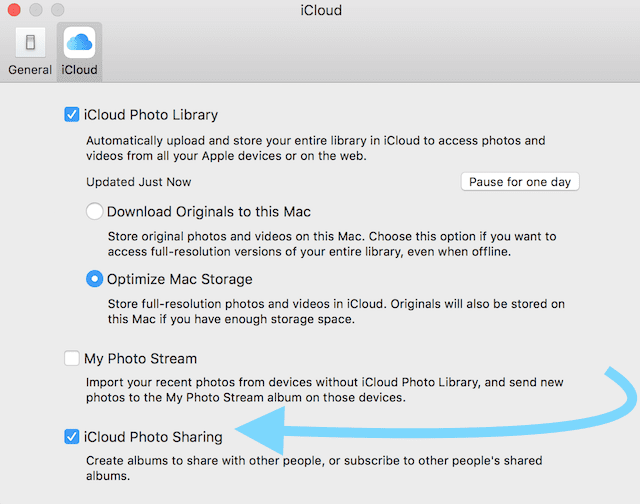
Finally, your iCloud Photo Library is tied to your iCloud username and syncs your own photos and videos between all your devices. The iCloud Photo Library cannot be shared between users, even users designated as a family. However, there are a couple of major caveats here. First, iCloud Family Sharing creates a Family photo album on each family members’ devices—that album is where you and your designated Family members can manually place photos to sync across the entire family’s iDevices. You also create albums to share with others by turning ON iCloud Photo Sharing.
Time to Share
Share with Your iCloud Family
First, you must have already set up iCloud Family Sharing. Check out our article on Family Sharing if you need to do this step. Once you have iCloud Family Sharing, you need to enable iCloud’s Family Sharing option along with iCloud Photo Sharing. Once you have these enabled, there is Shared section of the Photos app on iPhone and iPad and a special album called “Family” in your Shared tabs of Photos on your computer. Remember that this album syncs across everyone’s iDevices.
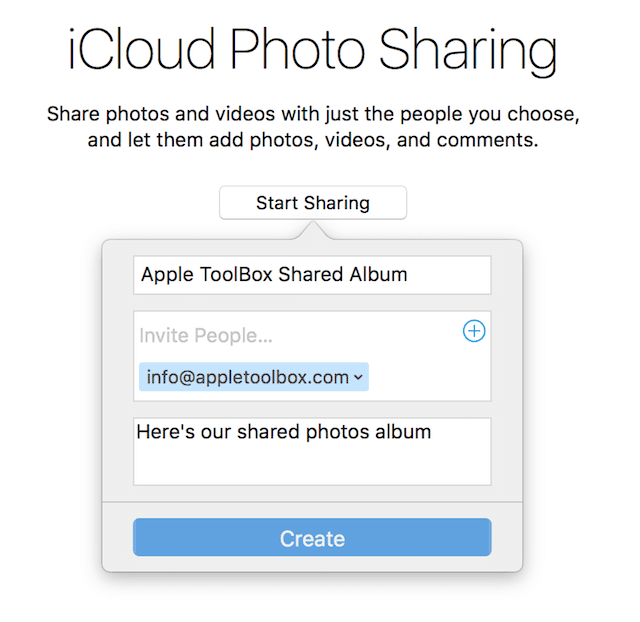
Sharing with Anyone
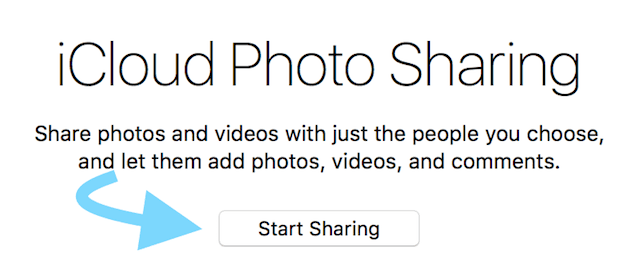
You don’t need a family to share photos. By enabling iCloud Photo Sharing, you send selected images to anyone you want.
Go to Photos>Preferences>iCloud
Check iCloud Photo Sharing
Go to the Shared Tab
Click Start Sharing or Click the Plus (+) sign
Name Album and Invite People
Press Create button
Add Photos to the album
You are all set-up to now share with the people you invited. You add more folks by clicking on the plus (+) sign. To add images, simply select them from your photos library and clicking the Share button and selecting the shared album just created.
The images you add to this folder will sync over to the invited folks’ devices. And they can also add pictures. Pretty amazing!
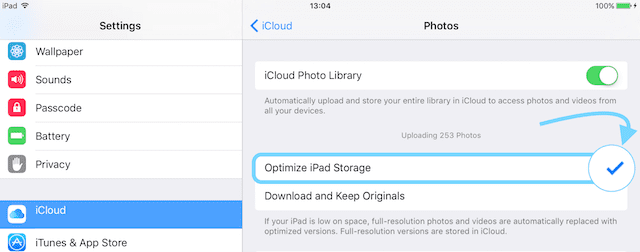
Let’s Get Optimized
One nice feature of iCloud Photo Library is the ability to conserve space on our iDevices and Macs using a setting called Optimize Device Storage. For folks using iOS 10 and above, Apple designed this Optimize Storage solution to better manage your photo storage for you. Find it under Settings > Apple ID Profile > iCloud > Photos or Settings > Photos >Optimize Storage.
When this feature is turned on, iCloud Photo Library automatically manages the size of your photo library on each device, so you have storage for other things. Full resolution pictures and videos are stored in the iCloud while device-sized versions are stored on your devices.
And you can download the original, full resolution photos and videos at any time, as long as you have an internet connection. Plus, whenever you choose to edit a photo, iCloud automatically downloads the original, full resolution version, so you are editing the best version of the photo possible. Nice!
This is one setting to check, especially if you find your storage is almost full. Apple’s default is to store full-resolution for all iOS devices. So take a look and check that you are getting the most out of your iCloud Photo Library by selecting the Optimize Storage option.
A Word About Backups
If you enable the iCloud Photo Library, your photos and videos are NOT included in your iCloud backup (it would be a duplicate backup and add to your storage total.) However, the iCloud Photo Library DOES count towards your total storage, so 5GB if you have the free plan and so forth depending on what iCloud storage plan you have.
The iCloud Photo Library is a great first backup. But as we consistently recommend here at Apple ToolBox, please backup in more than one place.
Do not ONLY have an iCloud Photo Library backup of your photos. Things happen so best to keep at least one additional backup (and preferably 2X2—two cloud, two local) of your photos on your computer, an external drive, or store them on another cloud service. Happy photo-ing!
For most of her professional life, Amanda Elizabeth (Liz for short) trained all sorts of folks on how to use media as a tool to tell their own unique stories. She knows a thing or two about teaching others and creating how-to guides!
Her clients include Edutopia, Scribe Video Center, Third Path Institute, Bracket, The Philadelphia Museum of Art, and the Big Picture Alliance.
Elizabeth received her Master of Fine Arts degree in media making from Temple University, where she also taught undergrads as an adjunct faculty member in their department of Film and Media Arts.
Like most Apple “informational” nonsense: meaningless. I went to settings and then I am supposed to go to icloud. Guess what? There is no “iCloud” line. Very helpful.
I am warning all my friends and students to get as far away from iPhones and Apple products as possible. Doubtless they are called “Apple” because it is nothing but worm ridden.
How frequently do iCloud photos update on AppleTV 4k?
There seems to be a big time lag.
Also, when using my PhotoStream or Shared Photos as screensavers, black blanks appear on my AppleTV 4K, but not on iPad, iPhone or via my PCs web browser.
And, some of the pictures displaying in my album are not mine!
A shot of a panda, for one. A nature shot of a stream for another.
Wow, it’s difficult to get the exact info on how often iCloud Photos update on Apple TVs!
According to Apple, it should check periodically (well, that’s lacking specificity!)
We suggest you do the following to force a sync:
1. Go to Settings > Accounts > iCloud, then turn off and then back on Shared Albums
2. Go to Settings > Accounts > iCloud, then turn off and on My Photo Stream
The black blanks you see indicate either that the image is in a file format that the Apple TV cannot interpret (like RAW image files) or that it is not yet completed streaming to your Apple TV.
We suspect that the images you mention are not your own (like the panda) are Apple’s own images meant to show off the image capabilities of the Apple TV 4K.


Like most Apple “informational” nonsense: meaningless. I went to settings and then I am supposed to go to icloud. Guess what? There is no “iCloud” line. Very helpful.
I am warning all my friends and students to get as far away from iPhones and Apple products as possible. Doubtless they are called “Apple” because it is nothing but worm ridden.
How frequently do iCloud photos update on AppleTV 4k?
There seems to be a big time lag.
Also, when using my PhotoStream or Shared Photos as screensavers, black blanks appear on my AppleTV 4K, but not on iPad, iPhone or via my PCs web browser.
And, some of the pictures displaying in my album are not mine!
A shot of a panda, for one. A nature shot of a stream for another.
Hi Michael,
Wow, it’s difficult to get the exact info on how often iCloud Photos update on Apple TVs!
According to Apple, it should check periodically (well, that’s lacking specificity!)
We suggest you do the following to force a sync:
1. Go to Settings > Accounts > iCloud, then turn off and then back on Shared Albums
2. Go to Settings > Accounts > iCloud, then turn off and on My Photo Stream
The black blanks you see indicate either that the image is in a file format that the Apple TV cannot interpret (like RAW image files) or that it is not yet completed streaming to your Apple TV.
We suspect that the images you mention are not your own (like the panda) are Apple’s own images meant to show off the image capabilities of the Apple TV 4K.
Let us know if problems continue.
Sam