AirDrop, Apple’s proprietary file-sharing technology, has become a staple for seamless transfer between Apple devices. However, the challenge arises when you need to bridge the ecosystem gap – specifically, transferring files from an iPhone to a Windows PC.
In this guide, we’ll dive into effective methods to facilitate this cross-platform file transfer. While AirDrop is exclusive to Apple devices, we will explore alternative solutions that mimic its convenience and speed, enabling you to share files from your iPhone to a Windows PC with ease. Whether you’re sharing photos, documents, or other data, this guide aims to equip you with the tools and knowledge for a smooth transfer experience, regardless of the operating system barriers.
AirDrop is a feature developed by Apple that enables the transfer of files across its devices in a remarkably seamless and wireless manner. This service is built into the macOS and iOS operating systems and uses a combination of Wi-Fi and Bluetooth to create a peer-to-peer Wi-Fi network. It allows users to share photos, videos, documents, and more with other Apple devices nearby.
The beauty of AirDrop lies in its simplicity and speed. Users don’t need to set up a connection or enter credentials to start sharing. Instead, they simply select the file they want to share, choose the AirDrop option, and then pick the recipient from a list of nearby Apple devices. The transfer is secure, with files sent directly between devices without passing through the internet.
AirDrop is particularly praised for its integration within the Apple ecosystem. It is accessible from various apps like Photos, Safari, Contacts, and others, making it a versatile tool for sharing a wide range of content. Additionally, the feature respects privacy settings, allowing users to choose to receive files from everyone, only from contacts, or to disable the feature entirely.
Can You AirDrop to PC?
Transferring files from an Apple device to a PC using AirDrop is not directly possible due to the proprietary nature of the AirDrop technology, which is designed exclusively for the Apple ecosystem. This means that AirDrop only works between Apple devices, such as iPhones, iPads, and Macs.
How to AirDrop to PC: Workaround Methods
However, users looking to transfer files from an Apple device to a PC have several alternatives. One common method is using cloud services like iCloud, Google Drive, or Dropbox. By uploading files to one of these services from an Apple device, users can then access and download them on a PC. Another option is using a USB cable to directly connect the devices, though this method requires iTunes or similar software on the PC.
For those who need a wireless solution similar to AirDrop, there are third-party applications available that can bridge the gap between Apple devices and PCs. These apps usually create a local Wi-Fi network to enable file sharing, mimicking the AirDrop experience. However, users should be aware of the security and privacy policies of these third-party solutions before proceeding.
In summary, while AirDrop itself is not compatible with PCs, there are multiple other ways to achieve file transfers between Apple devices and Windows computers, each with their own set of advantages and considerations.
iTunes File Sharing
iTunes File Sharing presents a reliable bridge for this cross-platform exchange. In this section, we’re going to explore the seamless integration of Apple’s iTunes into the Windows environment, enabling straightforward file transfers between your iPhone and PC. This process, often overlooked in favor of cloud services or email, offers a direct and secure method for moving files.
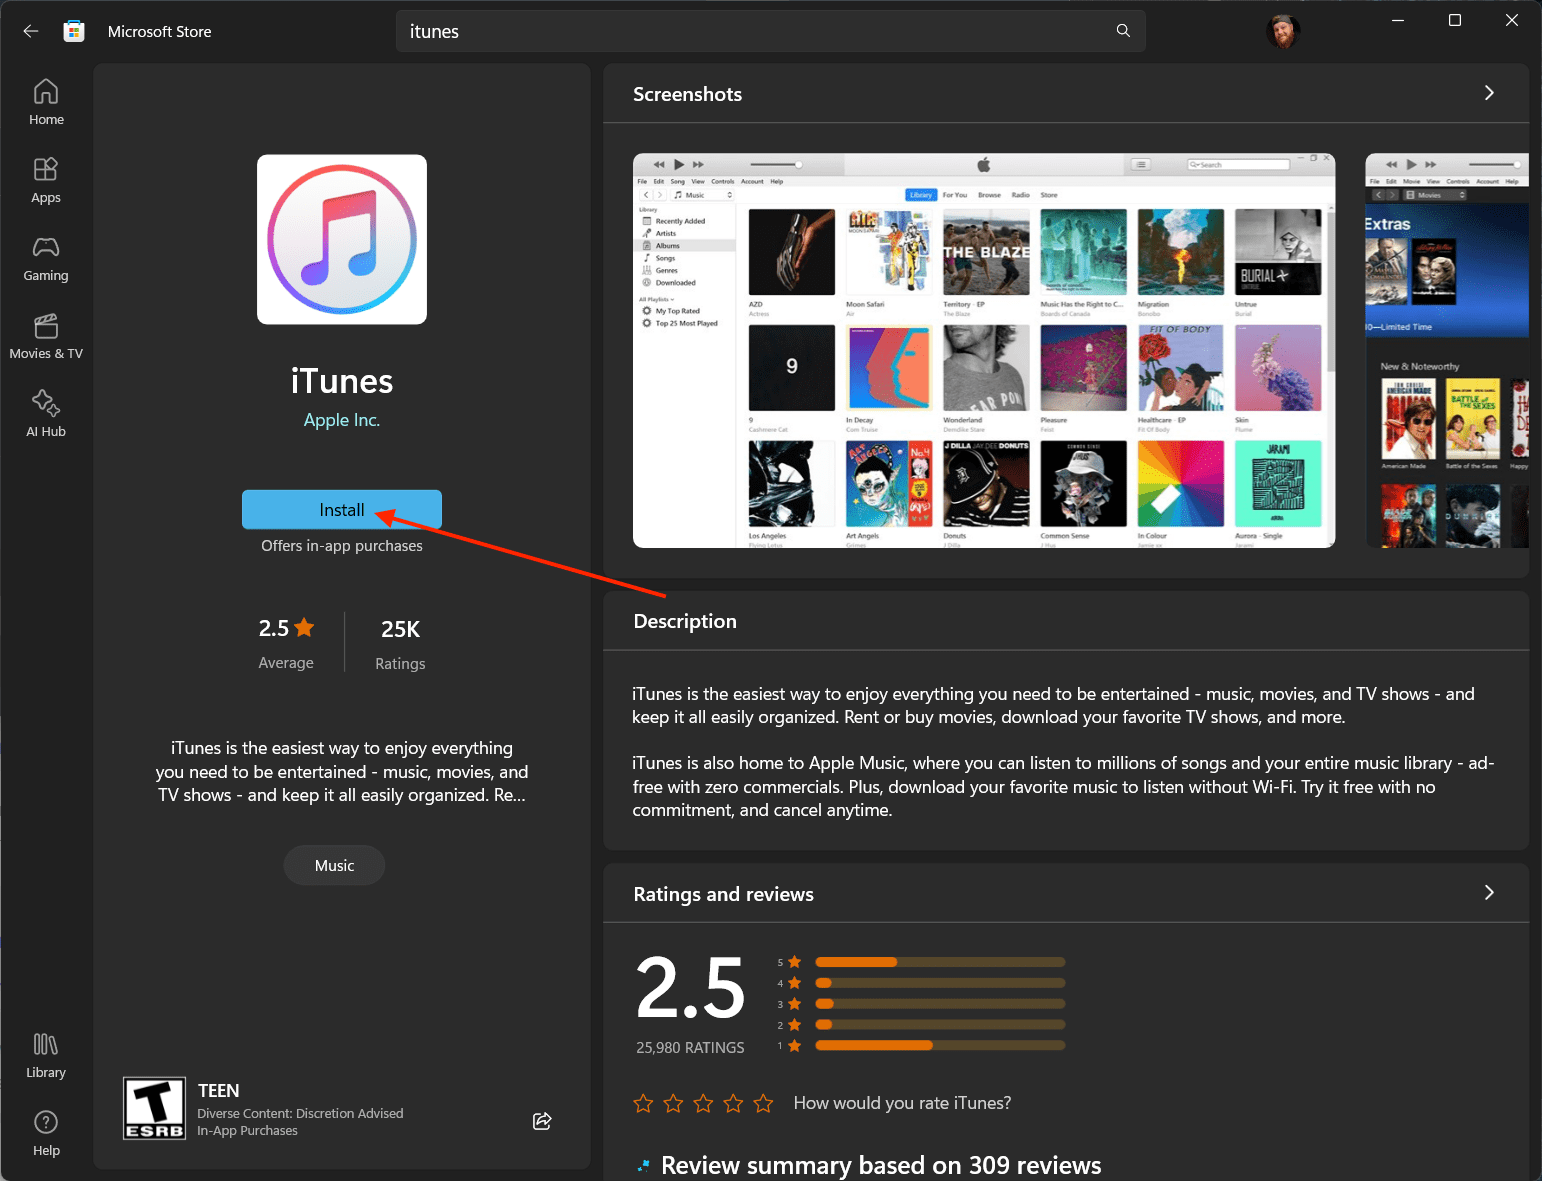
Download and install the latest version of iTunes for Windows.
After iTunes is finished installing, open the app on your Windows PC.
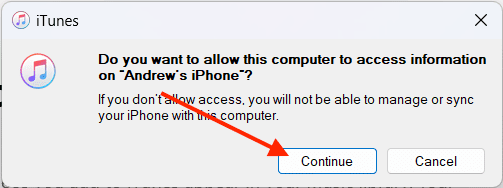
Connect your iPhone to your Windows PC using a USB cable.
Unlock your iPhone.
Click the Continue button on your Windows PC.
When prompted, tap the Trust button on your iPhone.
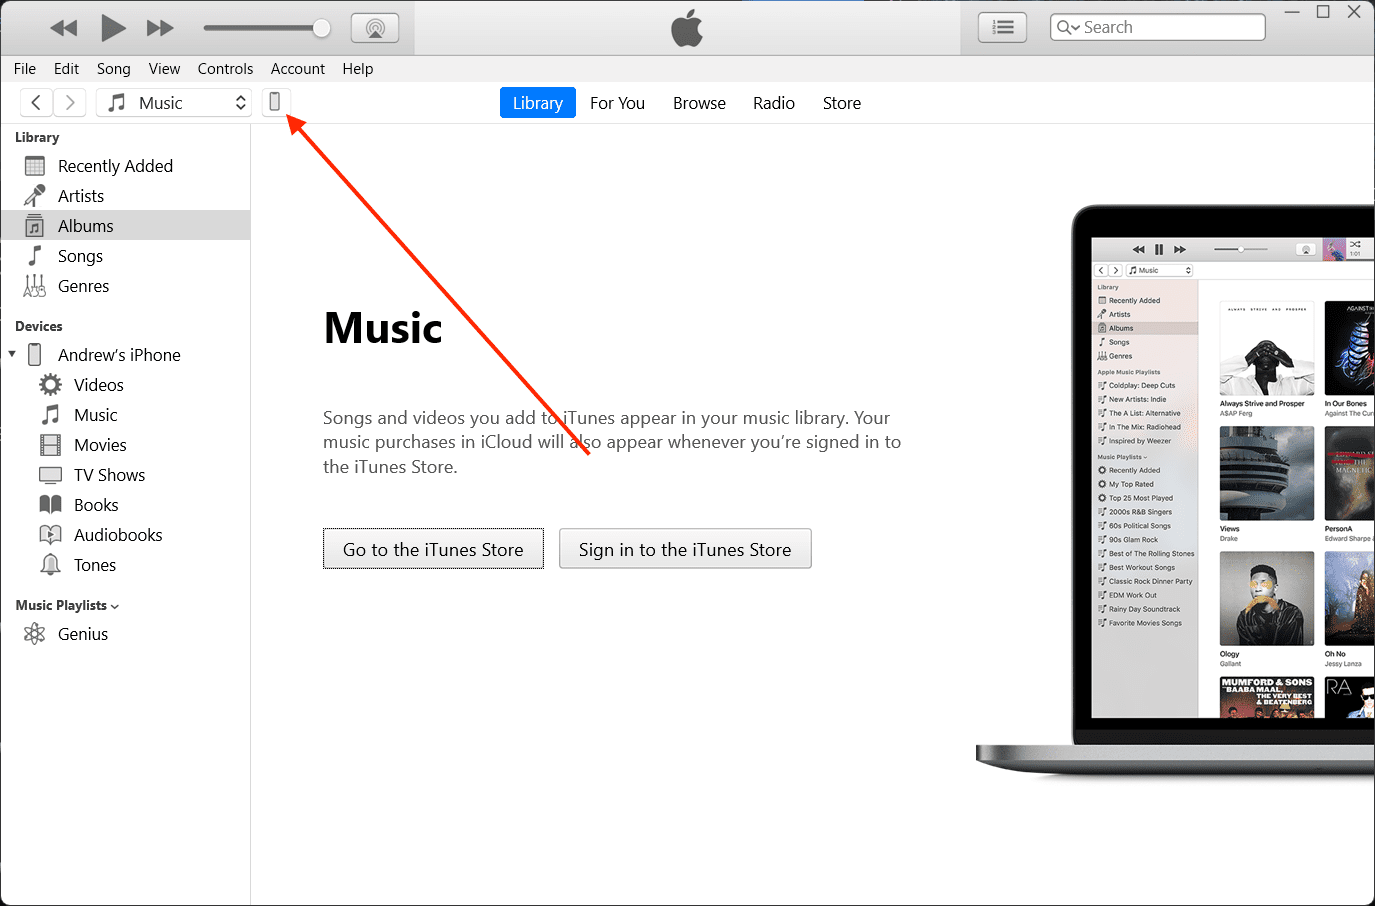
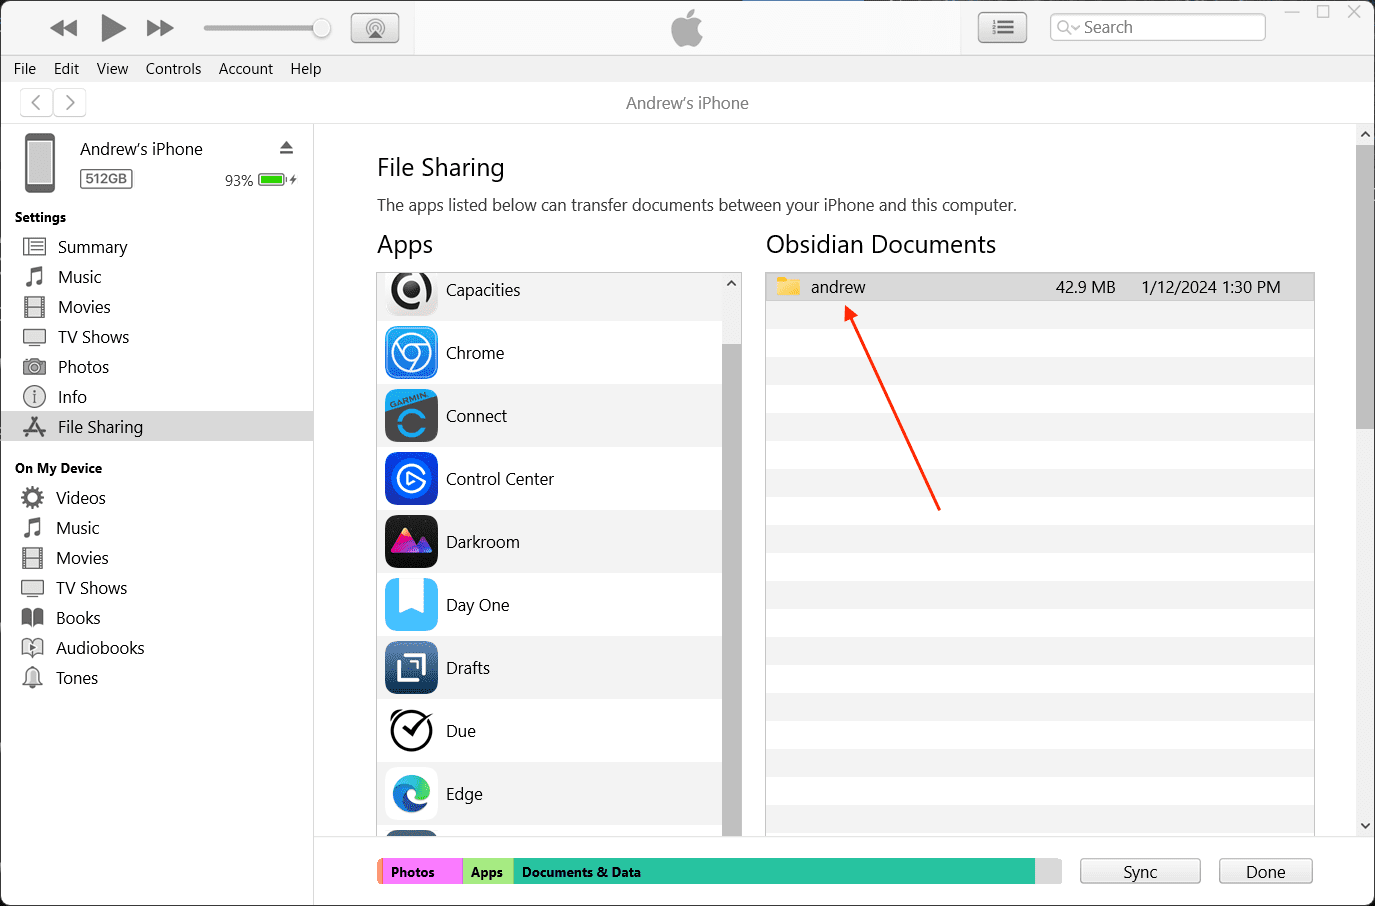
Once connected, click the iPhone button near the top left corner.
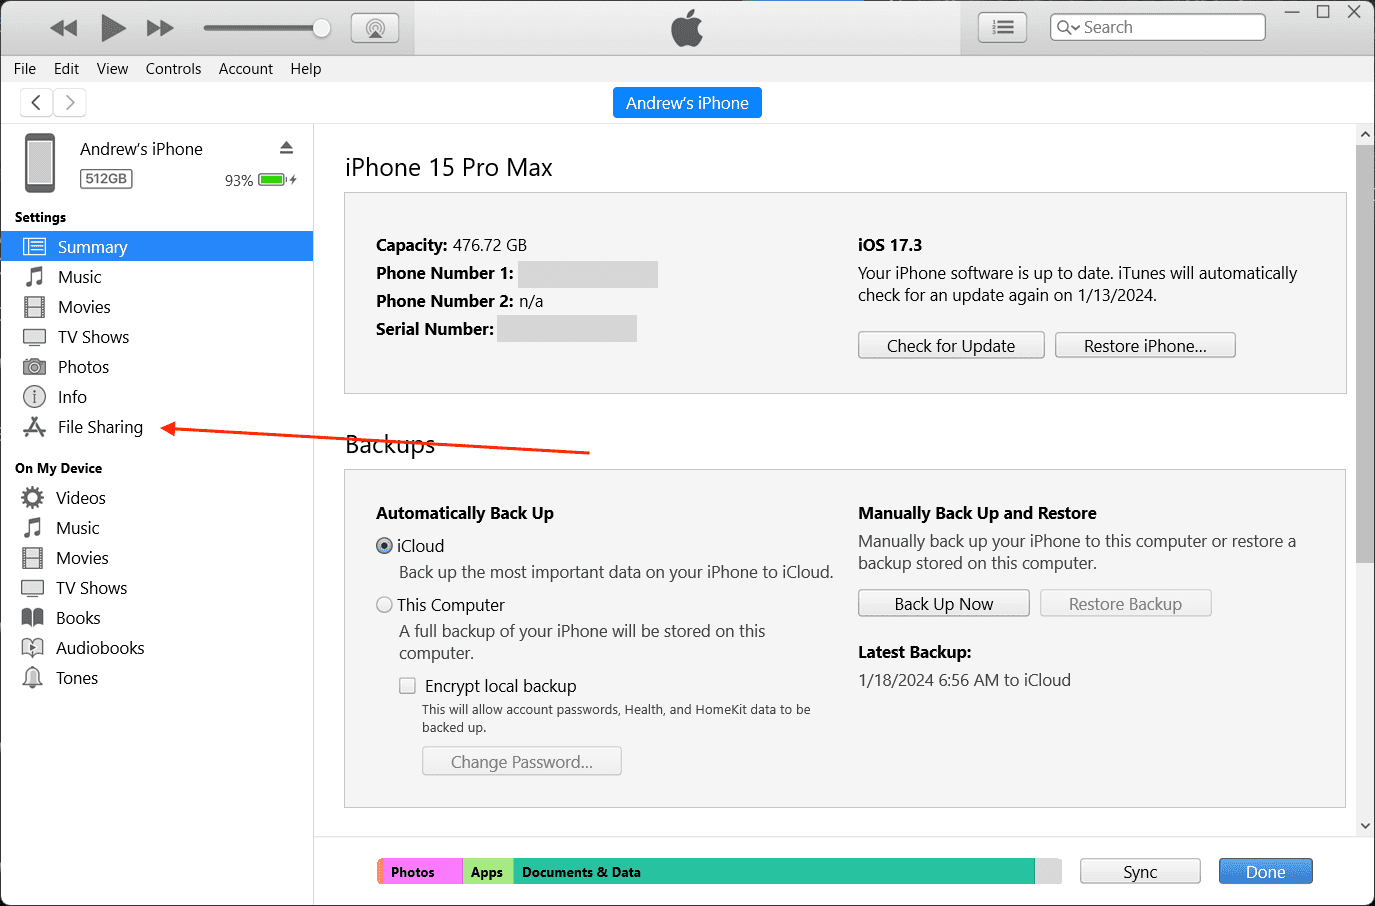
In the left sidebar, click File Sharing under the Settings section.
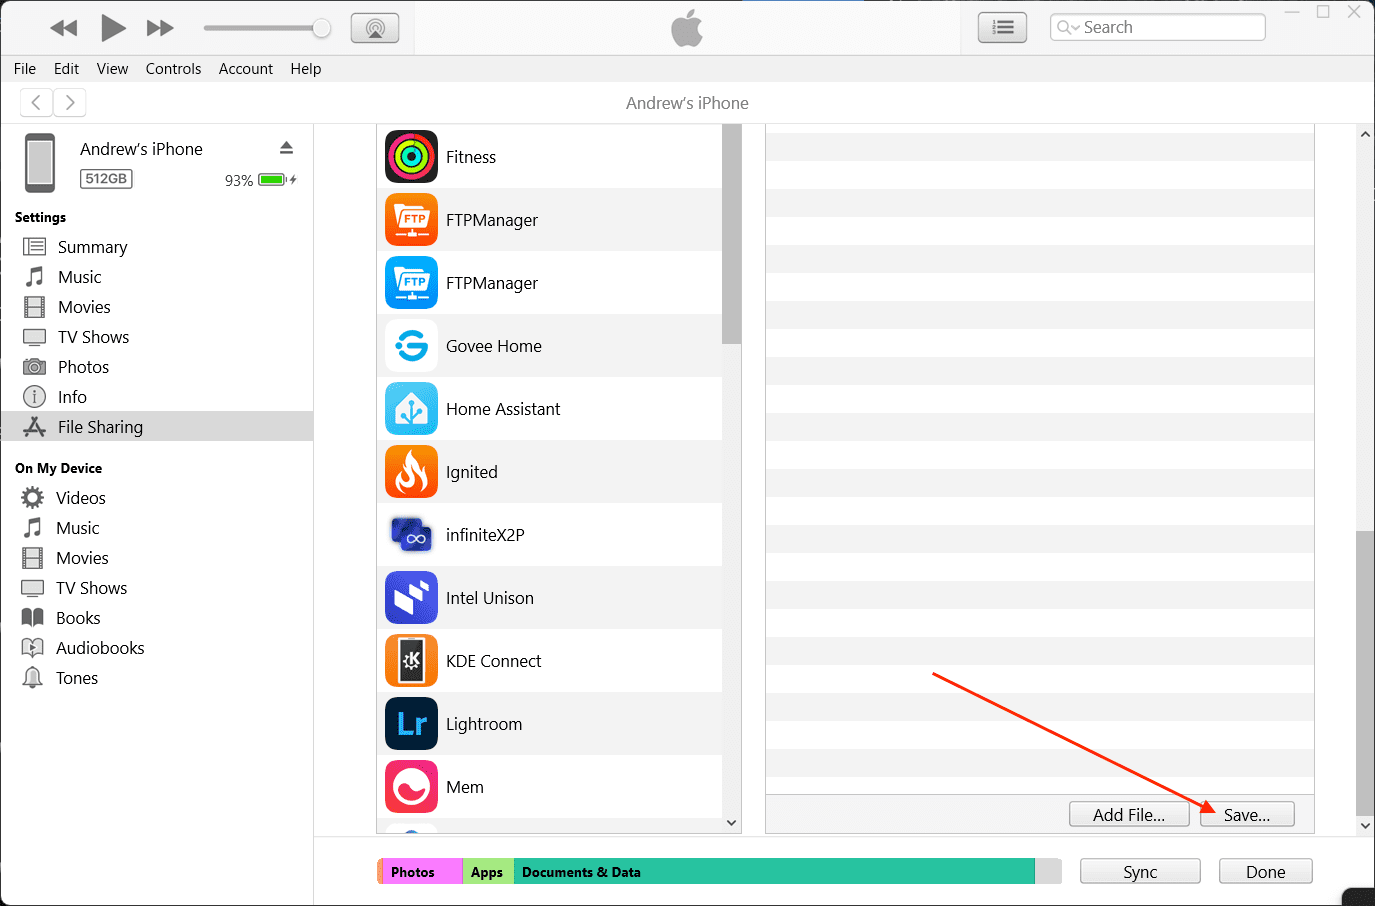
On the right side of the window, select the app that has the files you want to transfer.
Select the files that you want to transfer
Scroll down and click the Save… button.
Select the location that you want to save the files to.
Click the Select Folder button.
Wait for the files to finish being copied from your iPhone to your Windows PC.
SMB Share in Files App
In the realm of file sharing between different operating systems, navigating through the complexities can often be a challenge, especially when it involves sharing files between an iPhone and a Windows PC. This section aims to simplify this process by introducing you to the SMB (Server Message Block) protocol within the Files app on your iPhone.
SMB Share is a network file-sharing protocol that allows devices within the same network to access files, printers, and other shared resources. By utilizing SMB Share in the Files app, iPhone users can seamlessly connect to and exchange files with a Windows PC, bridging the gap between iOS and Windows environments.
However, you can’t just open up the Files app and start sharing things with your PC. Instead, there are a few steps that you’ll need to take in order to get everything ready on your Windows machine.
From your Windows PC, create a new folder that will contain all of your shared files.
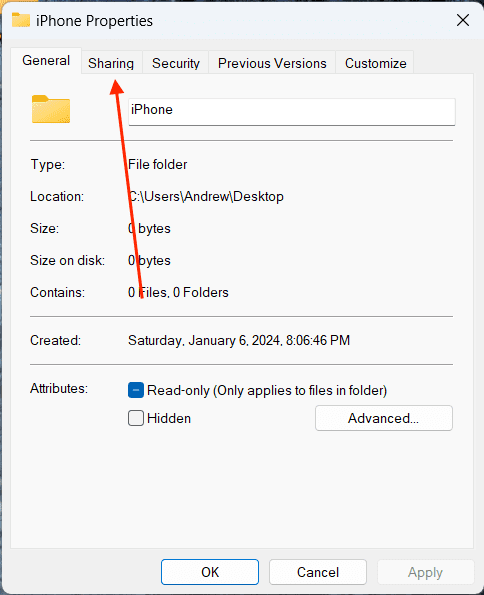
Right-click the folder.
From the drop-down menu that appears, highlight and select Properties.
Click the Sharing tab at the top of the Properties window.
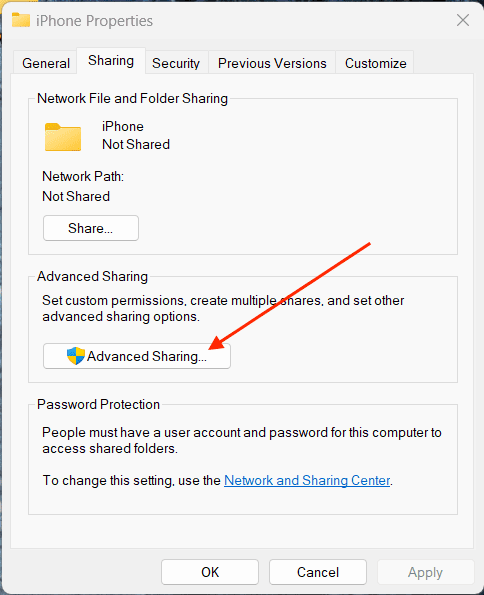
Click the Advanced Sharing… button.
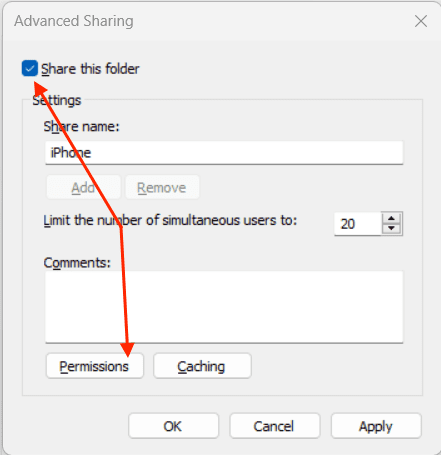
Next to Share this folder, click the checkbox.
At the bottom of the window, click the Permissions button.
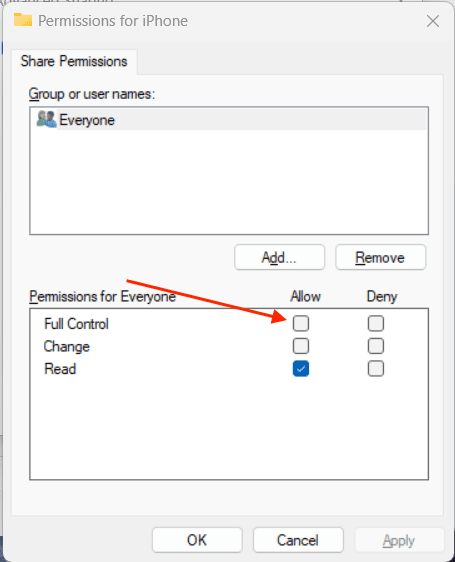
Under the Permissions for Everyone section, click the checkbox next to Full Control under the Allow column.
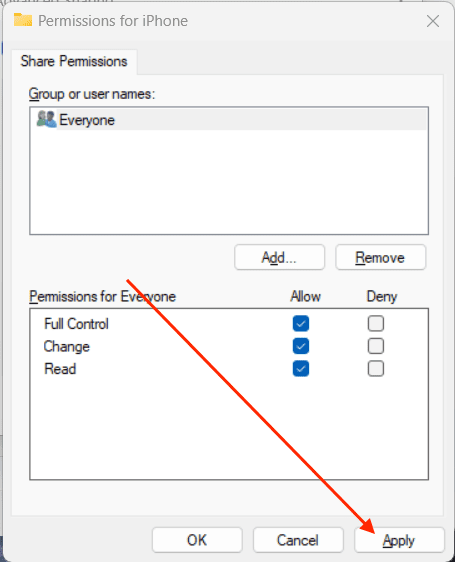
In the bottom right corner, click the Apply button.
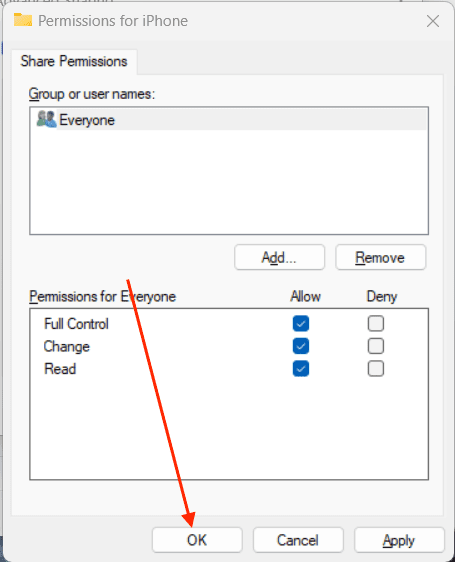
Click the OK button.
From the Advanced Sharing window, click the OK button.
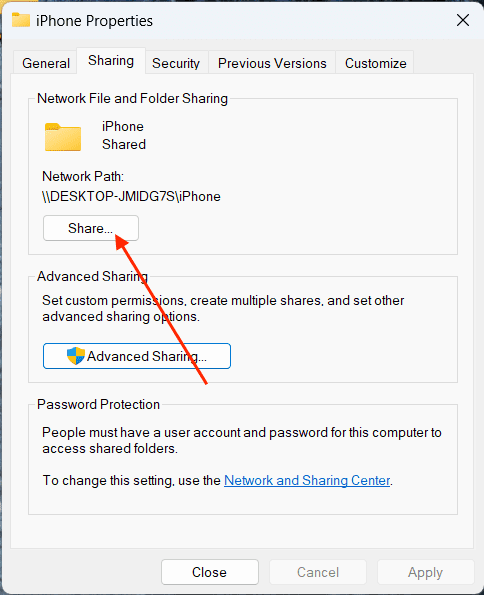
Under the Network File and Folder Sharing section, click the Share… button.
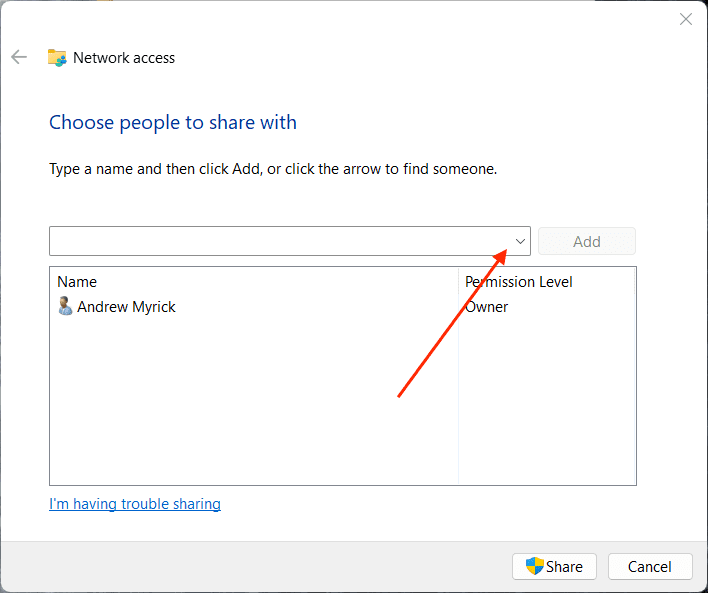
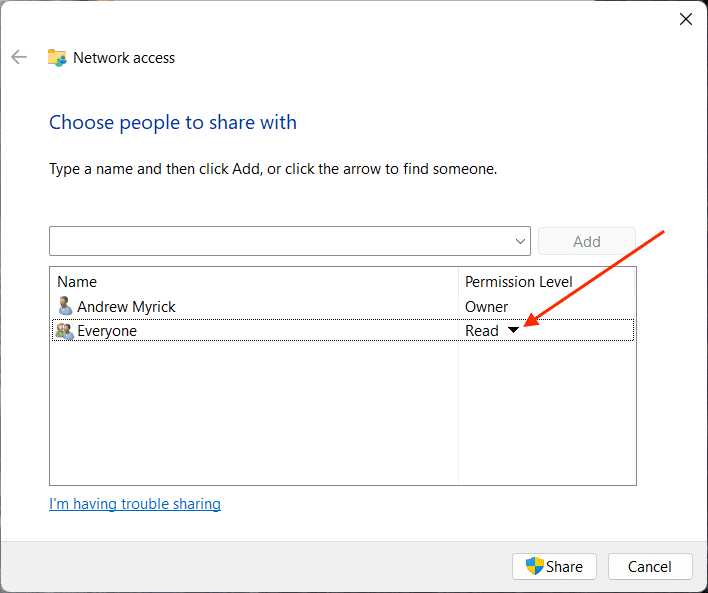
From the Network Access window, click the drop down under Choose people to share with.
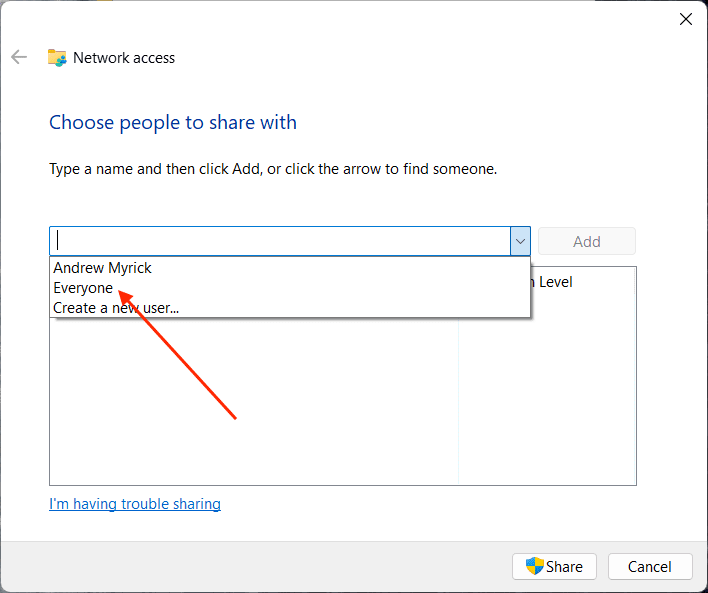
Select Everyone from the list of options.
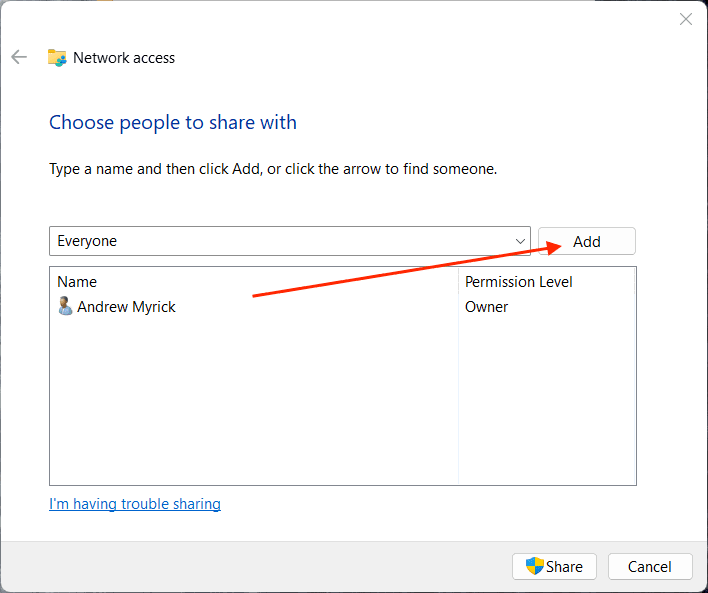
Click the Add button.
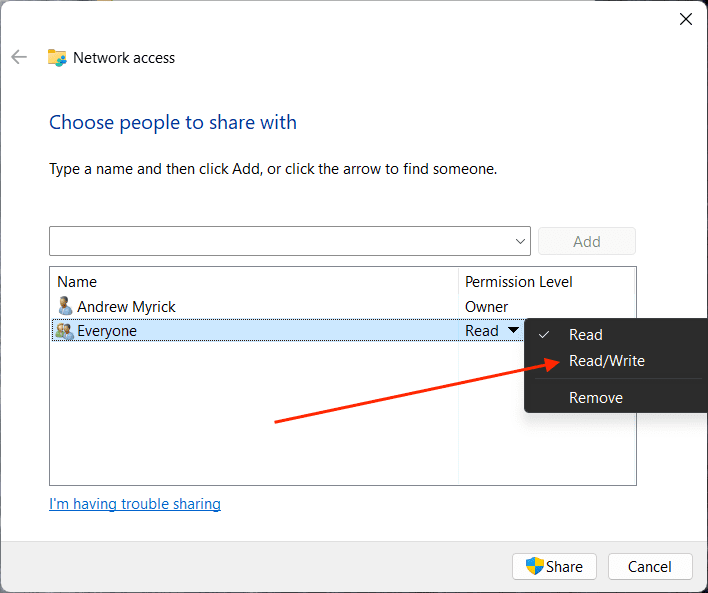
Click the Down Arrow next to Everyone within the Permission Level column.
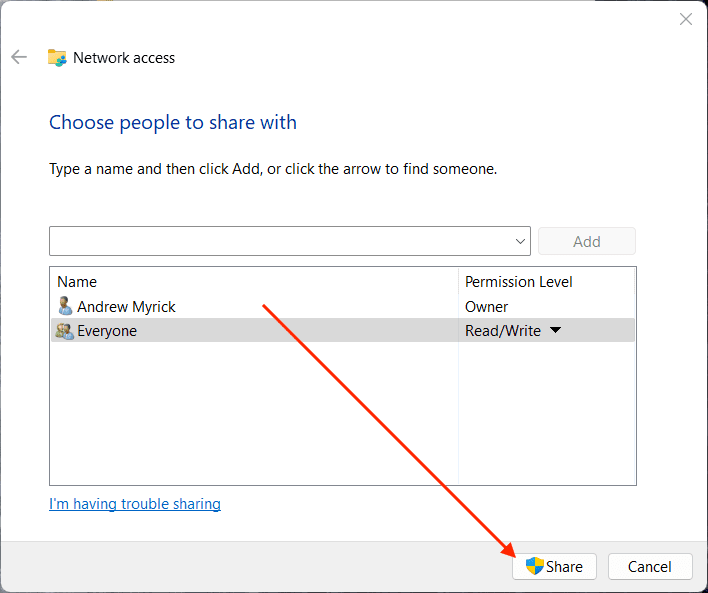
Highlight and select Read/Write from the list of options.
Click the Share button in the bottom right corner of the window.
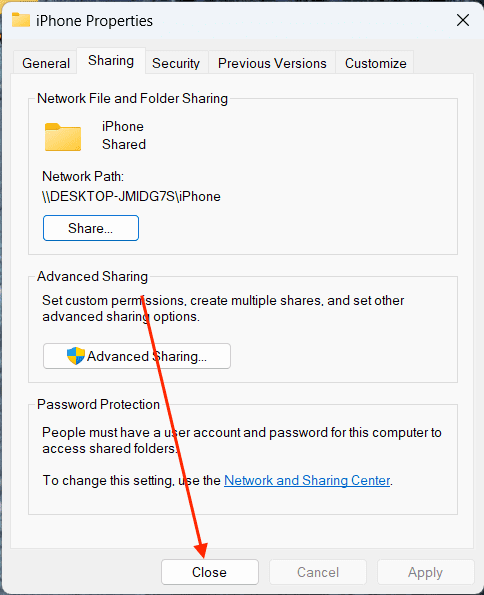
Verify the shared folder information, then click the Done button in the bottom right corner.
Close the Properties window.
Now that the appropriate folder has been created, and you have provided it with the necessary sharing properties, the last step you’ll need to take from your Windows PC is to figure out what it’s IP address is. Here’s how you can do so:
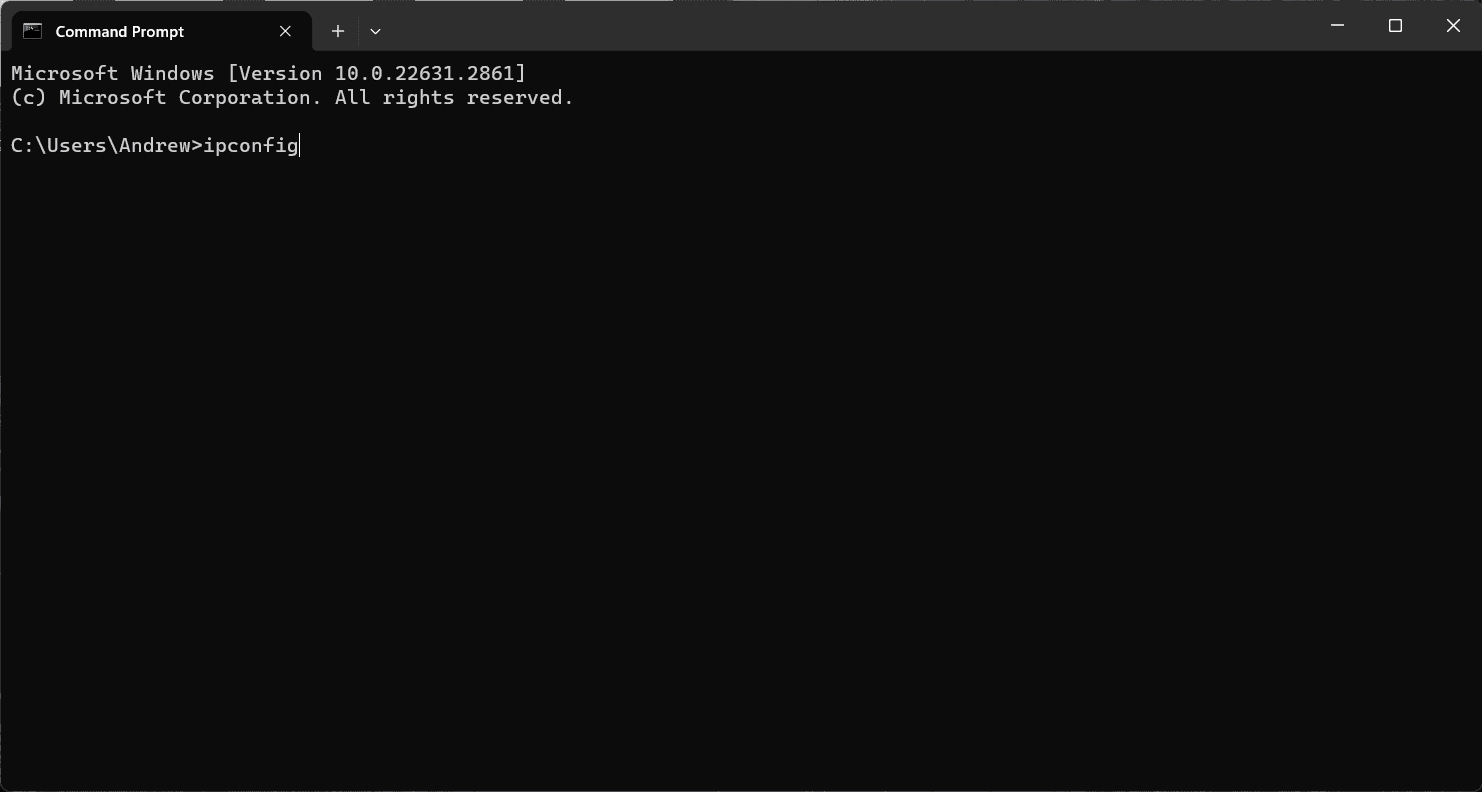
From your Windows PC, open the Command Prompt app.
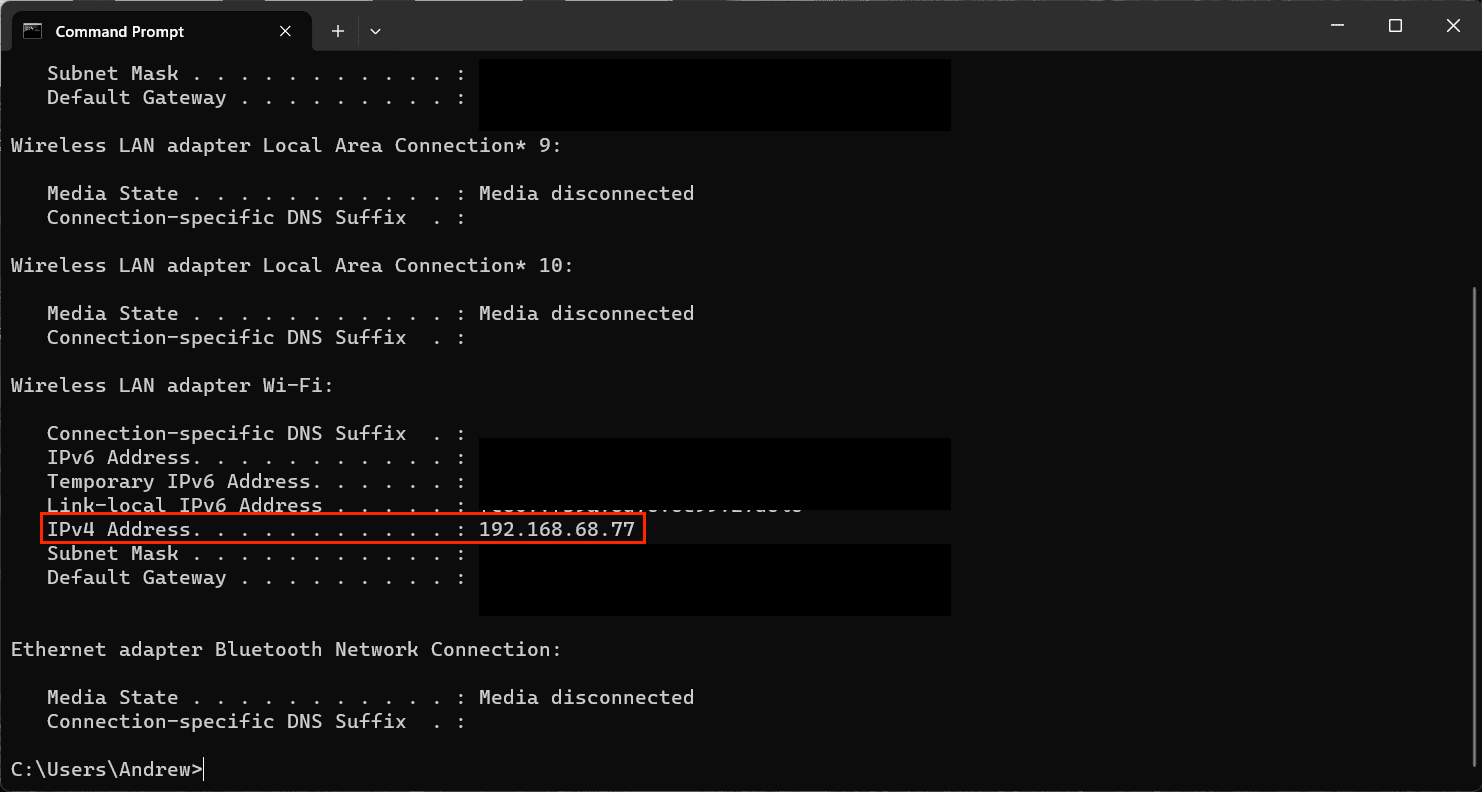
Type ipconfig and hit the Enter key.
Locate the IPv4 Address listed.
Make note of this, or write this down somewhere for the next section.
With the IP address of your Windows computer in-hand, you’ll need to actually make it so the folder is accessible from the Files app on your iPhone. It’s quite a bit easier than you might suspect, provided that all of the previous steps have been followed.
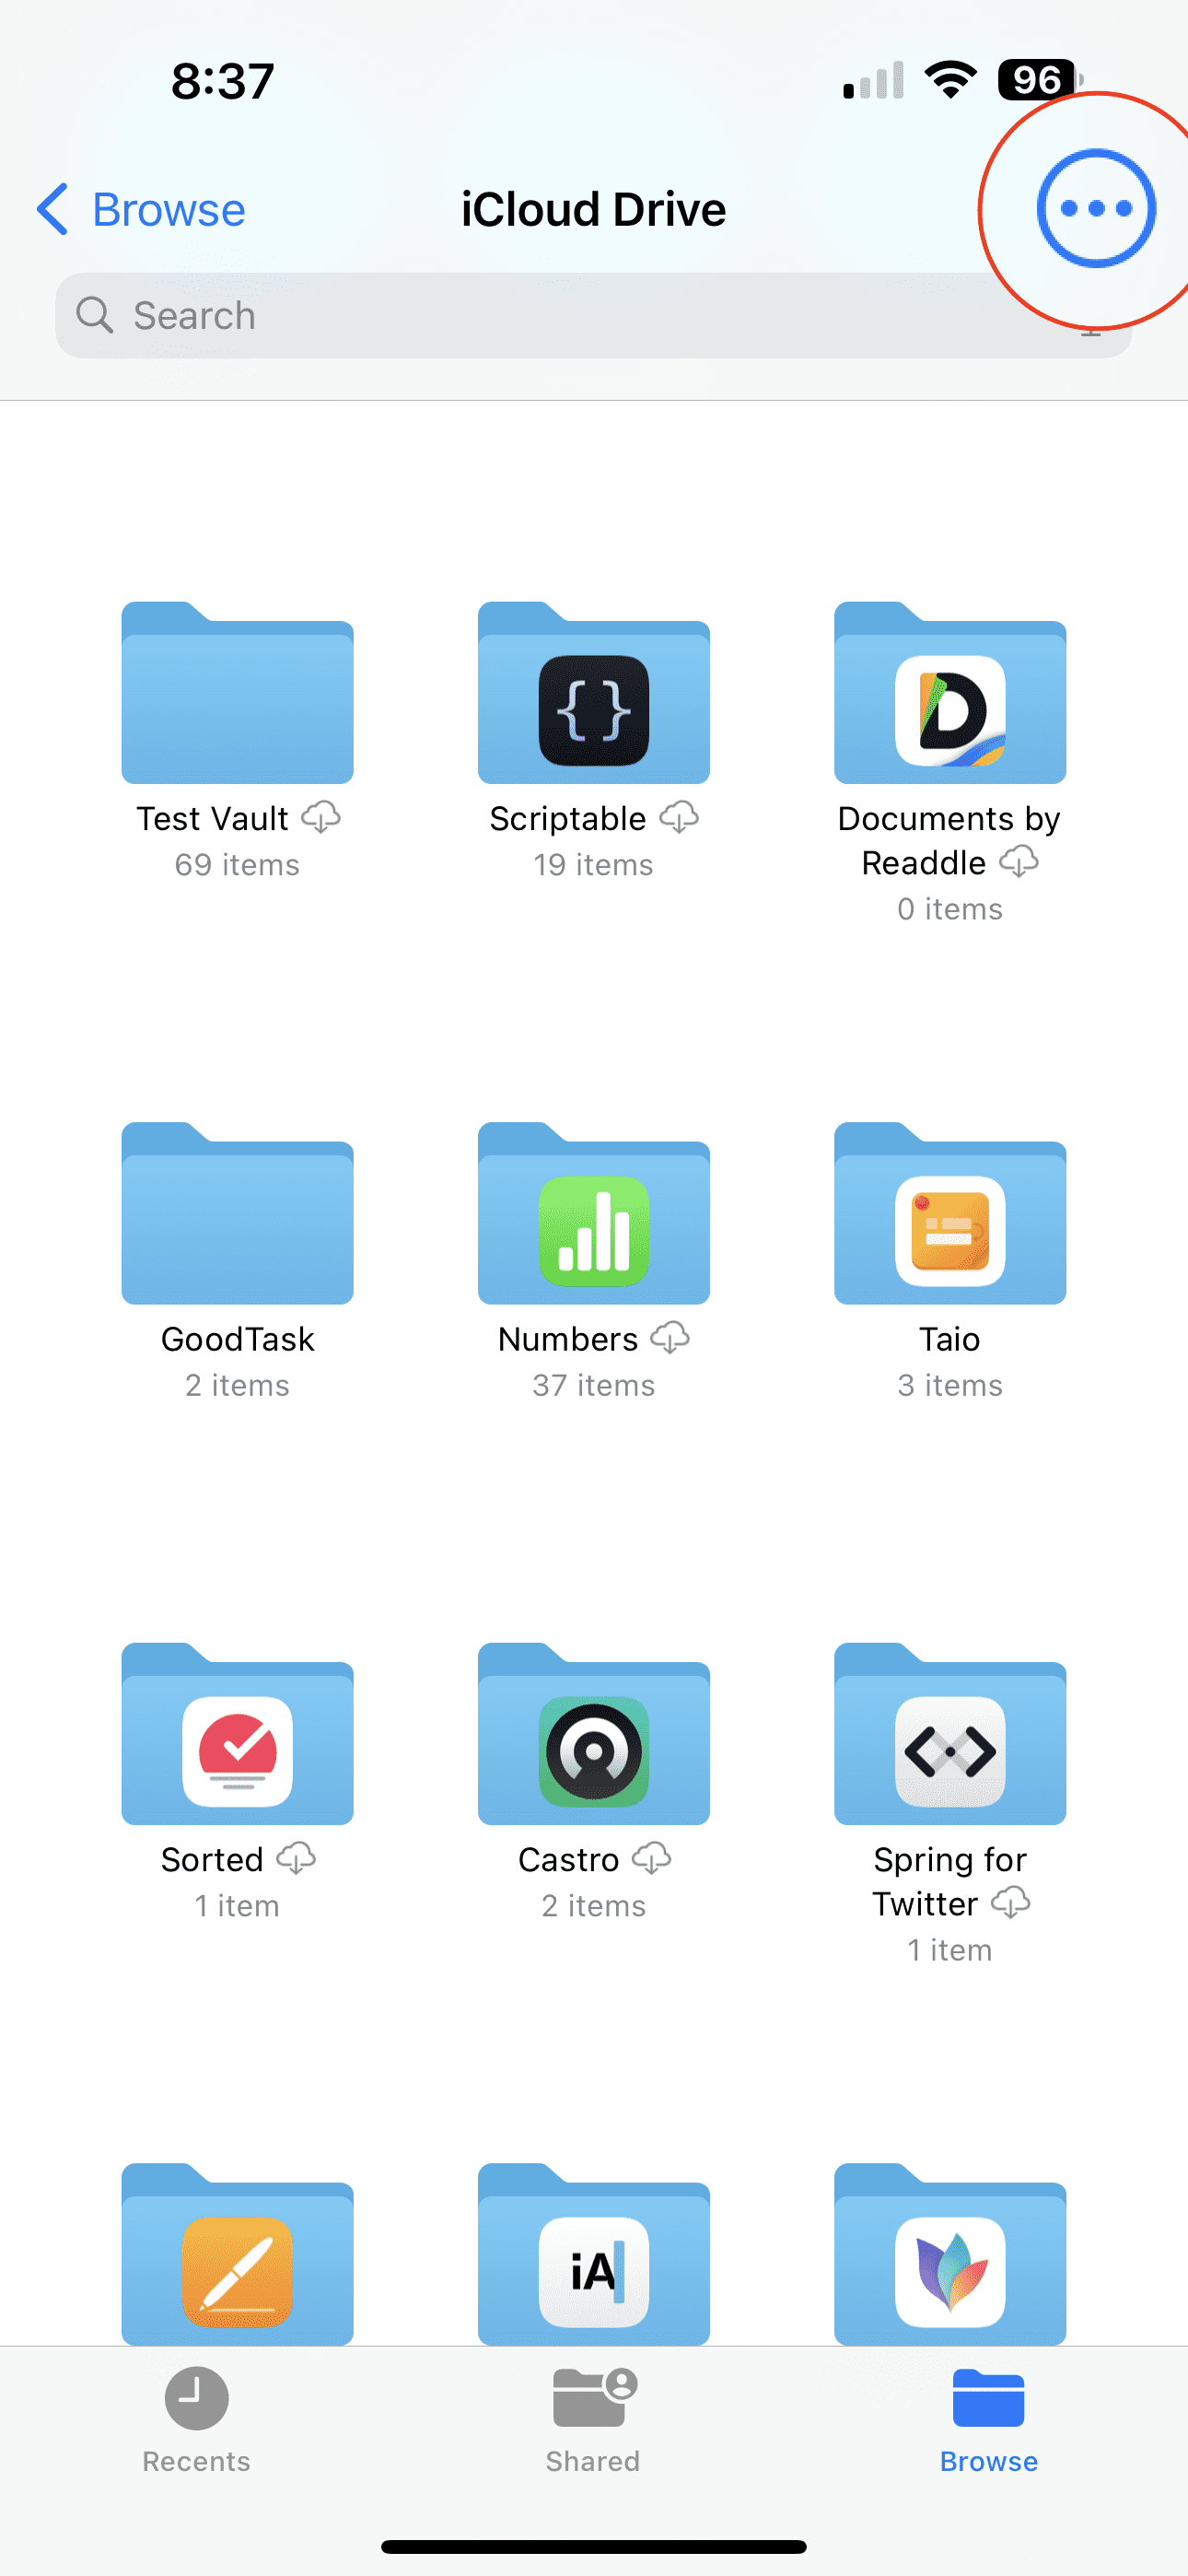
Open the Files app on your iPhone.
Tap the Browse tab in the bottom toolbar.
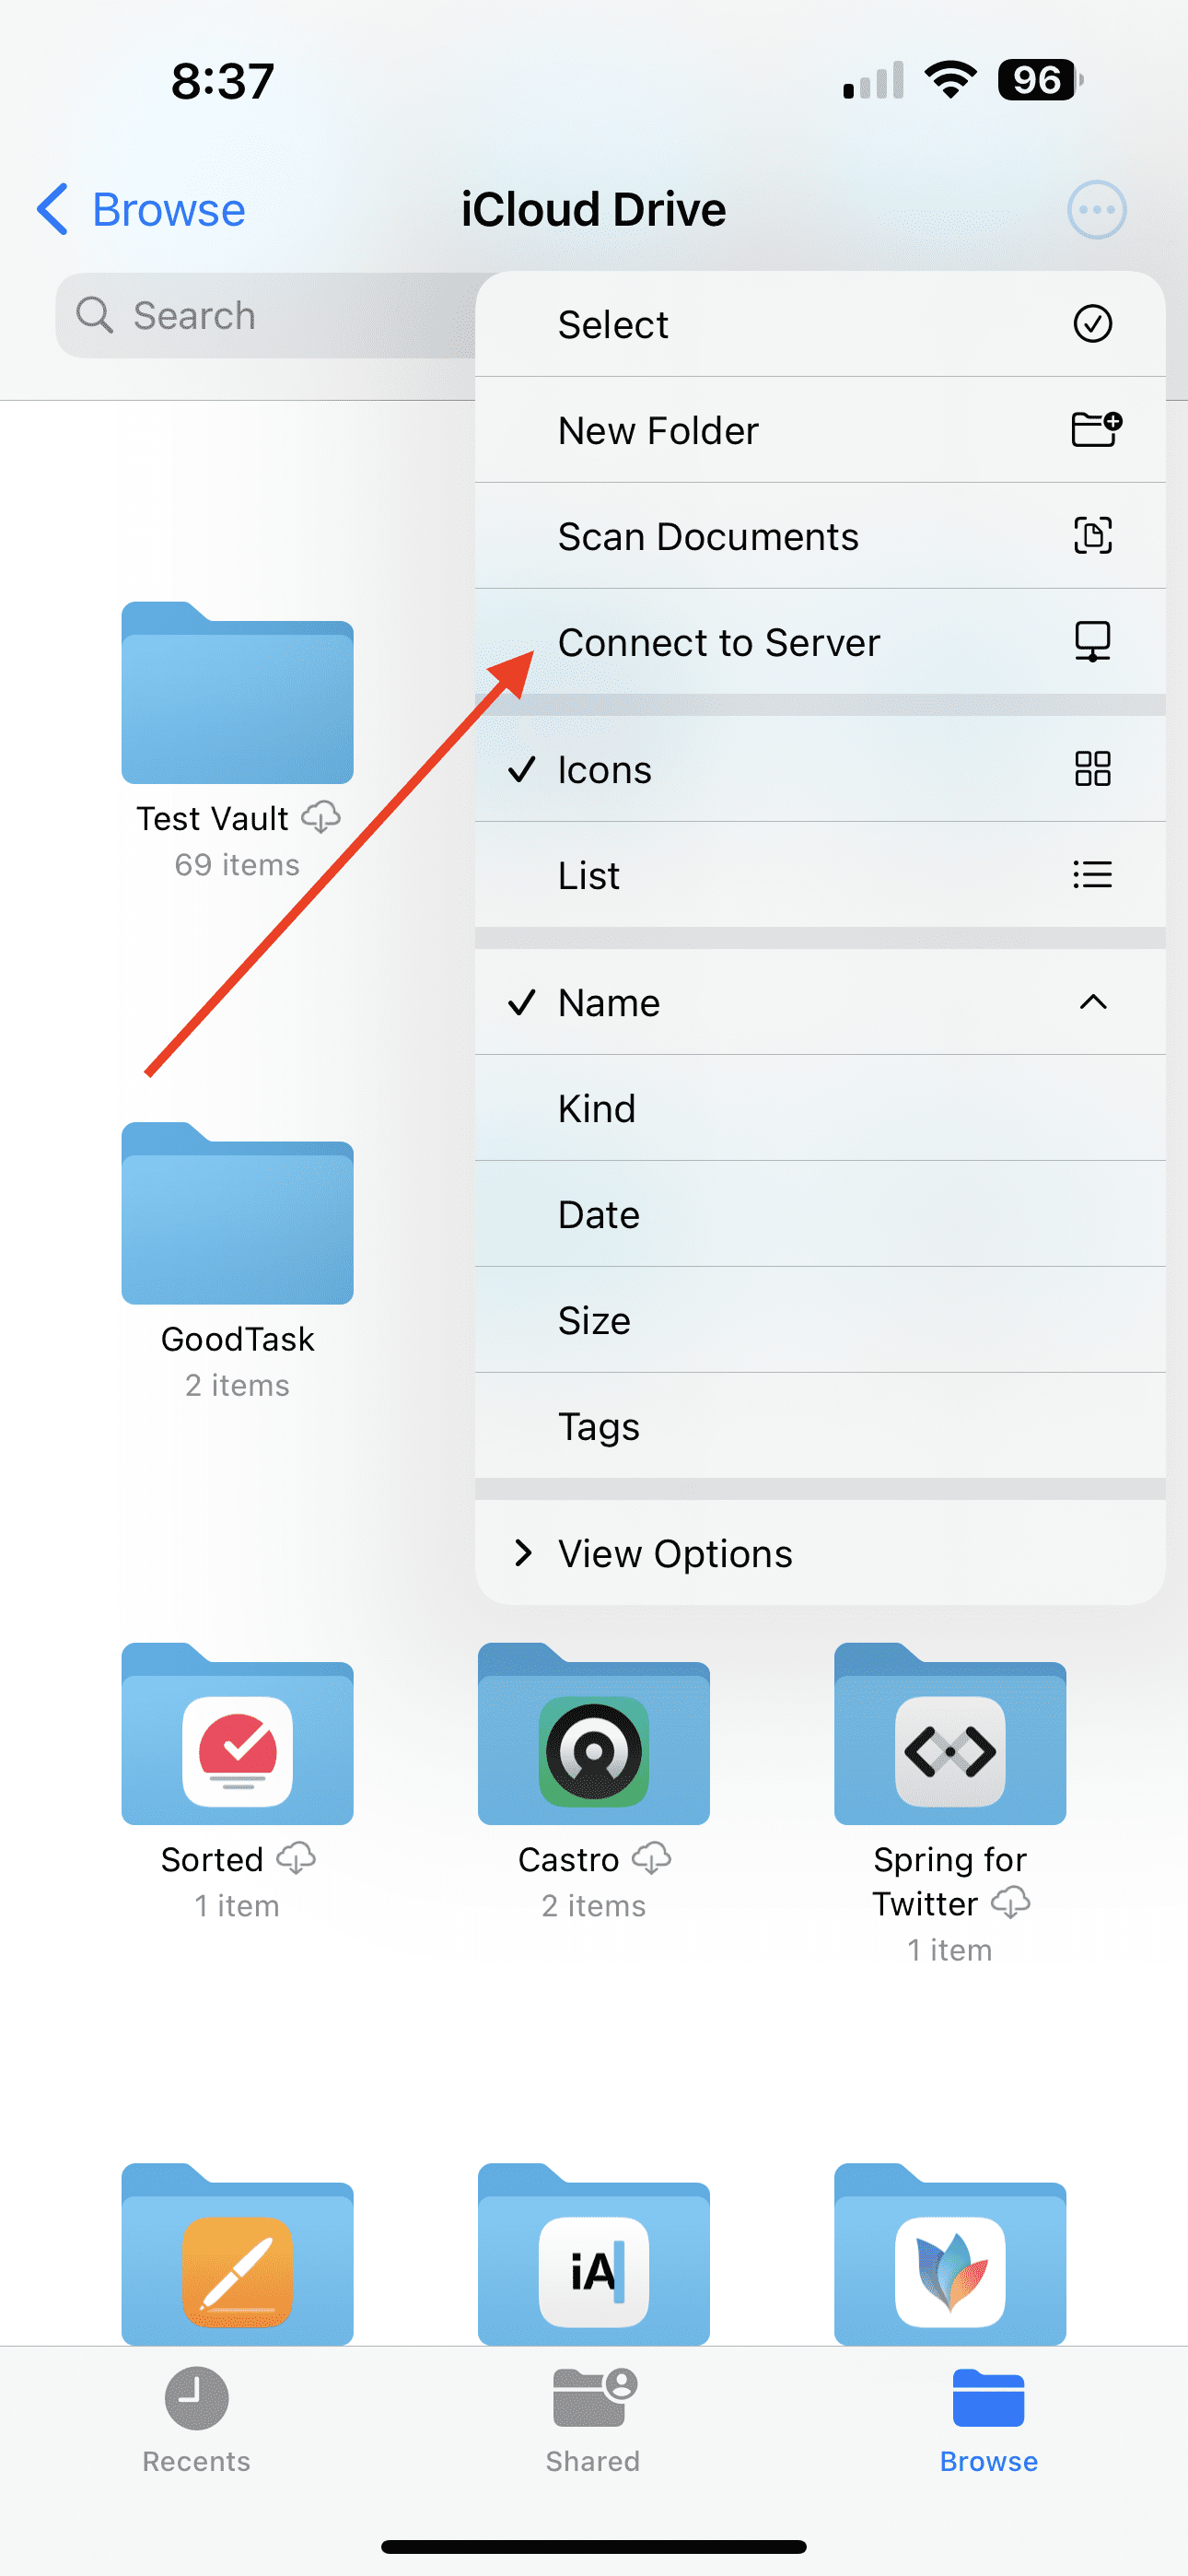
In the top right corner, tap the More button.
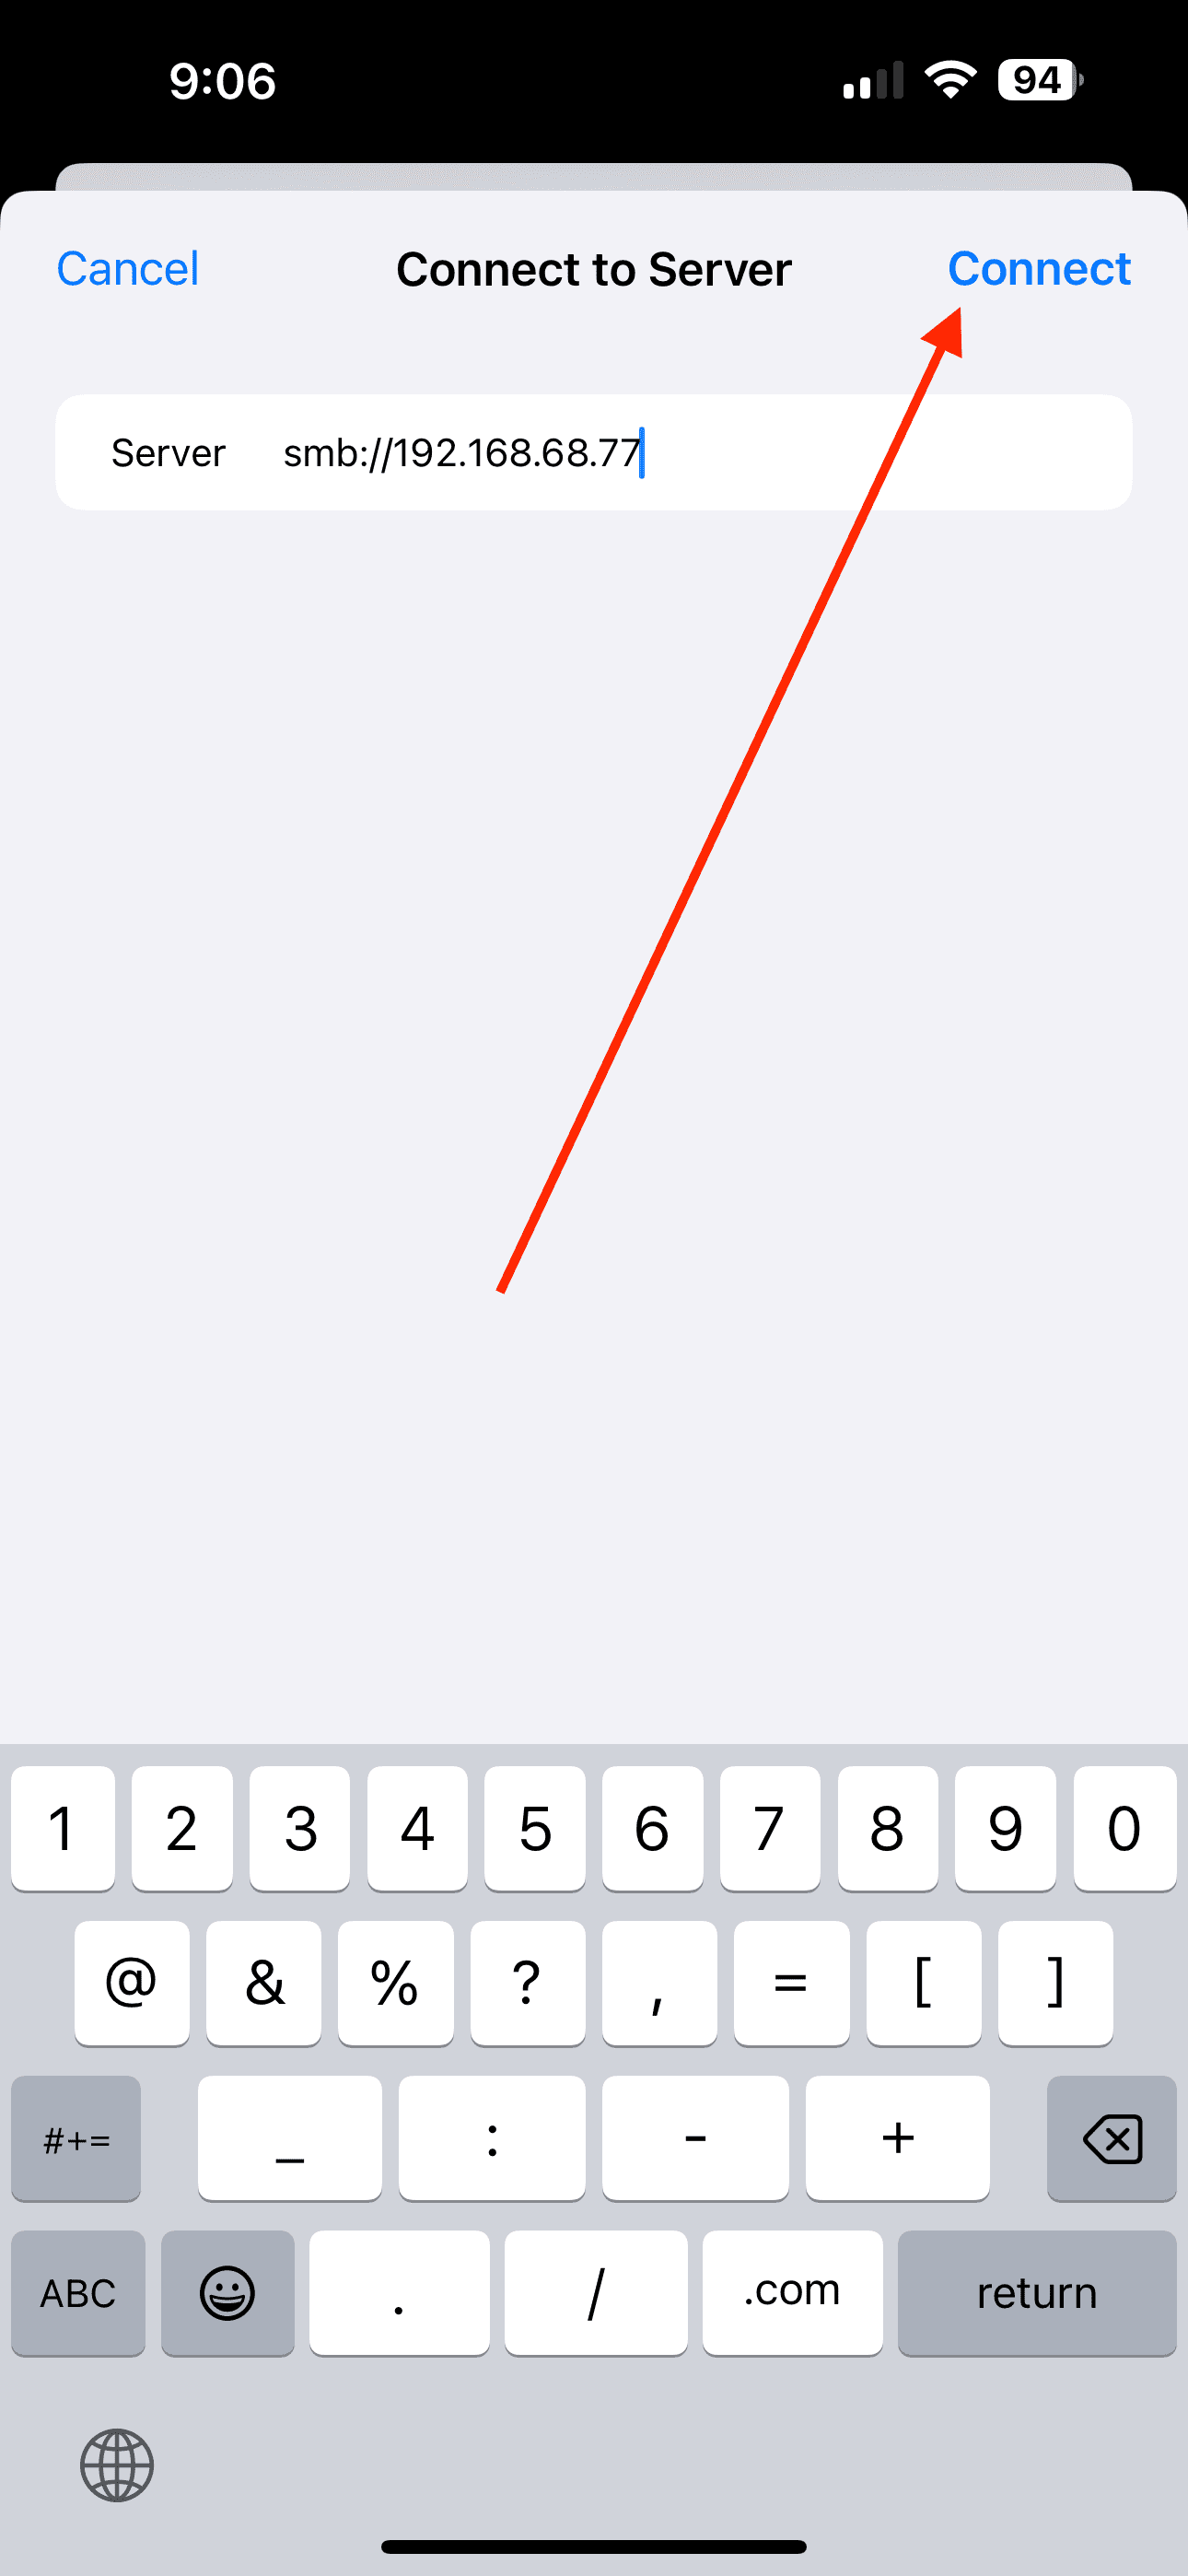
From the drop-down that appears, tap Connect to Server.
Type the following, without the brackets:
smb://[Your IP Address/]
Tap the Connect button in the top right corner.
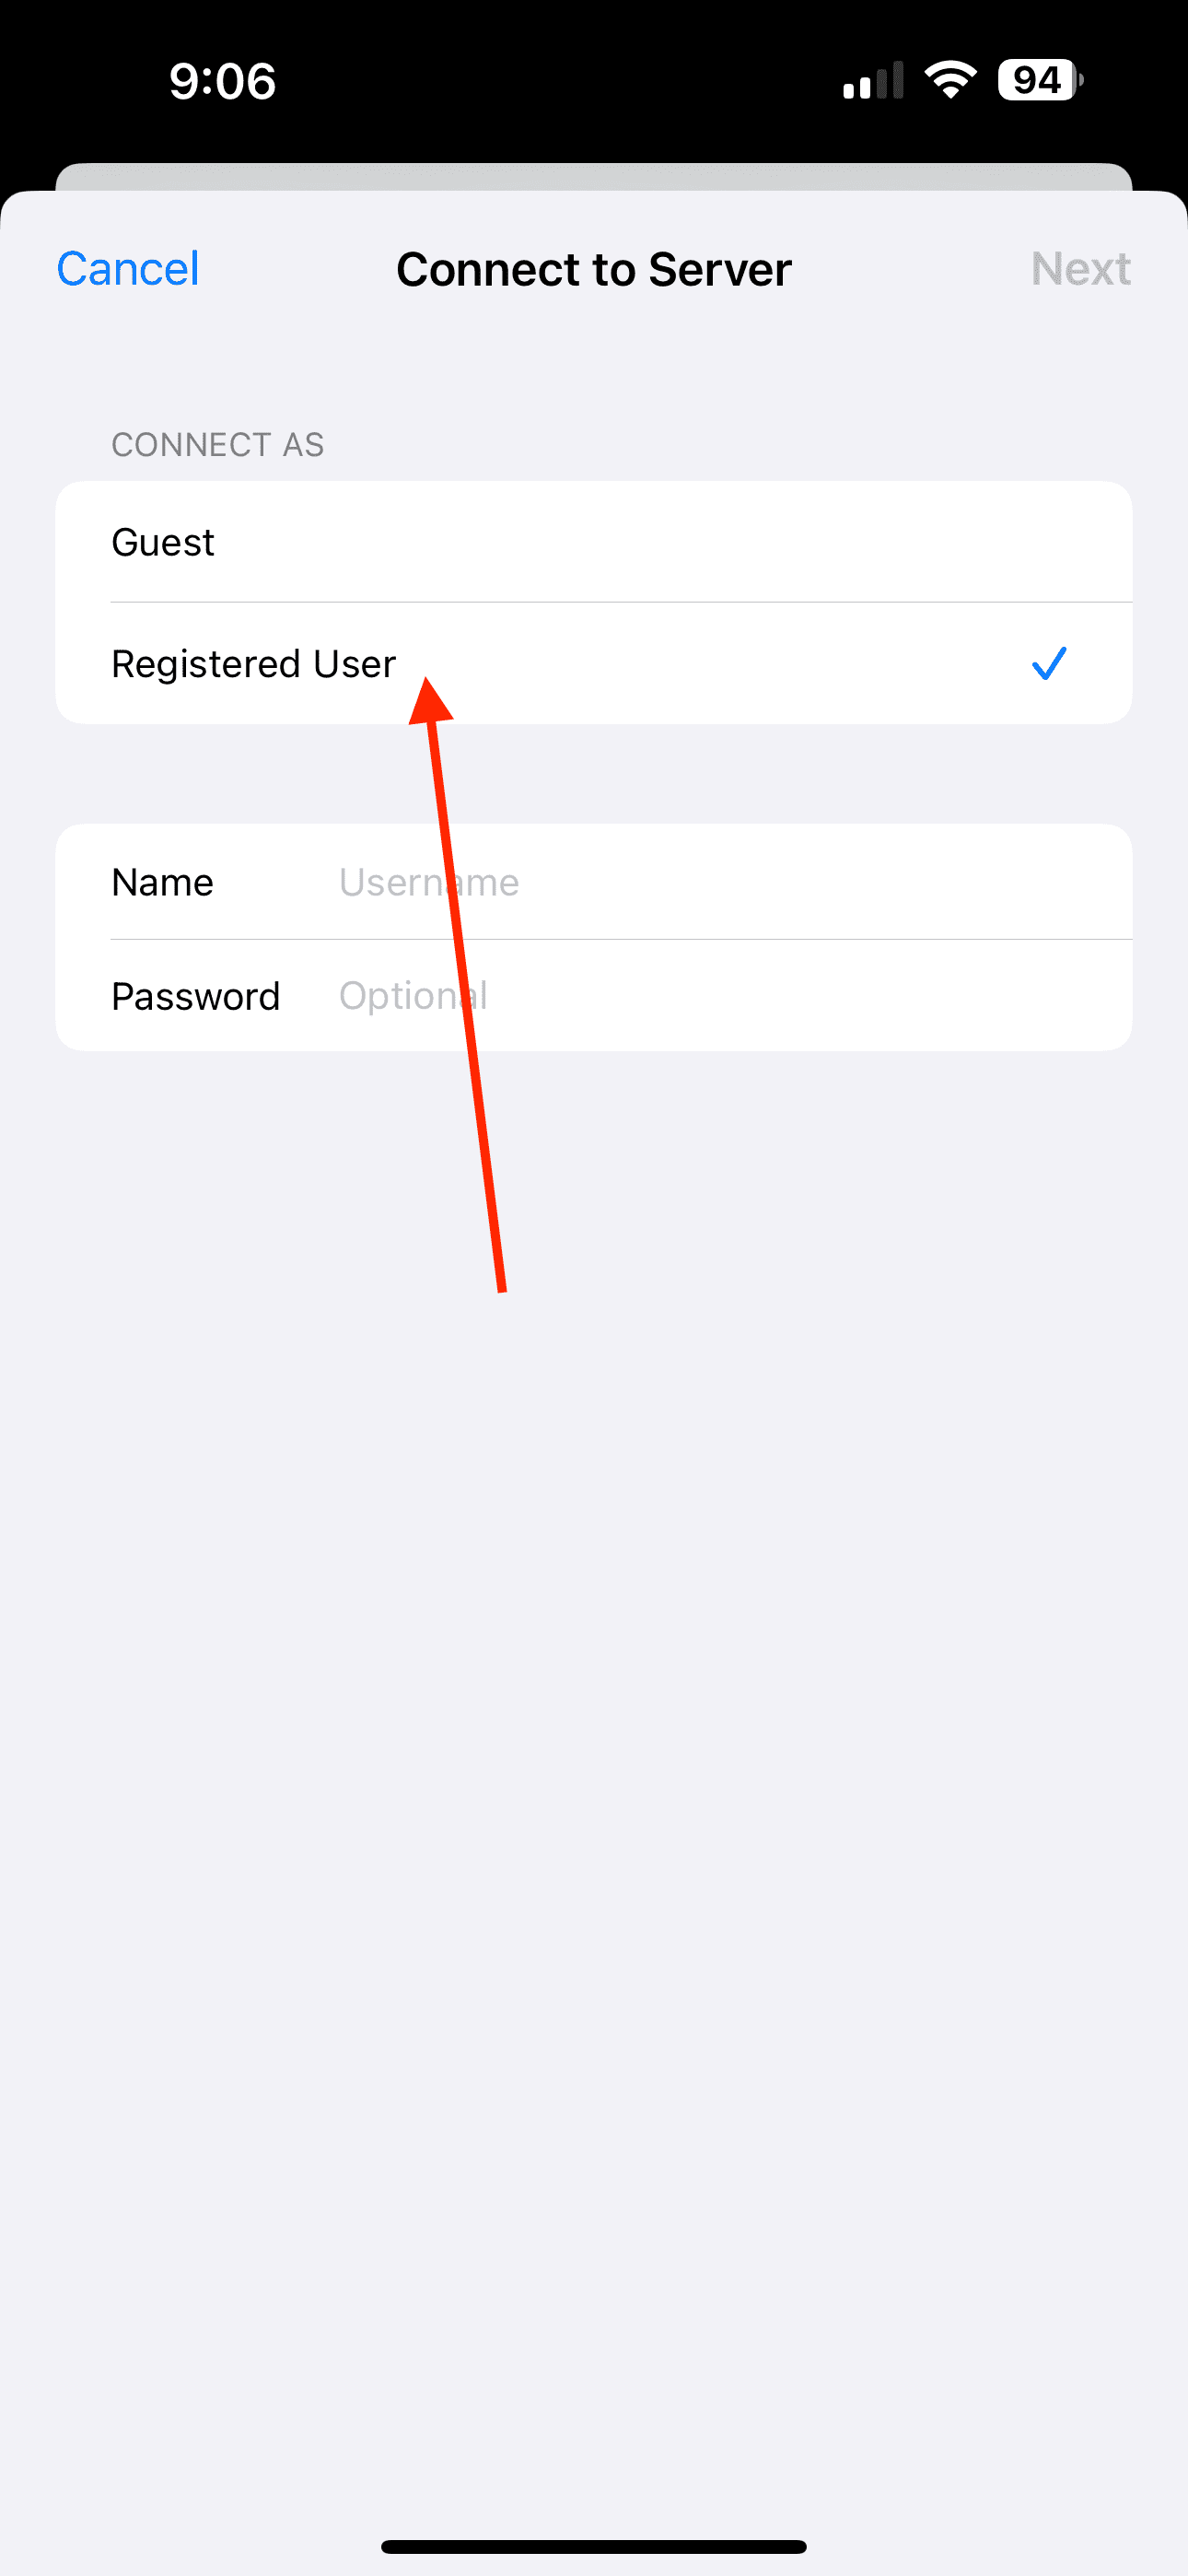
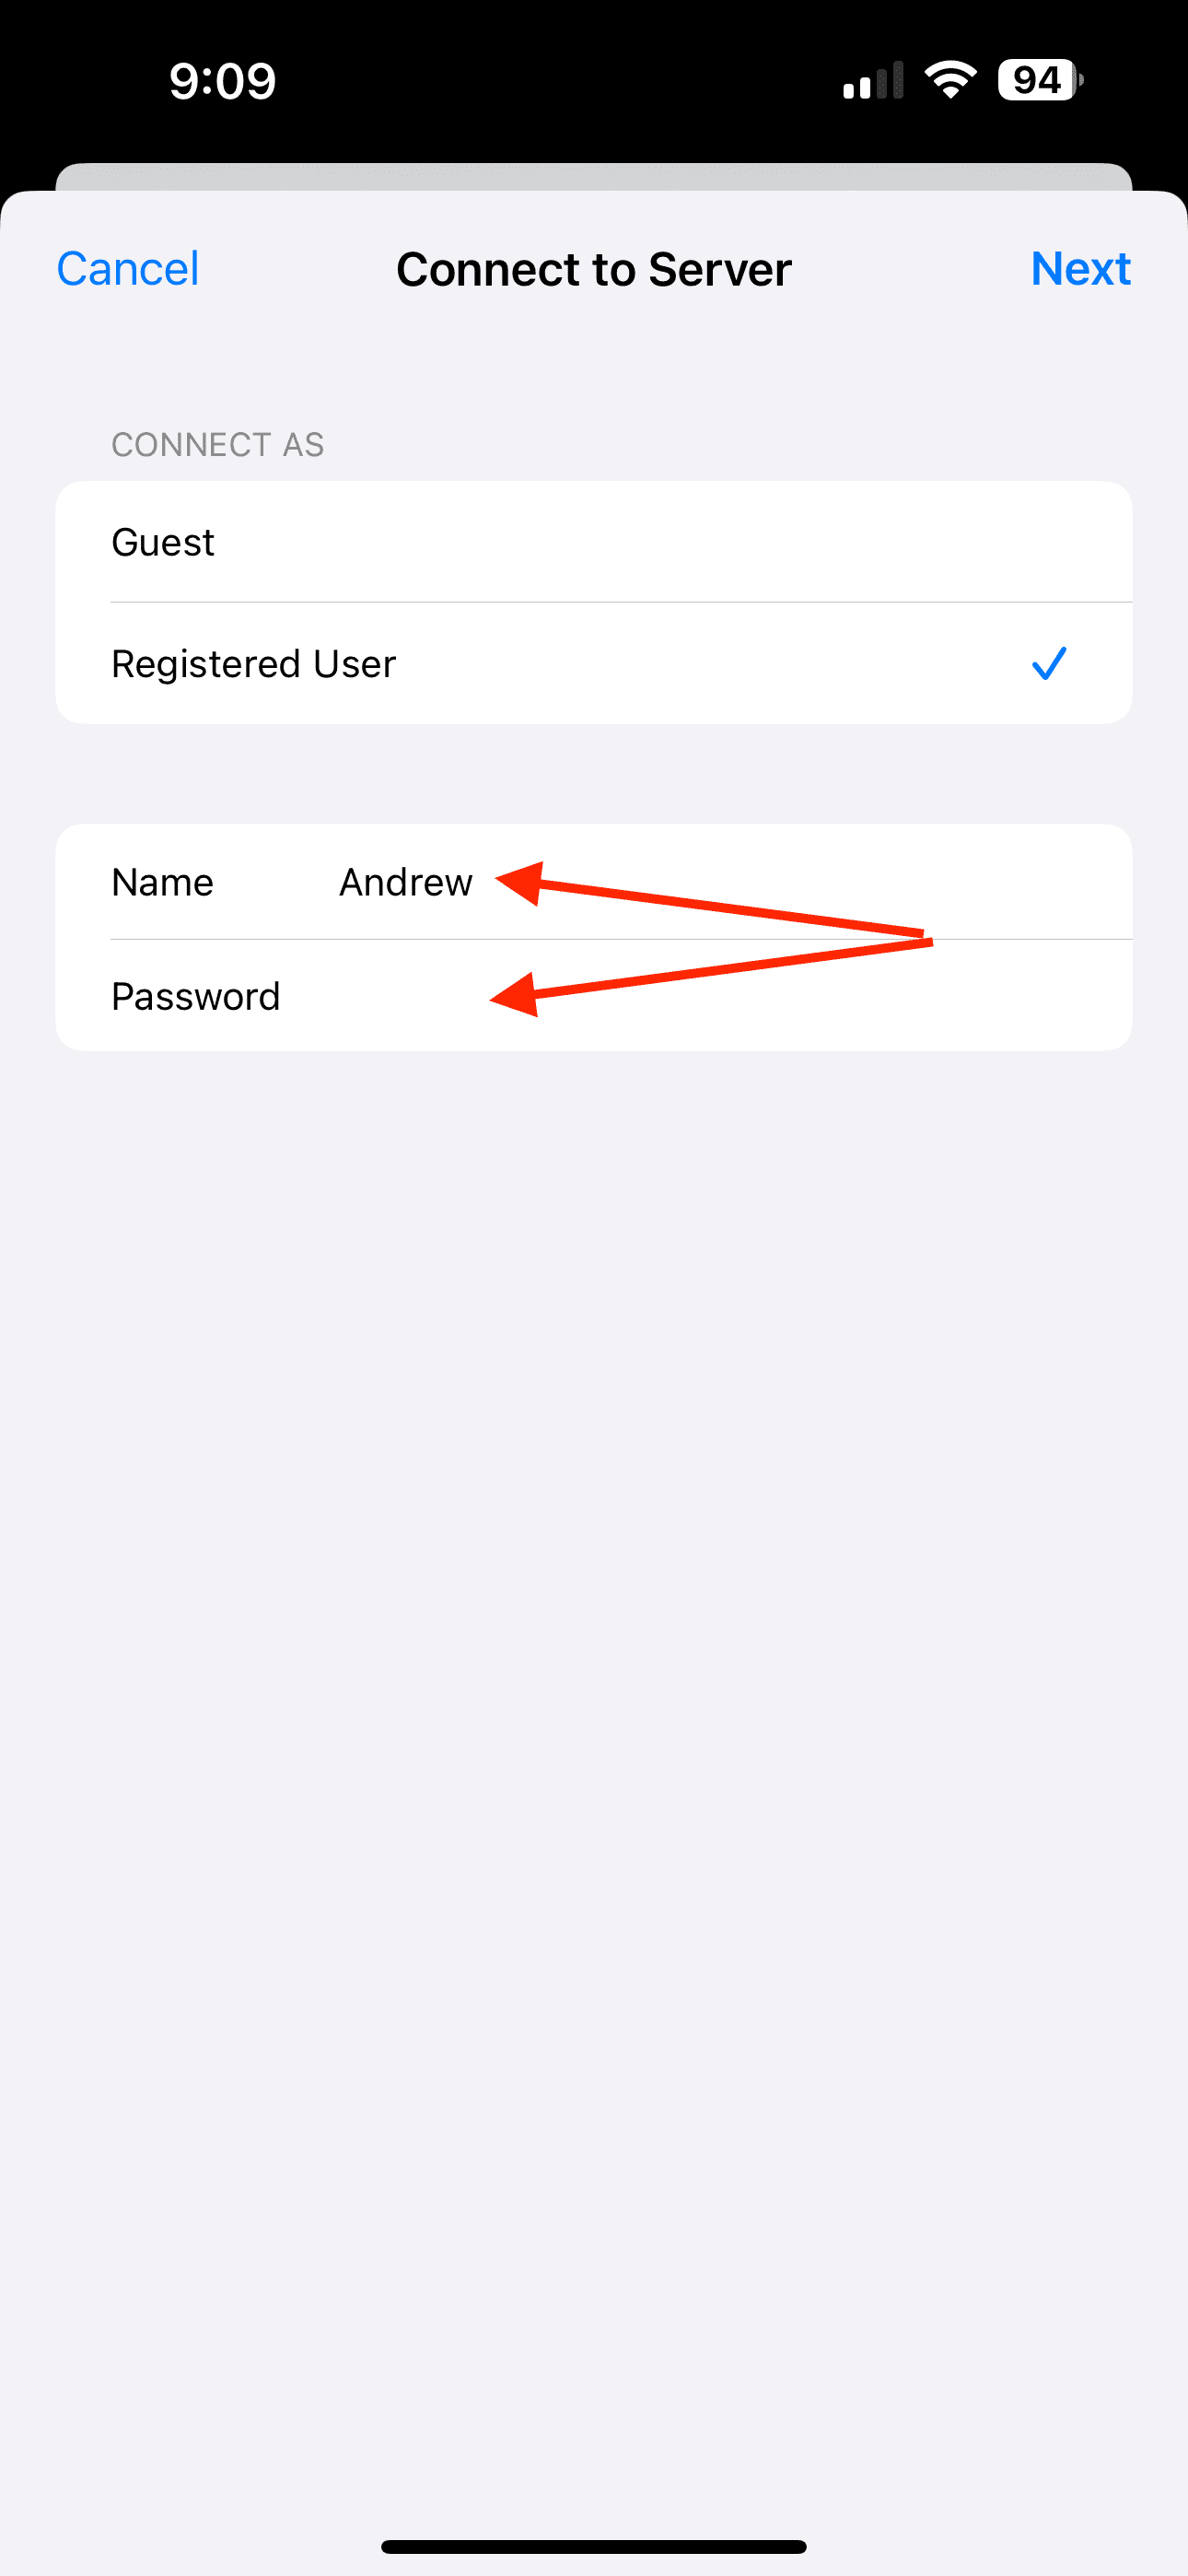
Under the Connect As section, tap Registered User.
Enter your PC’s username. You can double-check this by simply opening Command Prompt and seeing the name listed.
For the password, use the password for your Microsoft account.
Tap the Next button in the top right corner.
Intel Unison
Intel Unison isn’t the catchiest name out there, but it’s a new app that was released before the end of 2022 with the main goal of allowing users to connect their smartphones to select Windows 11 devices. By doing so, you’ll be able to respond to text messages, answer phone calls, and even transfer files between your smartphone and Windows 11 computer.
Since it can be used to transfer files, this makes it a great option for those want to be able to AirDrop from iPhone to Windows. You can follow our full guide to setting up Intel Unison at the link below:
Once you’ve followed our guide on getting your iPhone connected to your Windows PC, here’s how you can use Intel Unison to quickly share files.
Make sure that the Intel Unison app is open on your Windows PC.
This will still work even if the app is minimized to the System Tray.
Open the IntelUnison app on your iPhone.
Ensure that the app says Connected in the top left corner under My PC.
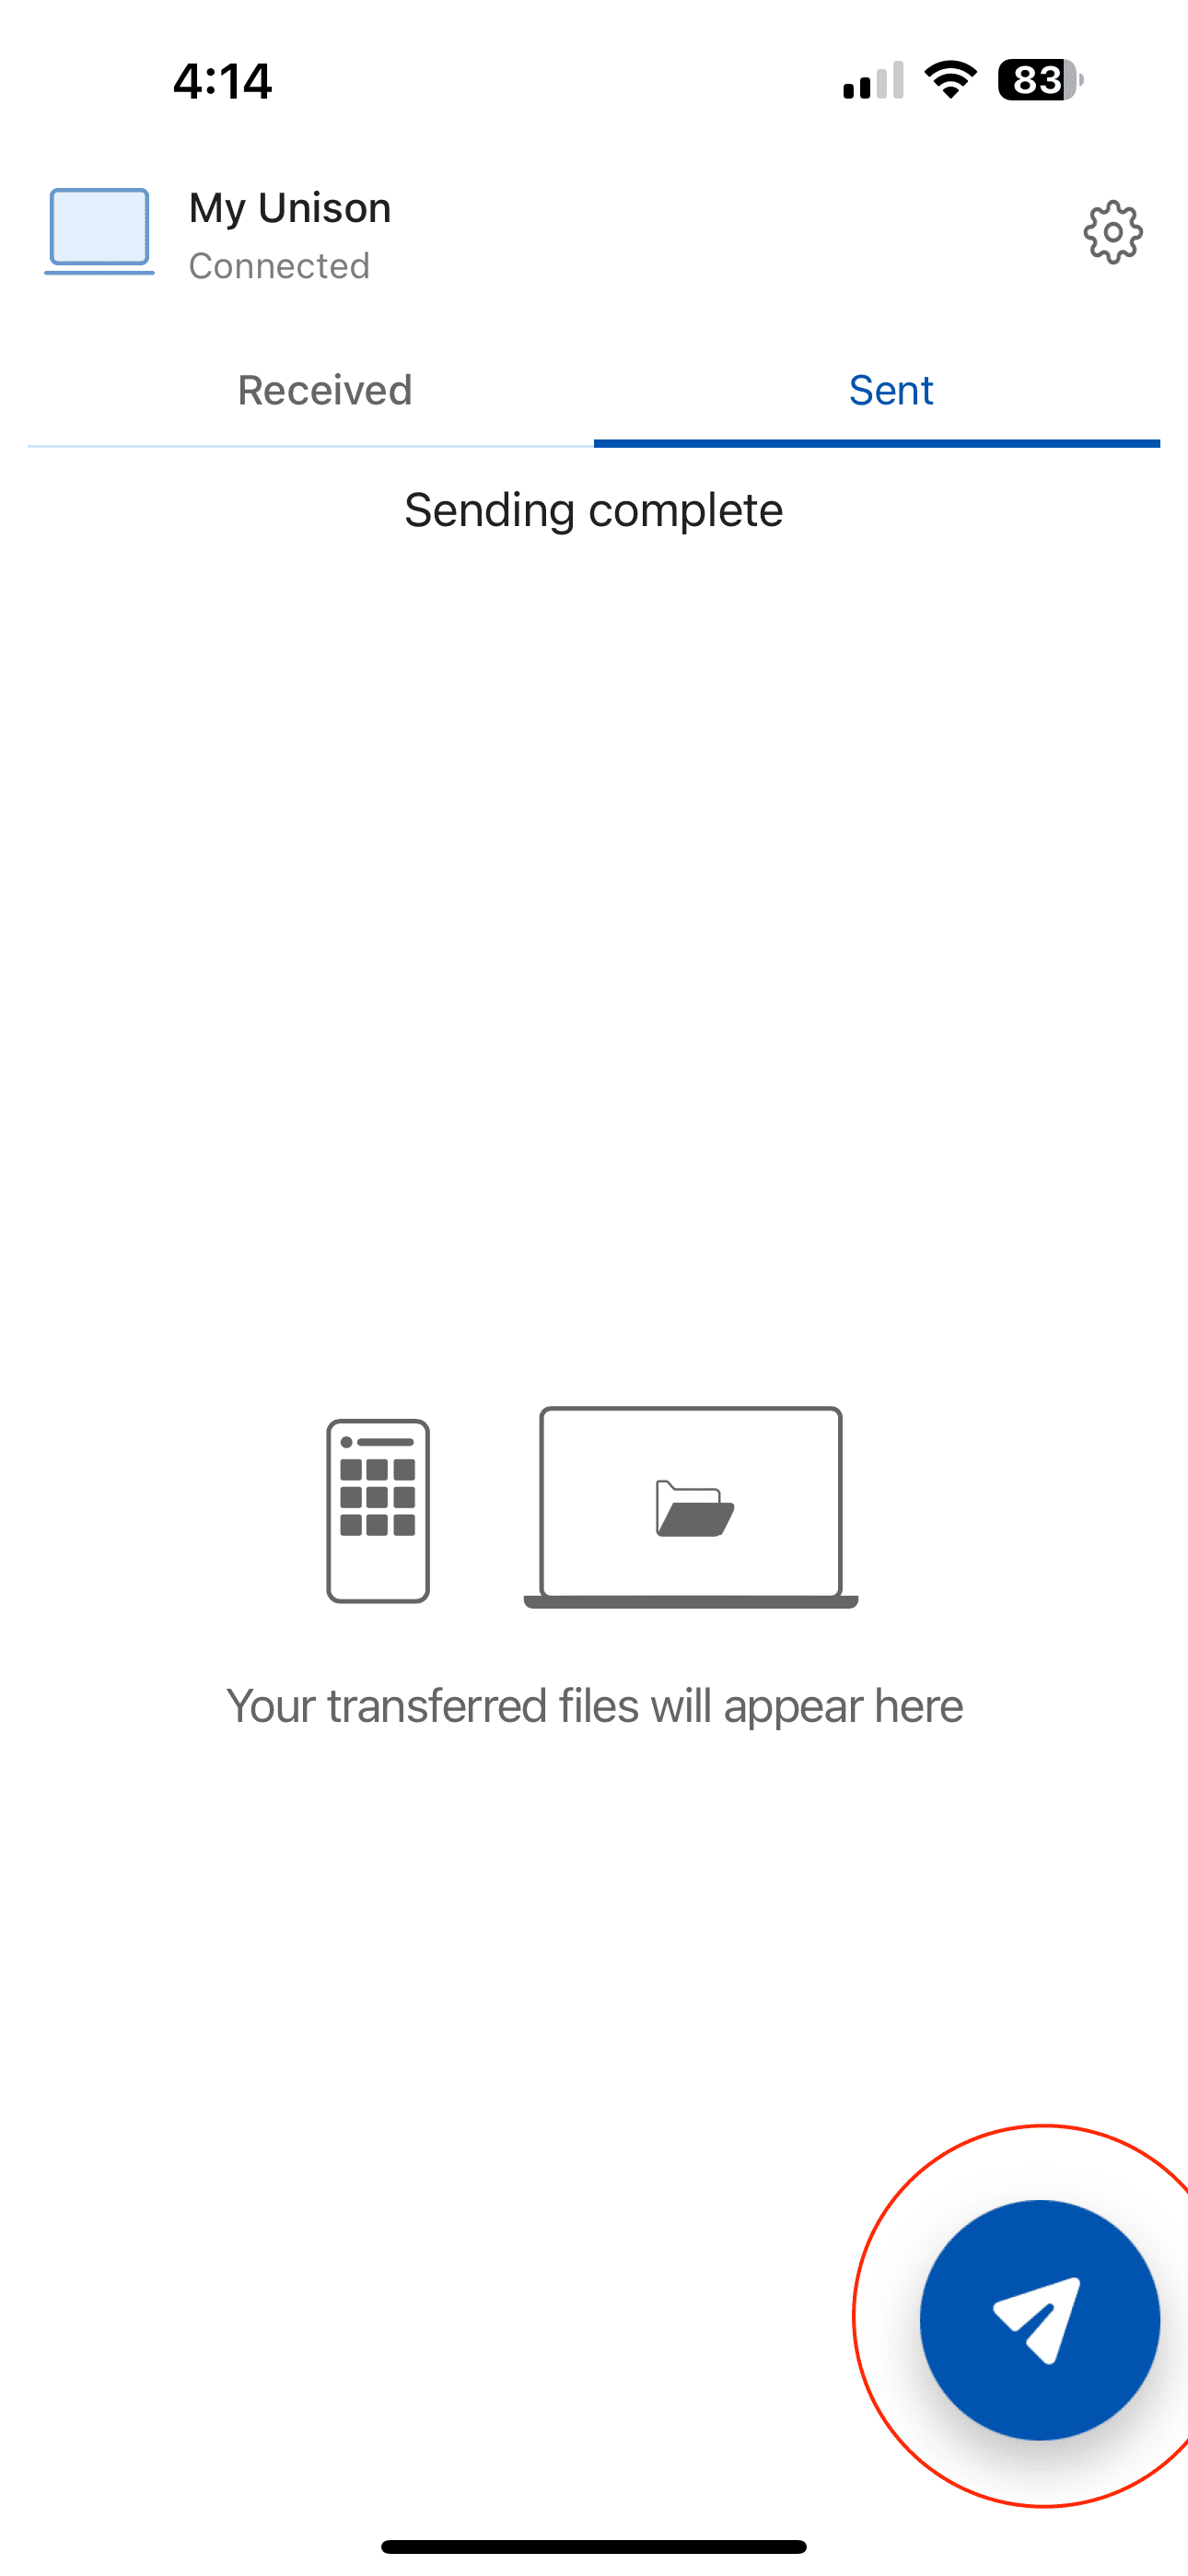
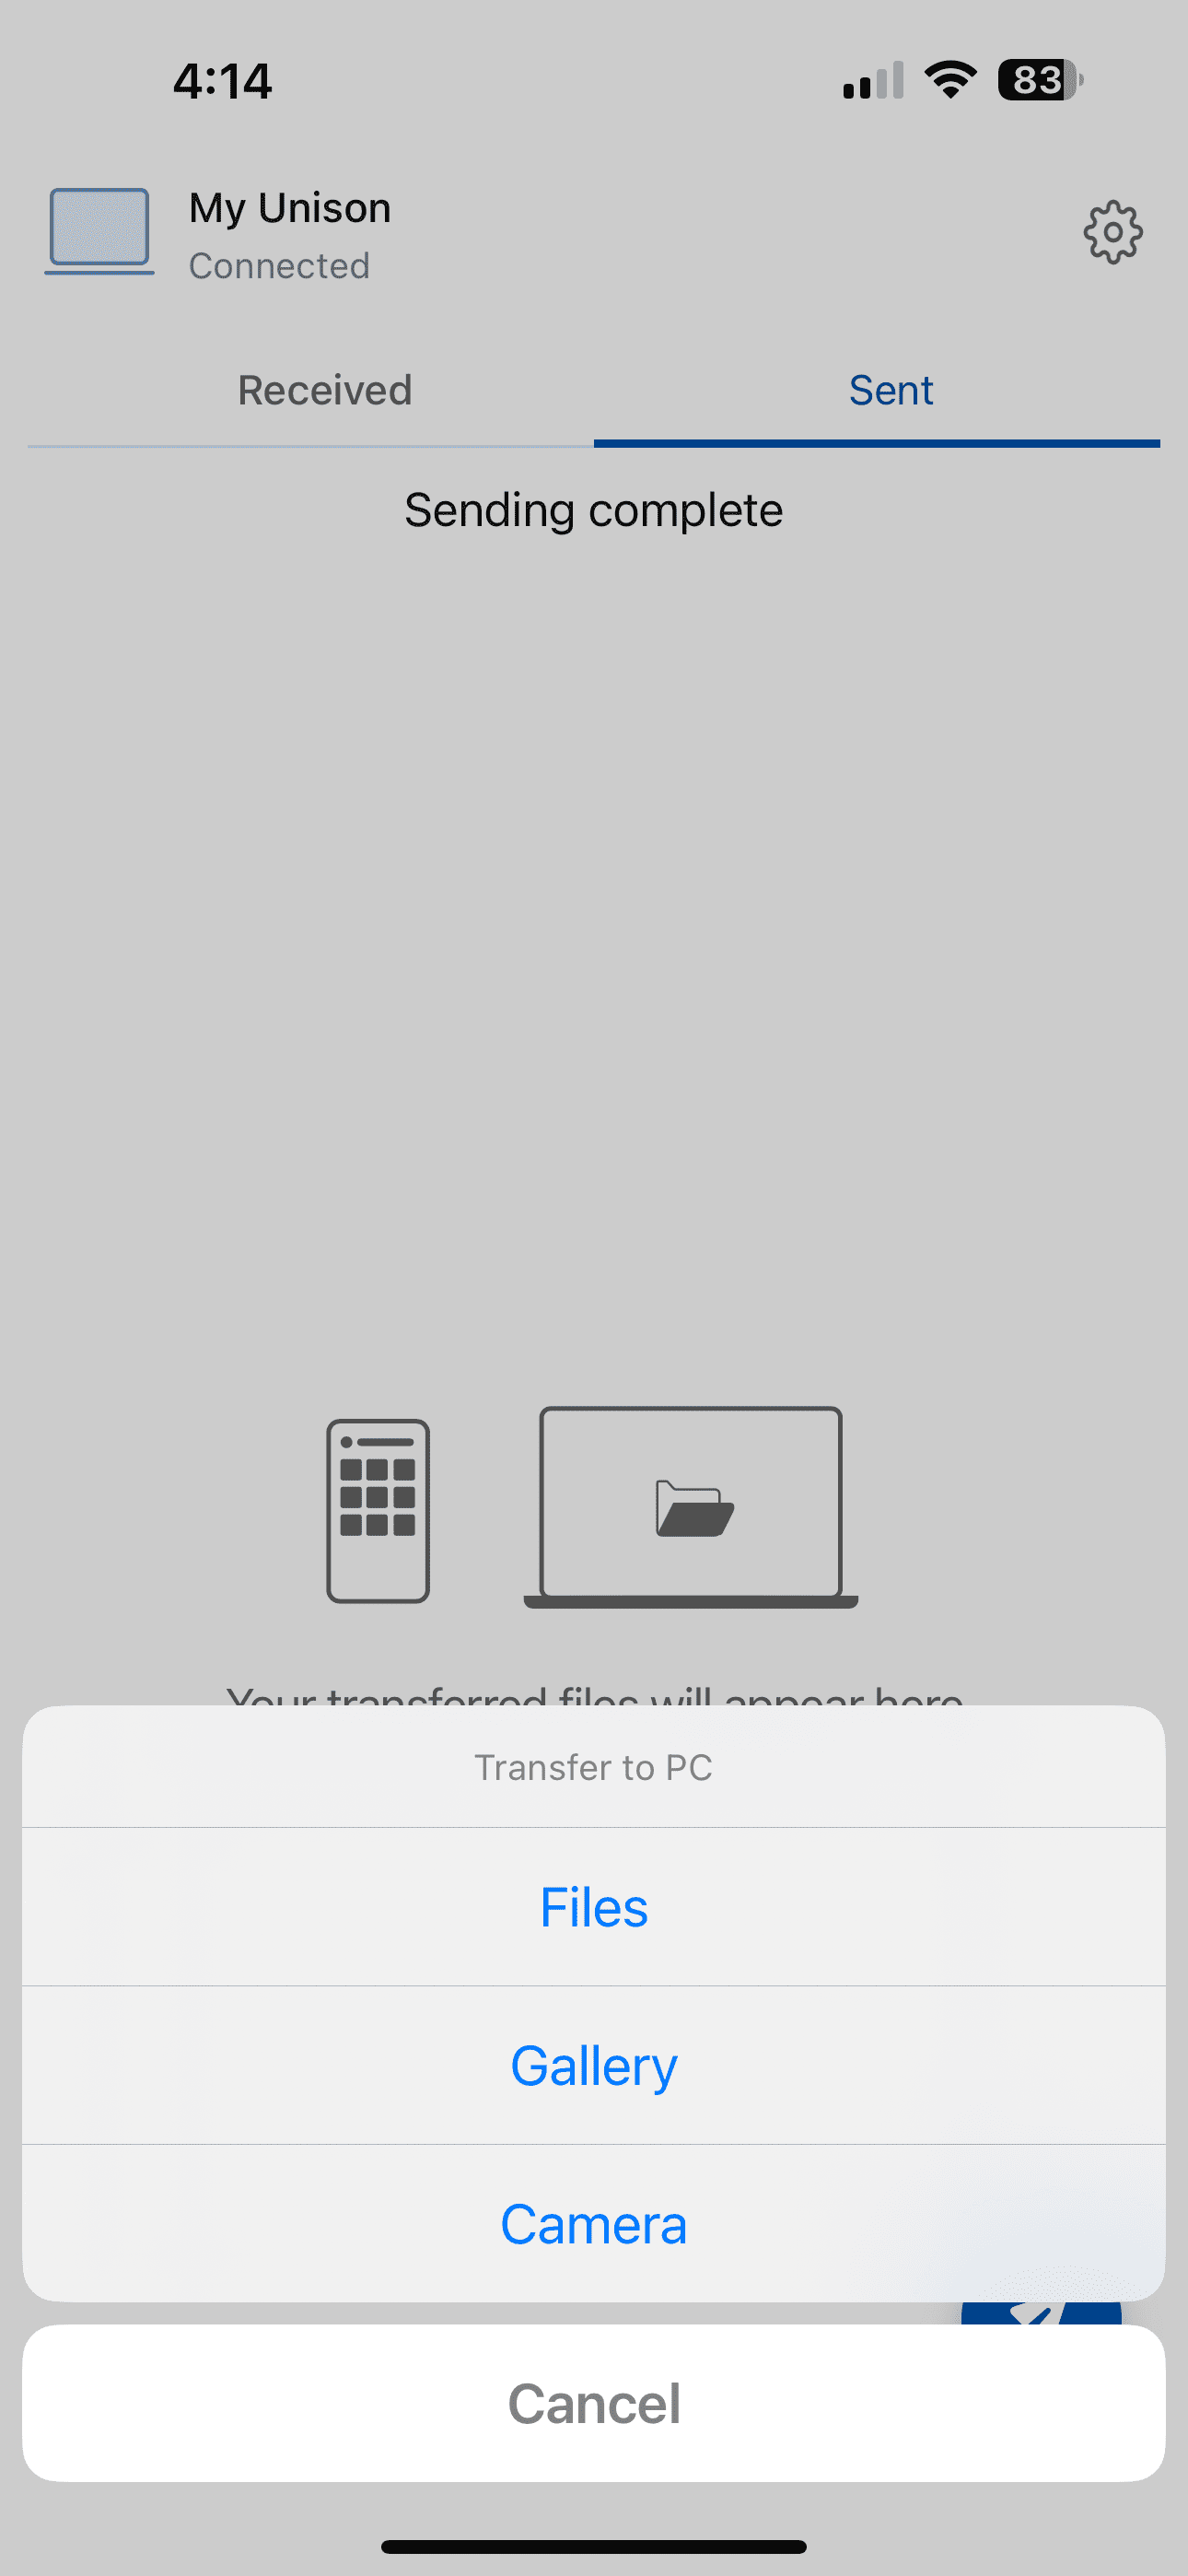
Tap the Send button in the bottom right corner.
Select one of the following:
Files
Gallery
Camera
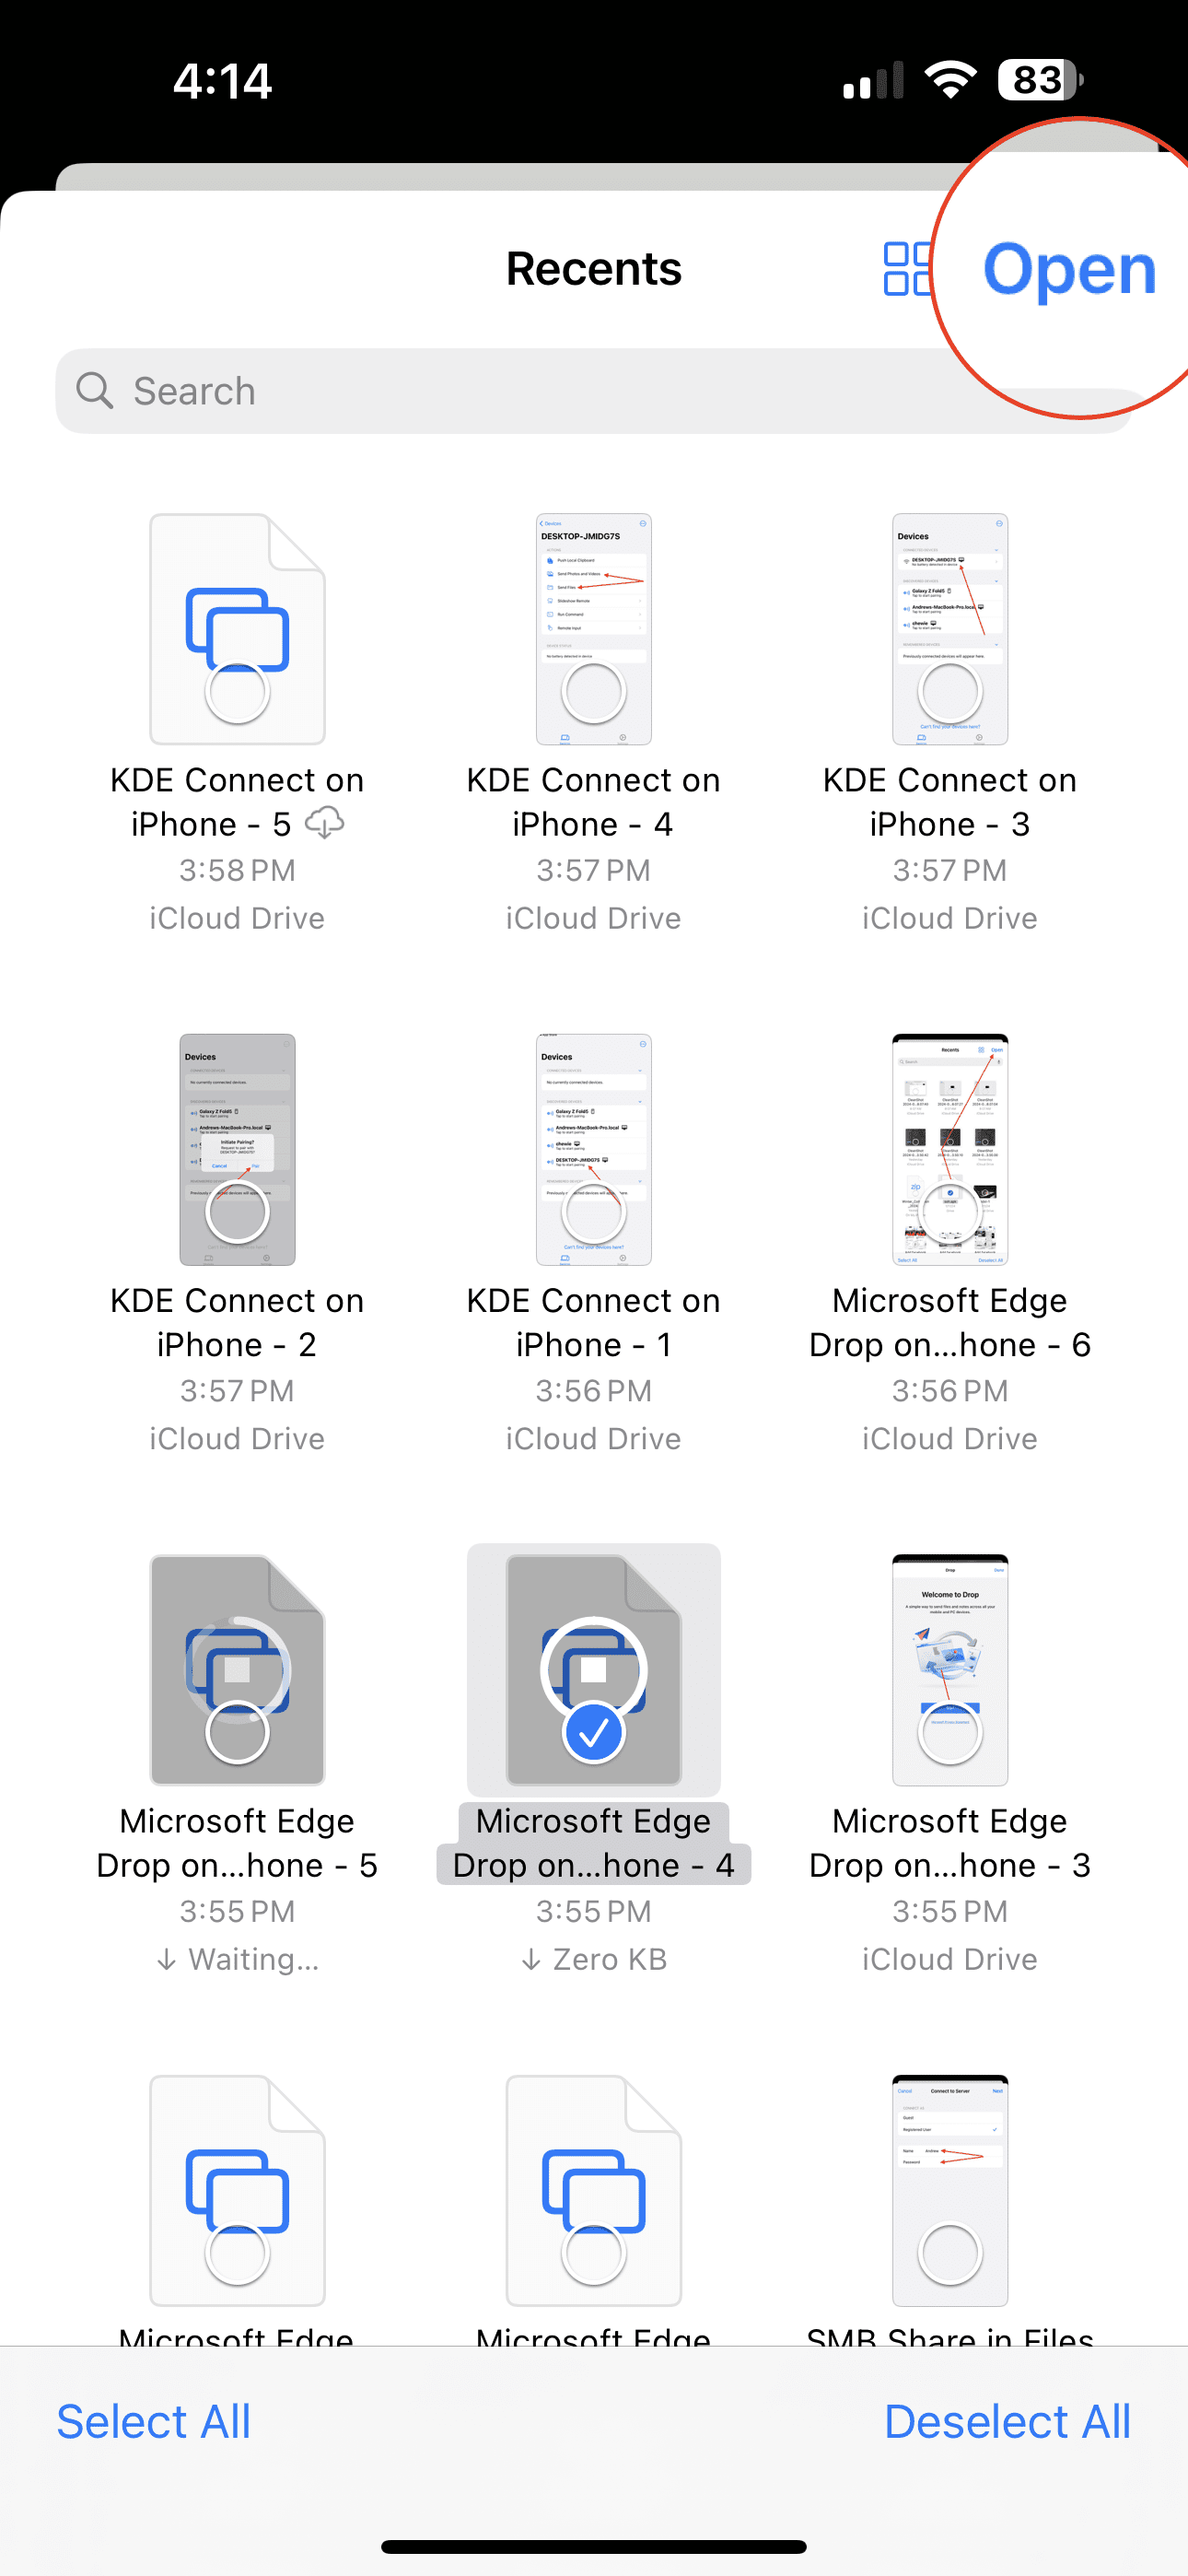
Locate the file that you want to send to your Windows PC.
Tap the Open button in the top right corner.
After the file is finished “preparing” it will be sent to your Windows PC.
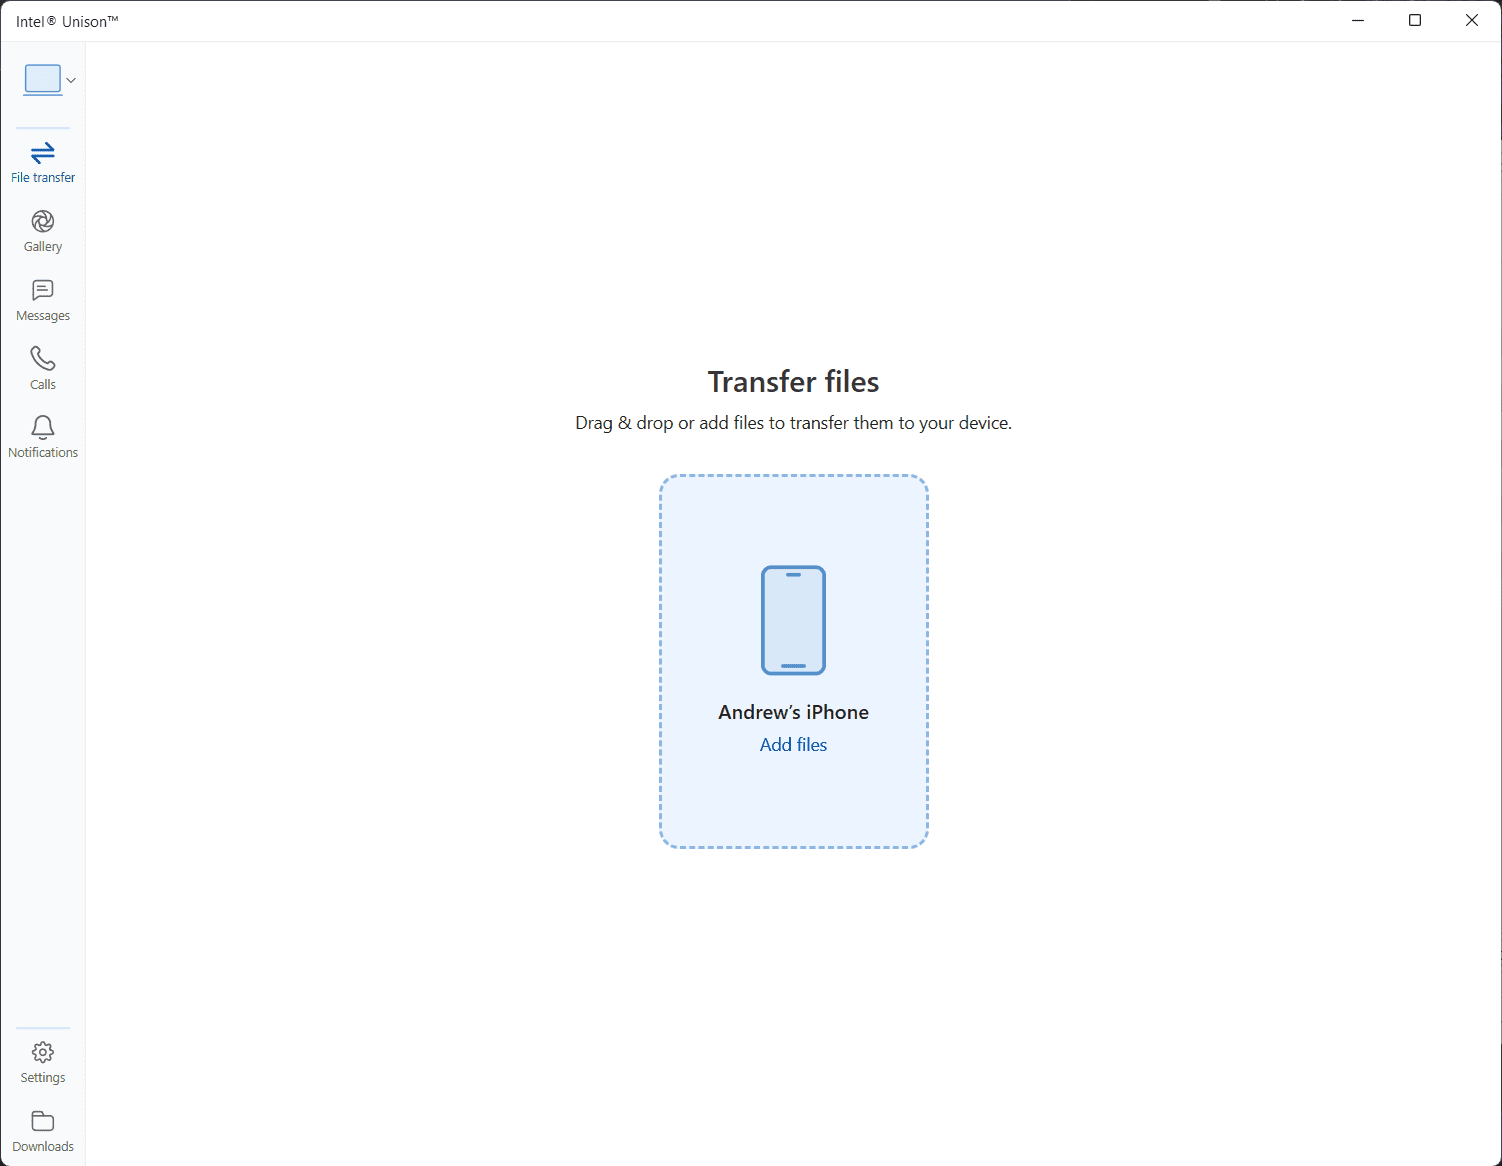
Whenever you send a file from your iPhone to Windows PC, it will automatically be saved to the Downloads folder. But did you know that you can use the Intel Unison app to send files from your Windows PC to your iPhone? Here’s how you can do so:
Open the Intel Unison app on both your iPhone and Windows PC.
In the sidebar on the left, click File Transfer.
Click the Add Files button listed below the name of your iPhone.
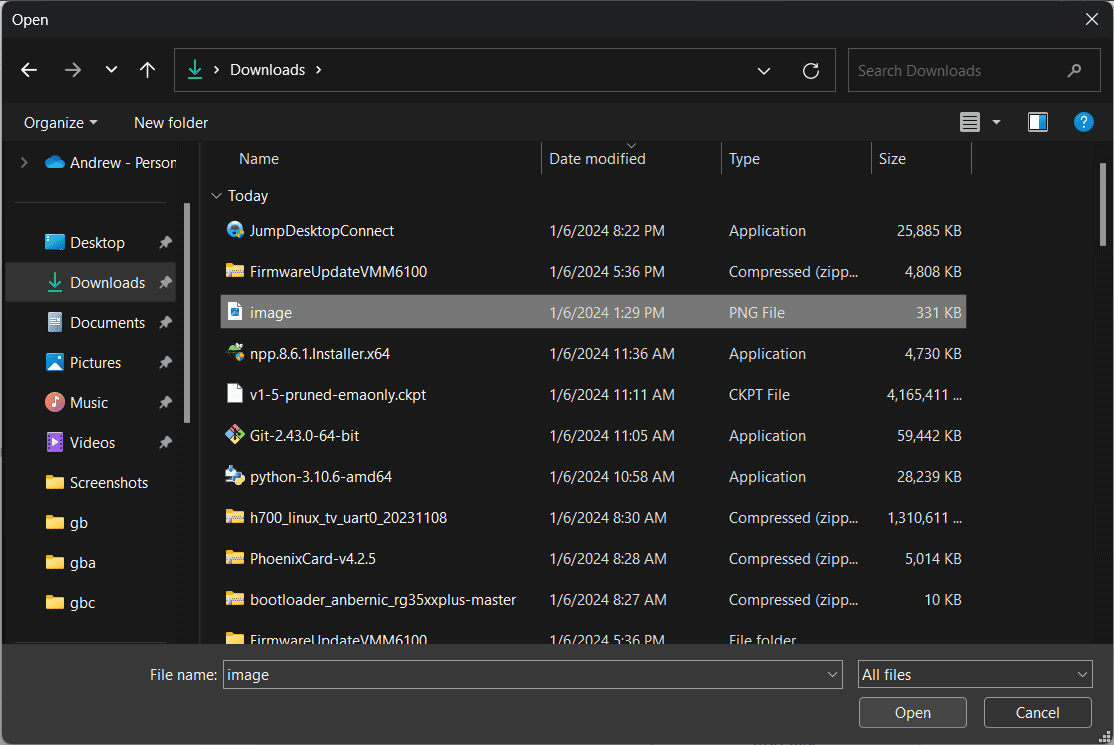
Navigate to the location and select the file(s) that you want to send from your Windows PC to your iPhone.
Once selected, click the Open button.
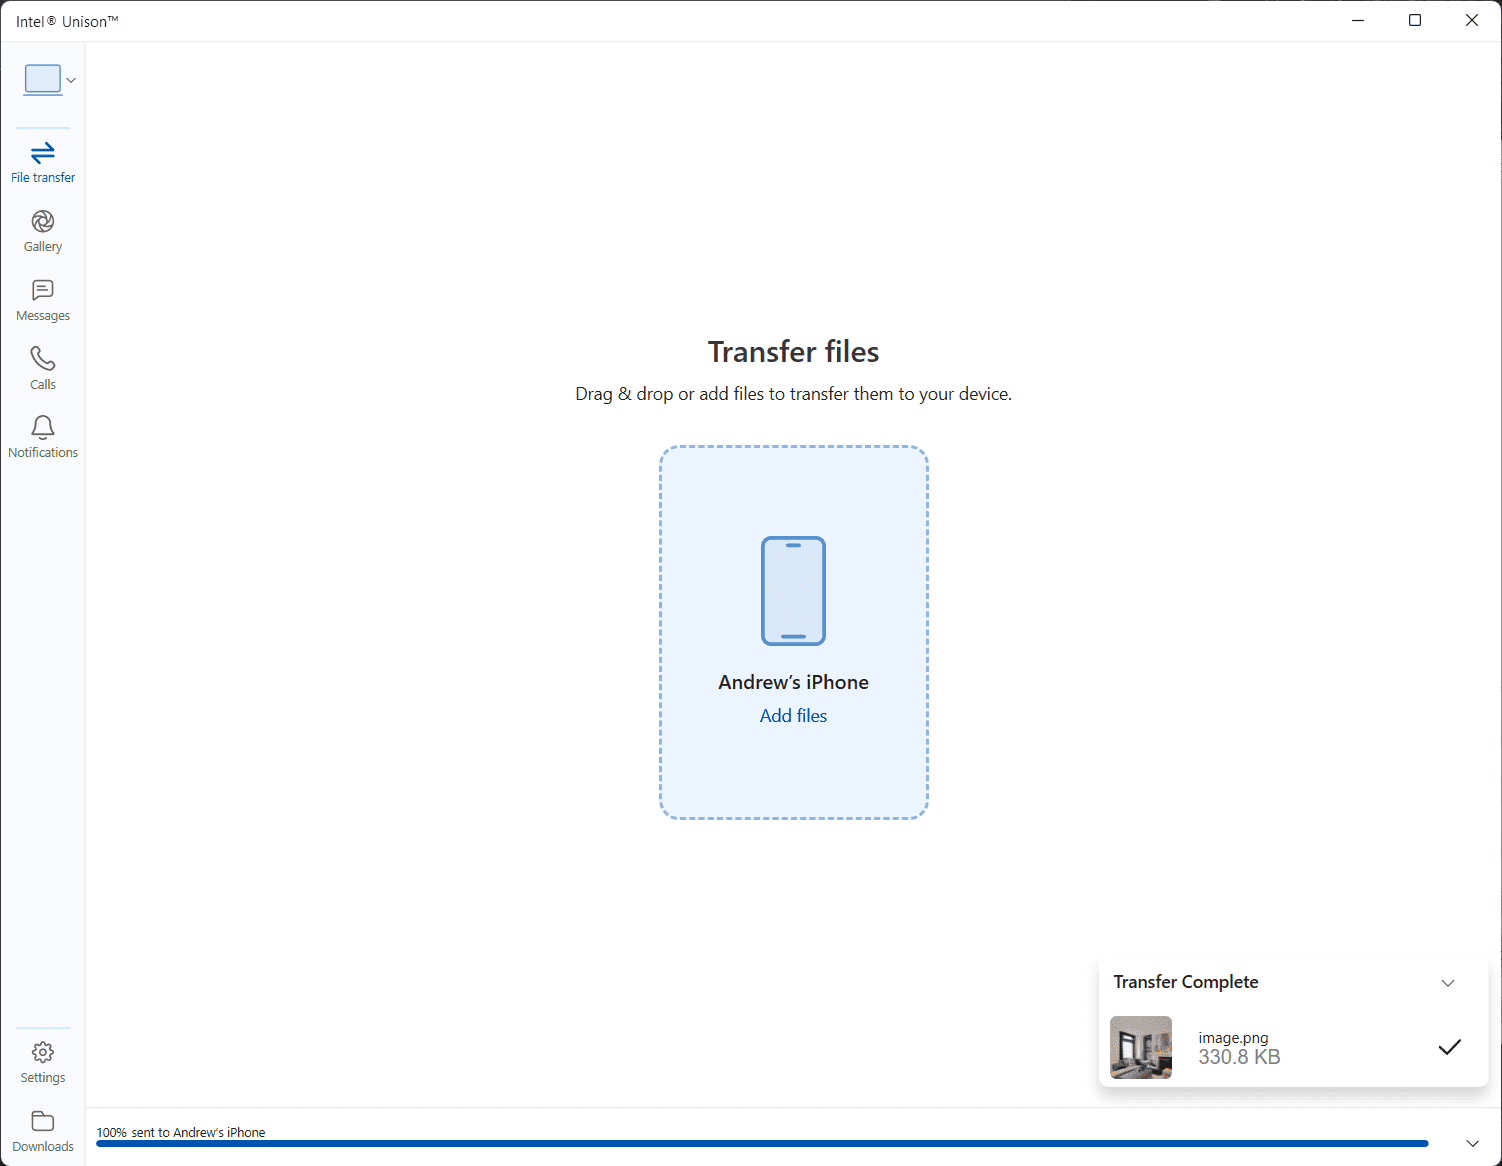
Keep the app open on both your iPhone and Windows PC until you see the Transfer Complete pop-up in the bottom right corner.
Microsoft Edge Drop
Although built with the same foundation as Google Chrome, Microsoft has managed to implement quite a few extra features that help it stand apart from the rest of the crowd. One such feature is known as “Drop”, which allows users to easily share files and messages between their devices, such as a phone and a desktop computer. It is designed to facilitate instant file sharing and note-taking while browsing, helping users stay in the flow of their work without needing to switch between different applications or services.
From your Windows PC, open the Microsoft Edge app and sign in with your Microsoft account.
Once installed, open the Microsoft Edge app on your iPhone.
Sign in with the same Microsoft account that you use on your PC.
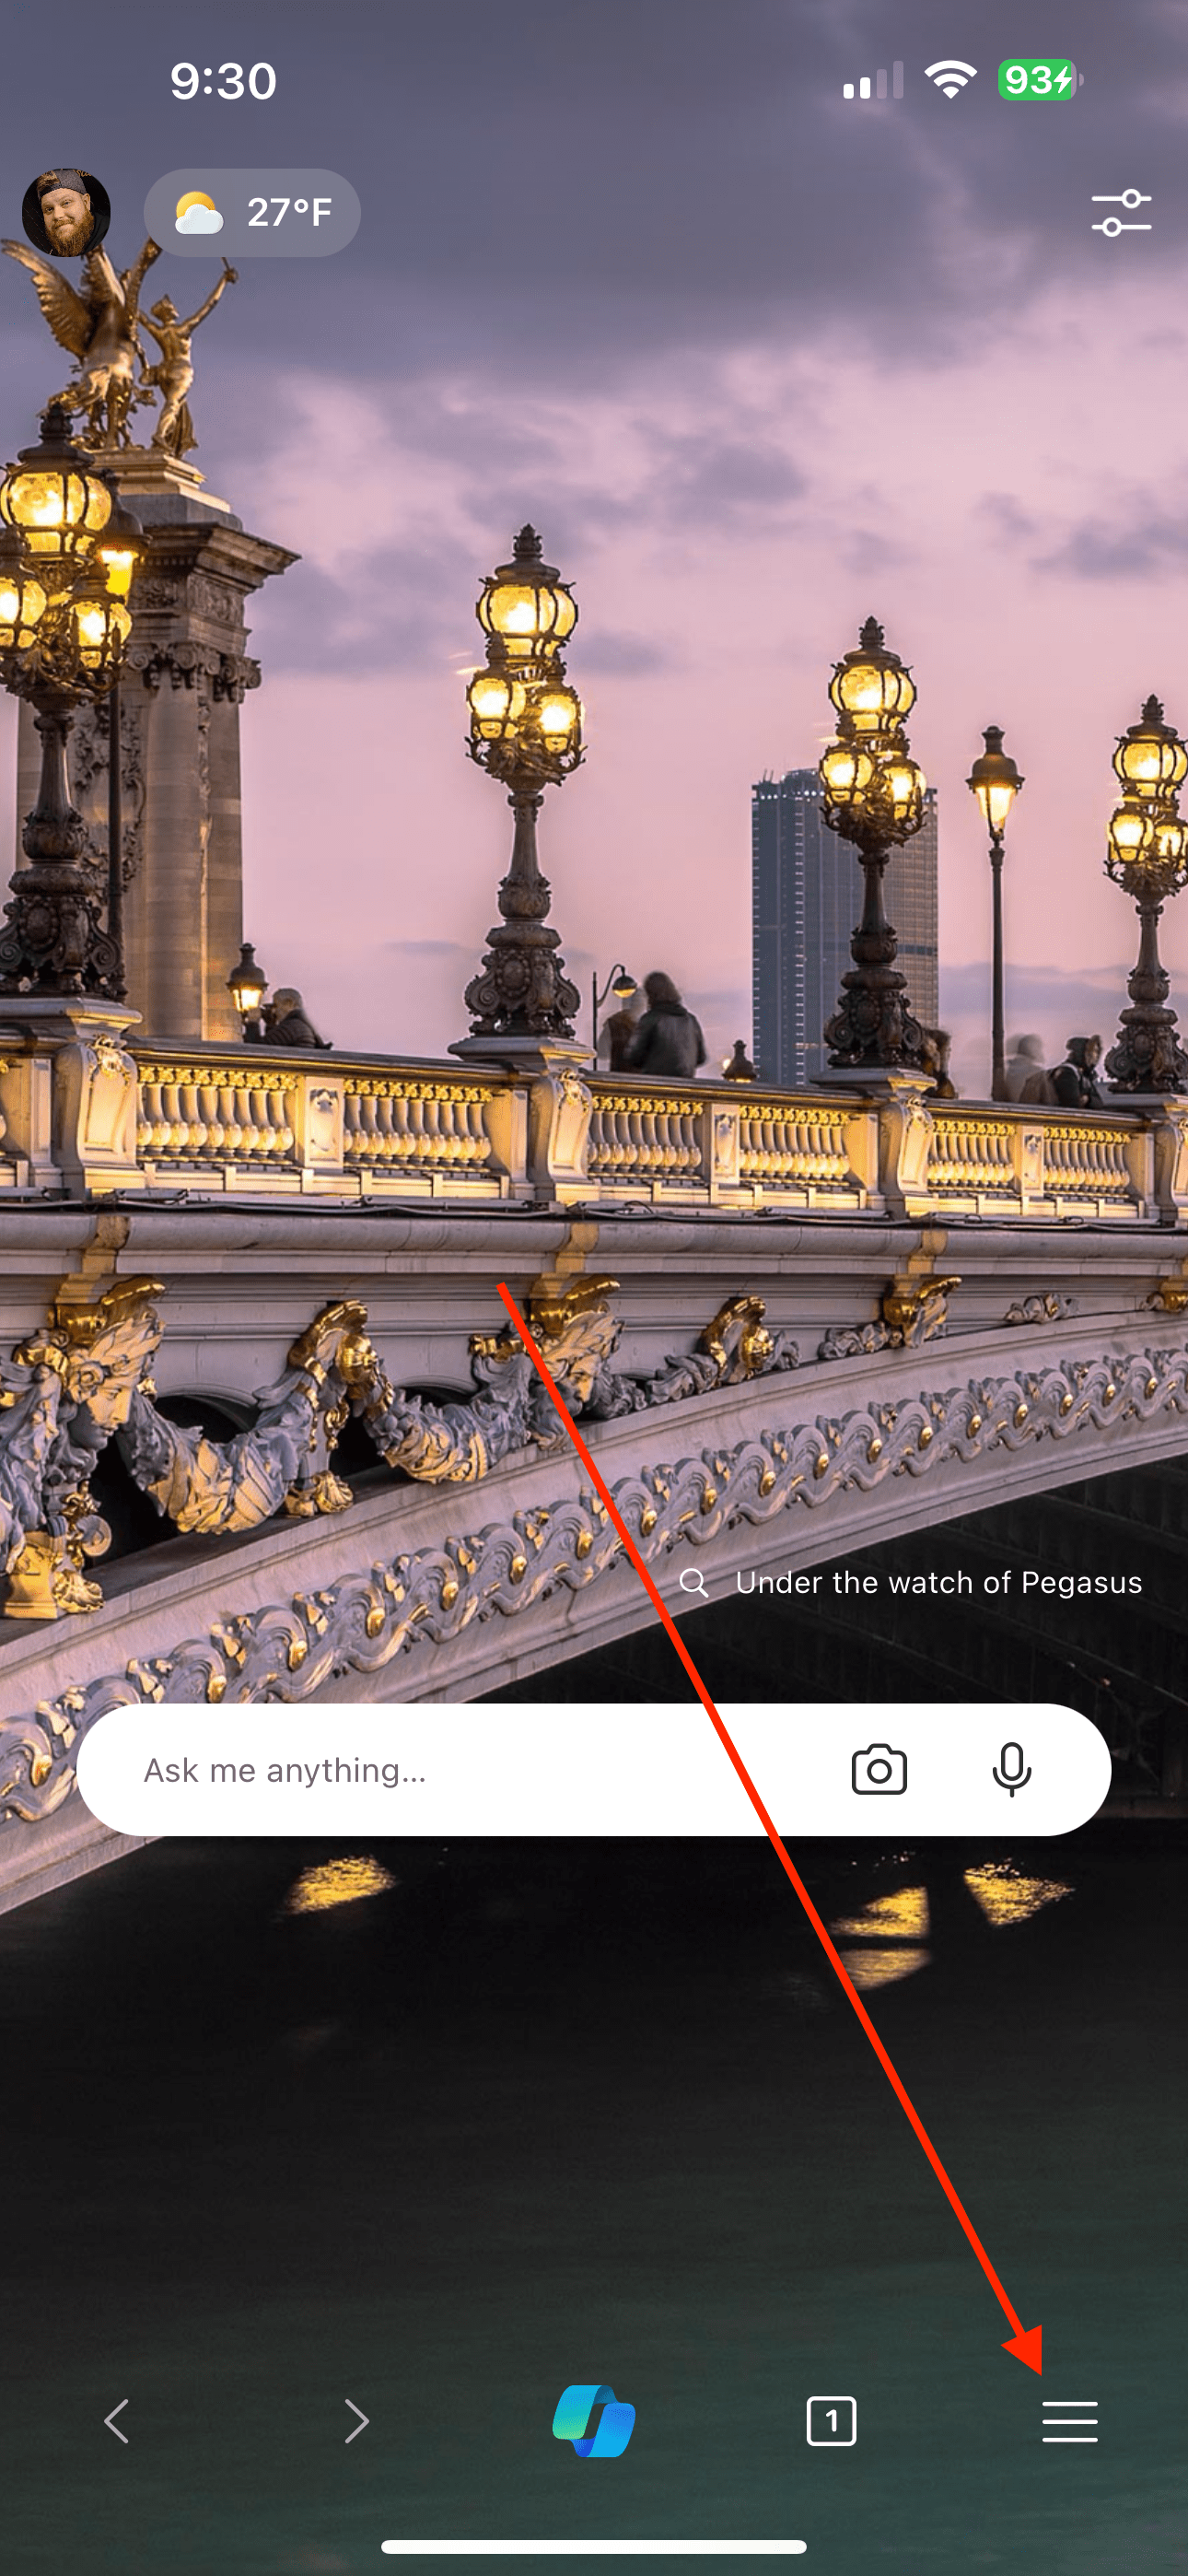
After you are signed in and have gone through the introduction screens, tap the three vertical lines in the bottom right corner.
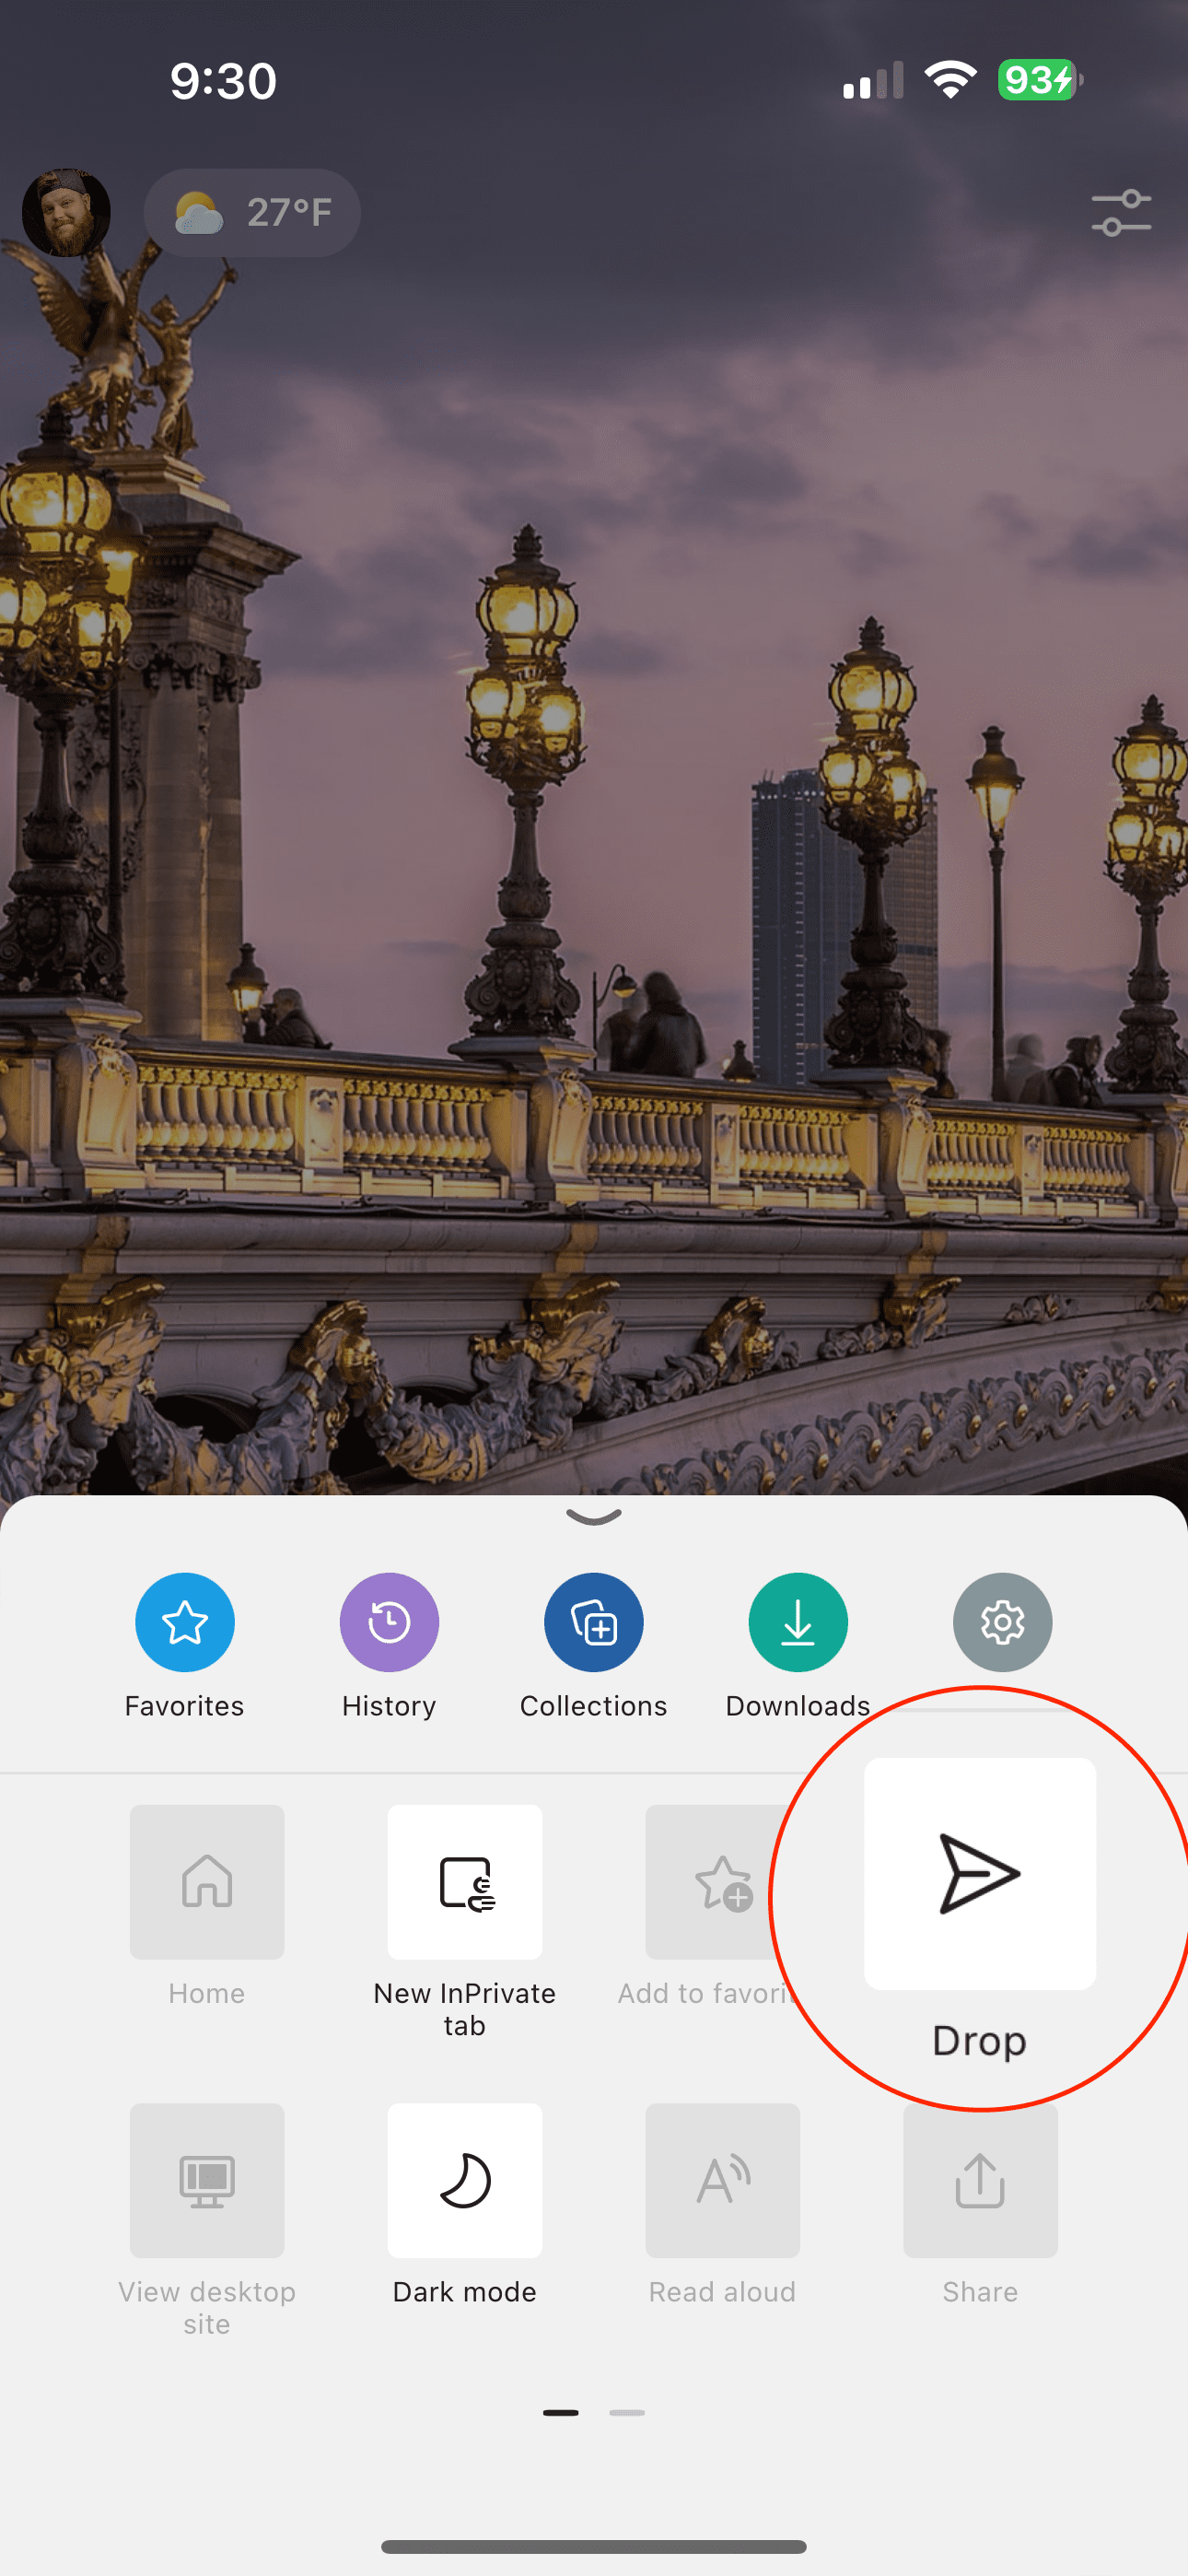
Tap the Drop button from the menu that appears.
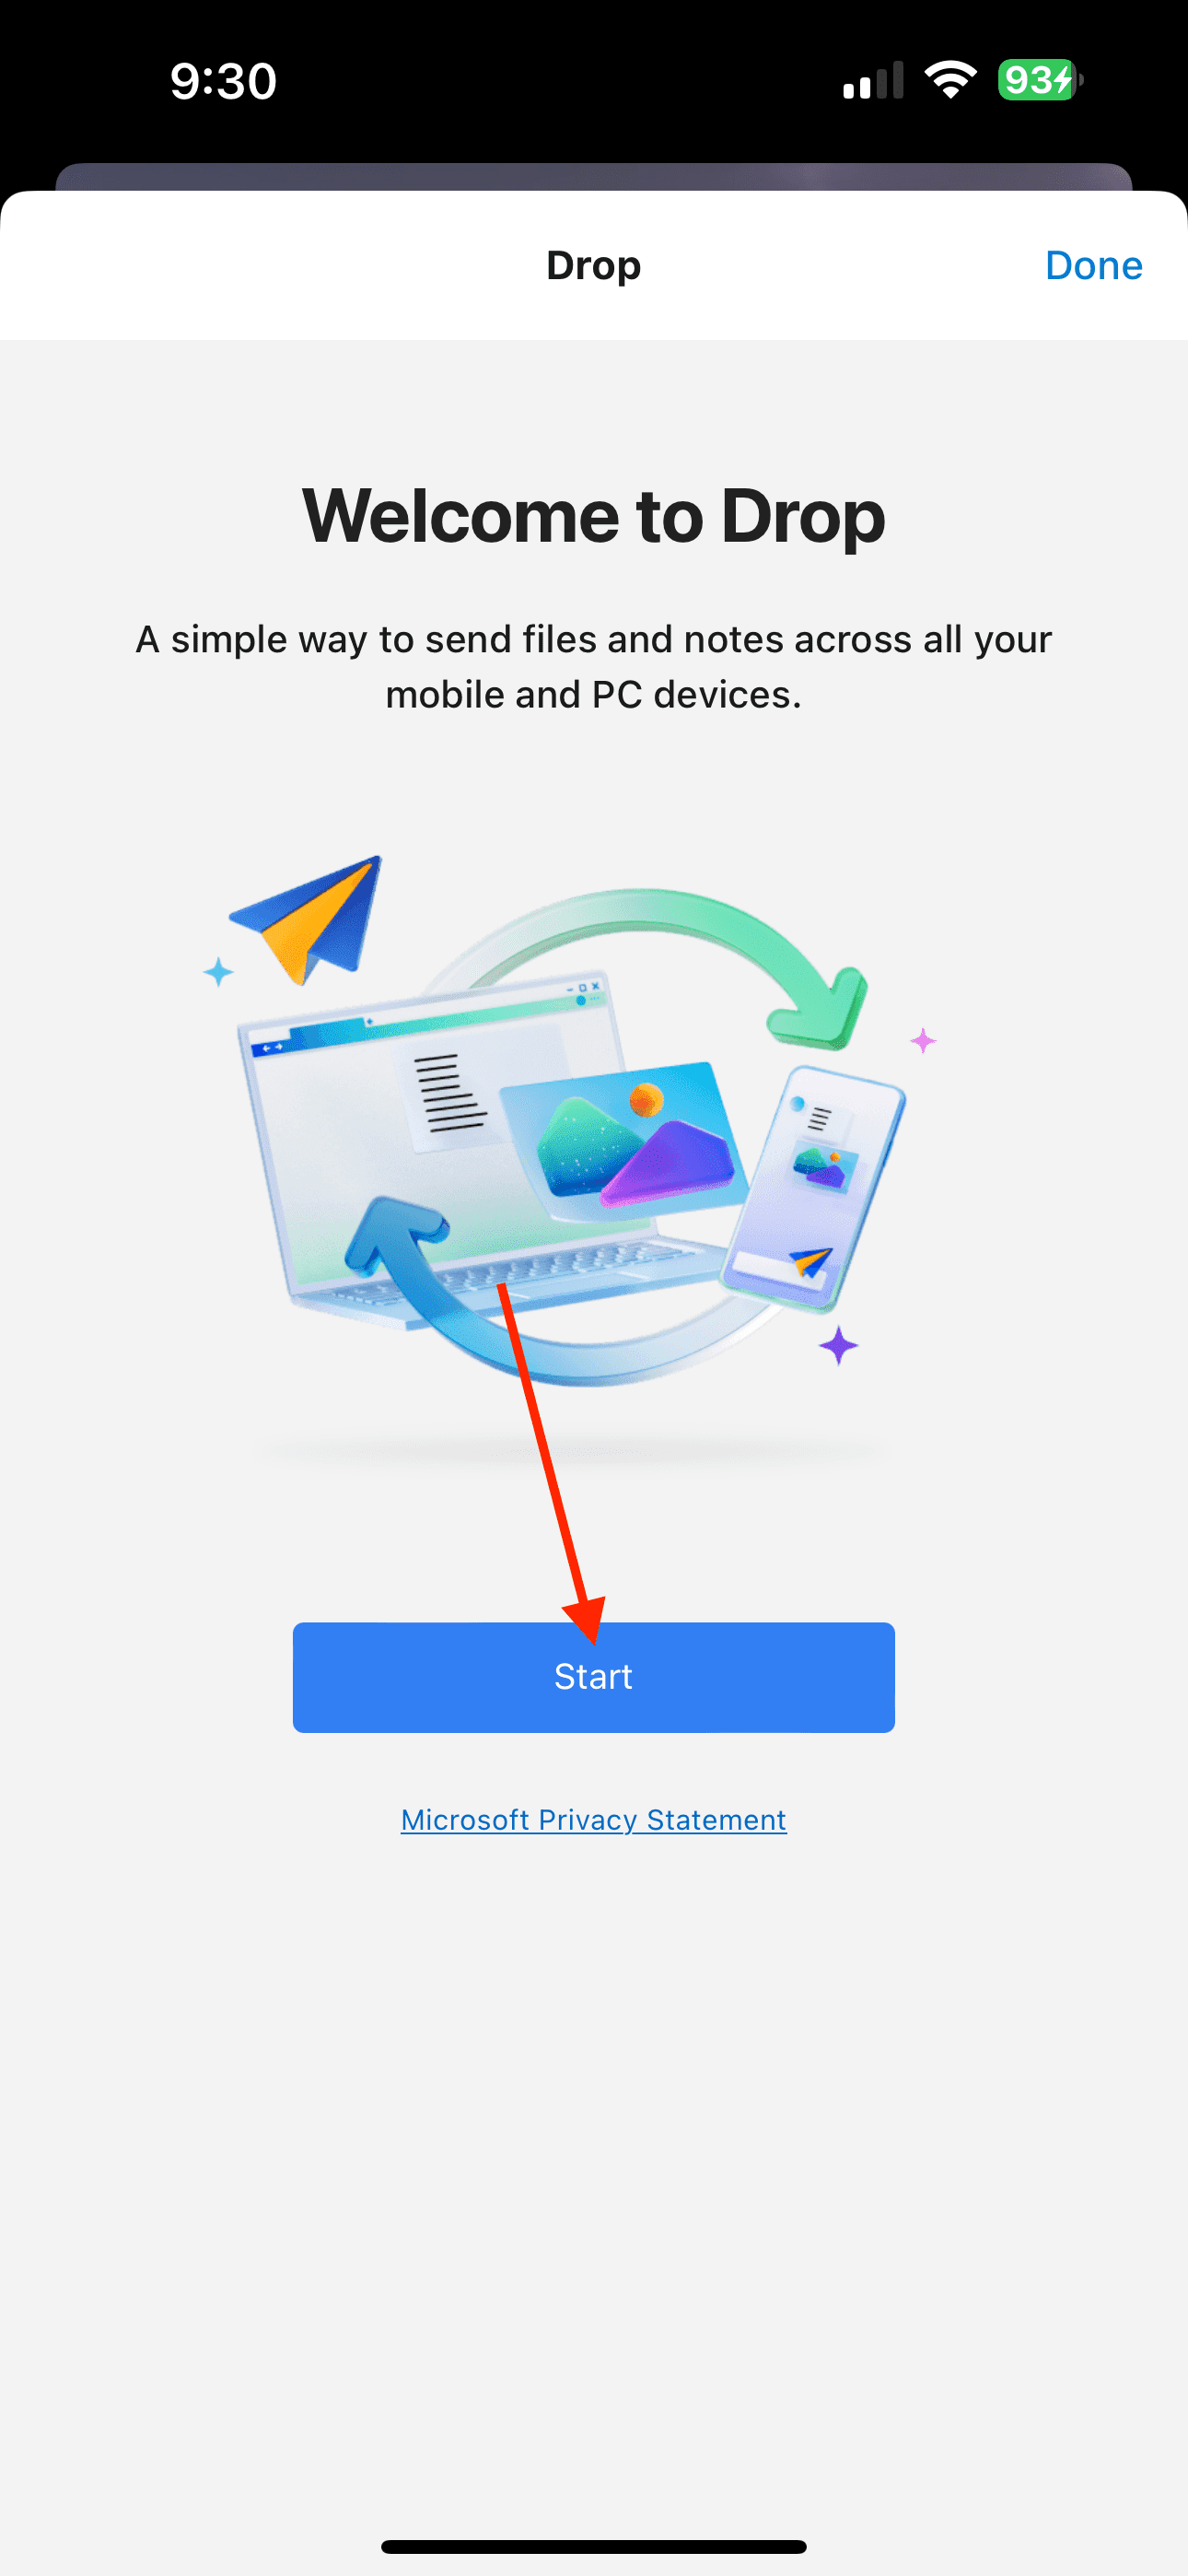
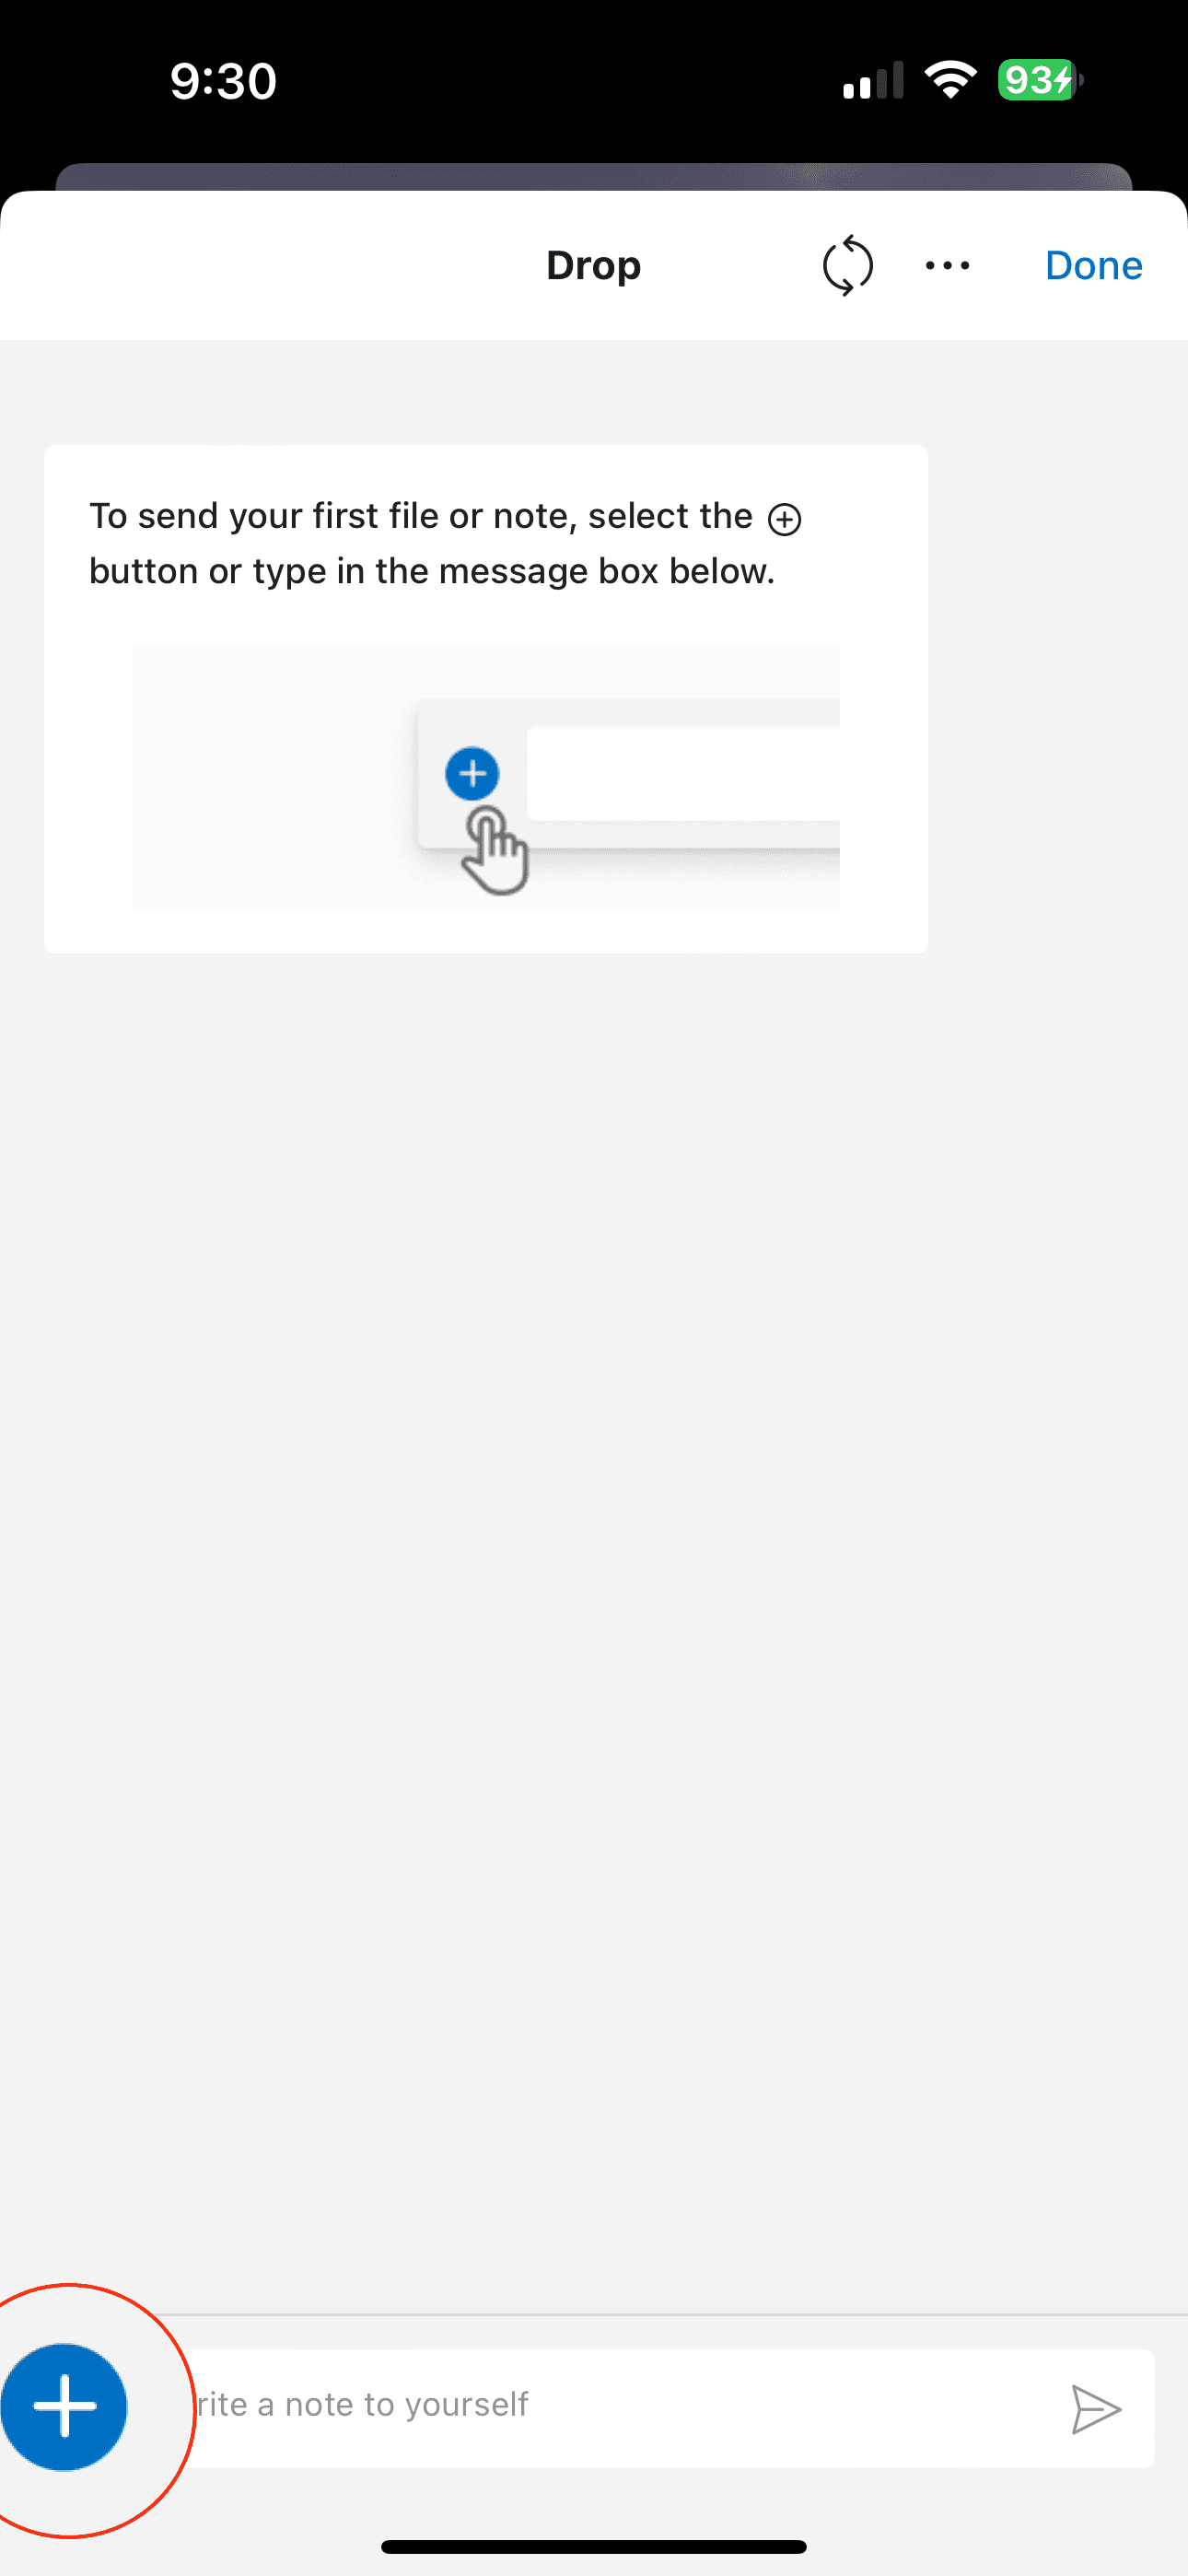
From the Welcome to Drop page, tap the Start button.
Tap the + button in the bottom left corner.
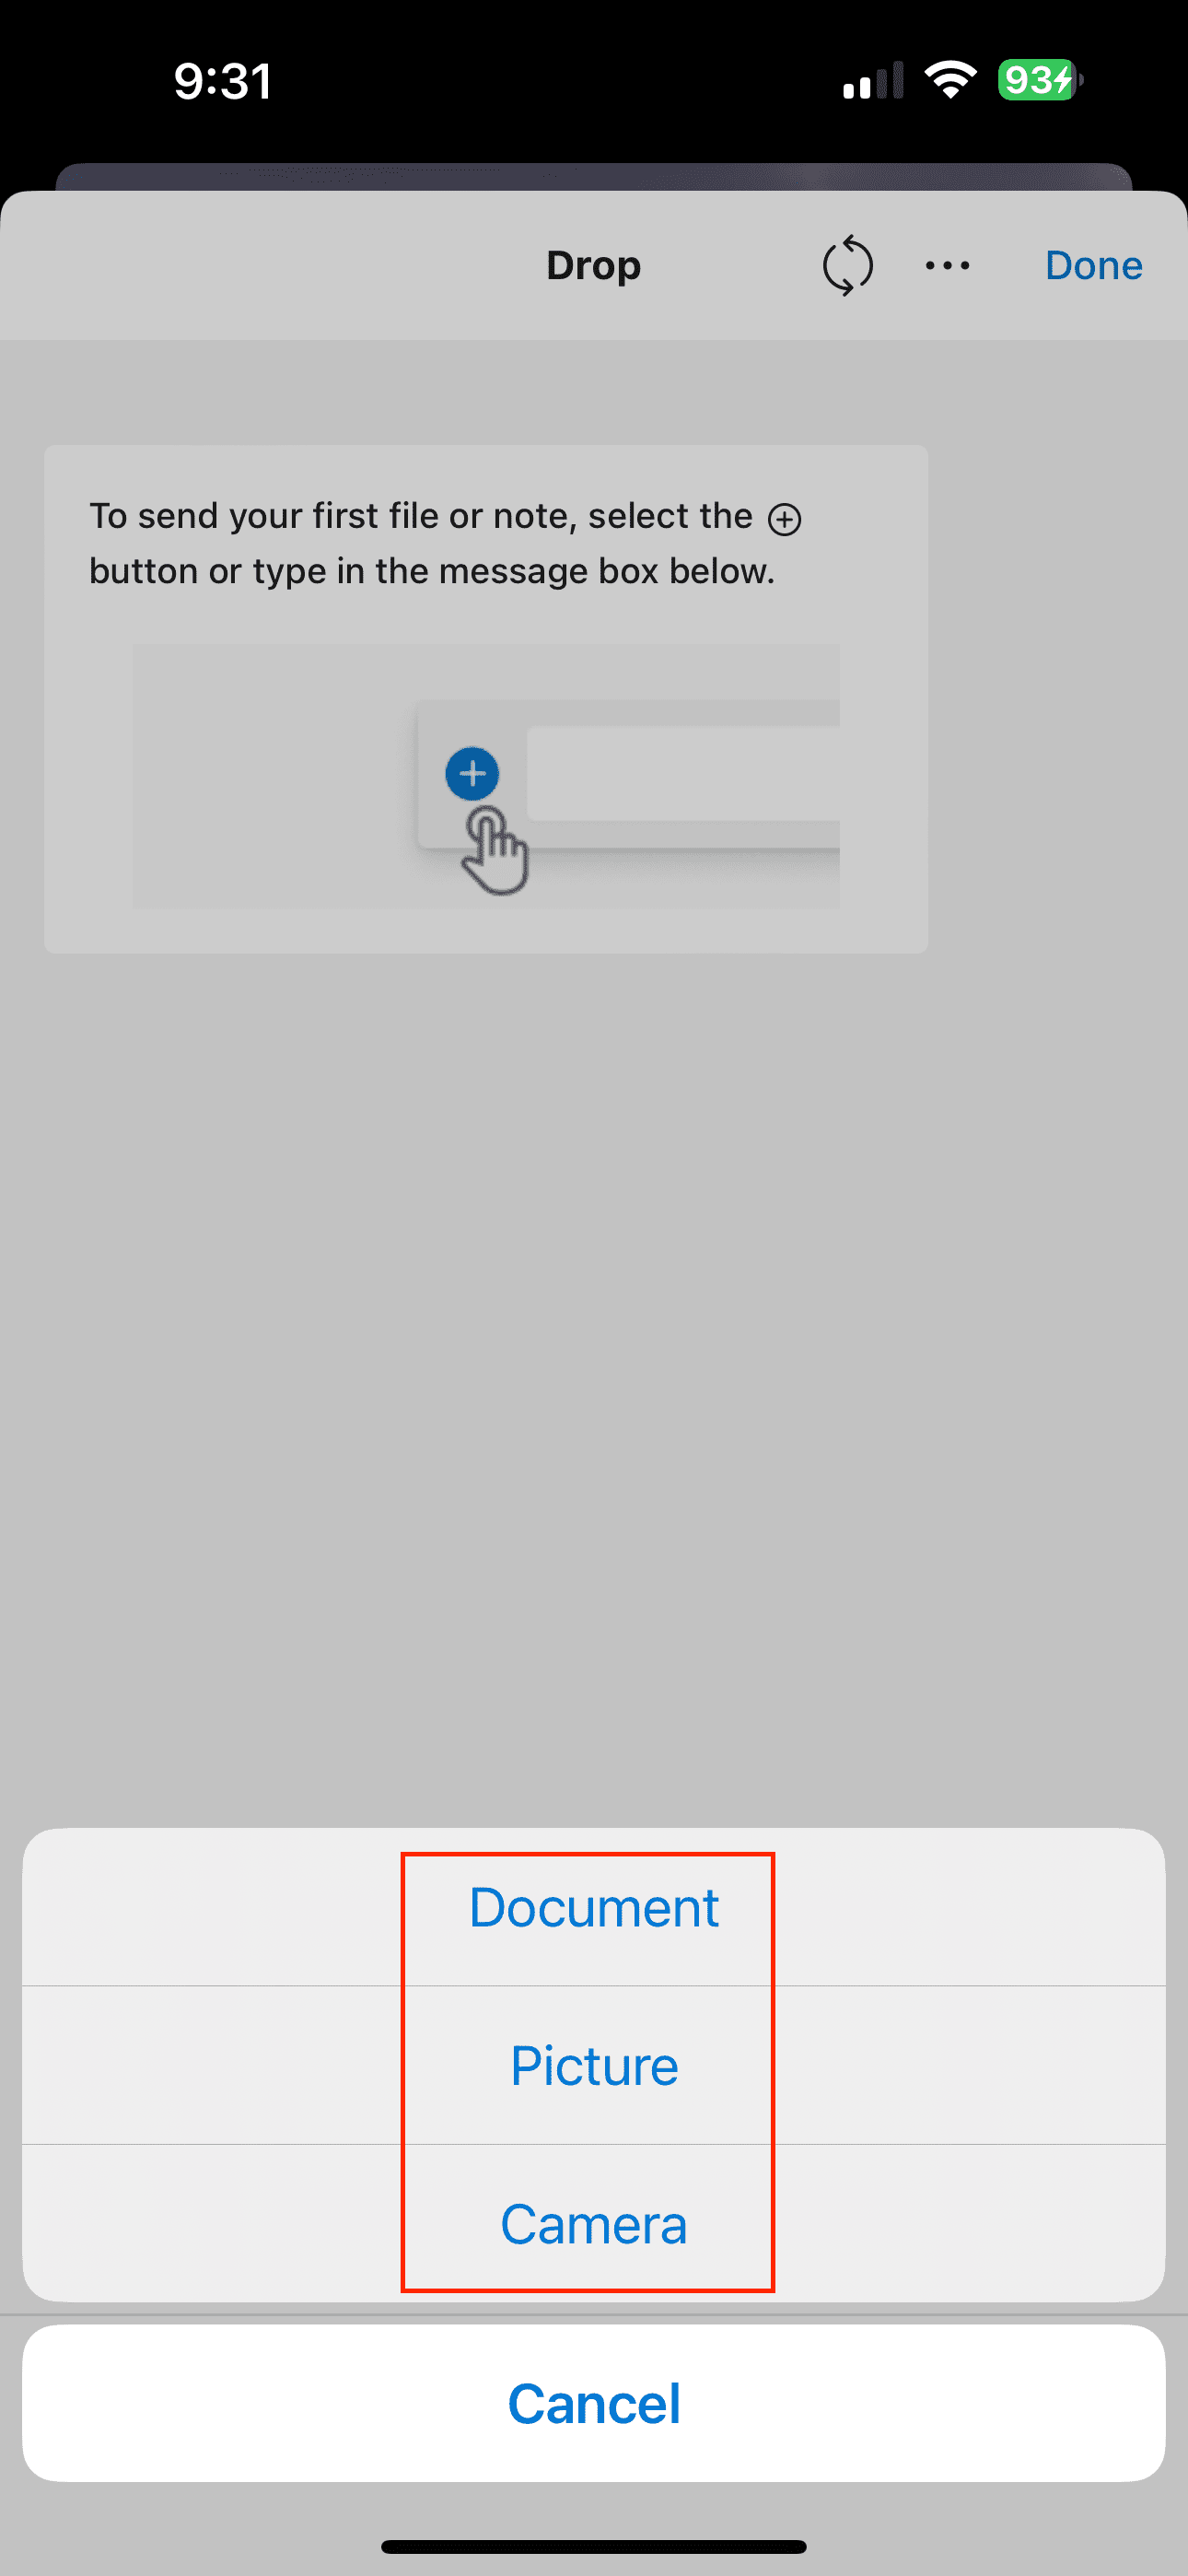
Select one of the following options:
Document
Picture
Camera
Locate and select the file that you want to share.
Once selected, tap the Open button in the top right corner.
After the file has been sent, go back to the Microsoft Edge app on your Windows PC.
In the toolbar on the left, click the Paper Airplane button. You can verify that this is the Drop feature by hovering your cursor over the different icons.
From the panel that appears, click the Start button.
Provided that everything is working properly, you should see the files from your iPhone appear in the Drop window on your Windows PC. However, if you tried sending the files and nothing appeared on your Windows PC, trying closing the app on both your iPhone and computer, then try sending the files again.
KDE Connect
KDE Connect is a multi-platform application that enables seamless communication and integration between different devices, such as smartphones, tablets, and computers. It is developed by KDE, a community that creates free and open-source software. KDE Connect allows users to share files, clipboard content, and notifications between devices over a local network, without the need for internet connectivity. KDE Connect uses a local network to establish a connection between devices. It employs various DBus interfaces and relies on end-to-end encryption to ensure secure data transfer. The application does not send any data through the internet or to third parties.
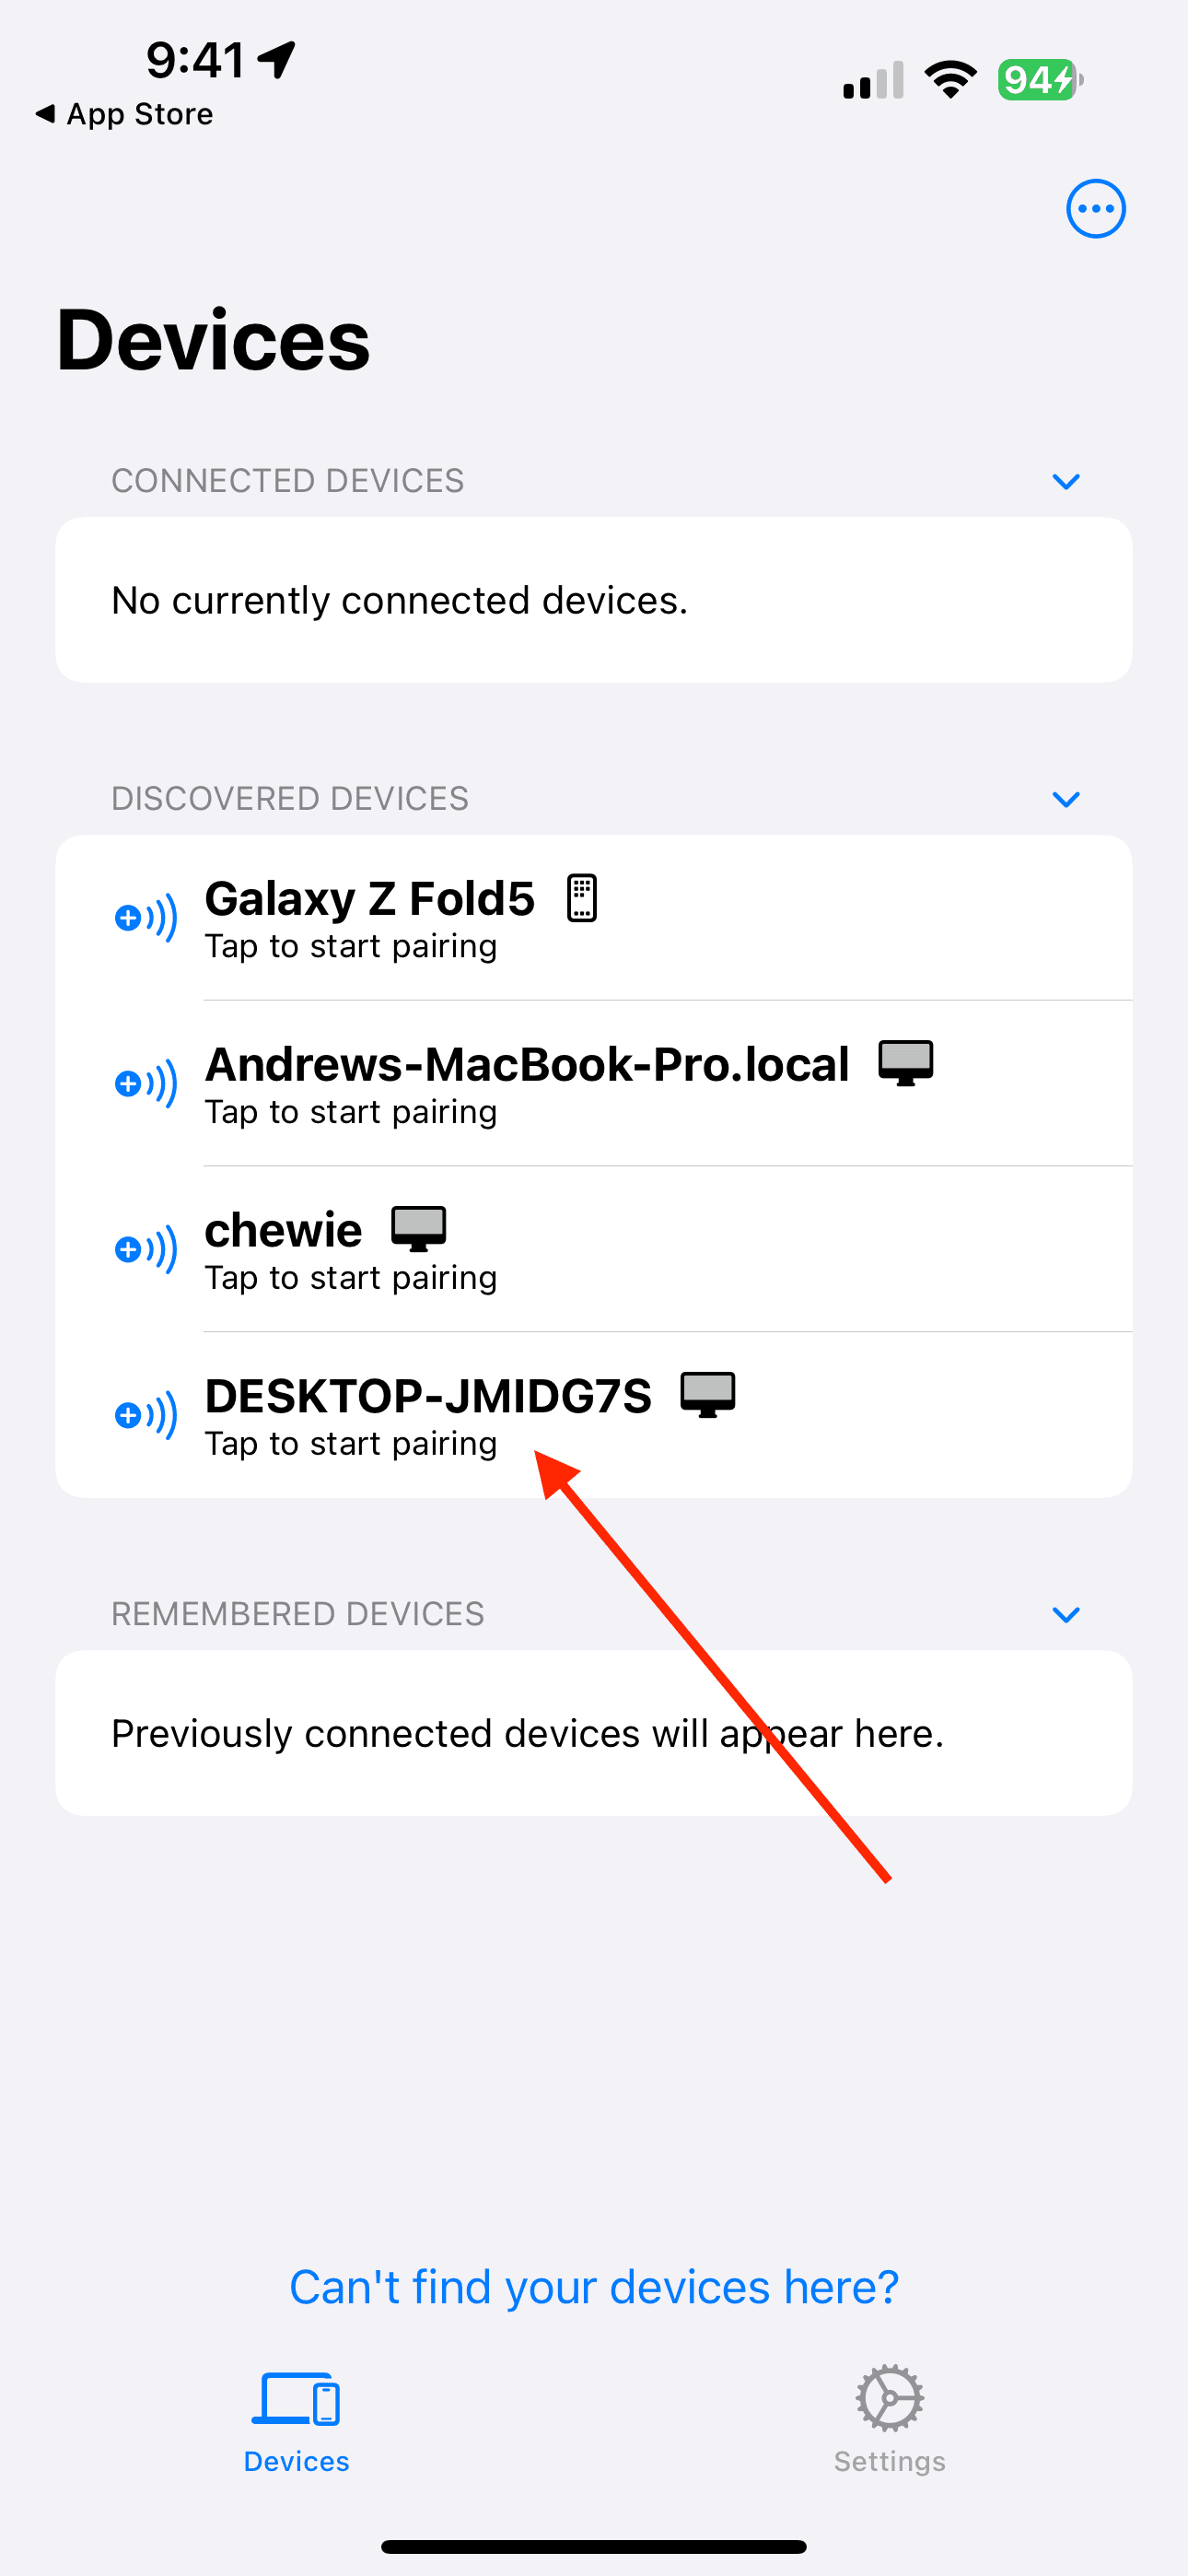
The biggest “catch” is that you’ll need to first make sure that it’s downloaded and installed on both your iPhone and Windows PC. That being said, here’s how you can use KDE Connect to AirDrop from iPhone to Windows:
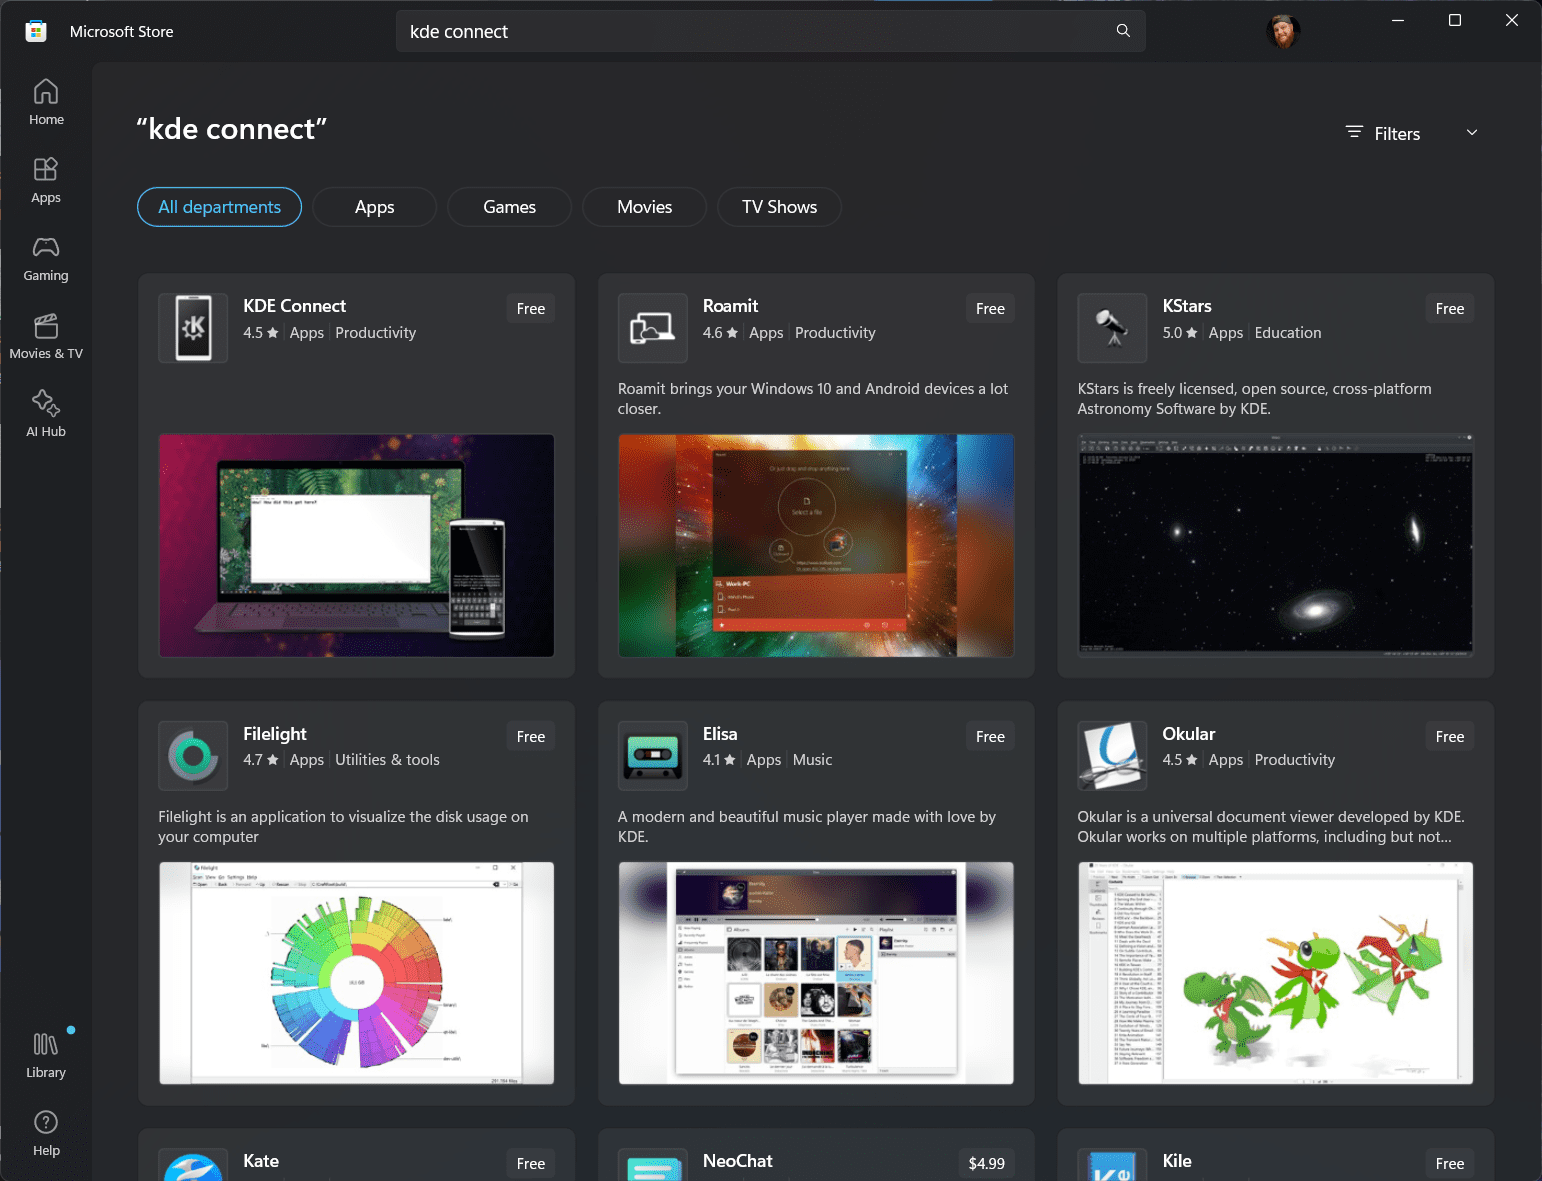
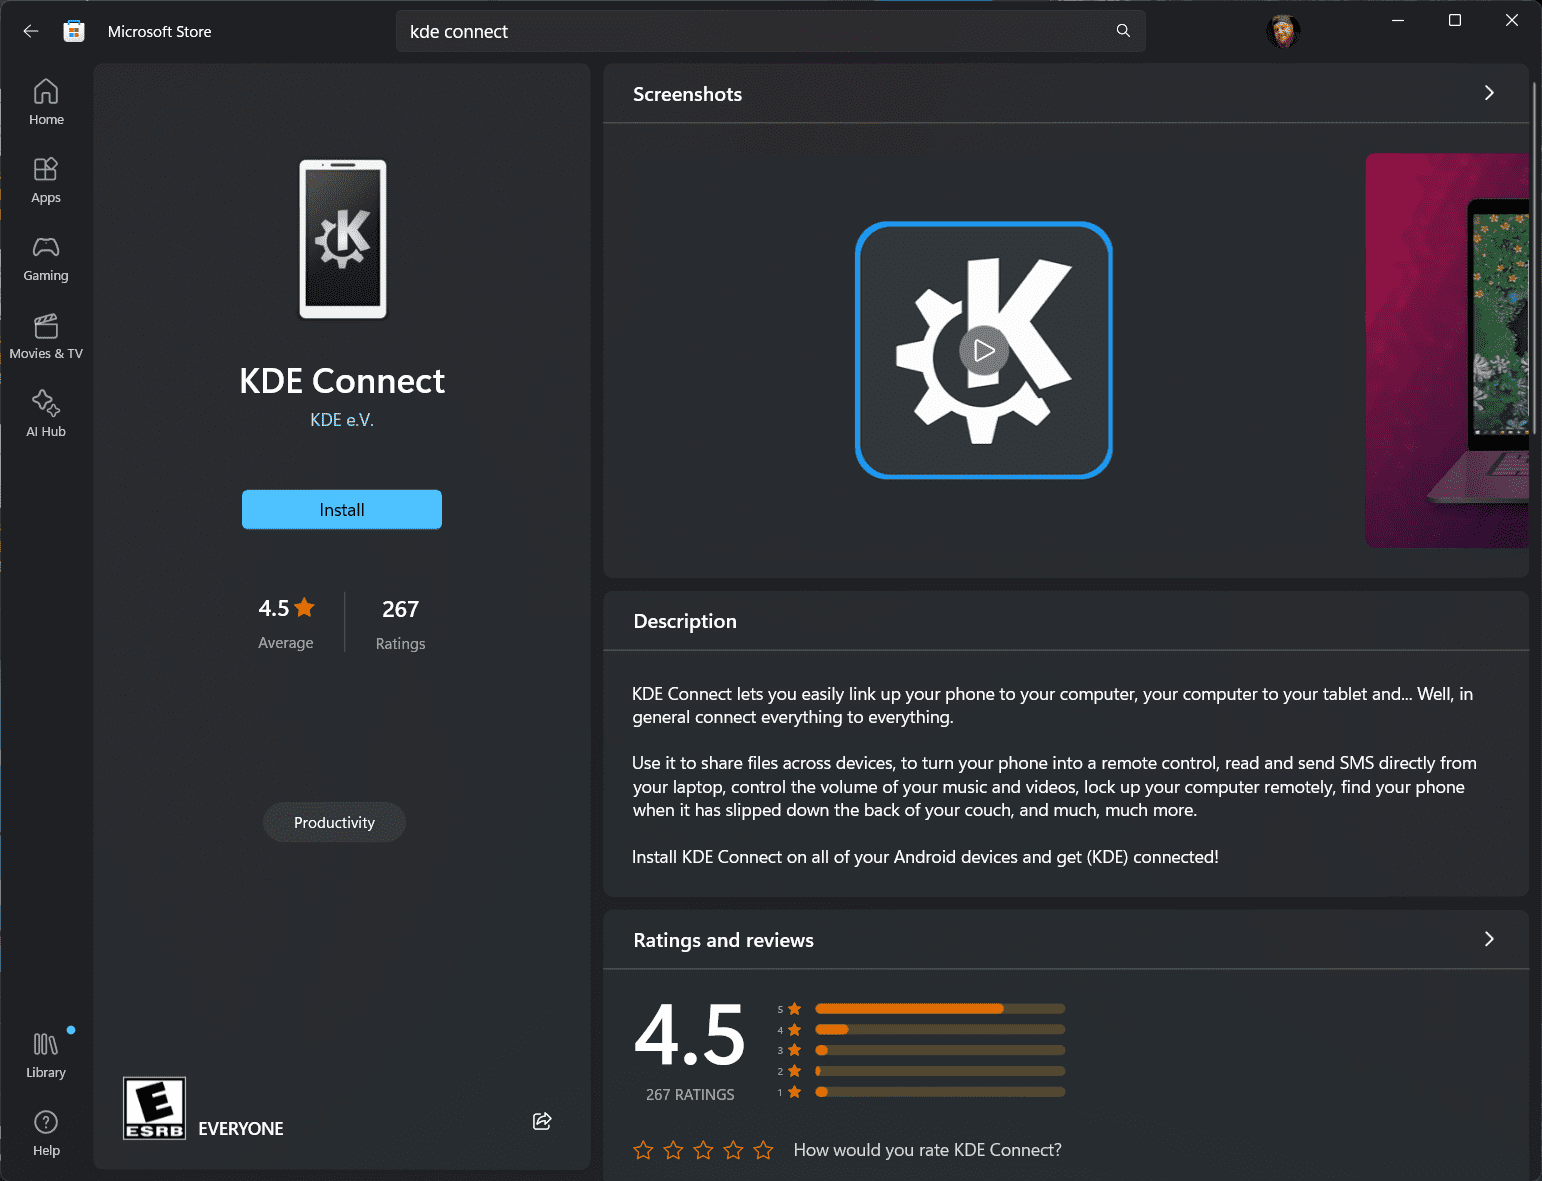
From your Windows PC, open the Microsoft Store app.
Search for KDE Connect.
Select the first option that appears in the top left corner.
Provided that the application properly installed on both your Windows PC and iPhone, you should see the device appear from within the app, regardless of which one you are actively using.
From your iPhone, tap the name of your Windows PC under the Discovered Devices section.
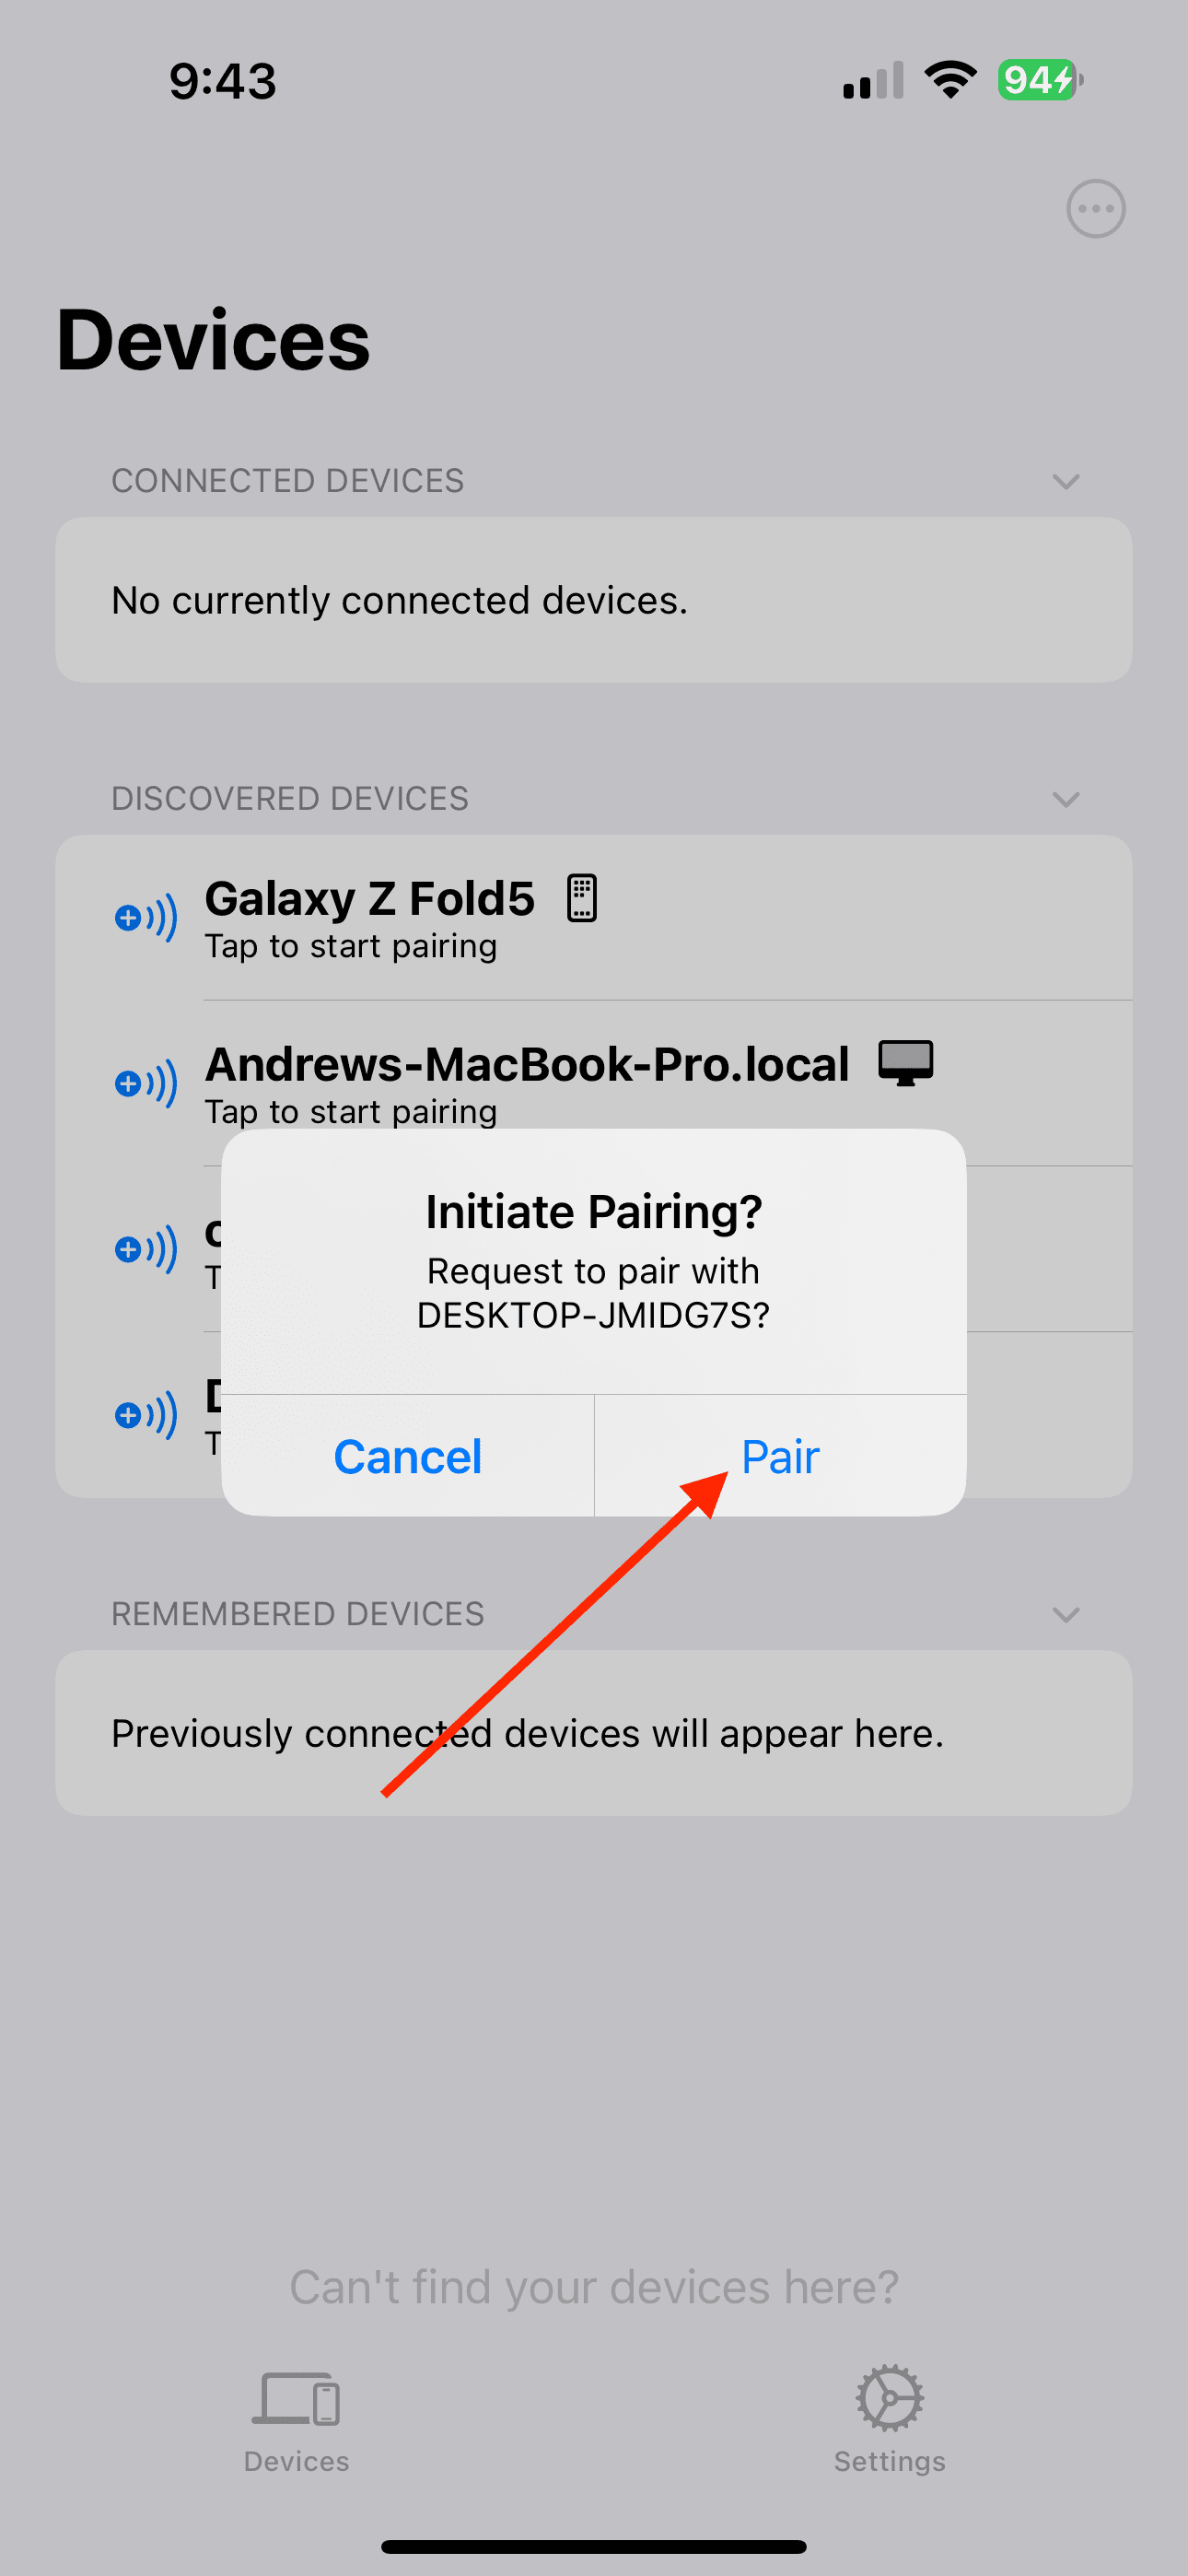
When prompted, tap the Pair button.
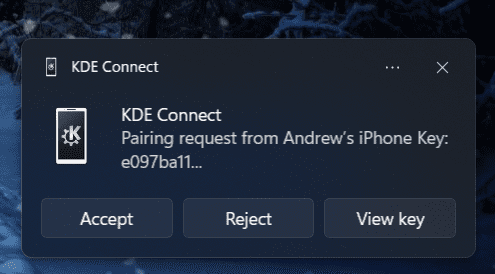
From your Windows PC, tap the Accept button when the notification appears.
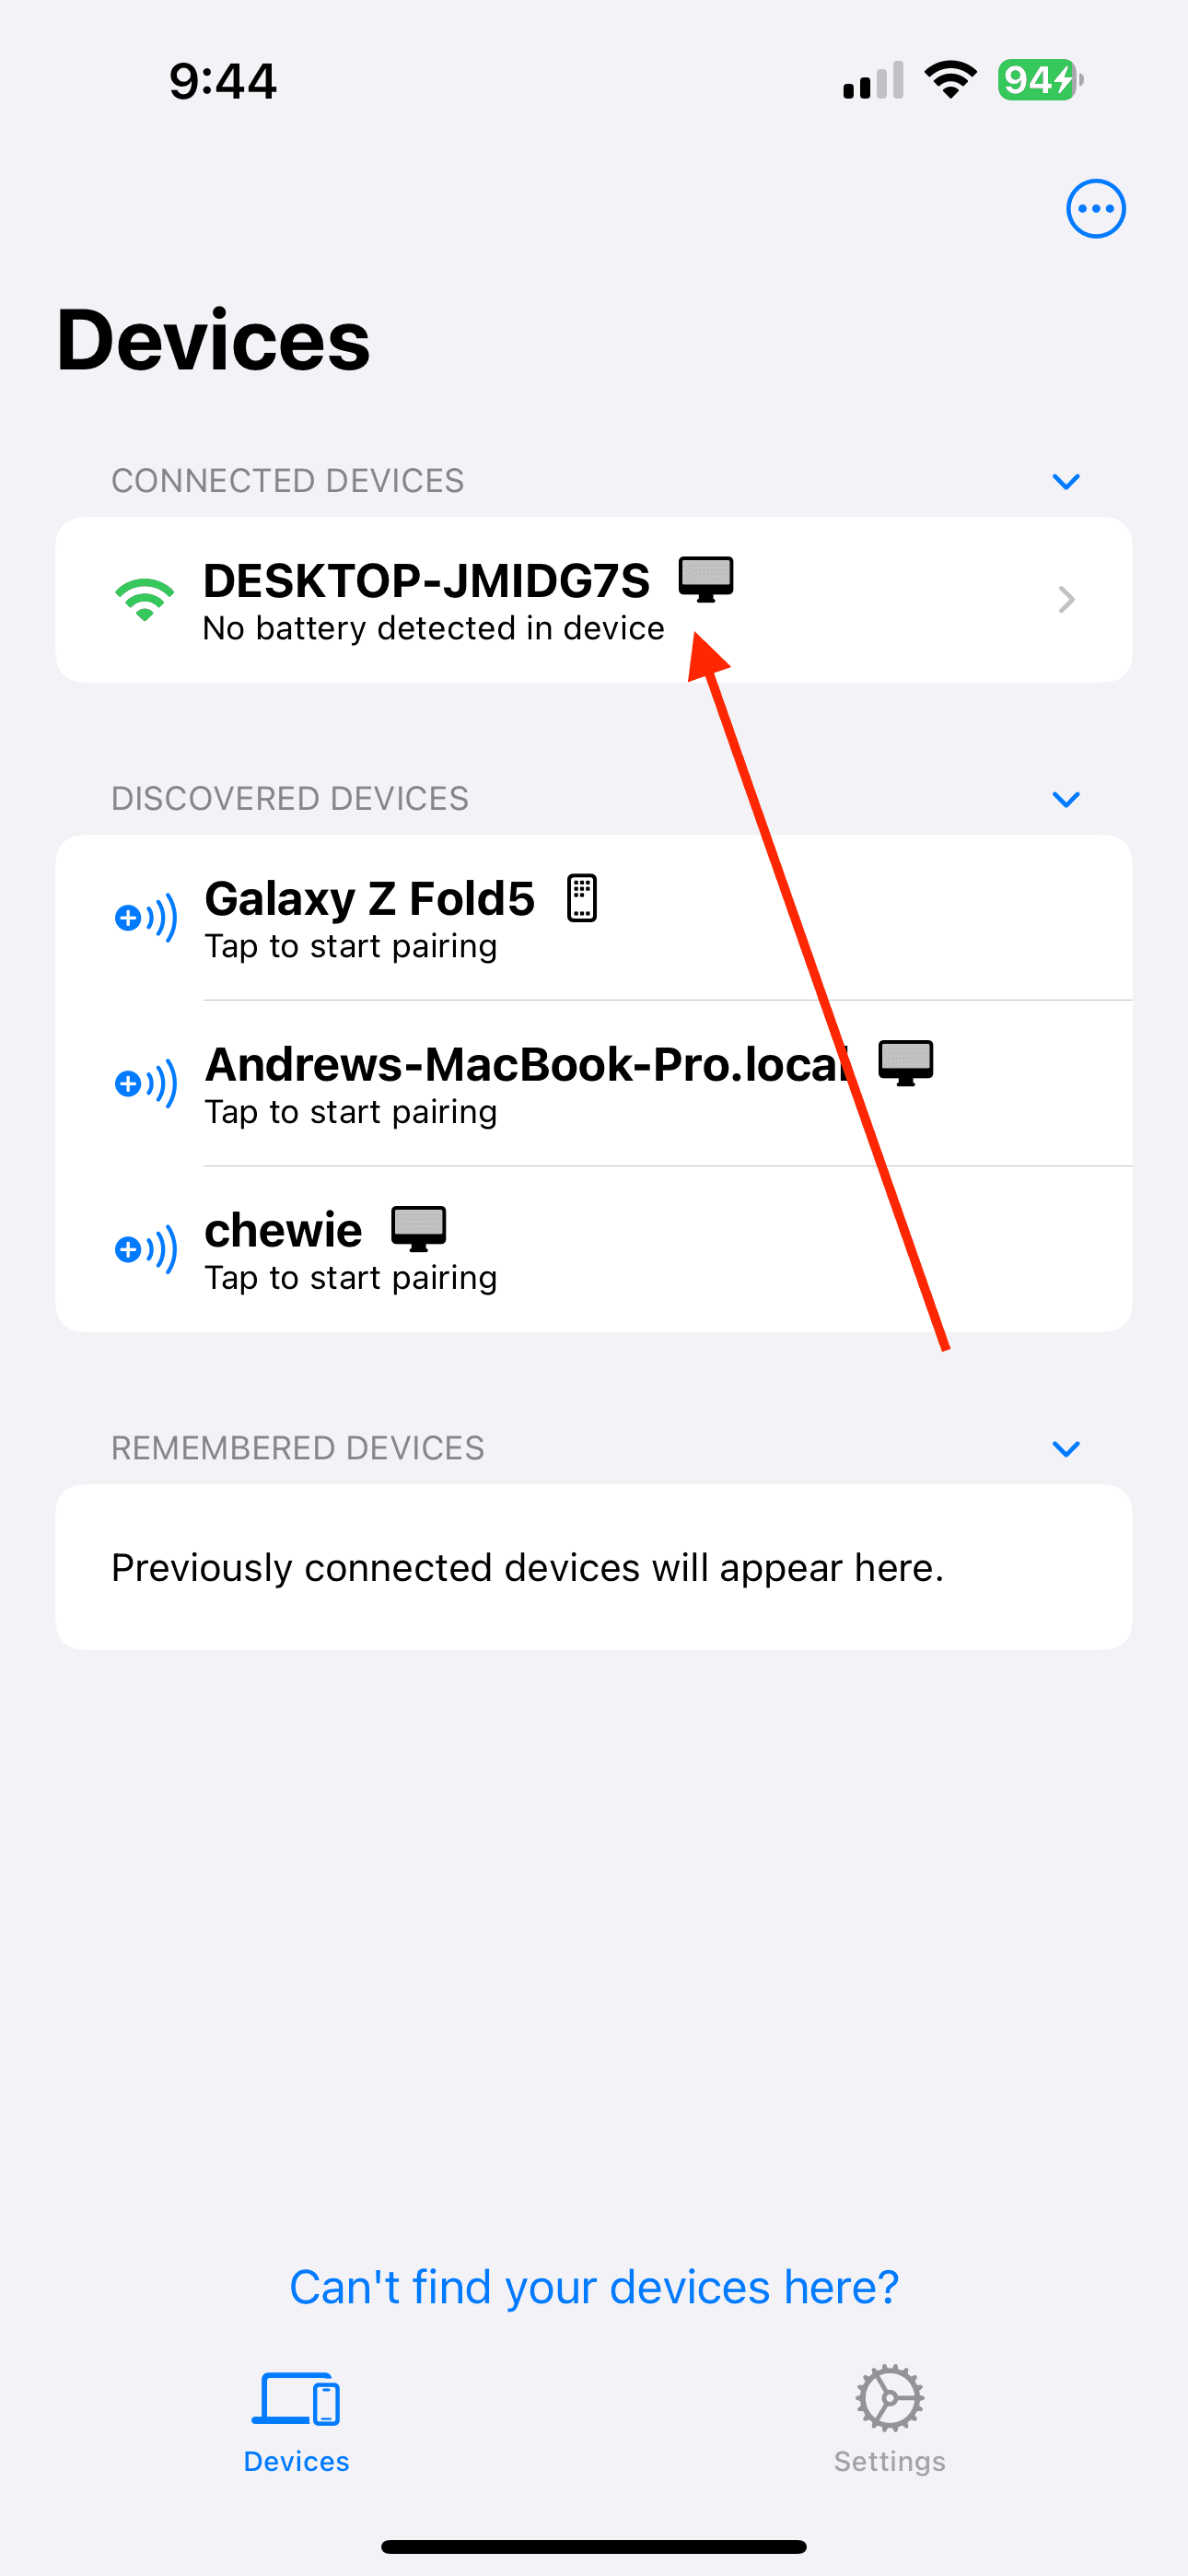
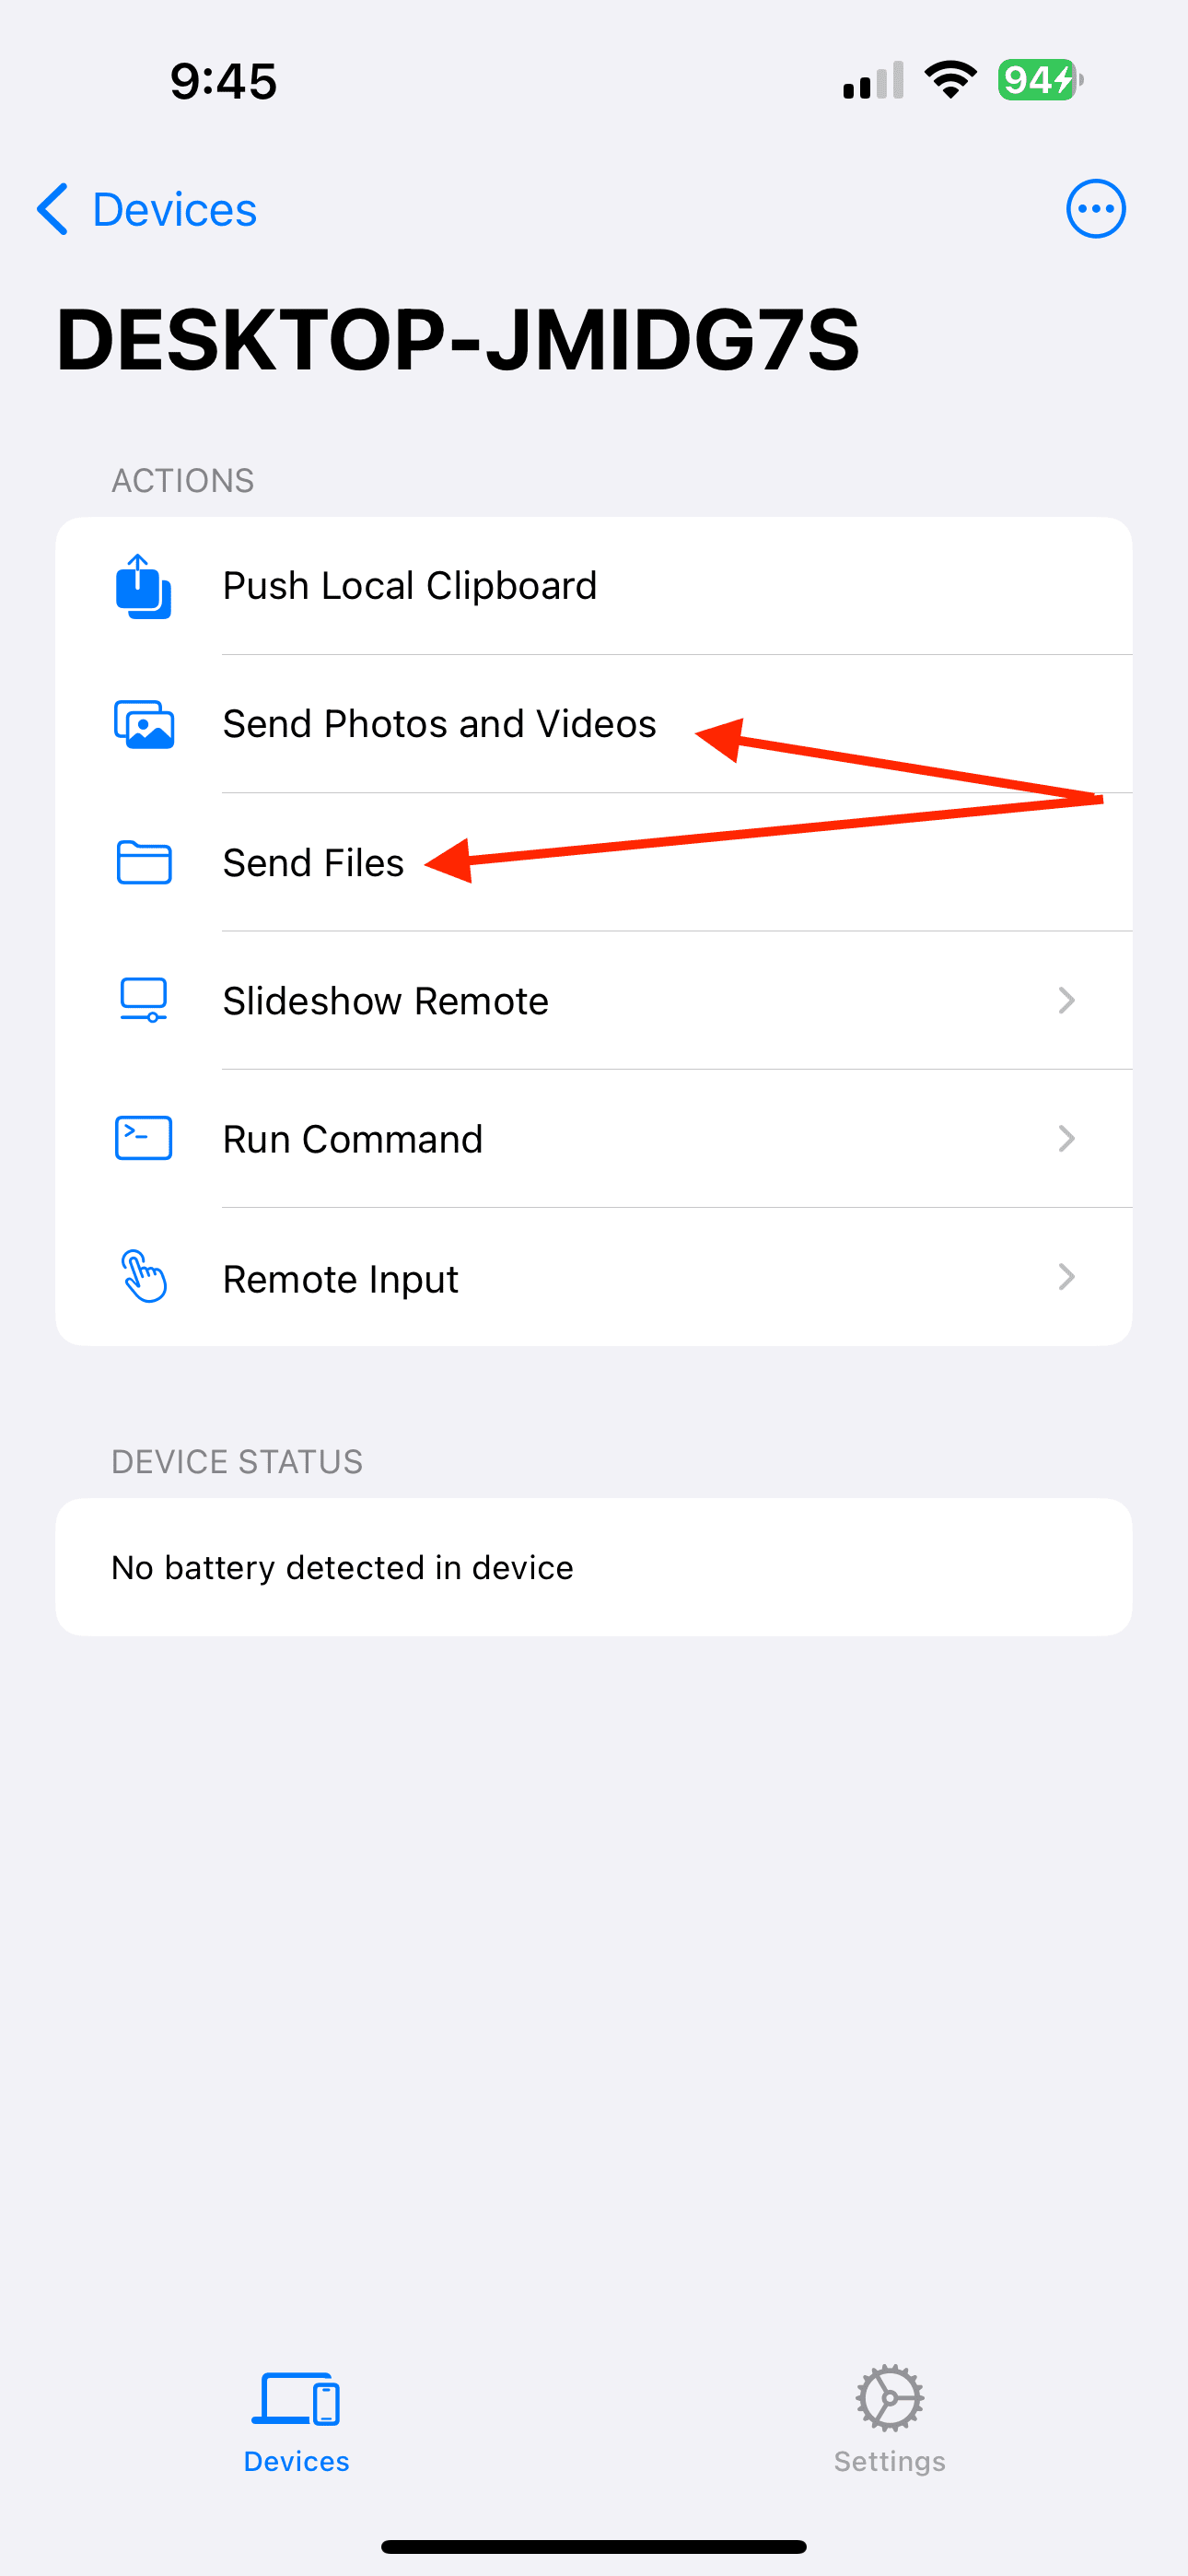
Once connected, tap the name of your PC under the Connected Devices section from your iPhone.
Tap one of the following options under the Actions section:
Send Photos and Videos
Send Files
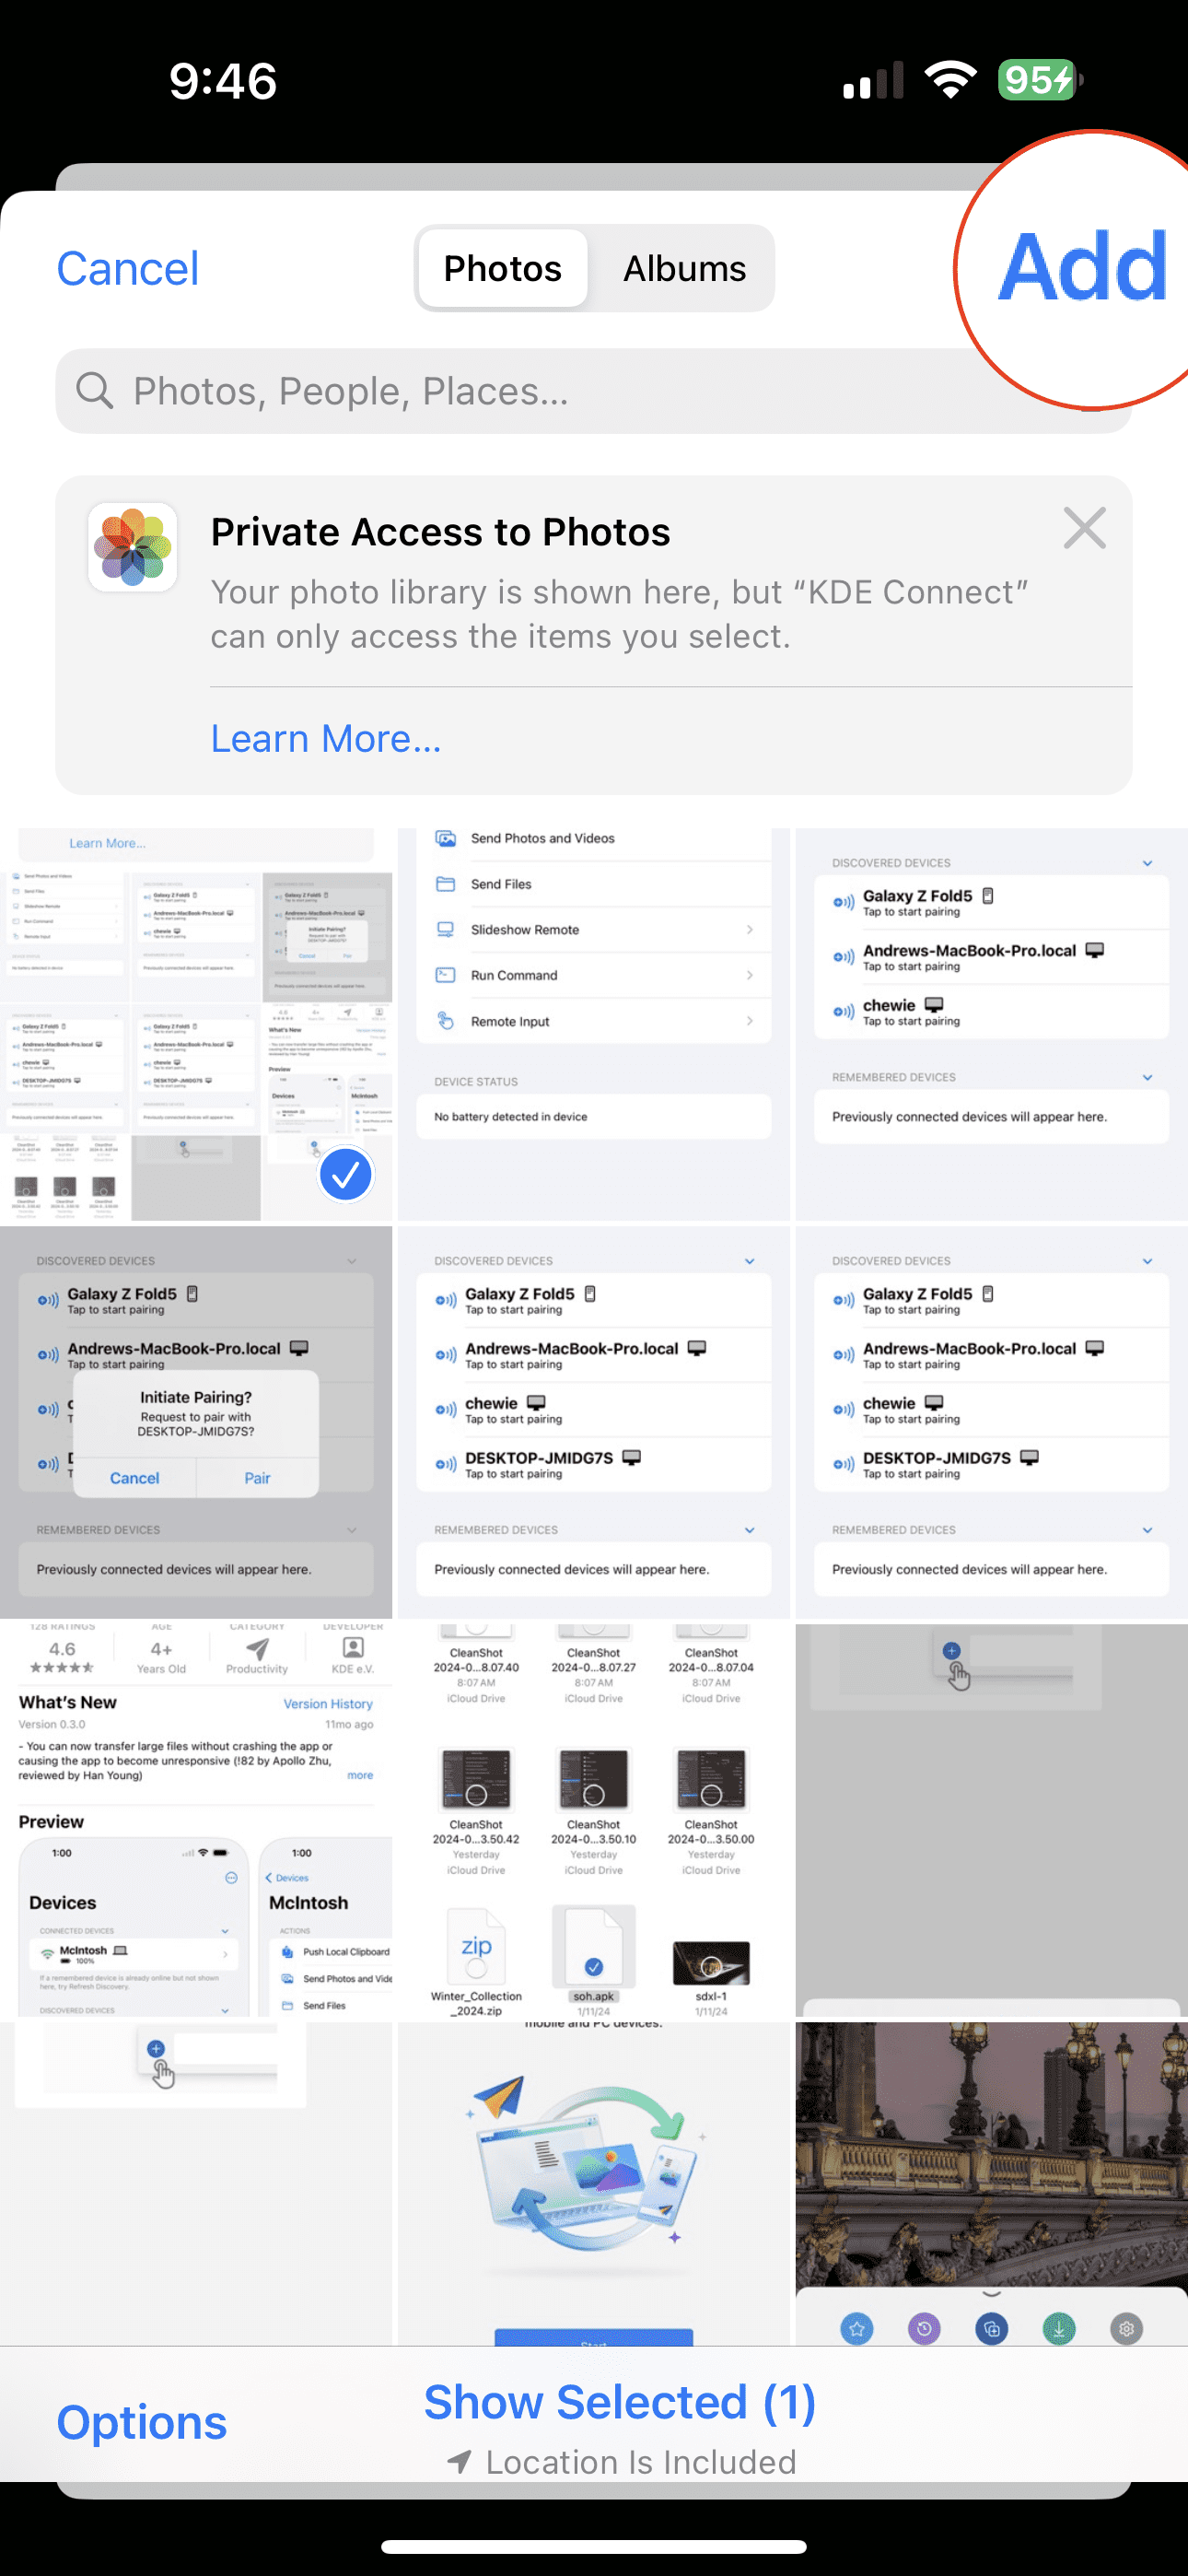
Locate and select the photos, videos, or files that you want to send.
Tap the Add button in the top right corner.
From your Windows PC, open the File Explorer app.
Navigate to your Downloads folder.
As is the case with the majority of these solutions, any files transferred between devices will be saved directly to the Downloads folder on your Windows PC.
How to AirDrop to PC: More Alternatives
There are a few other solutions available for those trying to AirDrop from iPhone to Windows. These aren’t quite as well-known but work extremely well compared to some of the alternatives that were previously made available.
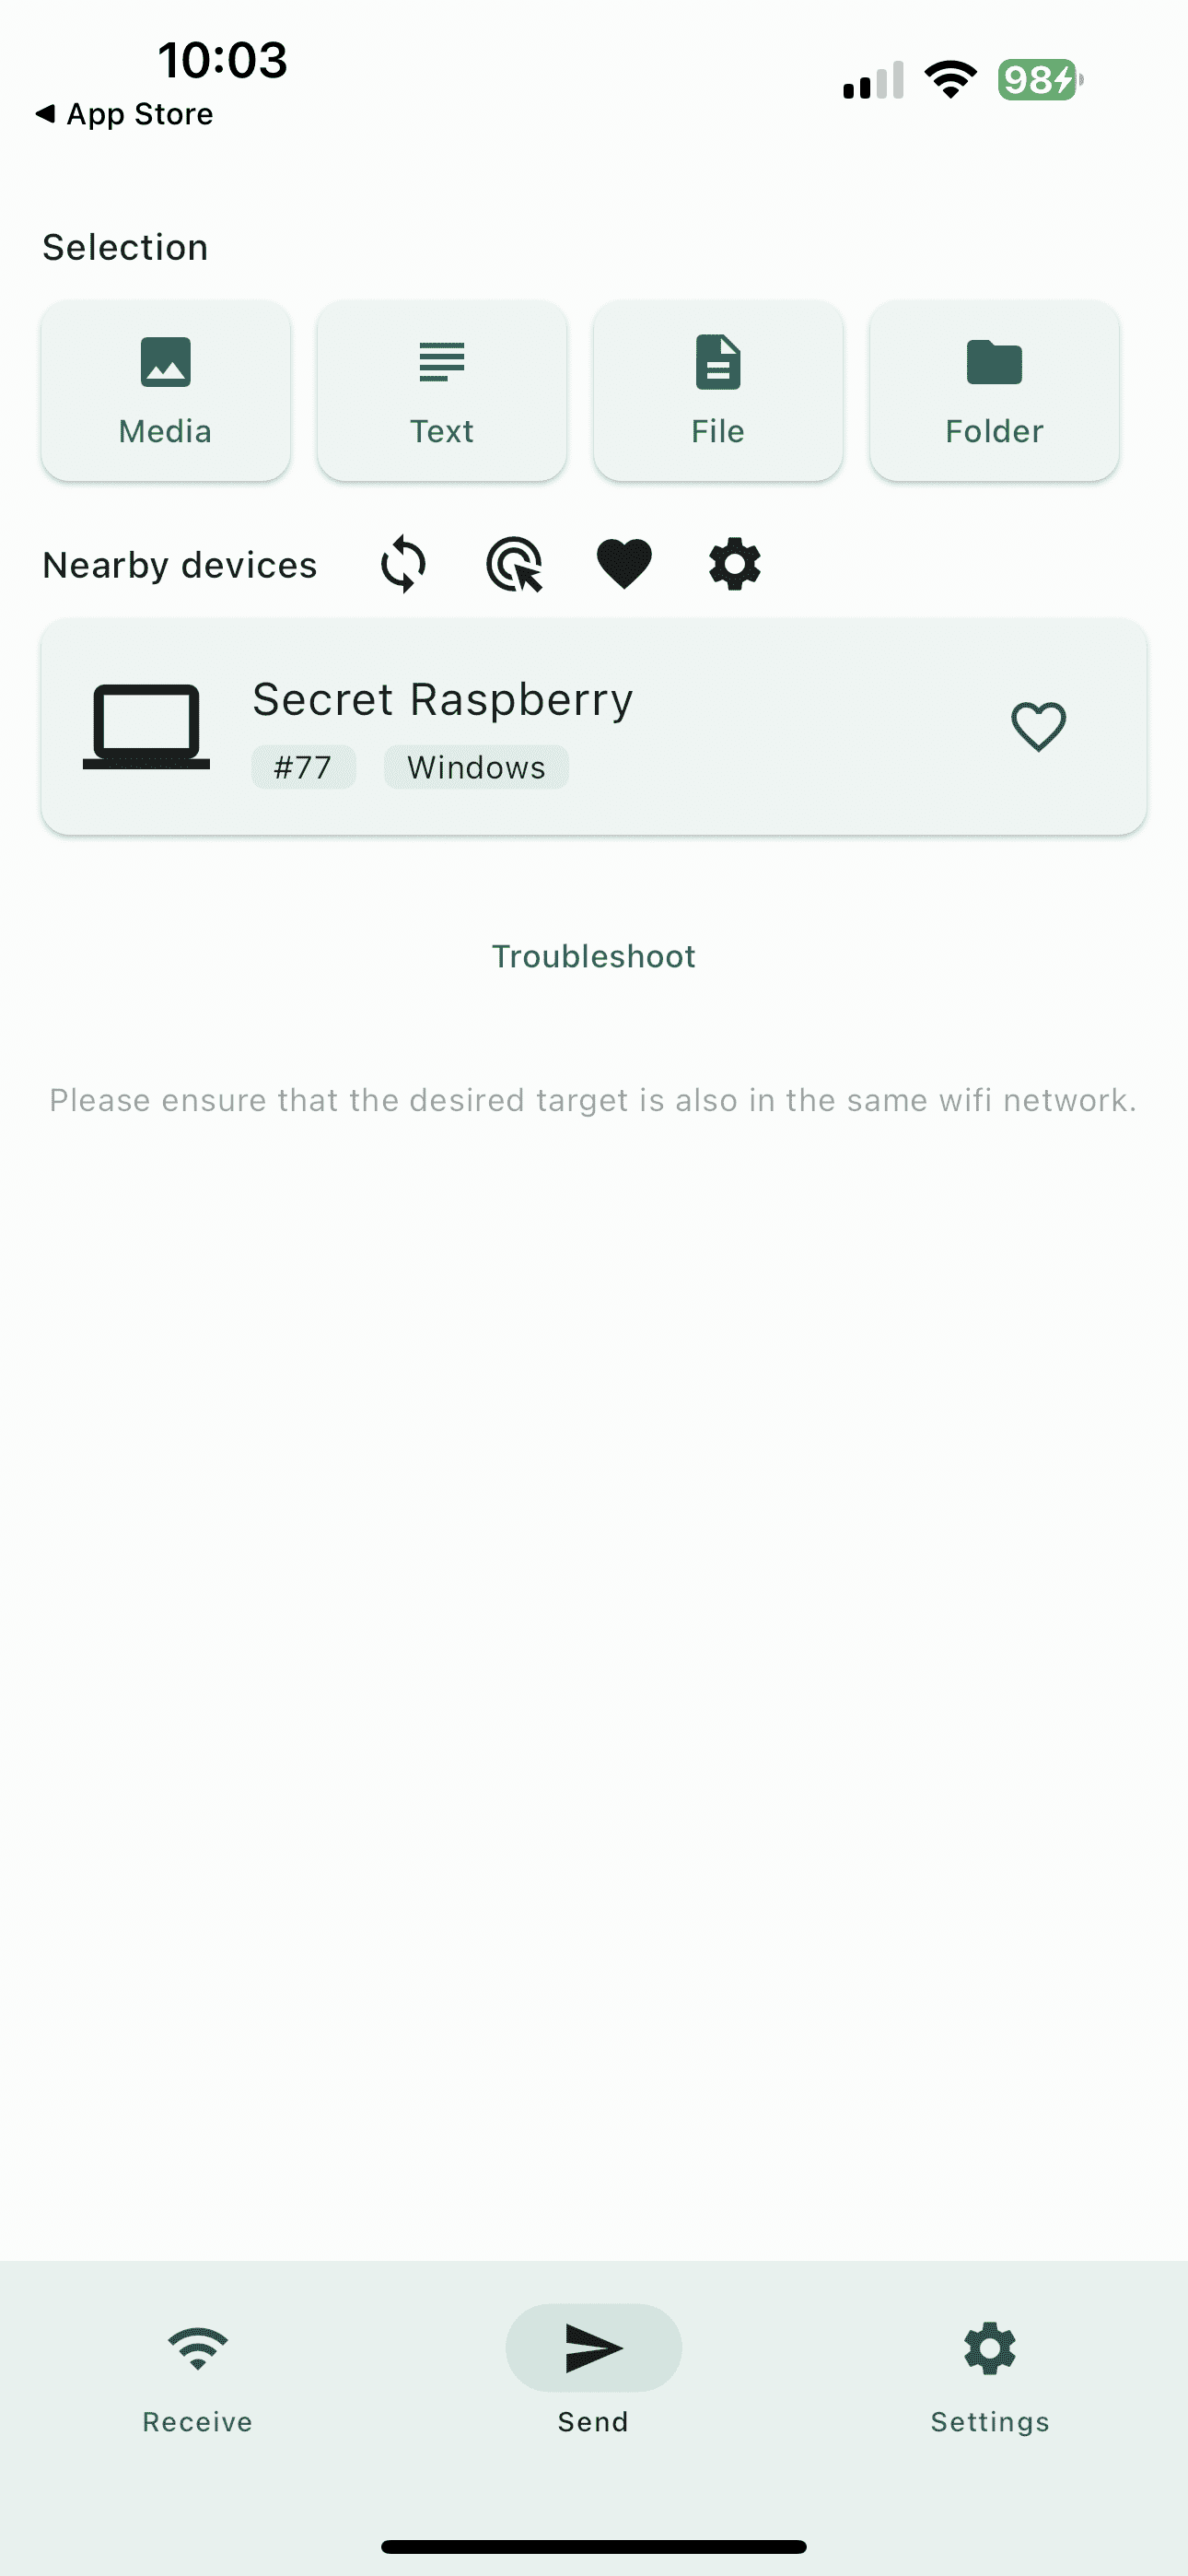
Local Send
LocalSend is a free, open-source, cross-platform application that allows you to securely share files and messages with nearby devices over your local network without needing an internet connection. This app is an alternative to Apple’s AirDrop, and it supports various platforms including Mac, Windows, iOS, and Android. The app doesn’t require an internet connection or any third-party servers to function. It uses its custom LocalSend Protocol and HTTPS encryption for secure communication within the local network.
It’s also pretty darn useful, making it extremely easy to quickly send files between your various devices. The best way to think about LocalSend is as an alternative to KDE Connect, but with a primary focus on transferring files back and forth.
Install the app on your Windows PC and iPhone.
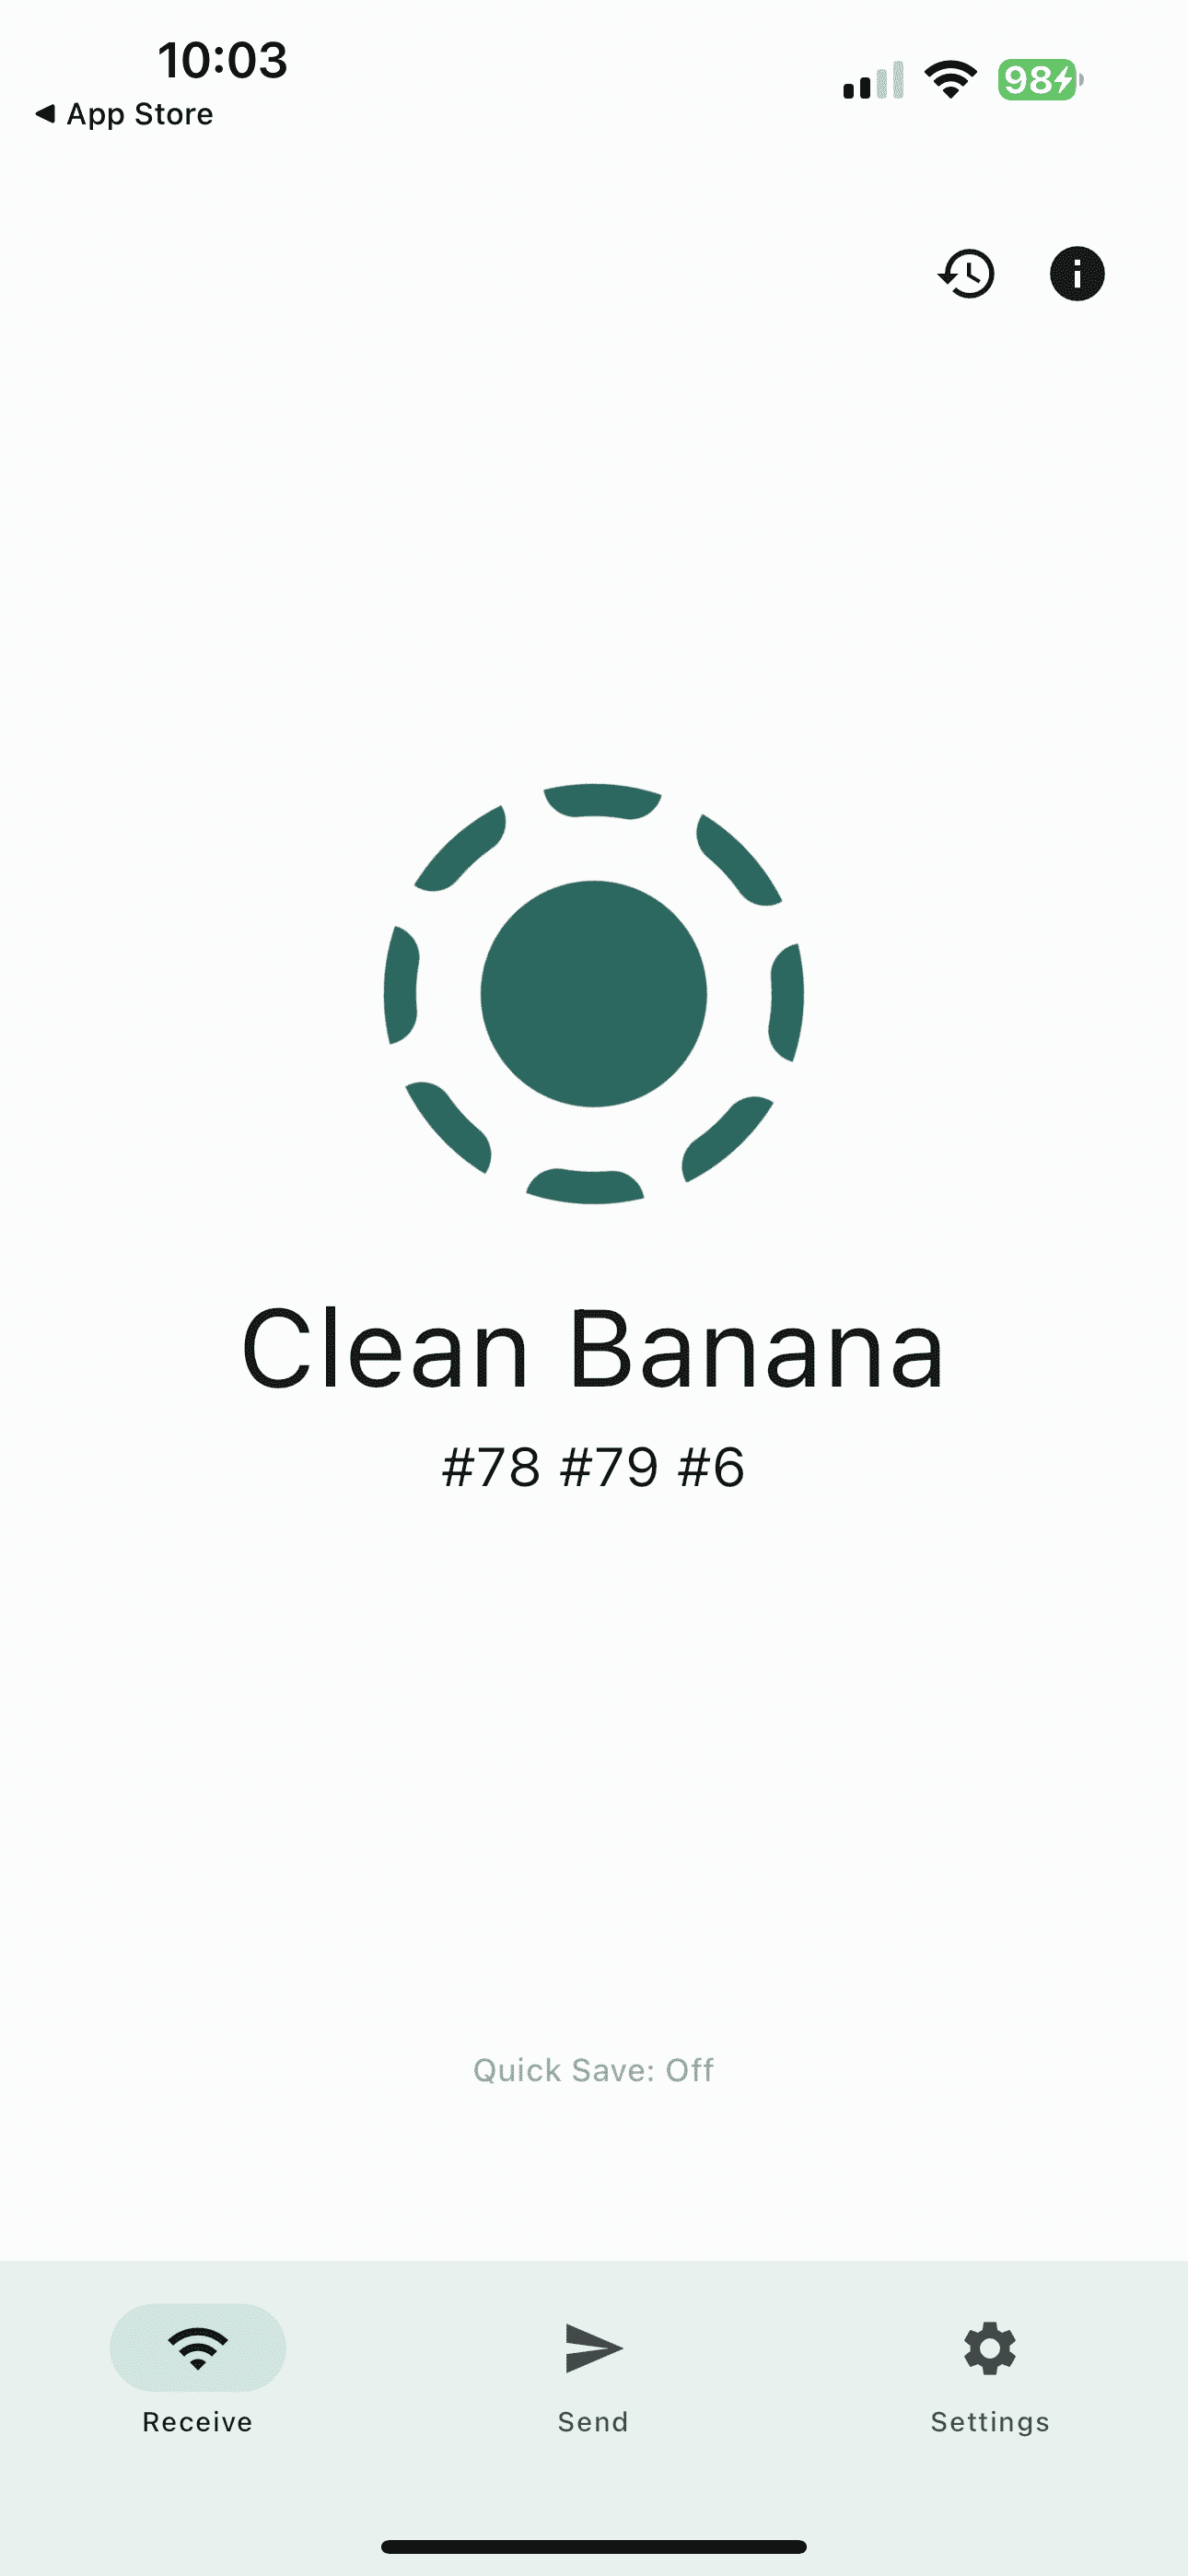
Open the app on both devices.
From your iPhone, tap the Send button in the bottom toolbar.
Tap one of the following options at the top of the screen:
Media
Text
File
Folder
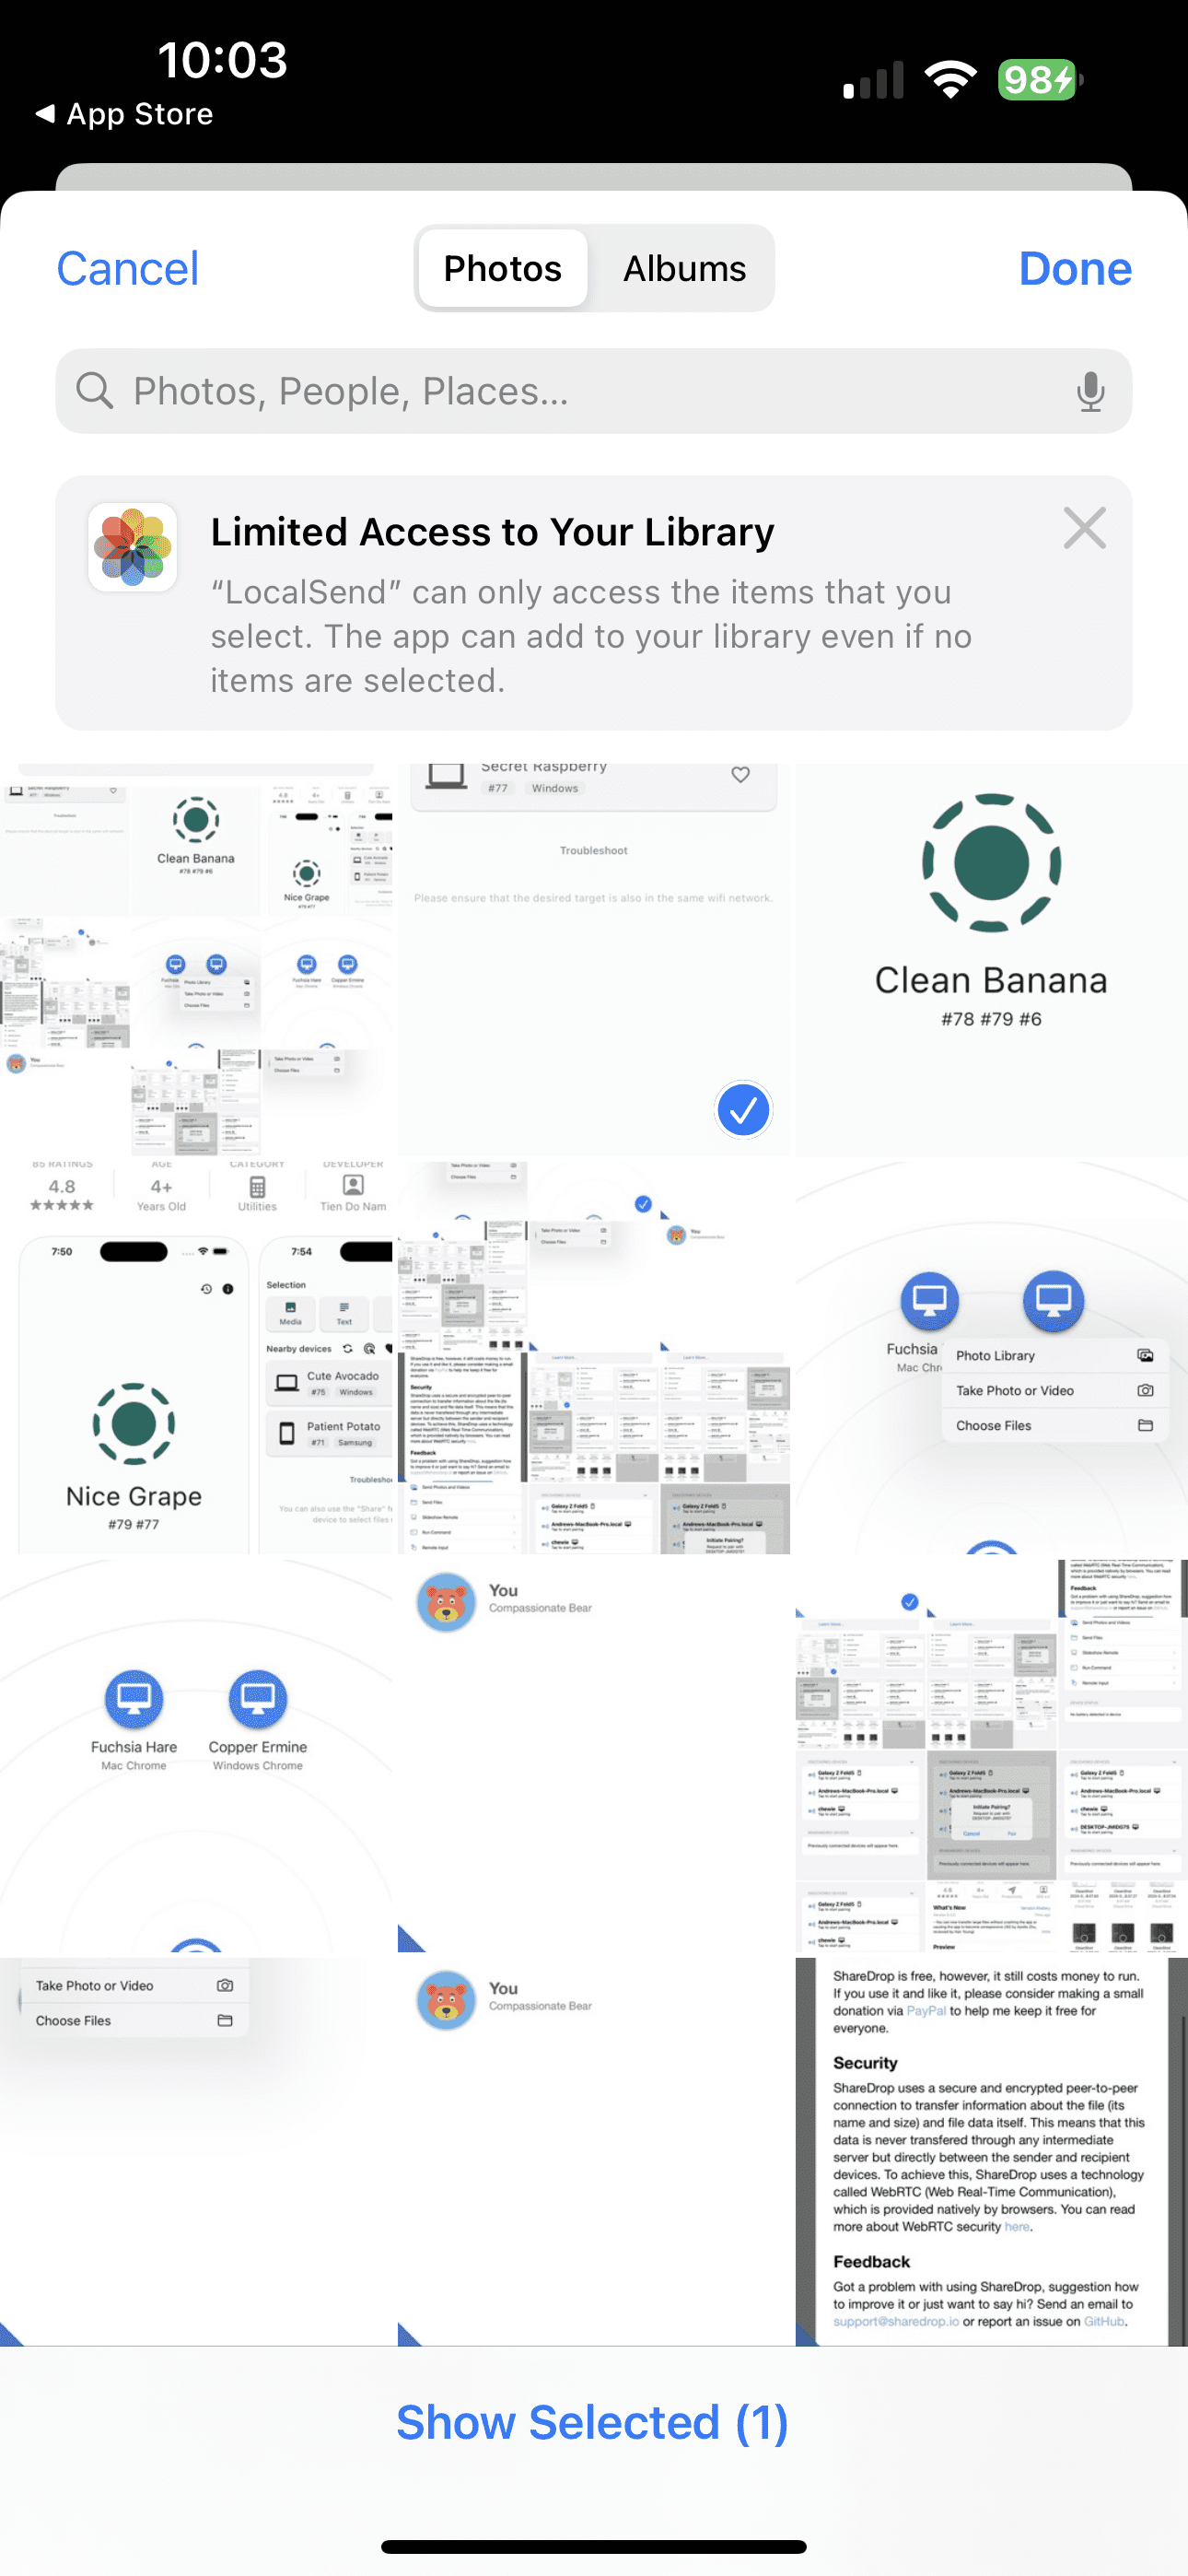
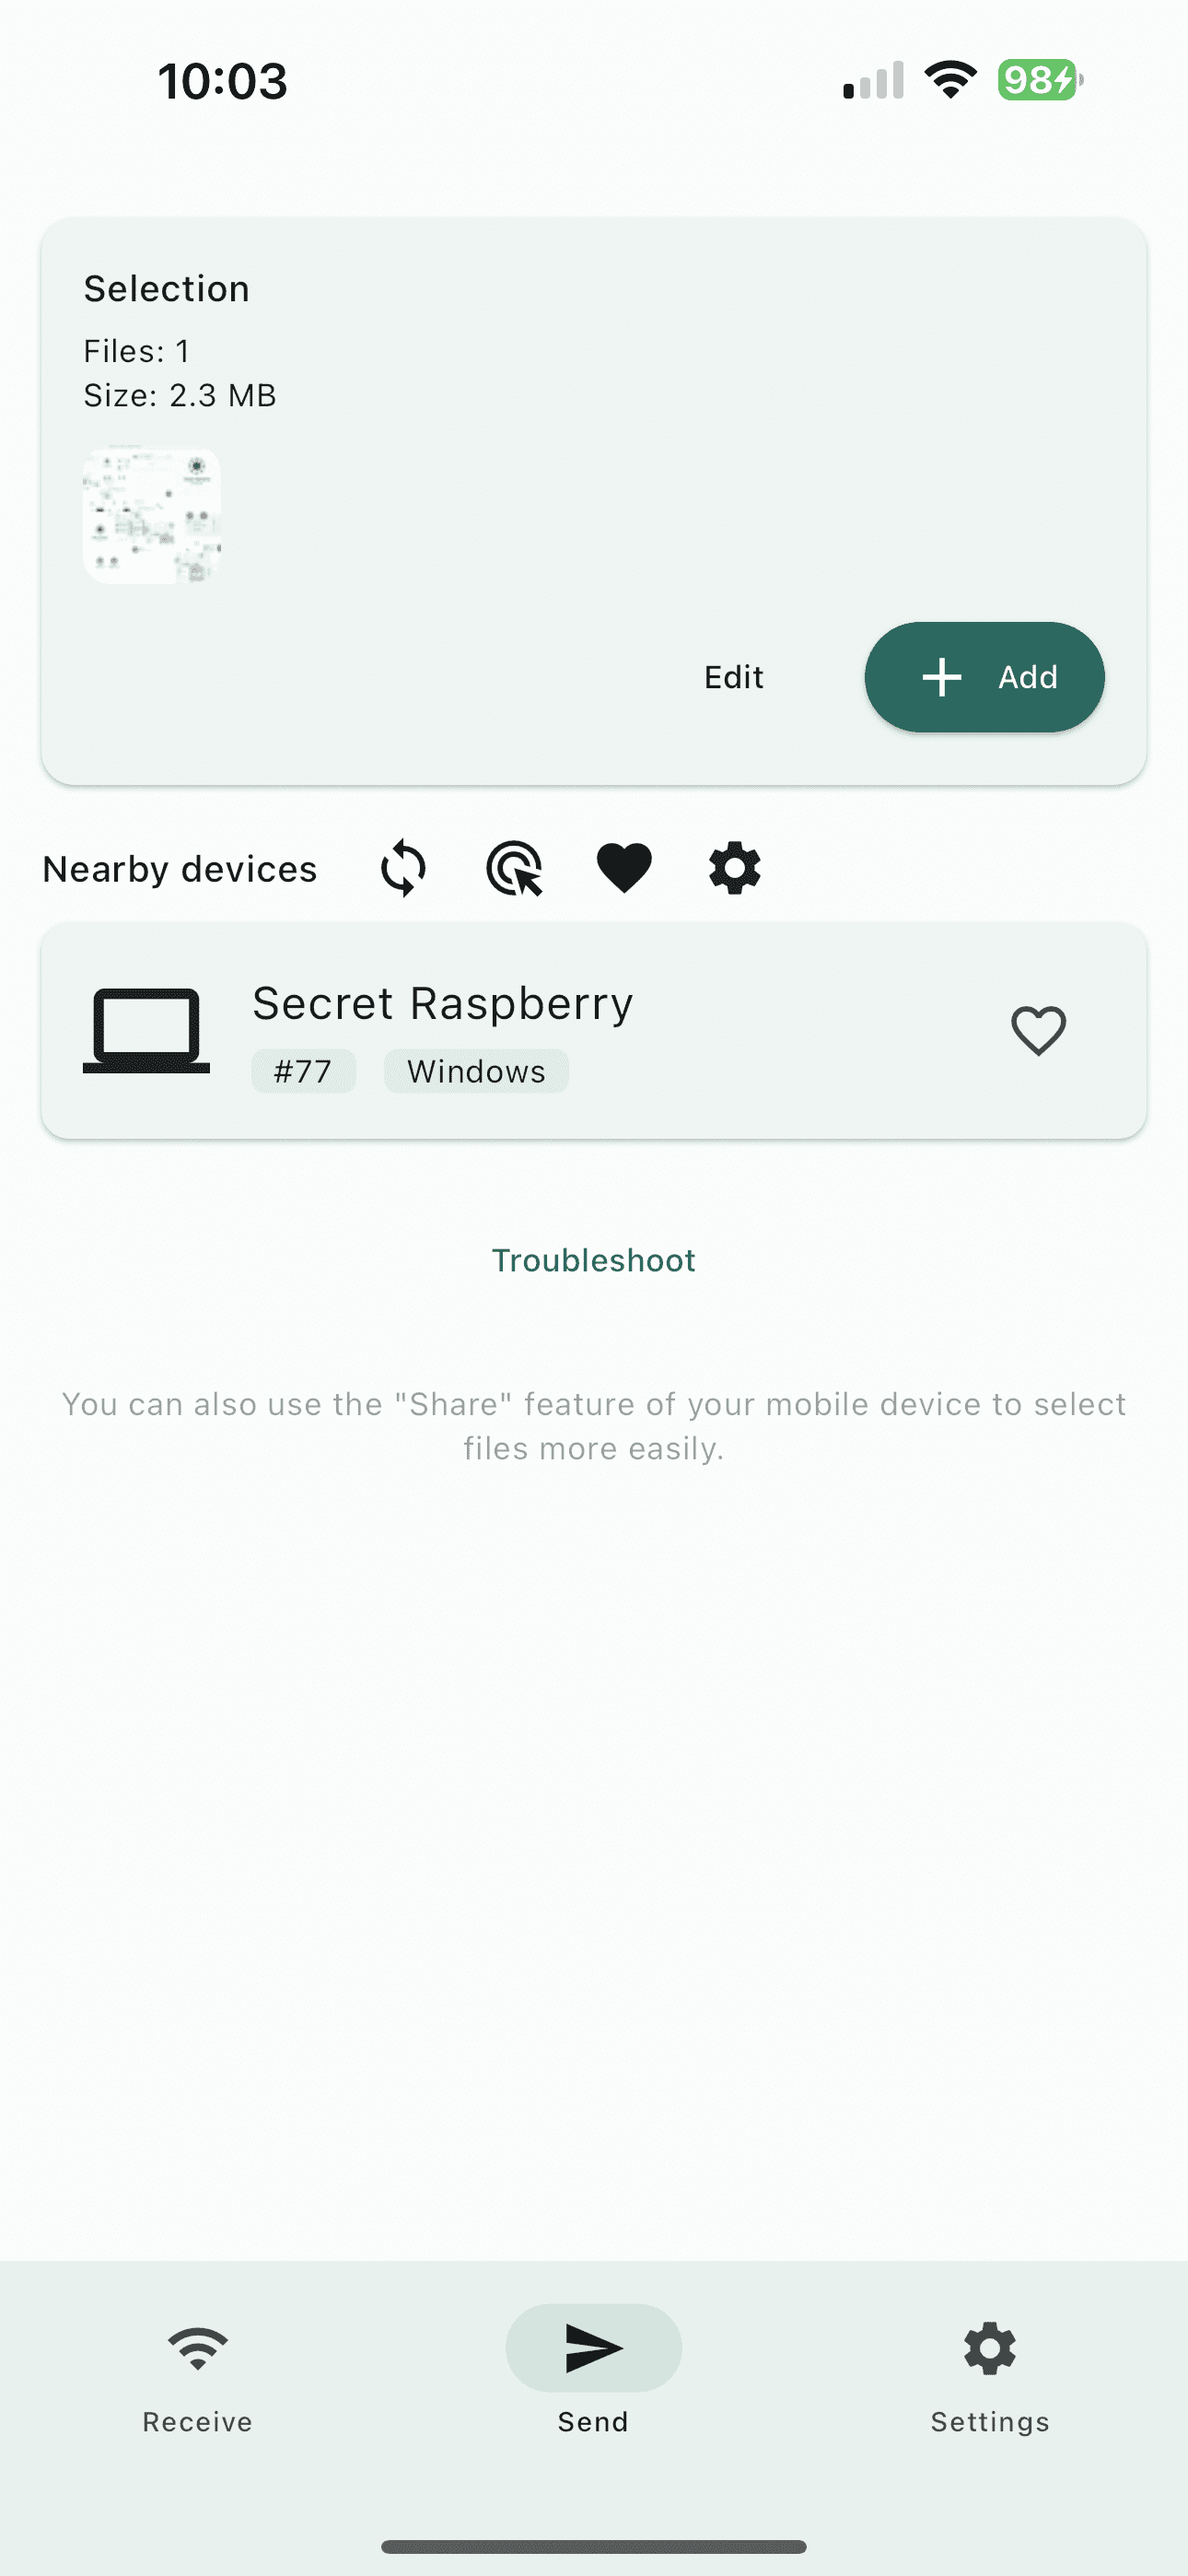
Locate and select the file that you want to send to your PC.
Tap the Done button in the top right corner.
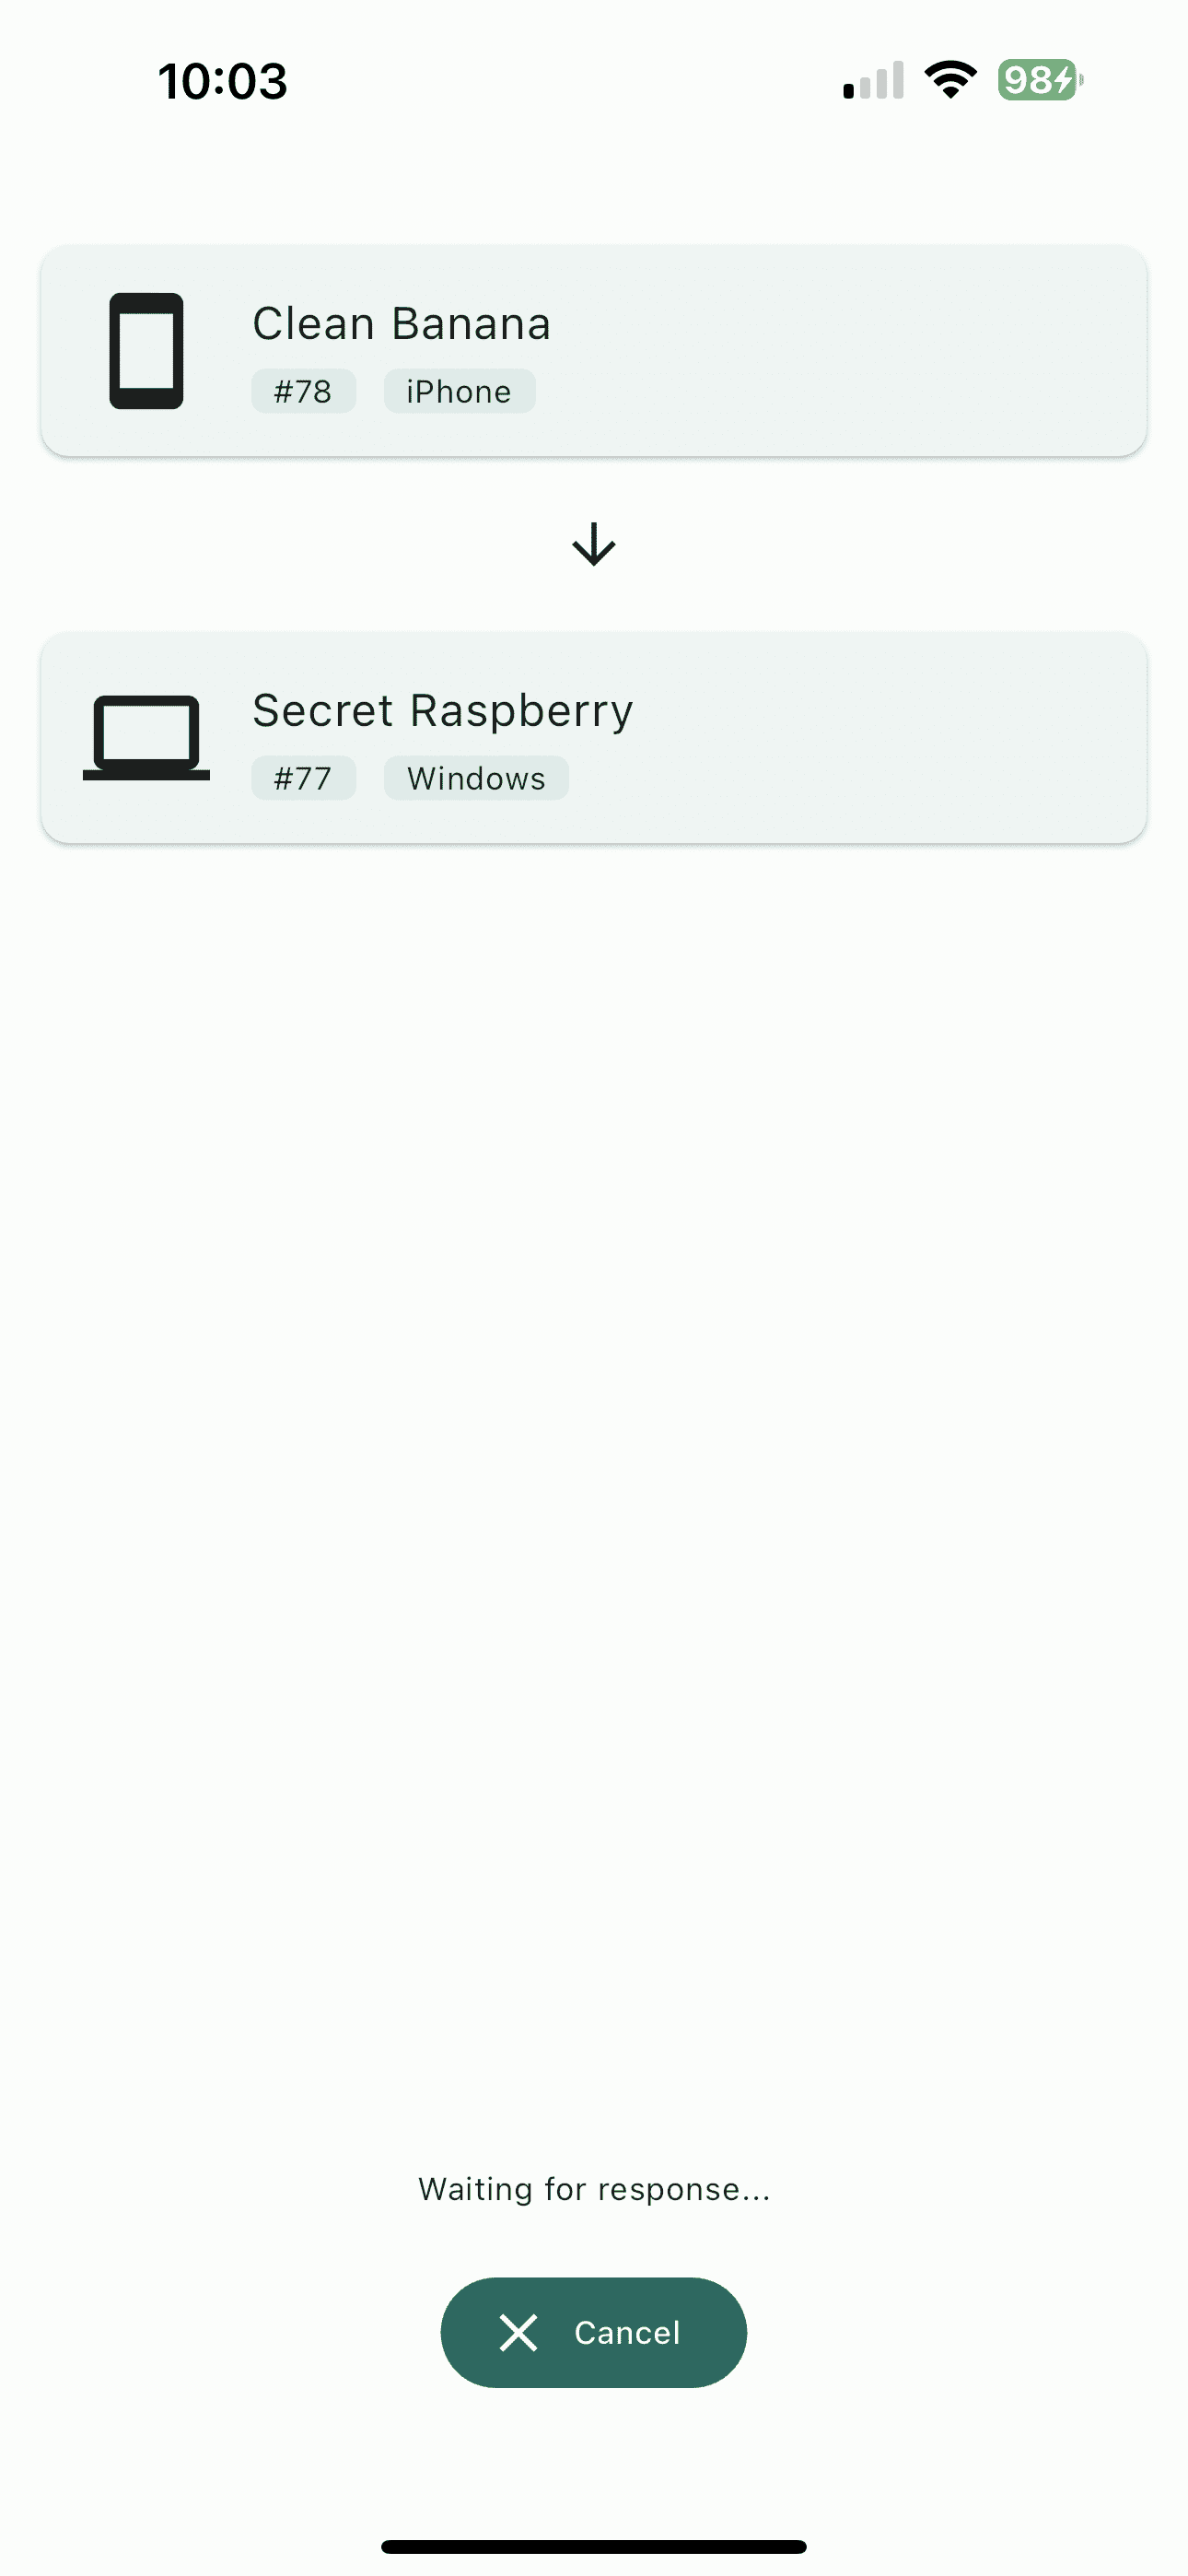
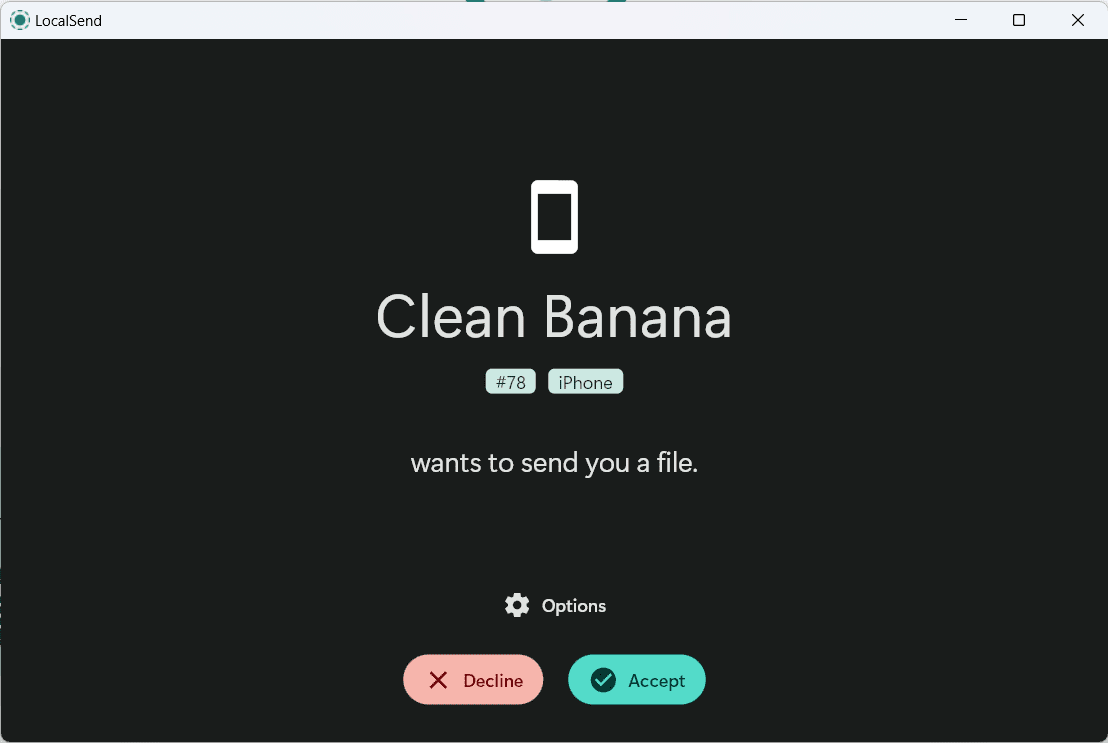
Tap the Confirm button in the bottom right corner.
Select your Windows PC from the list under Nearby devices.
From your Windows PC, click the Accept button that appears.
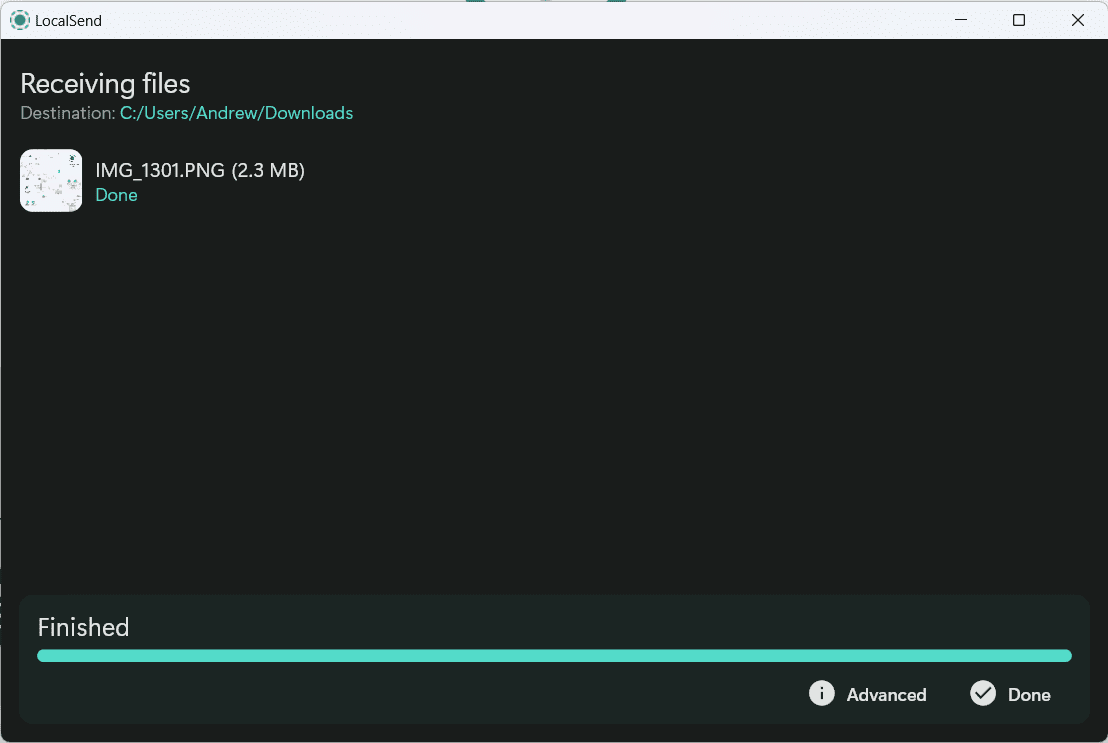
Wait for the progress bar to complete before trying to access the sent files.
Once complete, click the Done button in the bottom right corner.
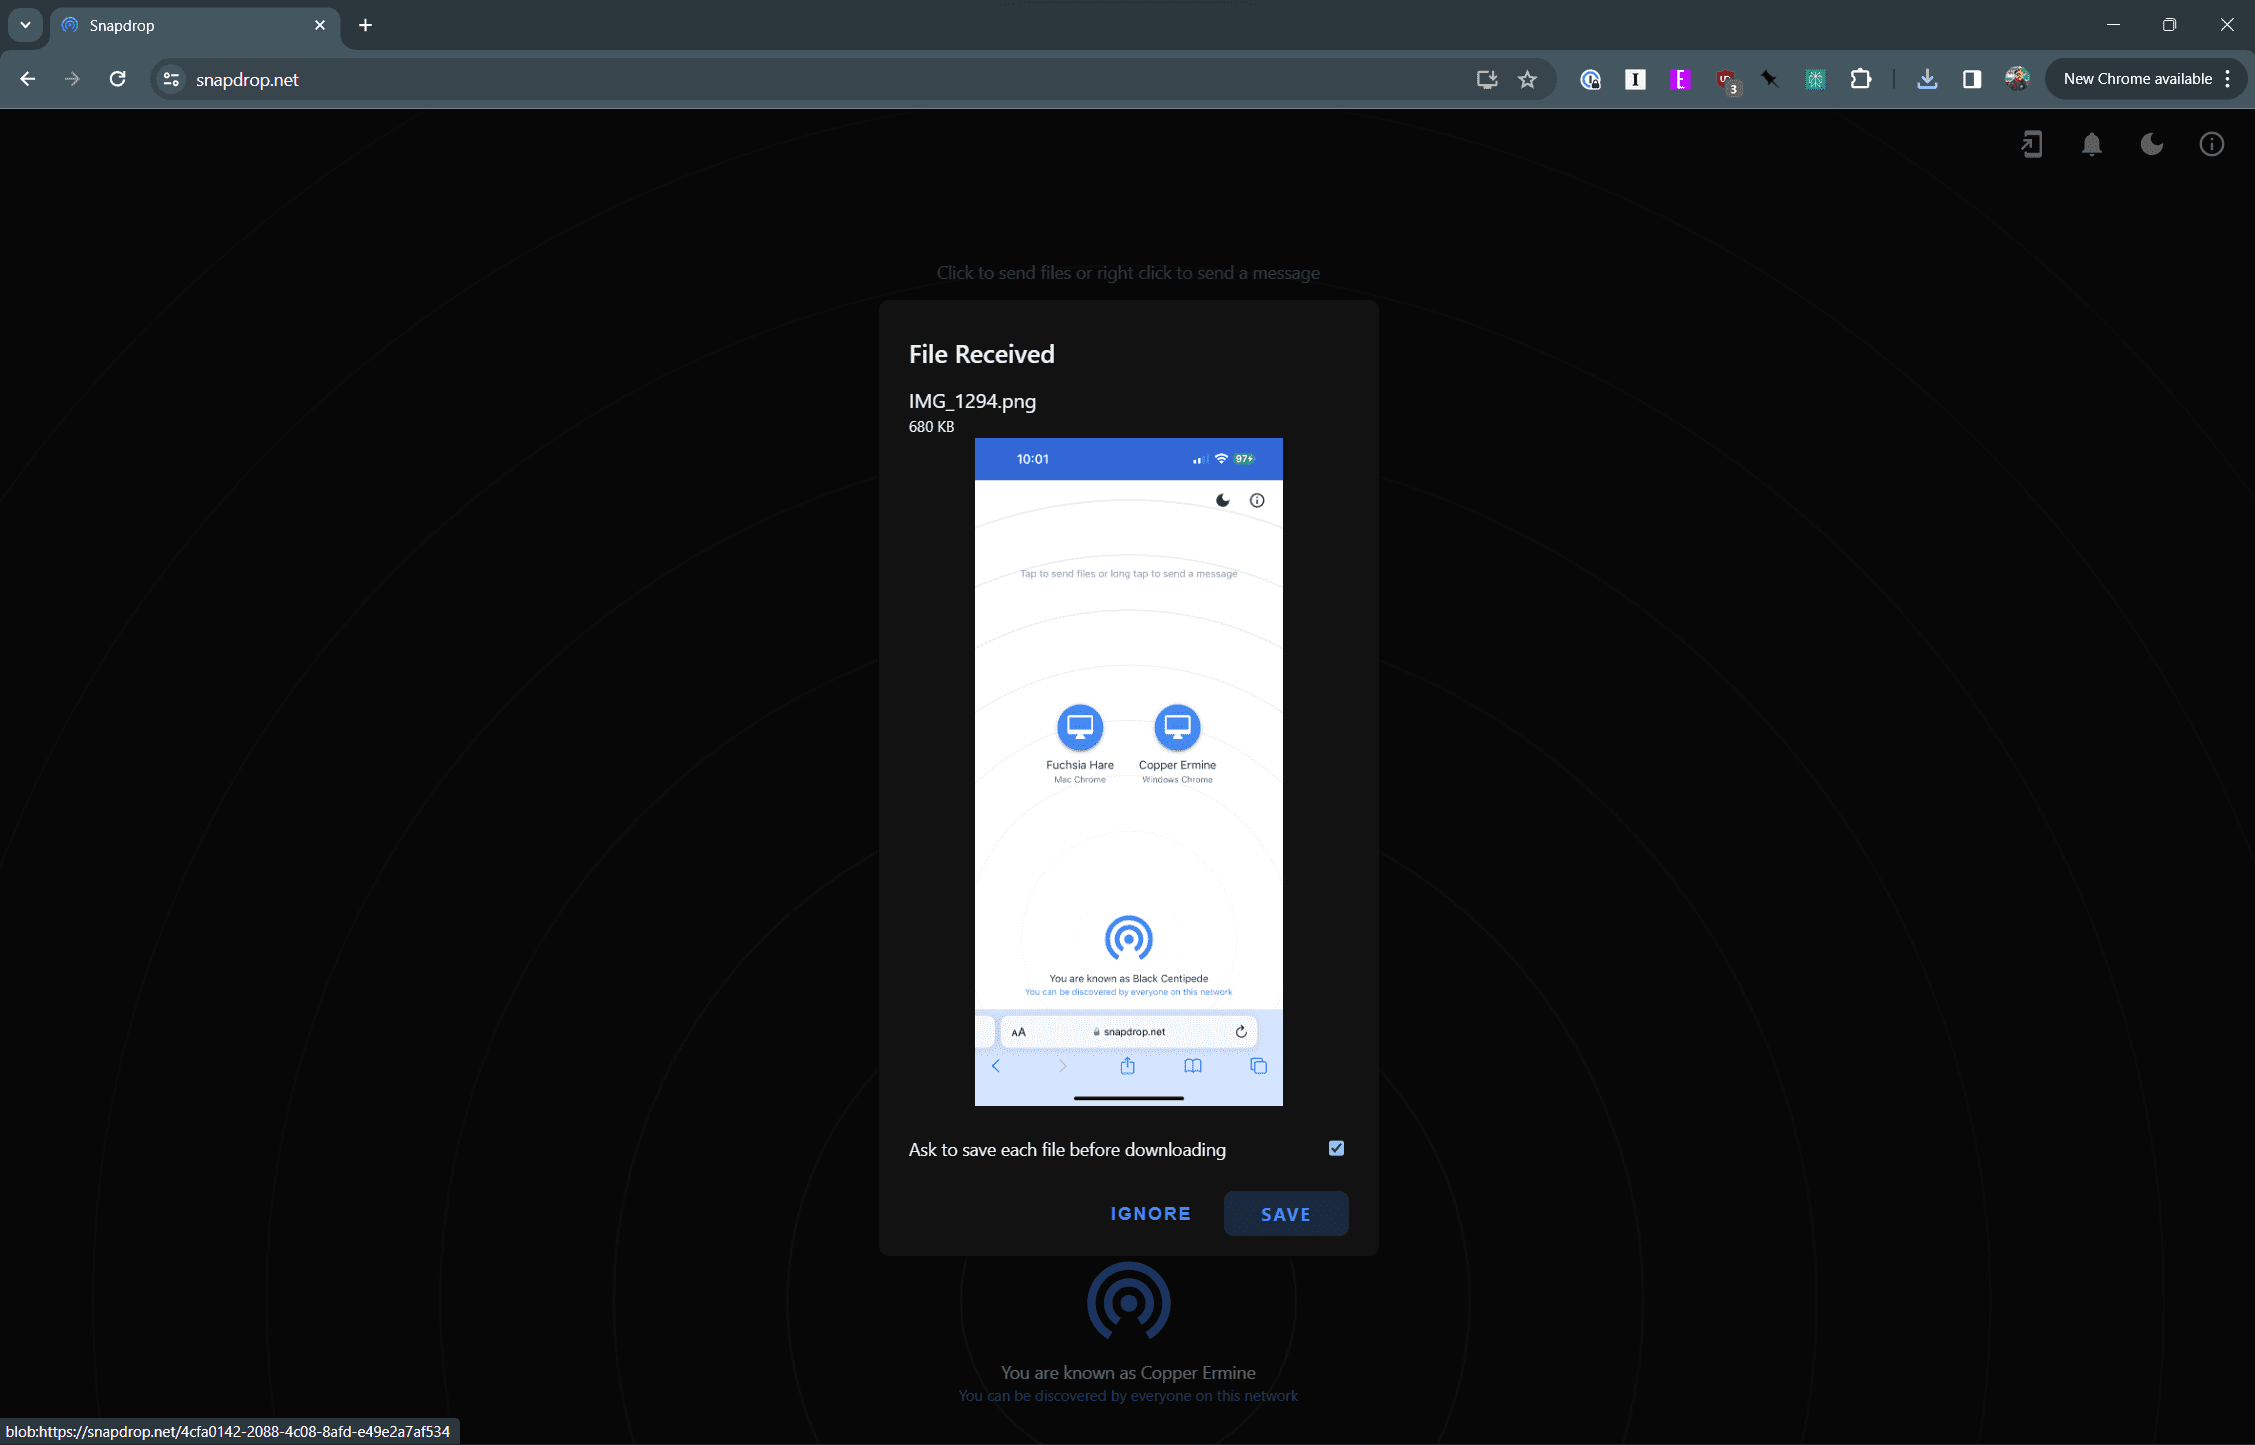
Snapdrop
Snapdrop is a free, open-source, peer-to-peer file-sharing application that allows users to instantly share images, videos, PDFs, and links with people nearby. It is designed to work across different platforms and devices, including smartphones, tablets, and computers.
Inspired by Apple’s AirDrop, Snapdrop uses WebRTC and WebSockets technologies to facilitate local file sharing in your browser. It does not require any setup or signup, making it a convenient tool for quick and secure file transfers.
Snapdrop is available as a web application, which can be accessed through any web browser by visiting the Snapdrop website. There are also dedicated apps for Android and iOS devices, which can be downloaded from the Google Play Store and the Apple App Store, respectively.
In addition to file sharing, Snapdrop also allows users to send text messages to nearby devices. It does not require an internet connection to function, as it operates over your local network. This means that your files are not uploaded to any servers, providing an additional layer of privacy and security.
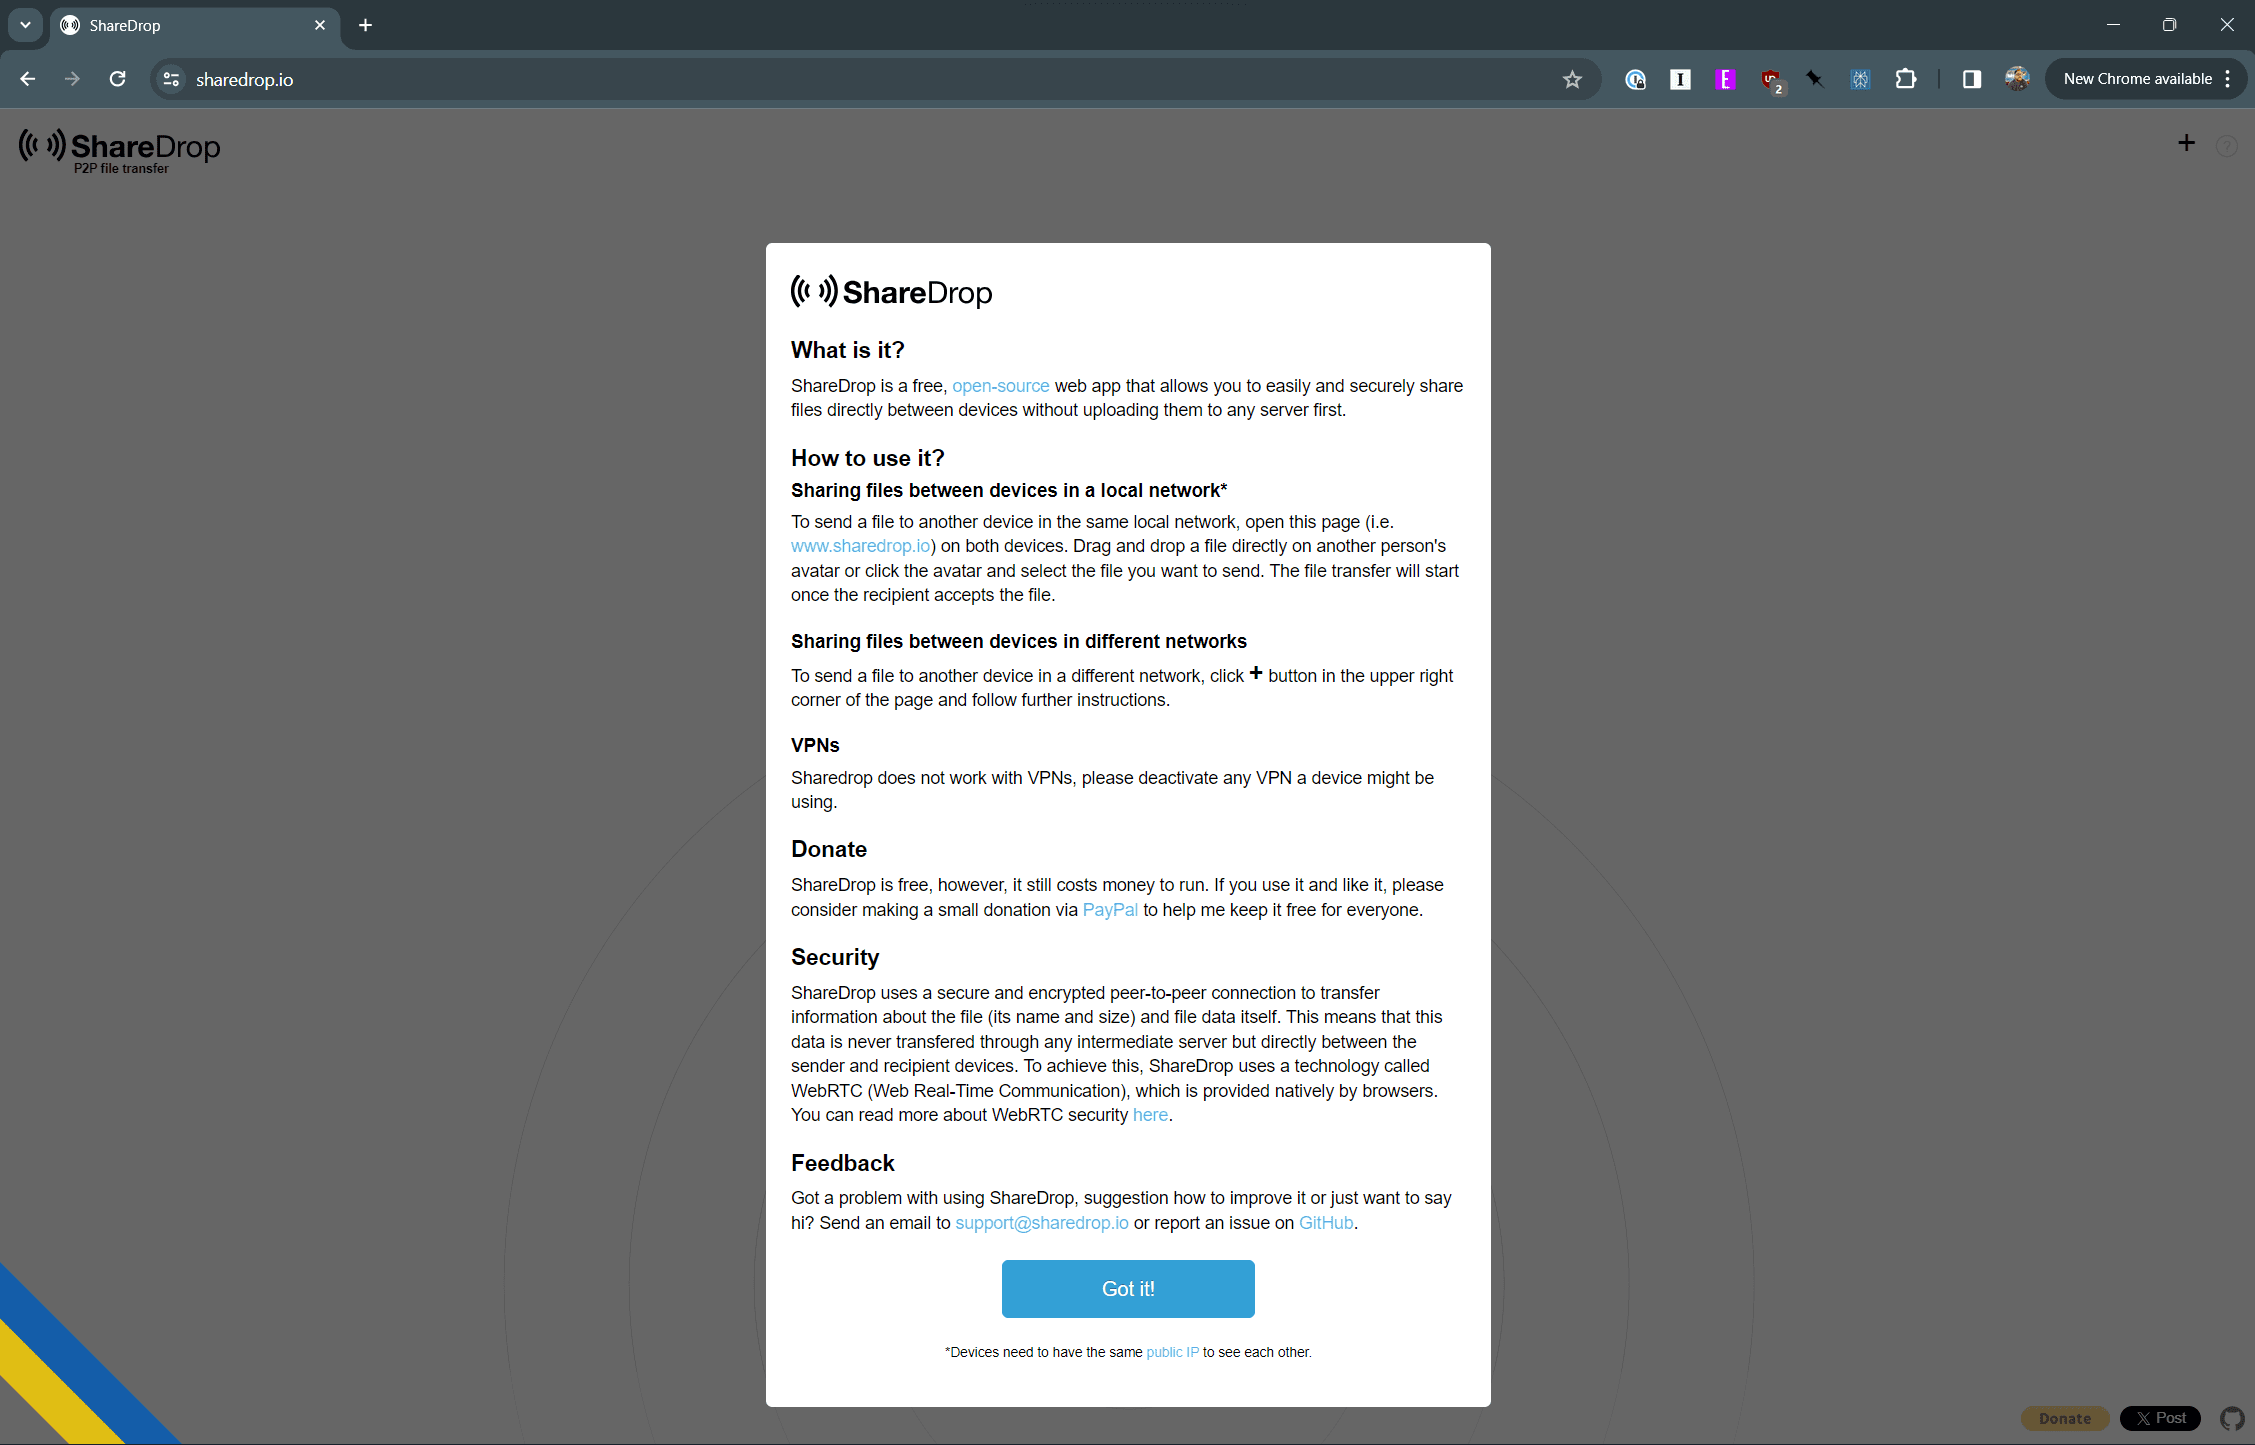
Sharedrop
ShareDrop is a free, open-source web application that allows users to share files directly between devices without uploading them to any server first. It is designed to facilitate peer-to-peer file transfers, making it a useful tool for quickly and securely sharing files across different devices on the same network.
ShareDrop is available as a web application, which can be accessed through any web browser by visiting the ShareDrop website. There is also an Android application developed by Ayokunle Sunmola, which allows users to send files across their devices without the need for wires, sign-ups, or logins.
In addition to file sharing, ShareDrop also has a system for Linux that eases file sharing provided you have your own server to store the files. It works by monitoring a folder for file creation or modification and by automatically and securely synchronizing these files to your web server through rsync.
It’s important to note that ShareDrop is different from SnapDrop, another similar tool for peer-to-peer file sharing. While both are inspired by Apple’s AirDrop and use WebRTC for file transfers, they are built with different technologies and may offer slightly different features.
Conclusion
Navigating the file-sharing process between an iPhone and a Windows PC doesn’t have to be a daunting task. Throughout this article, “How to AirDrop from iPhone to Windows PC,” we have explored various methods that allow for efficient and hassle-free transfers, bridging the gap between Apple’s iOS and Microsoft’s Windows platforms.
From cloud services to third-party applications, each solution offers its unique approach to replicating the AirDrop experience. It’s about selecting the right tool that fits your specific needs and comfort level. With the steps and insights provided, you now have the knowledge to confidently transfer files from your iPhone to a Windows PC, ensuring a seamless sharing process across different operating systems.
Andrew Myrick is a freelance writer based on the East Coast of the US. He enjoys everything to do with technology, including tablets, smartphones, and everything in between. Perhaps his favorite past-time is having a never-ending supply of different keyboards and gaming handhelds that end up collecting more dust than the consoles that are being emulated.


Write a Comment