Trying to install or update macOS and seeing the message “macOS could not be installed on your computer” is frustrating. This generic error doesn’t explain exactly why the installation failed, leaving you clueless on how to troubleshoot. However, there are a few common culprits behind this error including inadequate disk space, incompatible firmware, or issues with the installer files themselves.
The good news is this error can often be resolved with some basic checks and fixes. In this article, we’ll walk through the major causes of the “macOS could not be installed” message along with the corresponding solutions.
Getting ‘macOS Could Not Be Installed on Your Computer’ Message?
If you’ve ever tried to update or install macOS on your Mac and encountered the message “macOS Could Not Be Installed on Your Computer,” you know how frustrating it can be. This error can occur due to a variety of reasons, such as corrupted installer files, incompatible hardware, issues with your Mac’s startup disk, or even insufficient free space for the installation.
But don’t worry, this section of the article is dedicated to helping you understand why this error occurs and how to resolve it. We’ll walk you through several troubleshooting steps, from simple solutions like restarting your Mac to more complex ones like using Disk Utility to repair your startup disk. By the end of this section, you should be equipped with the knowledge to overcome this installation hurdle and successfully update or install macOS on your Mac.
Check macOS Compatibility with your Mac
Before attempting to install macOS on your Mac, it is important to check that the version you are trying to install is actually compatible with your machine. Apple supports macOS on Mac computers going back numerous generations, but eventually, older hardware reaches the end of official support. If you try to install a version of macOS that is newer than what your Mac can run, you will see errors that macOS “could not be installed on your computer” or similar wording.
To check that your Mac model and year can properly run the macOS you want, review Apple’s specification pages listing which Macs are compatible with each macOS release. Generally, you can install the latest macOS release on a Mac from the last 3-5 years without issue. If your Mac is much older than that, check the specs to see what macOS versions it can handle. Trying to force an unsupported install will not work.
Things to do Before Installing macOS
Before jumping into a major macOS system update, take some time upfront to prepare your Mac. Doing so will help the installation process go more smoothly and avoid frustrating “could not be installed” errors partway through. Here are key things to do before installing macOS:
Backup your data: Be sure to fully backup your system before installation using Time Machine or another backup method. This protects you in case anything goes wrong.
Check disk errors: Open Disk Utility and run First Aid checks on your startup disk and partitions. This catches disk errors early and fixes them before installation.
Free up space: macOS updates require significant free disk space. So delete unused files and clear cached/temp data beforehand. 10-20GB of disk space is ideal to have available.
Update existing software: If the existing apps on your Mac have updates available, install those ahead of time rather than while also updating the whole OS. Fewer things changing at once reduces conflicts.
Gather installers: If you have non-Mac App Store software to reinstall after updating, gather the DMG files or license keys you’ll need so they are handy after booting into the new OS version.
Taking this preventative troubleshooting approach sets you up for the best chance of avoiding any “could not be installed” issues when installing macOS. Allotting extra time for preparation steps pays off through a smoother install process.
Reset NVRAM
Encountering the “macOS Could Not Be Installed on Your Computer” error can be a frustrating experience, especially when you’re excited about enjoying the new features of an updated macOS. One of the potential solutions to this problem is resetting the Non-Volatile Random Access Memory (NVRAM) on your Mac. NVRAM is a small section of your Mac’s memory that stores certain settings in a location that macOS can access quickly. The settings that are stored in NVRAM depend on your Mac and the devices that you’re using with your Mac.
Resetting the NVRAM can resolve issues related to your Mac’s startup disk, display resolution, time zone, and recent kernel panic information among others. This section of the article will guide you through the steps to reset the NVRAM on your Mac as a way to potentially resolve the “macOS Could Not Be Installed on Your Computer” error.
Shut down your Mac
Find Command (⌘), Option, P, and R on your keyboard
Turn on your Mac
Press and hold the Command-Option-P-R keys immediately after you hear the startup sound
Hold these keys until the computer restarts, and you hear the startup sound for the second time
Release the keys
If you have a late-2016 MacBook Pro, the steps are slightly different
How to reset NVRAM on late-2016 MacBook Pro models
Shut down your Mac
Find Command (⌘), Option, P, and R on your keyboard
Turn on your Mac
Press and hold the Command-Option-P-R keys immediately after you turn on your Mac
Hold these keys down for at least 20 seconds to ensure that your Mac completes the process correctly
Release the keys
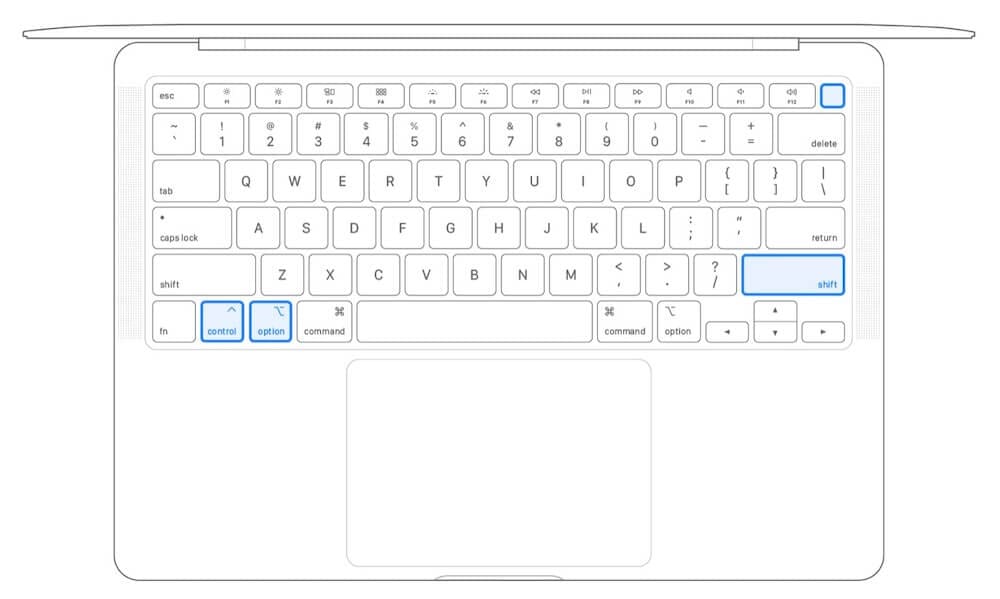
Reset SMC
If your Mac has a T2 chip, shut the laptop down and wait for 30 seconds. Then press and hold Control and Option on the left side of your keyboard, and Shift on the right side. Make sure to press the three keys simultaneously for seven seconds. Then press the Power button, and keep holding all four keys for another seven seconds.
Release them, wait for 30 seconds, and then press the Power button to turn on your Mac.
If your Mac doesn’t have a T2 chip, press the Shift, Control, and Option keys on the left side of your keyboard. Then press the Power button and keep holding all four keys for 10 seconds. Release all keys, wait for 30 seconds, and then power up your device.
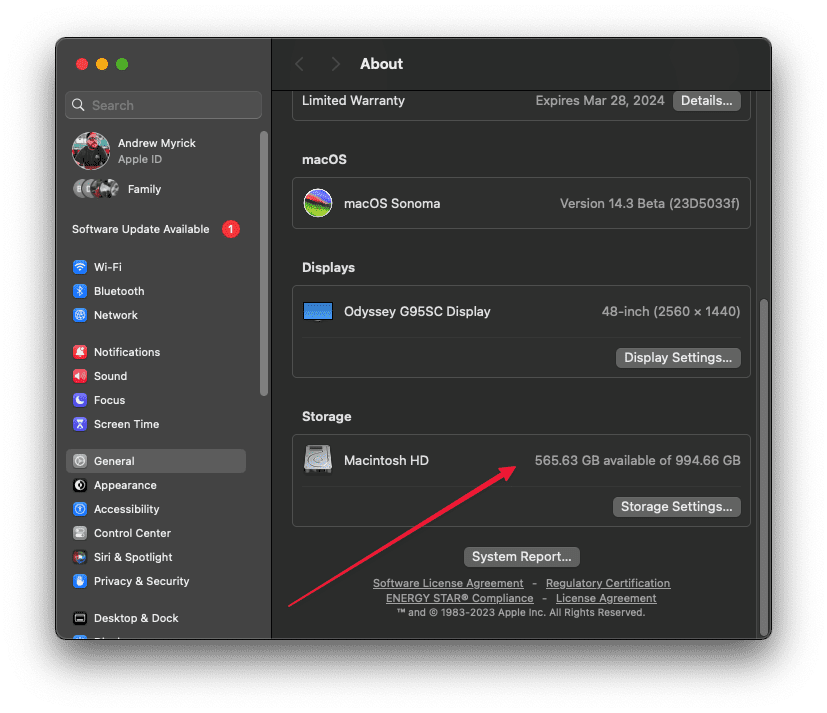
Check That You Have Enough Storage
One of the most common reasons a macOS installation fails midway through is simply not having enough available storage space on the startup drive. Major operating system updates like macOS require copying over and replacing many system files. Without sufficient disk space, the install process hits a wall partway through.
Before attempting to install macOS, check that your Mac startup volume has ample free space for the large temporary installer files. As a rule of thumb, you ideally want at least 15-20 GB of available space on the drive before beginning the installation. Here are ways to check and clear space if needed:
Open About This Mac and view the Storage tab to see the total and free space for your boot volume. Compare to the space noted on Apple’s macOS spec pages.
Use the OmniDiskSweeper app to analyze all files on the drive and sweep unused ones. Defragmenting may consolidate free space.
Store media files, downloads, or old document archives on external storage. Move sizable items off the startup disk.
Delete unused apps, logs, caches, iOS device backups, or temporary files that accumulate over time.
Confirming your Mac has sufficient open drive space before updating prevents the install process from halting with “could not be installed” errors. Allow extra buffer beyond Apple’s listed minimum specs. And remember to back up beforehand! With proper free space available, you are set for smooth sailing updating macOS.
How-To Fix ‘macOS Could Not Be Installed’ Issue
Receiving an alert that the macOS installation was not complete successfully definitely adds stress and unknowns about the next steps into the mix. However, in many cases, this error stems from common roadblocks that can be cleared up fairly easily without data loss or reinstalling from scratch.
The goal then is to methodically troubleshoot the potential causes for the failed macOS installation. This article section will guide logical steps to isolate why the updater crashed mid-process and how to get it back on track. We’ll cover checking Mac hardware compatibility, fixing underlying disk errors, freeing up drive space if low, using Safe Mode to install, and more.
Use Safe Mode to Fix the Install Issue on your Mac
Safe Mode, also known as “Safe Boot,” is a special boot mode that loads only essential kernel extensions. It is designed for troubleshooting on macOS, helping to separate software problems from hardware failures. When you boot your Mac in Safe Mode, certain checks are performed to prevent some software from loading or opening automatically.
The process to boot your Mac in Safe Mode varies depending on the type of Mac you have. Here’s how to do it:
For Mac with Apple Silicon:
Choose Apple menu > Shut Down and wait for your Mac to shut down completely.
Press and hold the power button on your Mac until “Loading startup options” appears.
Select a volume.
Press and hold the Shift key, then click Continue in Safe Mode.
For Intel-based Mac:
Turn on or restart your Mac, then immediately press and hold the Shift key until you see the login window.
Log in to your Mac. You might be asked to log in again.
Once you’re in Safe Mode, you should see “Safe Boot” in the menu bar. If you’re unsure whether your Mac started in Safe Mode, you can use the System Information app to check the mode.
How to Fix “macOS Could Not Be Installed” Error in Safe Mode
Once you’ve booted your Mac in Safe Mode, you can attempt to resolve the “macOS could not be installed” error. Here are some steps you can take:
Check Compatibility: Ensure your Mac supports the version of macOS you’re trying to install. You can do this by searching for the macOS version you’re trying to install and checking the Compatibility section.
Set the Correct Date and Time: Misconfigured date and time settings can sometimes cause the error. Ensure your date and time settings are correct.
Free Up Space: You’ll need up to 25GB of free space on your main drive to download and install an update to macOS. If you don’t have that much free space, it’s time to clear out the junk and free up space.
Check Your Internet Connection: Even if you’re not installing macOS from the internet, the installer needs the internet to get firmware and other information specific to your Mac. Make sure that your Mac has a working and stable internet connection.
Repair Your Disk: Use Disk Utility to repair your startup disk, then try updating or installing macOS again.
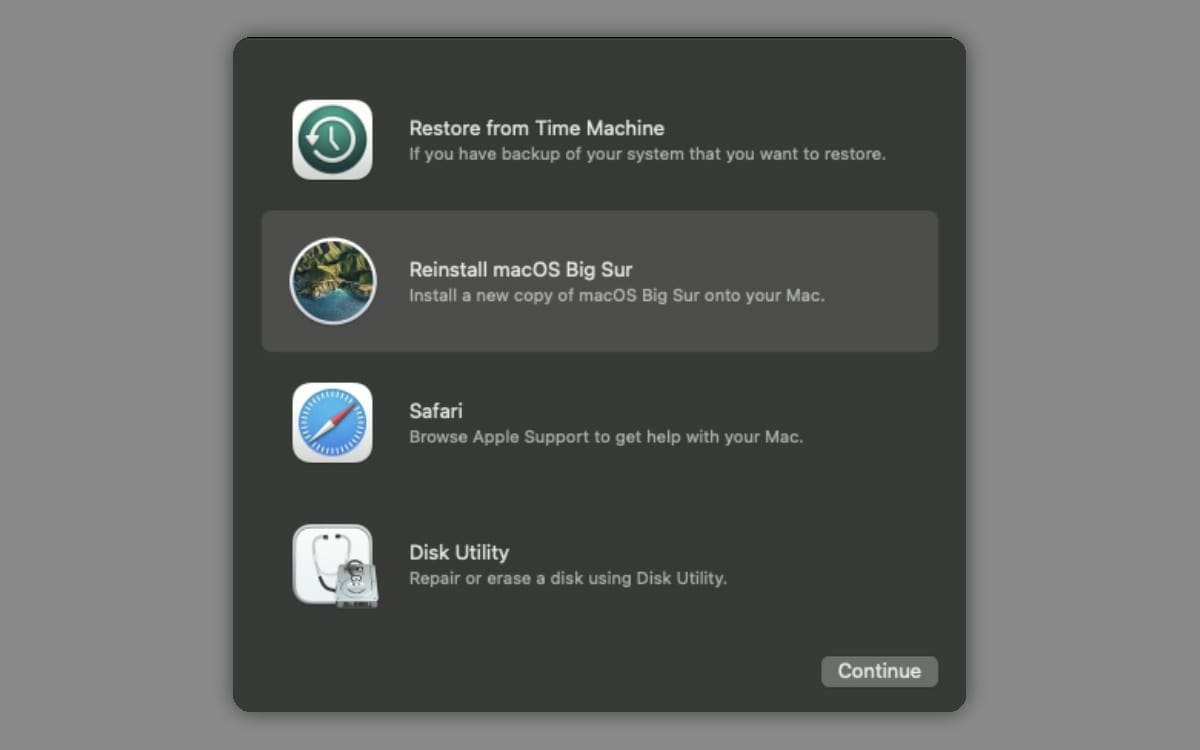
If the error persists, you may need to install from macOS Recovery. This gives you the latest version of the macOS currently or most recently installed.
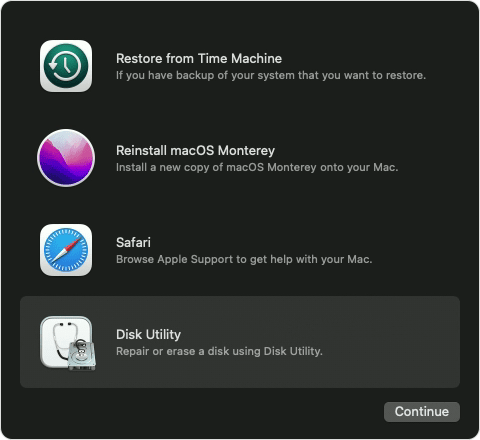
Enter Recovery Mode
Recovery Mode is a special mode in macOS that includes a set of tools used to diagnose and fix issues preventing your Mac from operating correctly. It allows you to repair or erase your disk, reinstall macOS, restore from a Time Machine backup, and more.
Entering Recovery Mode varies depending on the type of Mac you have. Here’s how to do it:
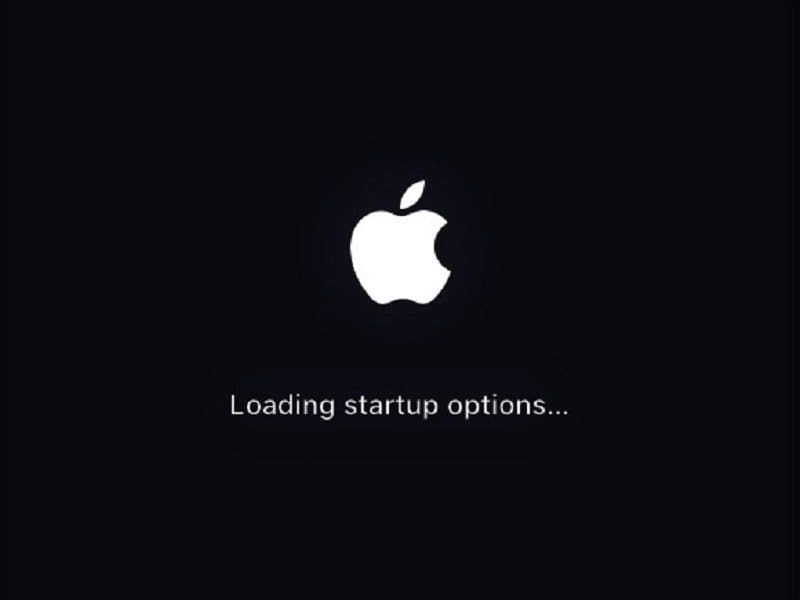
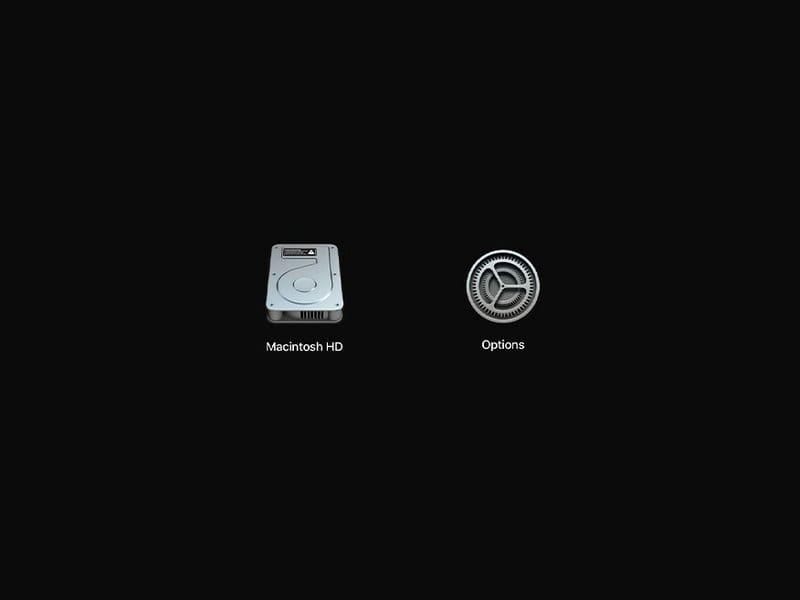
For Mac with Apple Silicon:
Choose Apple menu > Shut Down and wait for your Mac to shut down completely.
Press and hold the power button until you see “Loading startup options.”
Click Options, then click Continue.
For Intel-based Mac:
Turn on or restart your Mac, then immediately press and hold Command (⌘) and R until you see an Apple logo or other image.
Release the keys.
Once you’ve entered Recovery Mode, you can attempt to resolve the “macOS could not be installed” error. Here are some steps you can take:
Check Compatibility: Make sure your Mac supports the version of macOS you’re trying to install. You can do this by searching for the macOS version you’re trying to install and checking the Compatibility section.
Set the Correct Date and Time: Incorrect date and time settings can sometimes cause the error. Ensure your date and time settings are correct.
Free Up Space: You’ll need up to 25GB of free space on your main drive to download and install an update to macOS. If you don’t have that much free space, it’s time to clear out the junk and free up space.
Check Your Internet Connection: Even if you’re not installing macOS from the internet, the installer needs the internet to get firmware and other information specific to your Mac. Make sure that your Mac has a working and stable internet connection.
Repair Your Disk: Use Disk Utility in Recovery Mode to repair your startup disk, then try updating or installing macOS again.
If the error persists, you may need to reinstall macOS. This will install the latest version of macOS that was installed on your Mac.
Error Occurred Preparing the Installation of macOS
Upon downloading macOS, the system commences the preparation phase for installation. In rare cases, users may come across an error message stating, “An error occurred while preparing the installation. Please try running the application again.”
Additional messages that may appear include:
“This copy of the Install application cannot be verified and may have been corrupted or tampered with during the download.”
“This copy of the Install application cannot be verified and may have been corrupted or tampered with during the download.”
A more generic error message: “An error occurred during the preparation of the installation. Please attempt to run it again.”
If you encounter any of these error messages during the installation process, the initial recommended step is to restart your Mac and retry the installation. Often, this simple action can resolve the issue after a few attempts.
However, if the error messages persist despite multiple restarts, there are a couple of troubleshooting techniques that have proven effective in the past and are worth exploring until the problem is resolved.
Change the Time and Date on your Mac
Additionally, check your date and time settings. Let your Mac set up the date and time settings automatically. Go to System Settings, select General, click Date and Time, and set the date and time zone automatically. Restart your Mac, and try to reinstall the OS.
If you can’t boot up your Mac properly, use macOS Utilities and Terminal to edit your date and time settings.
Shut down your Mac.
Then turn it on, and immediately press and hold the Command, and R keys to enter Recovery Mode.
Release the keys when you see the Apple logo on the screen.
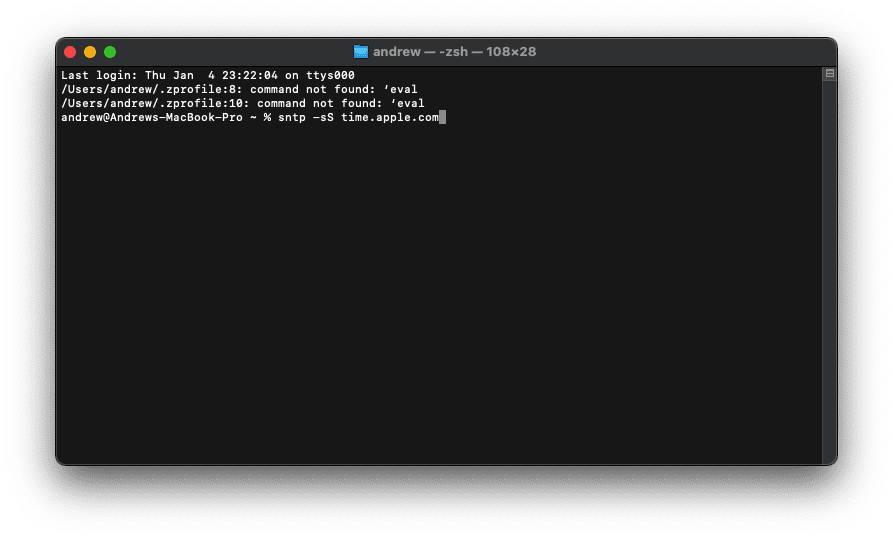
Click on Utilities, and then select Terminal.
Run the ntpdate -u time.apple.com command to set the date and time automatically. If this command doesn’t work, try running sntp -sS time.apple.com.
If you’re offline, edit the settings manually using the date [mm][dd][HH][MM][yyyy] format. There are no spaces between [mm][dd][HH][MM][yyyy].
Delete Old Copy of macOS and Reinstall
One potential culprit for a macOS installation failing to complete and presenting “could not be installed on your computer” errors is file corruption in the installer application itself. Perhaps the initial download of the large macOS installer package from the App Store did not fully complete or errors crept into the files. Trying to install from a damaged macOS installer app dooms the process from the start.
Before pulling your hair out trying countless forced reboots, disk repairs, and Safe Mode attempts, it is prudent to check if the root trigger may be flaws in the installer. Often deleting the corrupted installer and freshly downloading a pristine copy is an easy fix for installation woes.
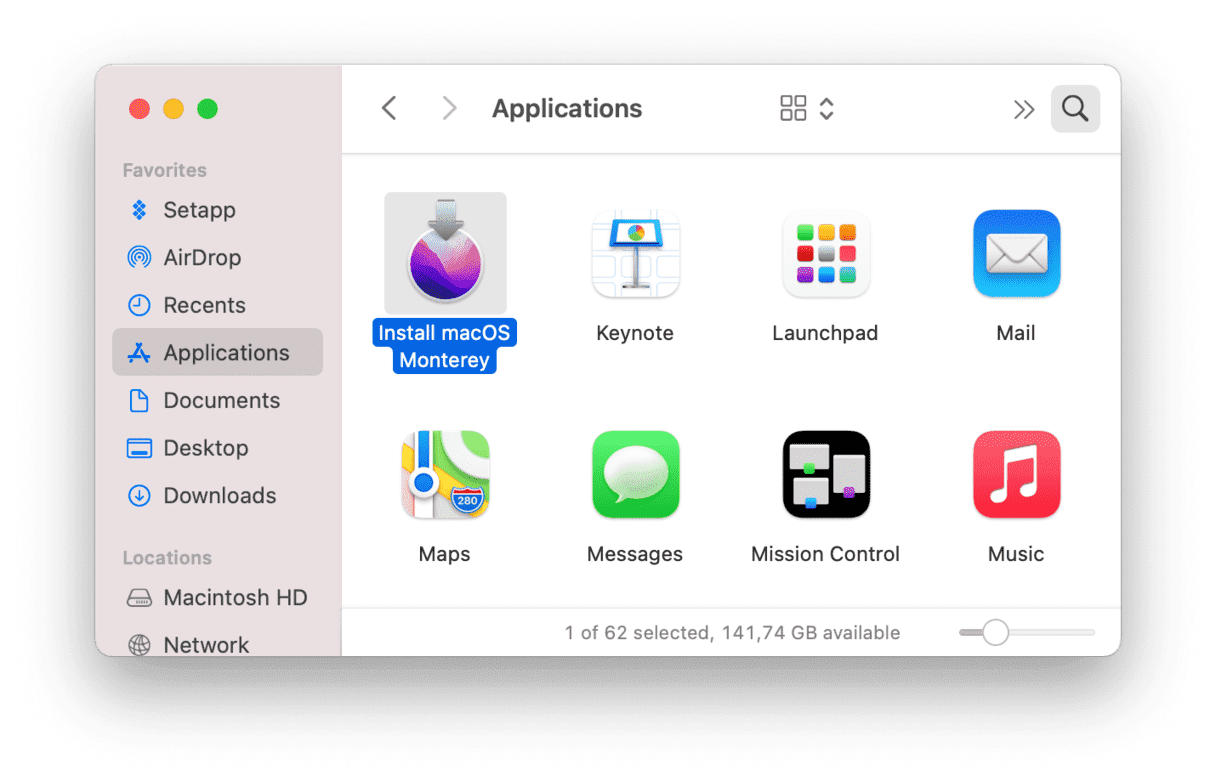
Open the Finder app on your Mac.
In the panel on the left, click Applications.
On the right side of the window, scroll through the list of applications.
Locate the macOS Install “application”.
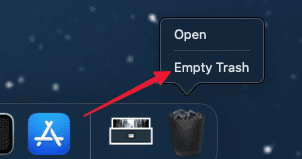
Drag and drop the application to the Trash Can.
If prompted, enter your admin password to confirm the deletion.
Right-click the Trash Can.
Highlight and select Empty Trash.
Restart your Mac.
Remove Third-Party KEXT Files
If you’re still reading and have exhausted all troubleshooting options in Safe mode and Recovery mode without success, it’s time to delve deeper into identifying the root cause of the issue. Sometimes, the culprits behind update or macOS installation problems are third-party KEXT extensions.
These KEXT files are introduced to your Mac or MacBook when you connect third-party devices. If you’re unsure about their presence, it’s advisable to inspect the current third-party extensions on your system.
To do this, access the Terminal utility and enter the following command to view non-Apple KEXTs:
“kextstat | grep -v com.apple”
This command will display a list of third-party extensions. You can then proceed to remove them individually, targeting the one you suspect might be causing the issue. Using the Terminal, you can unload a KEXT with the following command:
Replace ‘NAMEOFTHEKEXT’ with the appropriate name of the suspect KEXT file you identified earlier. After unloading the KEXT, verify its removal by using the ‘kextstat’ command.
Once you’ve successfully removed all third-party KEXT files and ensured you have sufficient disk space for the macOS update, attempt to restart the installation process.
Still Seeing Problems? Try Using Single User Mode
Single User Mode is a special startup environment, which loads a minimal number of services and launches a command line interface only. It’s often used for troubleshooting and system maintenance tasks.
Step 1: Enter Single User Mode
To boot your Mac into Single User Mode:
Restart your Mac.
Immediately press and hold the Command (⌘) and S keys together.
Keep holding these keys until you see white text on a black background, indicating that Single User Mode is loading.
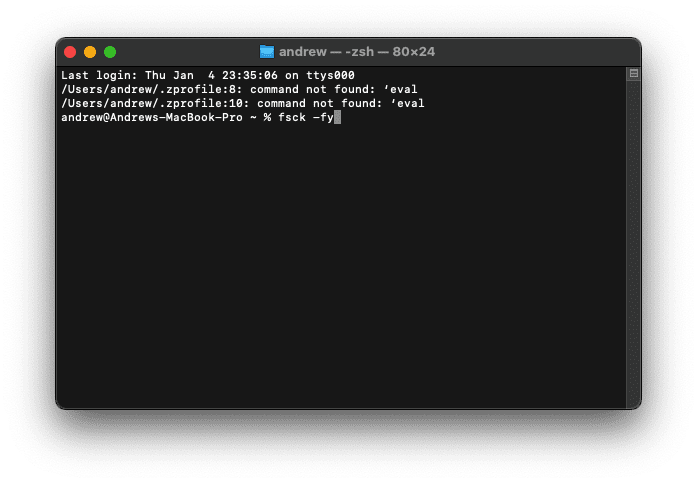
Step 2: Run Disk Check and Repair
In Single User Mode, you can run a disk check and repair command. This can help to fix any disk errors that might be preventing macOS from installing. To do this:
At the command prompt, type fsck -fy and press Enter.
If the system reports that the disk has been repaired, type reboot and press Enter to restart your Mac.
If the system reports that it couldn’t repair the disk, you may need to erase your disk and reinstall macOS, which will delete all data on your Mac.
Step 3: Reinstall macOS
If the disk check and repair process completes successfully but you’re still having issues, you may need to reinstall macOS. To do this:
Restart your Mac and immediately press and hold Command (⌘) and R to start up from macOS Recovery.
In the macOS Utilities window, select Reinstall macOS and click Continue.
Follow the onscreen instructions to reinstall macOS.
Remember, reinstalling macOS requires a stable internet connection. If the installation fails, try again or consider installing in safe mode.
Stuck at Setting Up Screen?
Certain users encounter issues where the update process appears to become unresponsive. Is it showing signs of being stuck on the ‘Setting up your Mac Screen’? Another common area where the update might seem frozen is within the ‘Find My’ app.
If you find your update stuck with a spinning wheel and unresponsive, the recommended course of action is to restart your MacBook. Simply press the Power button on your Mac to power it off, then proceed to restart your machine.
This advice is applicable to any user facing prolonged delays on the ‘Setting up’ screen while attempting to update to macOS.
Network Access Errors While Installing macOS
During the macOS installation process, you might encounter an error related to network and internet connectivity. This error is commonly identified by the ‘Code = 551’ message. To resolve this issue, it’s essential to inspect your Mac’s network settings.
This error is more likely to impact users who use their Macs within network environments protected by firewalls or employ third-party security software. If you come across this error, you may want to try temporarily disabling such software and then proceed with the macOS reinstallation.
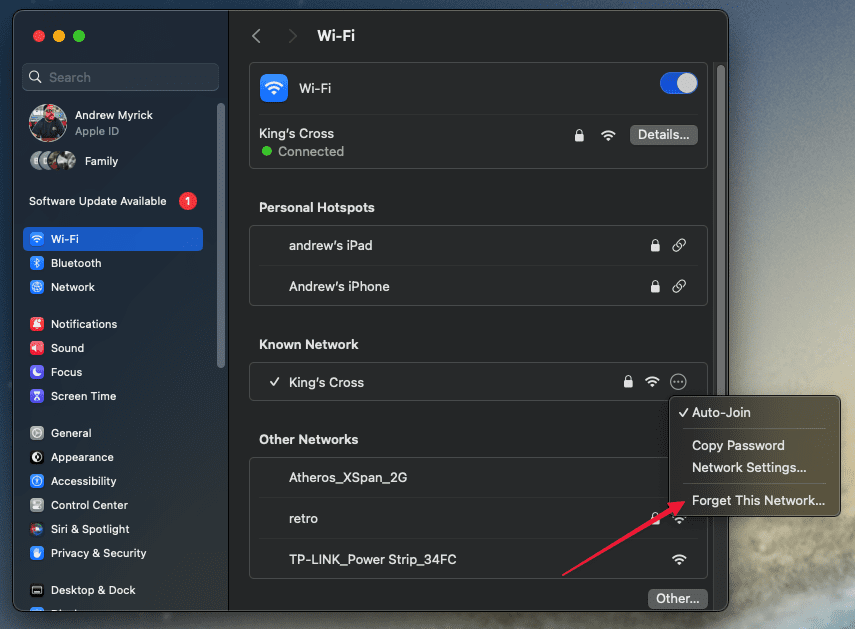
Forget Your Wi-Fi Network Then Reconnect
At times, your Wi-Fi network may not function as expected, leading to problems like intermittent connections, slow speeds, or inability to connect at all. One effective approach to address these issues is to make your device ‘forget’ the Wi-Fi network and then reconnect to it as if for the first time. This process clears any stored settings or configurations that might be causing the problem, providing a clean slate for establishing a more stable and efficient connection.
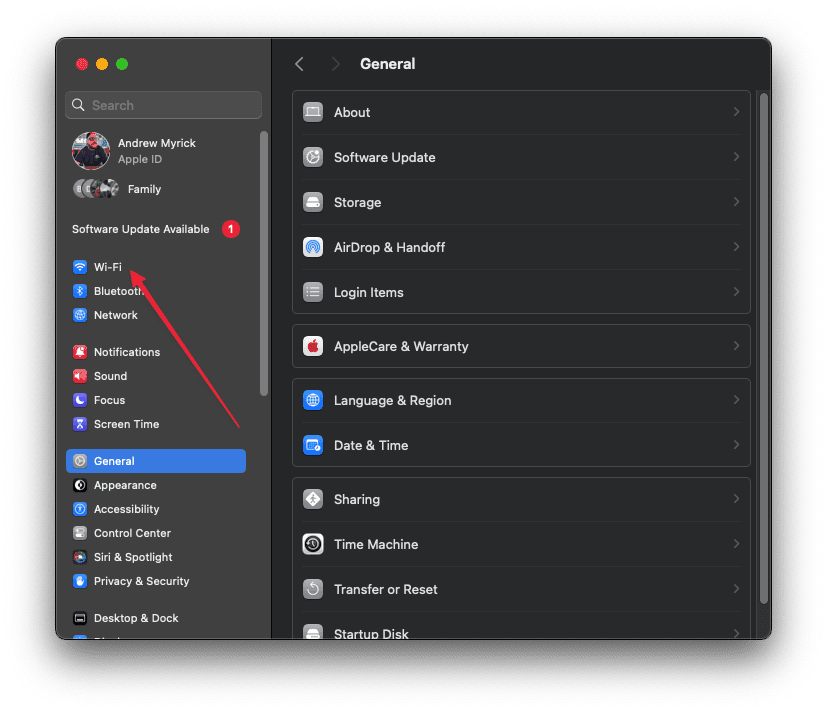
Open the System Settings app on your Mac.
In the sidebar on the left, click Wi-Fi.
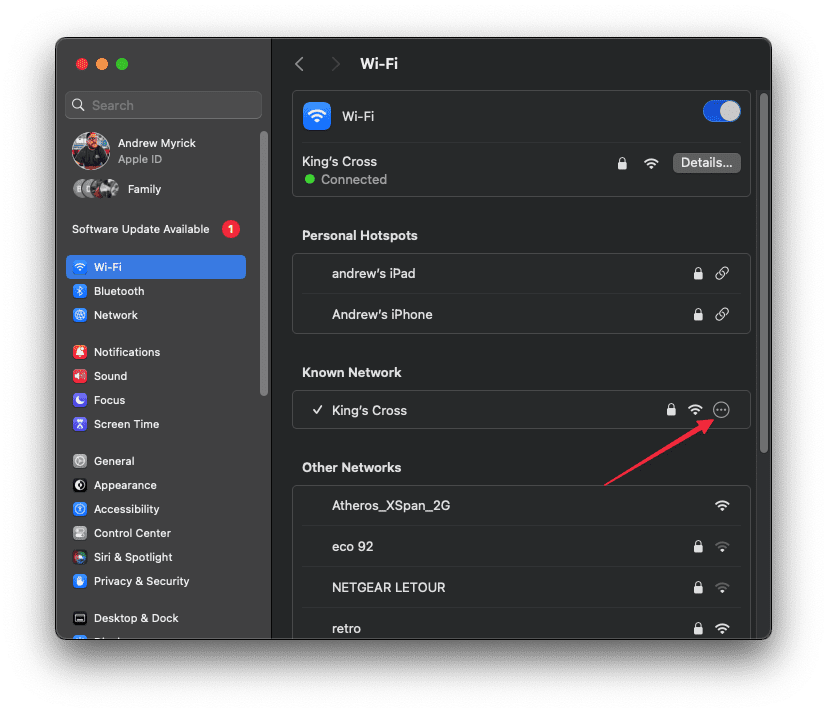
Locate the name of your network under the Wi-Fi section.
Click the Details… button to the right of the network name.
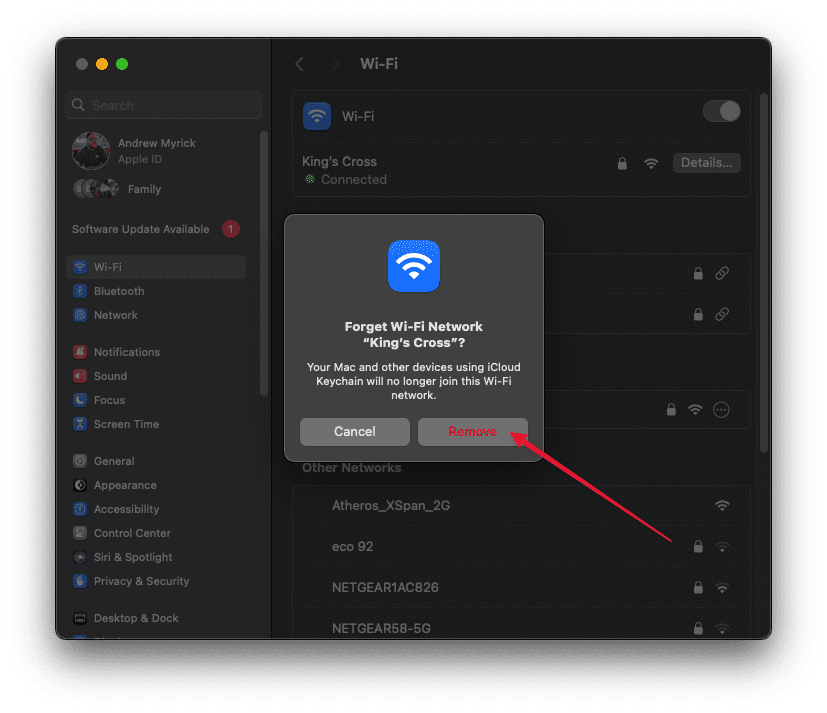
At the bottom of the window, click the Forget This Network… button.
When prompted, click the Remove button to confirm.
Wait a few moments to ensure that the connection has been removed.
Under the Other Networks section, locate and select the Wi-Fi network you want to connect to.
Enter the Wi-Fi password.
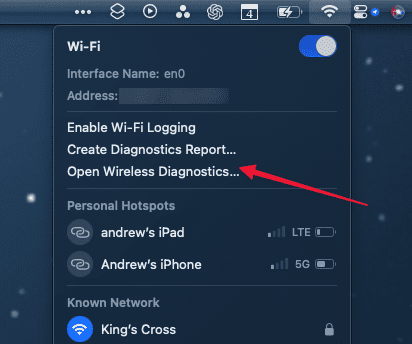
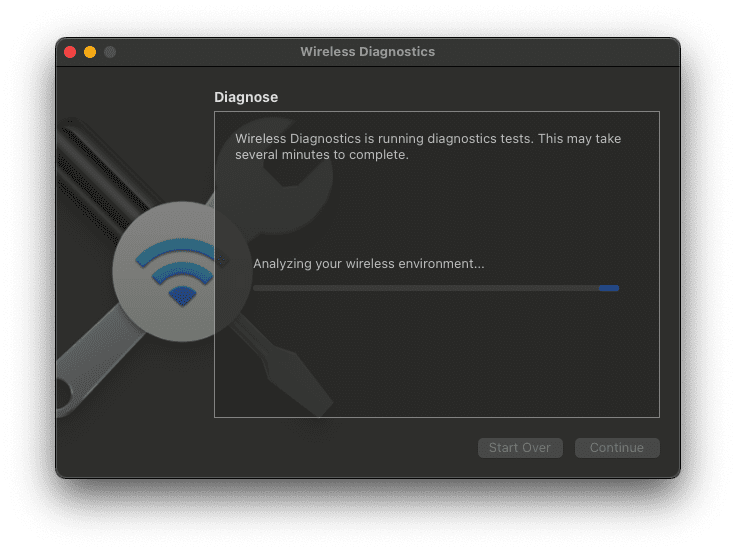
Run Wireless Diagnostics on your Mac
When you face persistent Wi-Fi issues, such as sporadic connectivity, slow speeds, or trouble connecting to networks, the built-in Wireless Diagnostics utility becomes a critical ally. This powerful feature in macOS is specifically designed to detect and analyze Wi-Fi problems, providing insights and potential solutions to enhance your wireless experience. Running Wireless Diagnostics can reveal underlying network issues, signal strength concerns, and other factors affecting your Wi-Fi performance.
Quit any and all open apps on your Mac.
Press and hold the Option key on your keyboard.
While holding the Option key, click the Wi-Fi button in the top right corner of the Menu Bar.
From the drop-down menu that appears, highlight and select Open Wireless Diagnostics.
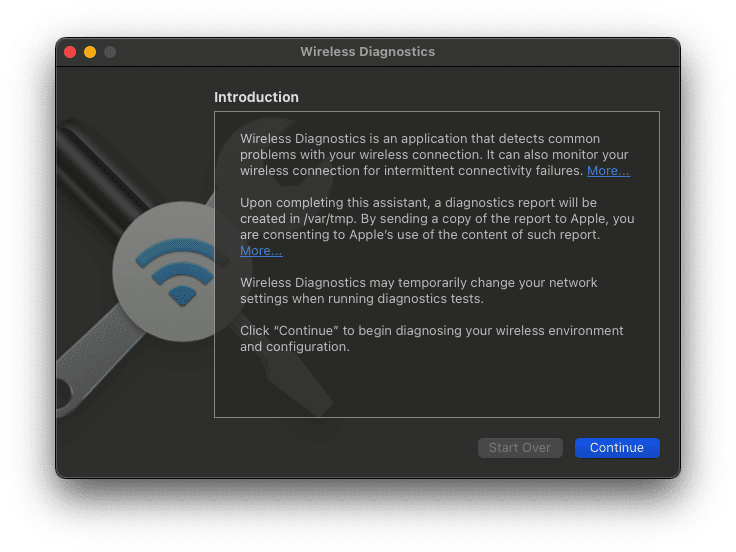
Click the Continue button.
Wait until the Wireless Diagnostics test has been completed.
If there are any issues, follow the on-screen steps in order to get things back in working order.
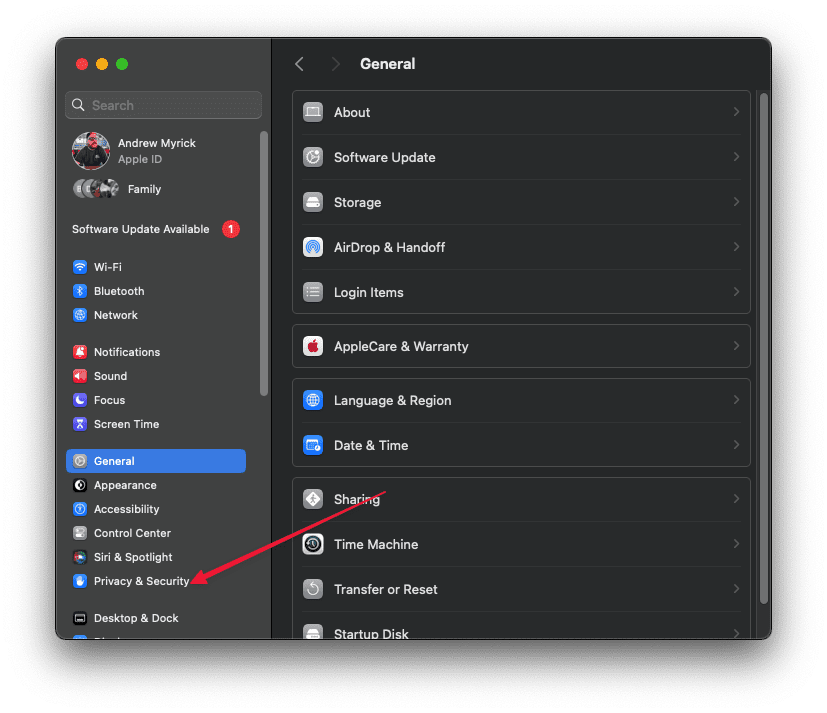
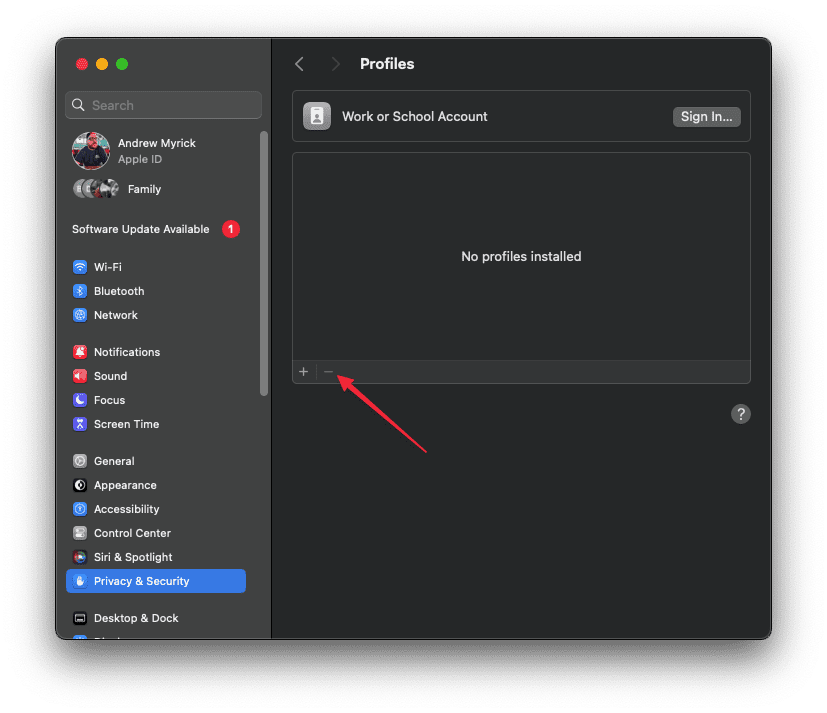
Remove Any Installed Profiles
Profiles on a Mac are often used for managing settings, particularly in organizational or educational environments. These settings can include network configurations, restrictions, or custom preferences tailored for specific needs.
However, there are times when these profiles may need to be removed – perhaps because they’re no longer necessary, they’re causing conflicts with your system, or you’re preparing the device for a different setup. Removing these profiles is an important step in ensuring that your Mac’s settings are aligned with your current requirements and that it operates without any unnecessary restrictions or configurations.
Open the System Settings app on your Mac.
Click Privacy & Security in the sidebar on the left.
Scroll all the way to the bottom until you see the Other section.
Click Profiles.
Highlight any profiles that you have installed.
Click the – button in the bottom left corner.
If necessary, restart your Mac.
Disable Your VPN
VPNs are widely used for enhancing privacy and security online, or for accessing region-restricted content. However, there may come a time when you no longer need a particular VPN service, whether it’s due to a change in your security needs, a switch to a different VPN provider, or troubleshooting network issues. Removing a VPN from your Mac is a process that involves more than just uninstalling an app; it requires a careful approach to ensure that all associated settings and configurations are properly cleared.
Open the System Settings app on your Mac.
In the left sidebar, scroll down and select VPN.
Locate the VPN service that you are currently connected.
Click the Information button to the right of the name of the VPN.
Click the Remove Configuration button.
When prompted, click the Remove button to confirm.
macOS Install Doesn’t Complete
If your macOS installation gets stuck on a screen showing “X minutes remaining” indefinitely, the process is hanging rather than proceeding. Even after clicking OK on error popups, you end up in a loop unable to finish.
In these scenarios where the install fails repeatedly in the final steps, check the var/log console logs for clues. Often a corrupt user account prevents completing the OS update install.
To work around this, first create a fresh admin user profile on the Mac. Log in to this new profile and launch the macOS installer again. With the clean user, the install should now be completed successfully.
Once updated, reboot and login to your original admin profile again as needed. You can then delete the temporary profile created just for the install. This avoids having to wipe the entire startup drive to fix the stuck update.
Mac Won’t Start After Installation
After installing macOS Catalina, some users report startup issues including the Mac getting stuck on a spinning icon indefinitely or the boot progress bar freezing around 90% completion. Another common problem is the Mac displaying just a black screen with the Apple logo for hours without fully starting up.
These stalled startup sequences typically indicate an incompatible third-party kext (kernel extension) file is interfering with the system boot. To troubleshoot, restart the Mac in Safe Mode by holding the Shift key on reboot until you see the login screen. Safe Mode runs only required macOS files.
Once booted in Safe Mode, open the Terminal app and enter:
This command backs all third-party kexts to a new Extensions-Backup folder in the user directory. It clears them out of the Library Extensions system folder temporarily.
With the suspect kexts moved, restart the Mac normally and observe if the startup proceeds fully without hanging now. If the issue is resolved, gradually move kexts back one by one to identify problematic extensions. Reinstalling macOS may also be required in stubborn cases.
Stuck on iCloud Sign-in After Update?
Experiencing a hitch in your macOS update, particularly getting stuck on the iCloud sign-in, can be like hitting a sudden roadblock on an otherwise smooth journey. In this focused segment of our comprehensive guide, we delve into the niggling issue many users face: the post-update iCloud sign-in stalemate. This problem often arises after an update, leaving your device hanging in a limbo that seems to defy resolution.
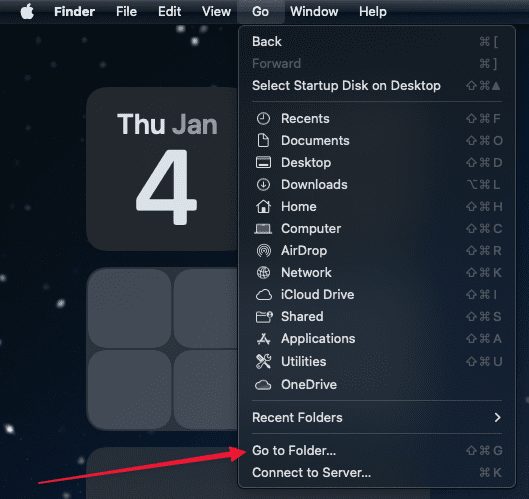
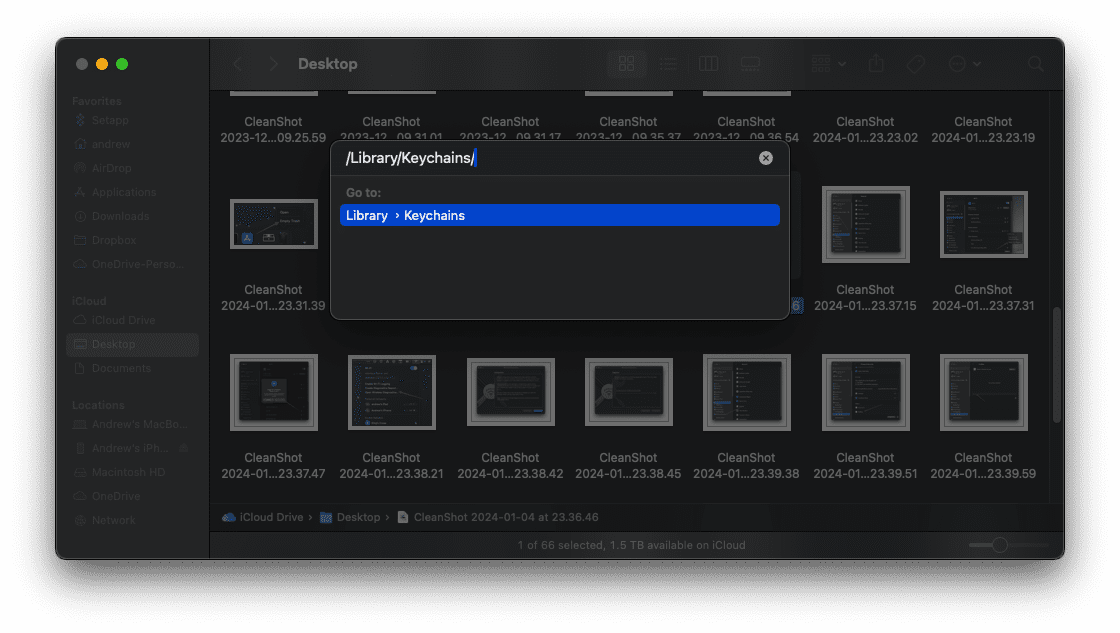
Open the Finder app on your Mac.
In the Menu Bar, click the Go button.
From the drop-down menu that appears, highlight and select Go To Folder.
Insert the following file location:
/Library/Keychains
Locate the folder that has a “Unique ID”. This will likely be a string of randomized letters and numbers.
Right-click the folder.
Highlight and select Rename from the drop-down menu.
Rename the folder to [uniqueid]_old.
Close Finder
Restart your Mac.
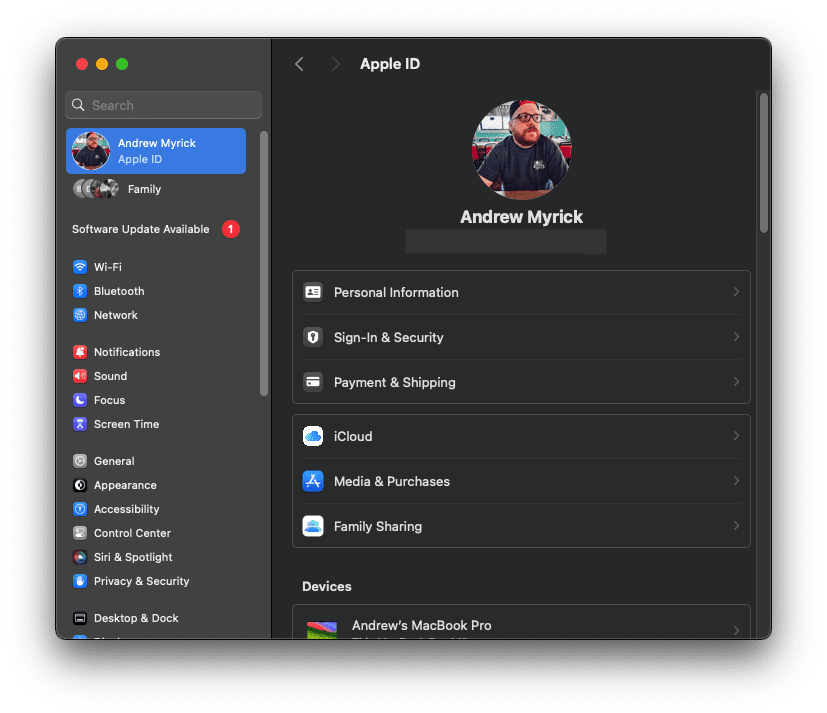
Once restarted, open the System Settings app on your Mac.
Click [Your Name] at the top of the left sidebar.
On the right side of the window, click iCloud.
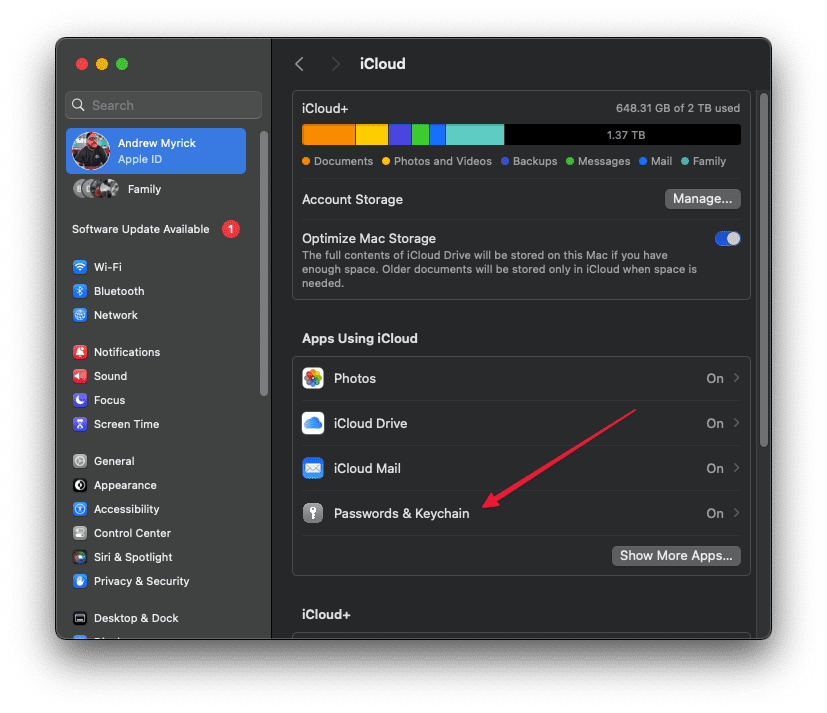
Select Passwords & Keychain.
Click the toggle next to Sync this Mac to the On position.
If prompted, enter your password.
Click the Done button.
Try to Install macOS Without Erasing the Drive
Apple’s macOS is celebrated for its robustness and intuitive user experience, but it’s not uncommon for users to face installation issues. The good news is that these problems often have straightforward solutions that don’t require wiping your data clean. Understanding the nuances of a non-destructive reinstallation is key to preserving your files and settings while giving your Mac the fresh start it needs.
Restart your MacBook, and press and hold the Command and R keys right after you hear the chime.
Release the keys when the Utility menu appears on the screen.
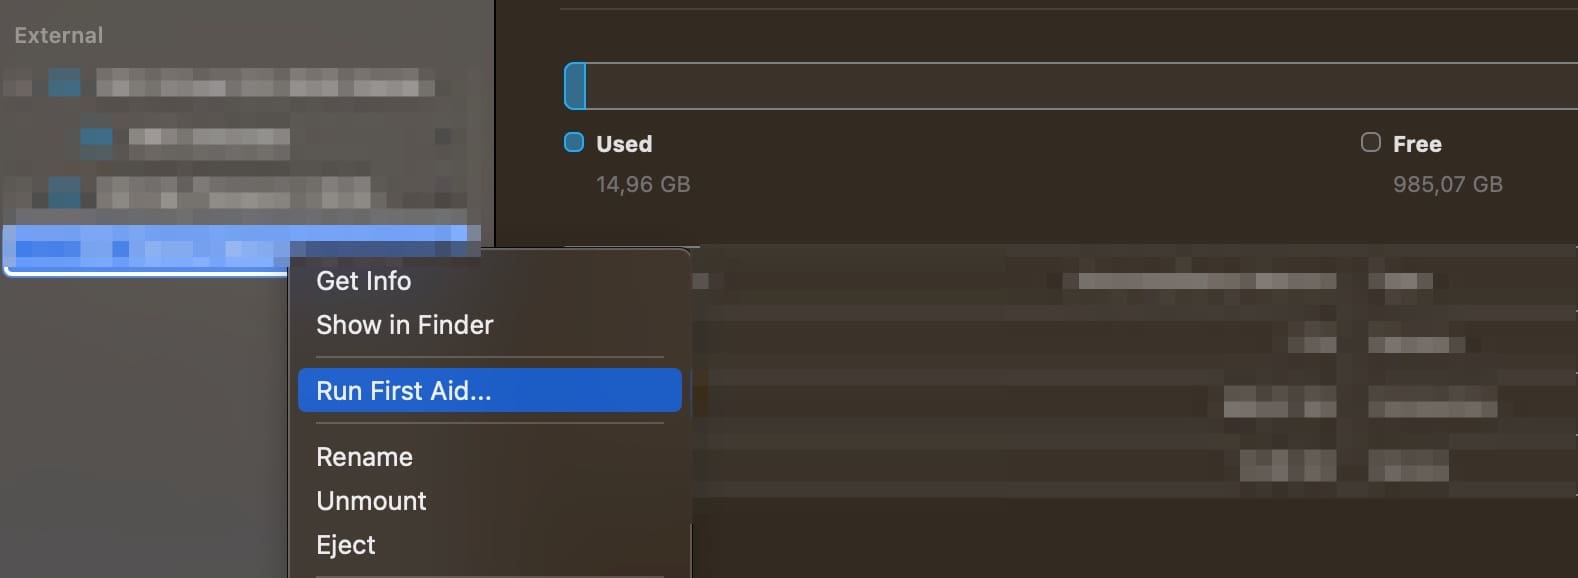
Select Disk Utility and click on Continue.
Select your disk. For most users, it’s Macintosh HD.
Then, click on the First Aid option.
You may need to wait for a few seconds, or a couple of minutes until the Done button becomes clickable. Hit Done.
Exit Disk Utility, go back to the Utility Menu, and select Reinstall OS X.
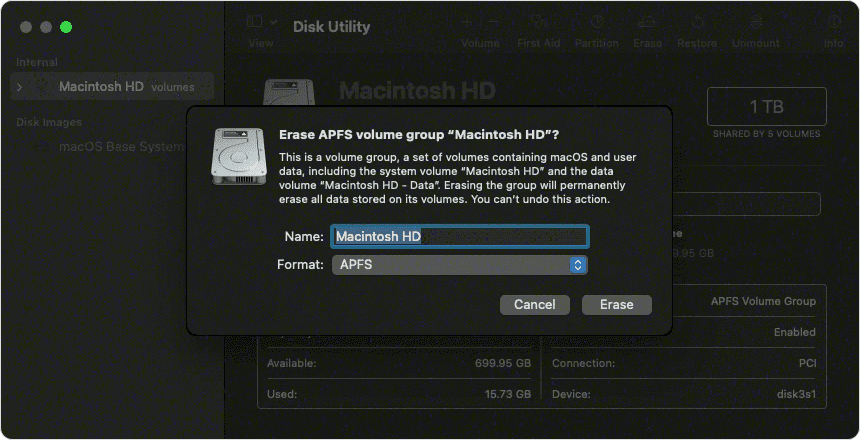
Manually Erase the Hard Drive Before Installing
After exploring all standard troubleshooting steps and less drastic options like re-downloading the installer, creating test user accounts, and attempting Safe Mode installations to no avail, it may ultimately be necessary to completely wipe your startup disk before installing macOS. This should be viewed as a method of last resort when all else fails.
Doing a clean, manual erase of the entire hard drive provides the best possible blank slate and—in theory—should enable a smooth, error-free reinstallation of the operating system. However, the process requires backing up all your data beforehand, eradicating everything on the drive non-recoverable. It also necessitates reinstalling all user applications and restoring files afterwards—very labor-intensive
Restart your Mac, and press and hold the Command, Option, and R keys right after the chime.
Release the keys when the globe or Apple logo appears on the screen.
Wait between 5 to 10 minutes until the Utility menu appears on the screen.
Then select Disk Utility and hit Continue.
Select your drive and then click on the Erase tab.
In the new panel, set the partition scheme to GUID, and select the format type to Mac OS Extended (Journaled).
Click on Apply and Done, and then quit Disk Utility.
Go back to the Utility menu, and select Reinstall OS X.
Give Up and Try a Fresh Installation of macOS
Despite your valiant efforts trying every logical troubleshooting step – from repairing disk errors to deleting old system files and caches to creating fresh test user accounts and re-downloading the latest installer app – you still have gotten nowhere resolving the “macOS could not be installed on your computer” issue.
At a certain point, it becomes necessary to make the tough call: acknowledging defeat in trying to upgrade the existing installation and resigning to wipe everything clean for a wholly new macOS deployment. This admission can be difficult after investing so much time tweaking fixes only to slam into the same stubborn wall. But ceaselessly trying the same workarounds in futility gets you no closer to your primary goal – using the device.
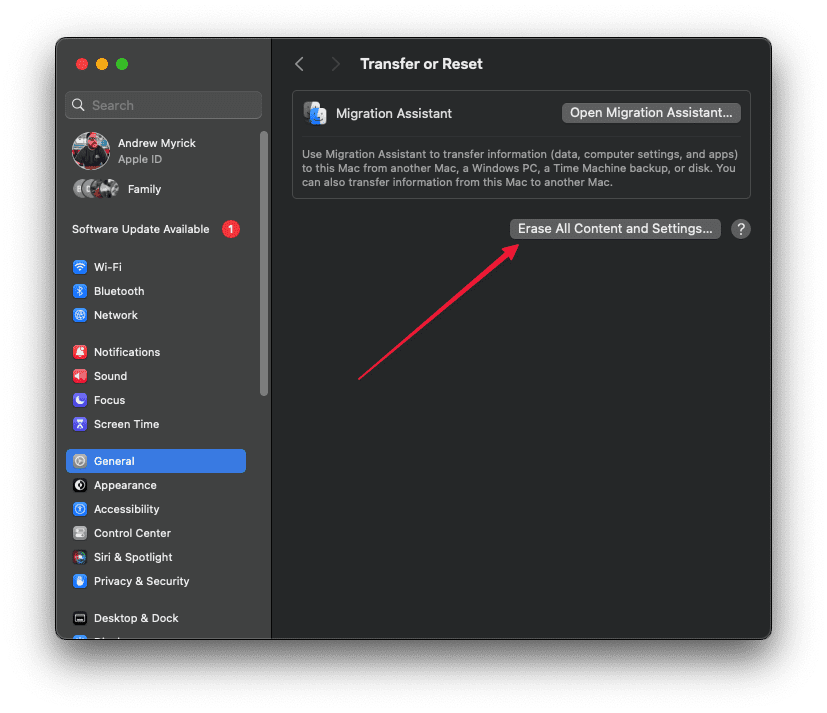
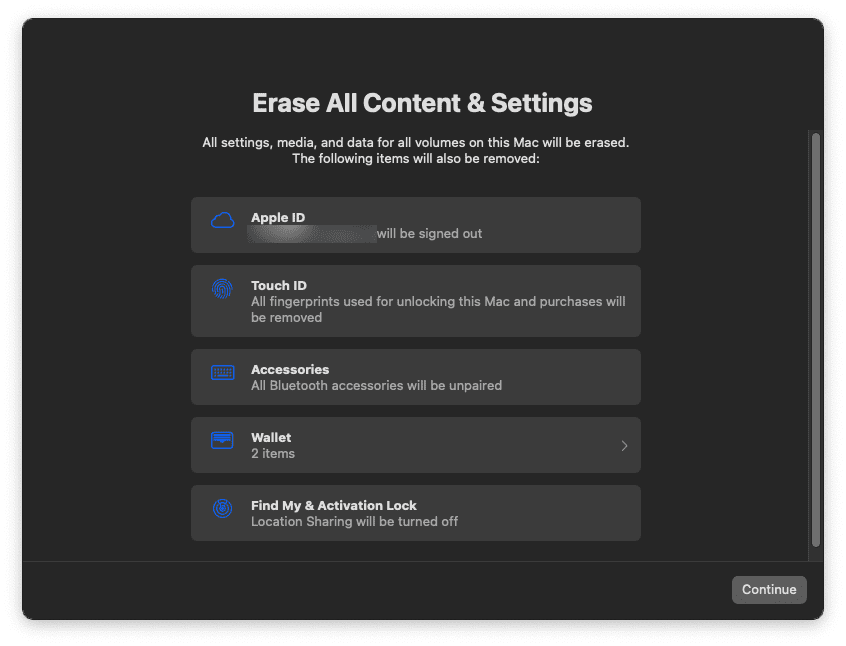
If using an Apple M-Series Mac:
Open the System Settings app on your Mac.
Click General in the sidebar on the left.
On the right side of the window, scroll down and click Transfer or Reset.
Click the Erase All Contents and Settings button.
Enter your admin password.
Click the Unlock button.
Review the items that will be removed in addition to your content and settings.
Click the Continue button.
Follow the on-screen instructions.
If using an Intel-powered Mac:
Follow the steps above to use Erase Assistant.
Restart your Mac.
Press and hold the Command, Option, and R keys right after the chime.
Release the keys when the globe or Apple logo appears on the screen.
Wait between 5 to 10 minutes until the Utility menu appears on the screen.
From the Recovery app window, click Reinstall.
Click the Continue button.
Follow the on-screen steps.
Exhausting all conventional troubleshooting steps yet still winding up stuck at square one with installation failures forces difficult reflection about how much additional effort makes sense. As noted at the outset, wiping everything to start fresh with a clean operating system install requires backing up your data, thoroughly erasing and reformatting the drive, downloading the installer again, and finally laying down a brand new OS foundation. This all demands substantial time and care.
Conclusion
While the “macOS could not be installed” error lacks specifics, some common issues like insufficient disk space, firmware problems, or installer damage are usually to blame. Going through checks and troubleshooting steps for these potential culprits can typically get macOS installing successfully. Be sure to backup your data first if possible. In some cases, you may need to wipe the drive completely before trying again.
Although it’s rather irritating, this error can be overcome in most cases with some targeted troubleshooting to get your Mac updated and working again. For difficult situations, you may need to consult Apple support or a repair technician, but this guide should help get macOS installing again for most users.
Andrew Myrick is a freelance writer based on the East Coast of the US. He enjoys everything to do with technology, including tablets, smartphones, and everything in between. Perhaps his favorite past-time is having a never-ending supply of different keyboards and gaming handhelds that end up collecting more dust than the consoles that are being emulated.
The trick towards the end about starting up while holding the option key and selecting the main HD worked for me! Thank you for this article and for adding in those reader tips because that’s what saved me
This is why I’m a slow adopter, but I got caught anyway because I installed a security update, which we’re always told to do right away. Since then, I’ve been having this problem. A couple times, the computer has shut down on its own when I shut the lid which normally makes it go to sleep. That’s when the problem shows its face again. I’ve been planning to upgrade to Mojave, but since 32 bit apps will not work there at all, I’ve been waiting until I could verify all my apps were 64 bit before proceeding with that. Anyway, from what I’ve read, doing that step does tend to resolve this issue.
Worked for me. I shut down, turn it on, held command option P R at apple logo screen until installation logs appeared. Selected to restart from a different disk – there was only one disk to select from.
After that it restarted and came to login screen
My computer is stuck on ‘macOS could not be installed on your computer’ screen. It directs me to quit the installer to restart your computer.
There is no evident way to quit the installer as I cannot get into any toolbar or menu.
I have tried several things as directed in the appletoolbox. They aren’t working. What else can I do?
Lrockhill, Try Shutting down Mac.
Next,Hold Command+R (boots into recovery mode) (you can use Option+Power if you have a Time Machine Backup available)
Keep holding until Apple logo appears. Reinstall macOS. You will lose no data. You can verify this by clicking Get Online Help, and scrolling down to “Reinstall macOS”. Or if you have a backup you can restore from, choose Restore From Time Machine Backup. Having said that if you are having issues getting to recovery mode when you start up, I think your best bet would be reach out to Apple Support. Just curious. What macOS are you upgrading from? El Capitan or Sierra?


The trick towards the end about starting up while holding the option key and selecting the main HD worked for me! Thank you for this article and for adding in those reader tips because that’s what saved me
This is why I’m a slow adopter, but I got caught anyway because I installed a security update, which we’re always told to do right away. Since then, I’ve been having this problem. A couple times, the computer has shut down on its own when I shut the lid which normally makes it go to sleep. That’s when the problem shows its face again. I’ve been planning to upgrade to Mojave, but since 32 bit apps will not work there at all, I’ve been waiting until I could verify all my apps were 64 bit before proceeding with that. Anyway, from what I’ve read, doing that step does tend to resolve this issue.
Worked for me. I shut down, turn it on, held command option P R at apple logo screen until installation logs appeared. Selected to restart from a different disk – there was only one disk to select from.
After that it restarted and came to login screen
1. Shut Down
2. Restart while pressing the Command + Shift + R Keys
3. Click on apple logo
4. Restart
5. Back to sign in page
My computer is stuck on ‘macOS could not be installed on your computer’ screen. It directs me to quit the installer to restart your computer.
There is no evident way to quit the installer as I cannot get into any toolbar or menu.
I have tried several things as directed in the appletoolbox. They aren’t working. What else can I do?
Lrockhill, Try Shutting down Mac.
Next,Hold Command+R (boots into recovery mode) (you can use Option+Power if you have a Time Machine Backup available)
Keep holding until Apple logo appears. Reinstall macOS. You will lose no data. You can verify this by clicking Get Online Help, and scrolling down to “Reinstall macOS”. Or if you have a backup you can restore from, choose Restore From Time Machine Backup. Having said that if you are having issues getting to recovery mode when you start up, I think your best bet would be reach out to Apple Support. Just curious. What macOS are you upgrading from? El Capitan or Sierra?
Why isn’t it all done by apple automatically?