Occasionally, our Mac computers exhibit peculiar behaviors that disrupt our perception of their stability and flawlessness. We often regard our Apple Computers as infallible until they encounter issues, and then chaos ensues. So, what can be done to restore our once-pristine machines to their normal, reliable state?
Lately, I’ve encountered significant challenges with my Mac. Despite being able to log in, none of my applications seem to launch. Moreover, the computer’s performance has noticeably slowed down, rendering it nearly unusable. On certain occasions, the dreaded spinning beach ball appears and persists seemingly indefinitely. Can you empathize with this situation?
Consider your Mac user account as the central hub for all your data—a repository where your information consistently resides. Within your user account’s HOME FOLDER, you’ll find the majority of your digital assets, including modifications to application settings, alongside a plethora of other crucial elements:
Files stored on the desktop.
Preferences for your desktop background.
Safari’s cached data, browsing history, and website-related information.
Your email data, contact details, and calendar appointments.
iTunes media content, encompassing music, videos, and images from applications like Photos and Photo Booth.
Custom configurations tailored for applications such as Mail, Safari, Messages, FaceTime, Notes, Contacts, Calendar, Finder, as well as settings for third-party apps.
Files residing in specific directories like Documents, Downloads, Movies, Music, Pictures, Public, and Sites within your Home folder.
This HOME FOLDER serves as the core repository where your Mac’s vital components are stored, making it essential to your computing experience.
Changed the permissions of items in your home folder?
Occasionally, when you modify the read or write permissions of items within your home folder, it becomes necessary to reset these permissions. This becomes particularly important when you employ actions like Command+I keystrokes (or any other method to access Get Info) to alter these permissions.
If you encounter any of the following symptoms, it’s possible that issues have arisen as a result of changes in your home folder’s permissions:
When trying to save changes, you see a message that the file is locked or that you don’t have permission to save
You frequently (and repeatedly) see the message that macOS needs to repair your Library to run applications
In the Photos App, you see a message that your library needs to be updated or reselected each time you open Photos
System Preferences changes aren’t saved after you quit System Preferences
A message pops-up that the startup disk has no more space available for application memory
Updating your Dock isn’t saved after you log out of your user account
Windows that were open the last time you logged out or quit an app (before you changed permissions) open again after you log in or open the app
When moving items in the home folder, your Mac asks for an administrator name and password word
Preview, TextEdit, and similar apps unexpectedly quit when you try to open them
Activity Monitor shows that Safari or SafariDAVClient is using a lot of system resources
You’ve noticed a marked decrease in your Mac’s performance
iTunes displays a message that your device cannot be synced
Photos (or videos) that you import into Photos app don’t appear within the app but do appear in Finder
In the event that you come across any of these errors, resetting the permissions of your home folder typically resolves the issue. Users have reported success with this method across various macOS versions, including Mojave, High Sierra, Sierra, and most Mac OS X versions.
Create Another Administrator Account
Adding a new user to your Mac is a straightforward process that can be incredibly useful in various scenarios. Whether you’re setting up an account for a family member, creating a separate workspace for your professional needs, or simply organizing different aspects of your digital life, macOS makes it easy and secure. This section of the article will guide you through the steps to add a user on your Mac, ensuring that each user has their own personalized and secure space on your device.
Open the System Settings app on your Mac.
In the sidebar on the left, scroll down and click Users & Groups.
On the right side of the window, click the Add User… button.
If prompted, enter your the Admin password for your Mac.
Click the Unlock button.
At the top of the window that appears, click the pop-up menu next to New User.
Select Administrator from the list of options.
Enter the Full Name of the user that you are adding.
Once the Full Name is entered, the Account Name will be automatically generated. However, you can enter a different name that will be used for the Home Folder. As a reminder, if you do not customize or change the Account Name, it cannot be changed after the user is created.
Enter the password for the new user. Passwords must be at least four or more characters, but you can also leave the password field blank.
Enter the same password again to verify and confirm.
If needed, you can enter a Password Hint in order to provide a way for the new user to remember what their password is.
After everything has been entered, click the Create User button in the bottom right corner of the window.
Once the new user has been created, there are a few more settings and options that you can customize and enable. Here’s what you can do and how to do it:
Open the System Settings app on your Mac.
In the sidebar on the left, scroll down and click Users & Groups.
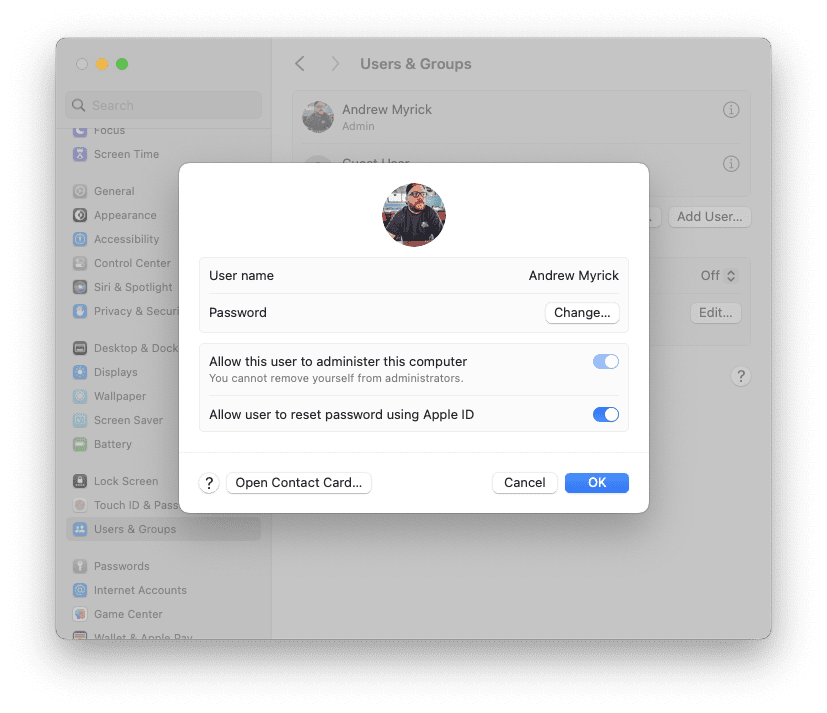
Click the Information button next to the new user that you just created.
If necessary, click the toggle next to Allow this user to administer this computer to the On position.
Click the OK button.
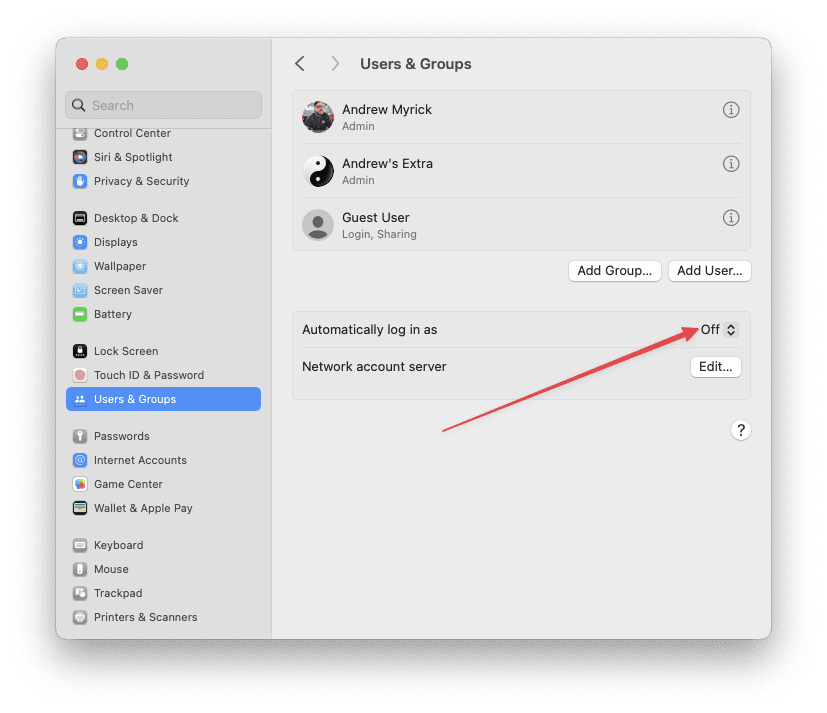
At the bottom of the Users & Groups window, click the multi-select menu button next to Automatically log in as.
Either select the account that you want to automatically log into, or select Off, if you want to select and sign into the account manually every time your Mac starts.
Successfully adding a user to your Mac enhances the device’s versatility and personalization. By following the steps outlined, you can create a distinct and secure environment for each user, catering to their specific needs and preferences. This feature is particularly beneficial in shared devices, ensuring that each user’s data and settings remain private and untouched by others. With each user having their own space, your Mac becomes a more efficient and organized digital hub, adaptable to the varying needs of its users.
Permission to Reset
Maybe all we need is to repair some user file permission (fingers crossed), so let’s try fixing that first. We’ll need to restart in Recovery Mode
For Yosemite and below
Shut down your computer
Press Command+R
Press the power button
Hold Command+R until you hear the startup chime or see apple logo and progress bar
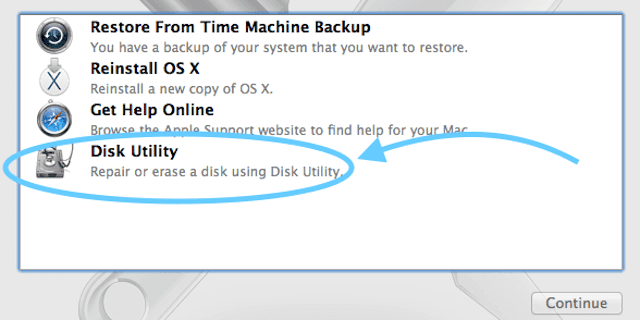
Select Disk Utility
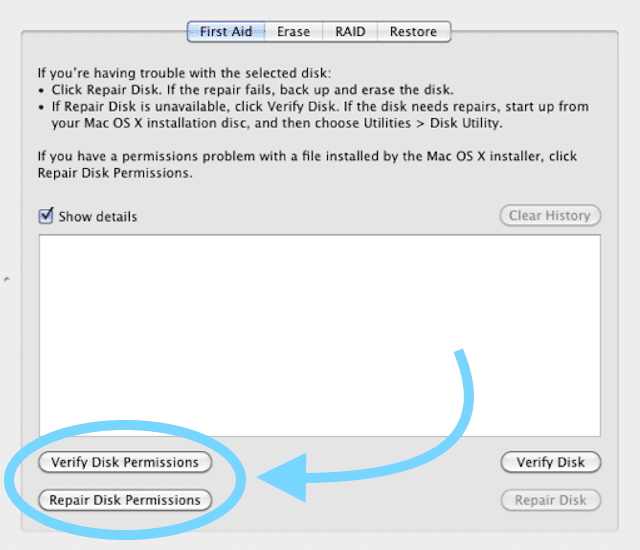
Select Disk Verify Permissions
After verify, choose Repair Disk Permission
Starting with El Capitan, Apple removed from Disk Utility verify and repair permissions buttons.
Apple claims that all system file permissions are now automatically protected and updated during software updating. But of course, there’s always a means to an end.
For El Capitan
Shut down your computer
Press Command+R
Press the power button
Hold Command+R until you hear the startup chime or see apple logo and progress bar
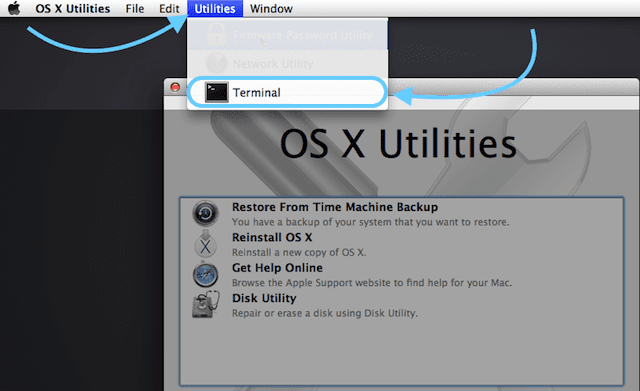
Select Utilities Menu at the top of the screen
Select Terminal
In the terminal window, type resetpassword
Press Return
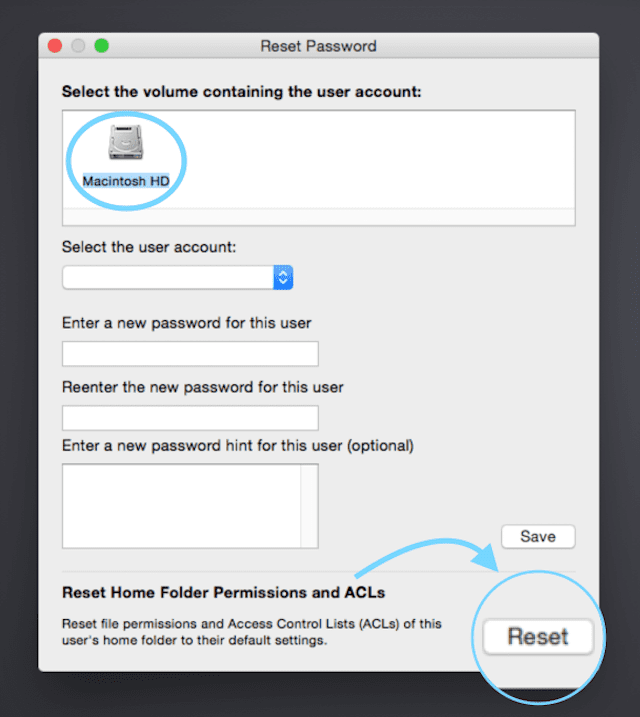
A Reset Password window opens
WE ARE NOT GOING TO RESET THE PASSWORD
Select your startup disk (Macintosh HD if not renamed)
Select your user account
Under Reset Home Directory Permissions and ACLs, click Reset
Select Restart from the menu bar
Can’t Verify Disk Permissions?
As per Apple’s guidance, there’s no longer a need for manual disk permission repair. macOS Catalina, Mojave, High Sierra, and Sierra (as well as Mac OS X El Capitan) automatically handle file permission repairs as part of their software update processes.
Enhancements in file integrity, initially introduced with El Capitan and further expanded in macOS Sierra, have rendered manual disk permission adjustments unnecessary.
If you suspect that your user account issues are linked to disk permission concerns, the recommended course of action for macOS Mojave, High Sierra, or Sierra users is to consider updating their operating system if an upgrade is accessible.
Reset Home Folder Permissions
Open the Finder app on your Mac.
Navigate to the Home folder. This will either appear under the Favorites section, or you can follow the following methods:
With the Finder app open, click the Go button in the Menu Bar.
From the drop-down menu, highlight and select Home.
Alternatively, you can press Shift + Command + H with the Finder app open.
Click File in the Menu Bar.
From the drop-down menu, highlight and select Get Info.
Click the Lock in the bottom right corner.
Enter your login password to authenticate.
Click the More button in the bottom left corner.
From the drop-down menu that appears, highlight and select Apply to enclosed items.
If prompted, click the OK button.
Wait until the progress bar completes.
Open the Terminal app on your Mac.
Type out the following command and press the Enter key:
diskutil resetUserPermissions / id -u
For US keyboards, the ` character is just above the Tab key
After entering the diskutil command, if Terminal says that permissions reset on user home directory failed (error -69841), enter chflags -R nouchg ~, then enter the diskutil command again: diskutil resetUserPermissions / id -u
After the commands are finished running, close the Terminal app.
In macOS, you can utilize the following terminal command to rectify user permissions, as detailed in the Apple Support Notes addressing issues arising from alterations in permissions within your home folder.
Terminal Commands Not Working in macOS? Seeing Operation Not Permitted?
If Terminal is not accepting your commands when working with macOS Mojave, Catalina, or above, you likely need to give Terminal Full Disk Access.
Open the System Settings app on your Mac.
In the sidebar on the left, click Privacy & Security.
On the right side of the window, click Full Disk Access.
Scroll through the list of apps and locate Terminal.
Click the toggle next to Terminal to the On position.
If you don’t see the Terminal app listed, click the + button in the bottom left corner.
From the Finder window that appears, click Applications in the sidebar.
On the right side of the window, scroll down to locate the Utilities folder.
Click the drop-down arrow to expand the folder.
Locate and select Terminal.
Click the Open button.
If you already have a Terminal window open, close the app.
Re-open the app and follow the steps in the previous section.
Tap More Into Terminal
If you feel comfortable, try using a command line in Terminal. Some readers report this works for them–particularly for folks still running Mac OS X.
Open a Terminal Window
At the command prompt, enter this exactly including spaces
If there are any errors, they display and your system repairs them, if possible
If there are no errors, it displays nothing
Boot to the Recovery Partition
Press and hold Command+R until you see the Apple logo
If your Mac doesn’t boot, hold down the Option Key while booting to display the built-in Startup Manager and choose Recovery Partition
Or manually start up from macOS Recovery over the Internet, hold down Option-Command-R or Shift-Option-Command-R at startup
Open Terminal and type repairhomepermissions
For macOS, try diskutil resetUserPermissions / `id -u`
This command opens up a window similar to reset the permissions on user accounts.
Boot into Safe Mode
With Safe Mode, you can strip the OS of many unnecessary items such as system extensions, fonts, system cache files, and so on. If your keyboard is fully functional in Safe Mode, this indicates one of your programs or settings might be interfering with it. Exit Safe Mode and check if the issue is gone.
How to enter Safe Mode on Intel CPUs
Restart your Mac and quickly hold the Shift key while your device is booting up.
You can release the Shift key when the login window appears on the screen.
Then log into your Mac and you should see the Safe Boot notification in the upper-right corner of the screen.
How to enter Safe Mode onApple Silicon Macs
Restart your device.
Then hold the power button for about 10 seconds while the device is booting up.
You can release the Power button when the Startup options appear on the screen.
Select your startup disk, press the Shift key, and select Continue in Safe Mode.
You can now release the Shift key and log in to your Mac.
Locate the Corrupt Preference File
After you have restarted your Mac into Safe Mode, you’ll need to locate and delete the cache. However, totally removing the cache is not recommended so save a backup of all the cache files before deleting them. If something happens, you can restore the old files using the backup.
While it may be tedious and time-consuming, this method remains a superior choice to dealing with a malfunctioning computer. Oftentimes, abnormal behavior on your Mac, such as applications not opening or frequent crashes, can be attributed to corrupted preference files.
Preference files contain a wide array of application-specific data, encompassing everything from your browser’s homepage and font settings to details like the shortcuts stored in your Finder sidebar. To begin the troubleshooting process, it’s advisable to boot up your Mac in safe mode. In this scenario, patience truly becomes your most valuable asset and virtue.
Follow the steps above to restart your Mac into Safe Mode.
Open the Finder app.
From your keyboard, press CMD + Shift + G.
Type in ~/Library/Preferences.
Click the Go button.
Open a separate Finder window.
Create a new Folder in a location that you will remember.
Name it something like “OLD User Preferences”.
Move one of the files into the folder that you just created.
Restart your Mac.
Check to see if your user account is still corrupt.
If so, repeat these steps for each individual preference file until you can successfully access your user account.
Use a Third-Party App
Certainly, there are applications available for nearly every task, including repairing permissions. InsanelyMac offers both a RepairPermission app and a Disk Utility app designed to streamline this process. Additionally, Kext Utility for Mac provides similar services, encompassing permission repairs for system folders and system cache rebuilding.
However, it’s worth noting that to run these applications effectively, you must disable SIP (System Integrity Protection) or configure a permissive CSR (Configuration Service Record) configuration. To enable these options, navigate to System Preferences -> Security & Privacy and select “Allow apps from Anywhere.” If you prefer to execute these changes through Terminal, use the command: sudo spctl –master-disable.
System Integrity Protection (SIP) was introduced in El Capitan and operates as a rootless mode, enhancing the security of your Mac by preventing malware from altering system files and directories.
Here’s how you can disable your Mac’s SIP (System Integrity Protection):
Restart your Mac
Boot into Recovery Partition
Hold down Command-R until you see an Apple icon and progress bar
From the Utilities menu, select Terminal
At the command prompt type exactly thiscsrutil disable
Press Return
The terminal displays a message that SIP is disabled
Restart from the Apple menu (upper-left)
If you need to re-enable SIP, follow the steps including restarts and typing exactly thiscsrutil enable.
A Visit With AppleCare
If your computer is still under your AppleCare agreement, the time has come to call or take the computer to the Apple Stores. Let the Geniuses take a look at it; you paid for this after all!
They usually know what they’re doing and should fix the problem in a lot less time than you. They certainly see a lot more questions than we do (thankfully.)
Even if your Mac is out of warranty, you may still be able to get it fixed for less than you think. Try this first, before paying:
Reinstall macOS Using Your Mac’s Recovery Mode
Reinstalling macOS using Recovery Mode can be a useful troubleshooting step or a way to refresh your system. This guide will walk you through the process step by step.
Before You Start
Before you begin, ensure that you have backed up any important data. The reinstallation process should not erase your data, but it’s always a good idea to have a backup just in case something goes wrong. Also, make sure your Mac is connected to the internet, as the reinstallation process requires an internet connection.
Entering Recovery Mode
The process to enter Recovery Mode varies depending on whether you have an Intel-based Mac or a Mac with Apple silicon.
For Mac with Apple Silicon:
Shut down your Mac.
Press and hold the power button until “Loading startup options” appears.
Select Options, then click Continue.
For Intel-based Mac:
Restart your Mac.
Immediately press and hold one of these key combinations:
Option-Command-R to install the latest version of macOS compatible with your computer.
Option-Shift-Command-R to reinstall your computer’s original version of macOS (including available updates).
Command-R to reinstall your current version of macOS.
Keep holding the keys until you see an Apple logo or spinning globe.
Reinstalling macOS
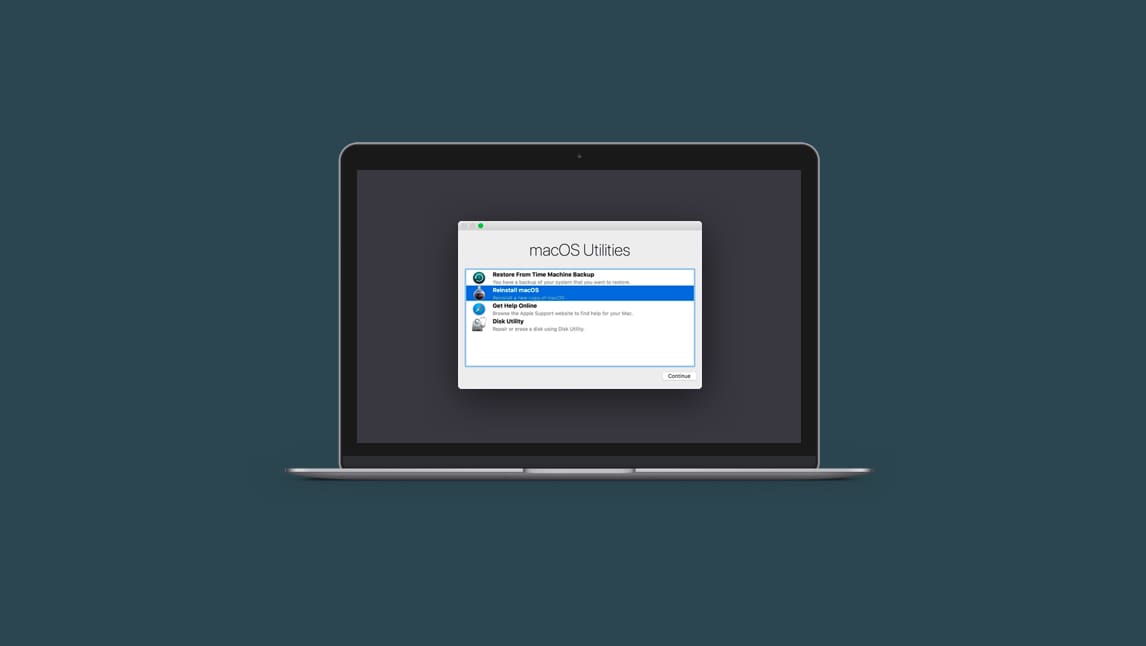
Once you’re in Recovery Mode, follow these steps:
When you see a window with the option to reinstall macOS, your Mac has started up from Recovery.
Select the option to reinstall macOS.
Click Continue.
Follow the onscreen instructions.
When asked to select a volume, select your current macOS volume (in most cases, it’s the only one available).
Wait for the reinstallation process to complete. This may take some time, and your Mac may restart during the process.
After Reinstallation
Once the reinstallation is complete, your Mac will restart. You’ll then need to set up your Mac as if it were new, including setting up a user account and configuring settings. If you had backed up your data, you can restore it after the reinstallation process.
Reinstalling macOS using Recovery Mode can help solve many issues and give your Mac a fresh start. Always remember to back up your data before starting the process to prevent any data loss. If you encounter any issues during the reinstallation process, consider seeking help from Apple Support or a professional with macOS system administration experience.
Conclusion
We’ve reached the end of our journey through the sometimes murky waters of fixing corrupt user accounts in macOS. It’s been a voyage filled with troubleshooting techniques, terminal commands, and hopefully, a renewed sense of control over your Mac.
Remember, the methods explored here should be approached with caution. Always back up your important data before venturing into account repairs, and don’t hesitate to seek professional help if any step feels unclear or overwhelming.
By understanding the causes of user account corruption and implementing the appropriate solutions, you’ve conquered a potential tech hurdle and reclaimed access to your valuable data. Take a moment to appreciate your newfound Mac mastery, and remember, even the most seasoned users encounter occasional hiccups. The key is approaching them with a cool head, a proactive spirit, and the knowledge gained from resources like this.
As you move forward, keep an eye out for potential warning signs of account corruption, such as unexpected login issues, application crashes, or permission errors. With a little vigilance and the tools you’ve acquired here, you’ll be well-equipped to handle any future bumps in the road.
For most of her professional life, Amanda Elizabeth (Liz for short) trained all sorts of folks on how to use media as a tool to tell their own unique stories. She knows a thing or two about teaching others and creating how-to guides!
Her clients include Edutopia, Scribe Video Center, Third Path Institute, Bracket, The Philadelphia Museum of Art, and the Big Picture Alliance.
Elizabeth received her Master of Fine Arts degree in media making from Temple University, where she also taught undergrads as an adjunct faculty member in their department of Film and Media Arts.
Apple intentionally damages all non-apple applications with upgrades. They should be heavily fined for this practic. They do not inform you that the files are save in a file that I inadvertently located. I have not yet confirmed if they are usefull or if this will help yet. All saved passwords will not work even though the file that contains them includes all of the correct info. Other critical spreadsheet financial files will not open and the applications states that
I had an issue that would have pointed to a hardware failure (WiFi could not be turned on, refused to look for networks or “apply” any changes in the System Preferences for Network > Advanced).
At first it was blamed on third-party software but no amount of disabling helped. Then it was suspected that there was malware or a virus but no such issue was found. The natural thing to do is to blame it on failing hardware in the case of an older Mac (2009). But it just so happened I run a partitioned drive and the WiFi worked flawlessly on a pre-El Capitan OSX. Just the same, after troubleshooting extensively in every form mentioned on the web it was decided to just change the Wireless card out entirely. That solved nothing. Still no way to power on the WiFi interface. The only thing that has ever really gone wrong with my setup is some massive permissions issues between the two partitions. So I kept coming back to that but how to fix the permissions since that isn’t an option in El Capitan? Nonetheless I am trying that as a last ditch effort before I just write off El Capitan and attempt to upgrade the OS.
In my case, deleting various Preference plist files for the network/airport did nothing. The only thing left was to erase the partition entirely given that an “in place” install of El Capitan failed to resolve the issue.
I can’t say that third party software is a reasonable scapegoat because there is very little software for El Capitan released in the past five years and my hardware/software on the impacted partition hasn’t been changed, yet went from working to nonworking for no reason at all.
I can’t help but think that there are Airport, WiFi or WiFiProxy settings that are corrupt or don’t have the correct permissions given that I HAVE in the past done “Get Info” to alter the default permissions when other issues came up (like asking me to enter my password to move files between folders). So my money is on a corrupted file of some sort that is not being overwritten by an install of the OS.
I found this website after I Googled something I found burried deep in my “About this Mac” System Profile, in which SyncManager reported “Admin database corrupted. Resetting data directory.” This reaffirms my feeling all along that somehow corrupt system-level permissions are involved.
Afer searching for days, yours is the first article that looks like it will address my question of transferring files to another user account because my main account seems to be corrupted. The problem with my user account is the color/contrast is off. Darks are too dark, whites too white and all colors off a bit. Because I am a photography enthusiast, this is a huge problem, as you can imagine.
Fixing the corrupted user account would be a preferred solution, but does my problem sound like something that could be fixed or should I just put my time into sharing files?
Apple is absolutely correct. With Mojave and Catalina we no longer need to concern ourselves with user permissions. That is, as long as we don’t use Migration Assistant or Time Machine to populate our directory on a clean install to a version upgrade. So folks, its now fresh installs. Fresh installs of apps, prefs, settings and all that stuff we love to do. My OSX solution was to downgrade back to Mojave rather than face my 3rd fresh install of the year (cloned my way back on a T-2 chipped mini). My hardware solution has been to wean myself off OSX and move everything to an iPad. I’m not there yet but, other than serving media and photography, I’m off my one remaining Mac (from 3).
After many years, I’ve run across many issues with computers, so when I bought this one I just decided to install a dozen user accounts, just in case.
One for each member of my family in the event they needed to use it while I’m away, with their own backup account, and six for me.
It finally became necessary today, and I still have four left.
I set up a daily use account with some restricted permissions so I can use everything I need day to day, and can’t do some things inadvertently.
Hopefully, that also means a virus or malware or whatever can’t do those things either, I’m not sure. But if something does happen, Time Machine is great to have.
I also use two drives for Time Machine (OK, I have three, but I didn’t want to sound crazy).
I store two well away from my computer in secure boxes and one hooked up.
I rotate them every now and then. If somebody gets some sort of disk encryption ransomware or whatever onto my disk, well, I have another backup if it affected my backup, too.
I also bring one of my work computer’s backup home and bring one back the next day.
I don’t want any interruption of my A/R or special logos and things I paid people to create for me.
After a while, even if you own a top-end computer, your data can be worth a hundred times what your computer and software is worth.
I have read through all the comments and have a slightly different issue which brought me here.
My Mac with Mavericks (10.9.5) crashed and I had to restore it from a Time Machine backup.
All went good except that my account preferences were reset to defaults for things like mouse preferences, screen saver, Finder sidebar items, etc. Not the end of the world, but annoying enough for me to look for a solution.
No problem I thought, just restore ~/Library/Preferences from Time Machine prior to the crash, right?
Well, that didn’t work, and now I’m that much more annoyed! What else can I try?
Sorry to hear about your mac crash, but glad it’s working again!
You did exactly what we would recommend in restoring the Preference folder from your user account from a previous backup.
If you inspect that folder, the personalized settings (.plist files) for things like your mouse, finder, and so forth are all there. So, in theory, it should work!
I assume you restarted after restoring these preferences…
So the next step would be restoring your user cache folder as well and see if that does the trick!
After running updates on High Sierra the other day, and running Microsoft Office updates too, Excel would not launch. Spent an afternoon with Microsoft support to no avail, but they then suggested that I set up a new user account, which I did, and Excel worked on that account.
The problem was a bad preference, just as you coached.
But, based on your article, here is a tip: Instead of just going through the Preferences brut force to find the corruption one, I sorted the preferences by date/time. Turns out there was one preference for MobileMeAccounts that had been changed RIGHT AT THE TIME I started having problems. Totally unrelated to Excel, of course, but when I deleted it and restarted, Excel fired right up!!
Thank you!! This information saved me from trashing a 5 year old iMac that I thought developed a faulty hard drive or memory. – As a last ditch effort, I first attempted to create a 2nd admin account with the intention of wiping sensitive info from the main admin account. What a surprise when my computer came back to life under the new user account.
That led me to search to see if it was a known issue, and that led me here.
I migrated from an old MacBook pro to a new one running macOS Mojave. I had what appeared to be permissions problems and I could not create a second admin account due to permissions on the user folder. Thanks to your comment regarding the OS repairing itself on an update, I tried to update. Luckily one existed; I updated and it repaired the problem.
I have been able to fix an issue with Adobe Animate not saving FLA files and a whole bunch of other issues that appeared out of nowhere on my mac by following your guide.
I received messages about iCloud settings, Firefox profile has gone missing, Illustrator crashing at the start every single time, Mail not saving messages, etc.
I previously restored from Time Machine, but the issues came back. This latest issue came back just a day after a restore, so I was about to break every single breakable in the house, haha!
I performed the home permissions fix and Terminal command permissions fix. I’m on High Sierra.
You are a legend Elizabeth!!
NO more of this message ‘Mail can’t open because you don’t have the necessary permissions to change the folder where it saves information.’
Life is back to normal again!
Thank you again!!
It started shutting down and restarting randomly a couple days ago, but would start back up and work fine. Then last night it happened again but this time on reboot I was greeted with a blinking grey folder icon with a question mark.
I’ve been trying to figure it out all day without much success. At first I thought it was my iCloud causing the problem, since when I logged on I kept seeing an iMessage error popup but none of the buttons were responsive and couldn’t access system preferences.
I’ve managed to login to my guest user account for now and set it up as admin, but still unable to access my main user account.
Also tried Safe Reboot with no luck.
Also tried logging out of all iCloud accounts and changing the password.
Sorry to hear about your iMac’s woes! Let’s try to reset your iMac’s System Management Controller (SMC for short)!
Choose Apple menu > Shut Down
After your iMac shuts down, unplug the power cord from the computer’s power port
Wait 15 seconds
Plug the power cord back in
Wait 5 seconds, then press the power button again to turn on your iMac
If that doesn’t do the trick, let’s also try resetting the NVRAM:
Shut down your iMac, then turn it on and immediately press and hold these four keys together: Option, Command, P, and R. Release the keys after about 20 seconds( right after the second startup chime–if your iMac model chimes).
Once restarted, open your System Preferences to adjust any settings that reset, like volume, screen resolution, startup disk selection, and your time zone.
If none of these helps, try rebooting and hold down the OPTION key–this opens up your iMac’s Startup Manager. Locate your main HD and select it and click the arrow below or press return.
Finally, if you’re still not in luck, run Apple Diagnostics or Hardware Tests to identify problems. Remove all connected devices except your keyboard and mouse, and Ethernet (if using that.) Reboot again, this time holding down the D key. This command runs through a series of tests on your Mac and then shows you results as well as actionable next steps. Follow the directions on-screen.
I have a 2011 macbook air on Sierra. In the admin account it says it got full wifi and connected but when opening a browser states no internet connection but imessage works. In guest account wifi and browsing works fine. this is after a complete hard drive wipe and os reinstall from apple store, they said must be hardware issue. looking for help as it seems like a software issue and i don’t want to buy new one at this point.
Sorry to hear about your WiFi issues with your Mac. Have you tried forgetting all WiFi networks in your Admin account then adding in again? Forgetting wireless networks allow your computer to reset some settings, such as usernames, passwords, or configurations that may allow you to reconnect again.
To Do This:
1) Open System Preferences > Network or Tap on the WiFi symbol in your top menu bar and choose Open Network Preferences at the bottom of the drop down
2) Select WiFi in the left panel of the then click Advanced located at the bottom right
3) Select all your saved WiFi networks and click the minus sign to remove
4) Once all networks are deleted, restart your Mac
5) Go back to System Preferences > Network > WiFi > Advanced
6) Click on the plus sign and from the drop-down menu select your local WiFi Network(s) to set up the WiFi as a new connection (WiFi on Macs appears to work more reliably when WPA/WPA2 security is selected rather than WEP)
Hopefully that does the trick! If not, let us know.
I am on Sierra. The problems I’m having seem relevant to this article, but none of this worked. Mostly because my lack of permissions prevents me from doing anything AS THE USER whose account is corrupted. And because many nice features have been disabled in Sierra.
BUT, I have learned a lot from this article and it makes me feel more and more comfortable dabbling around in the deep system. 😉
Thanks for the great summary. The terminal resetUserPermissions option seems to have worked for me in Sierra. We’ll see what happens once the upgrade to HighSierra goes through…
I suffered from that iCloud password loop on my iMac/ EL Cap for weeks until I stumbled upon this article! I bit ago I did change folder permissions between users, moved files, then deleted an extra user which I think screwed up my system even more. Everything above “Tap More into Terminal” did the trick.. I can’t thank you enough, it was driving me batty! Thank you!
I recently upgraded to Sierra, now running 10.12.6. The install process created another startup folder with all the attendant folders; Applications, Library, System and Users. I don’t seem to be having any problems, all apps installed are working normally, but I’ve never encountered a situation like this.
Model Name: MacBook Pro
Model Identifier: MacBookPro8,1
Processor Name: Intel Core i5
Processor Speed: 2.3 GHz
Number of Processors: 1
Total Number of Cores: 2
Memory: 16 GB
I’ve made a classic error. I installed an SSD in Macbook Pro which I dropped High Sierra on, so on first start-up I transferred the user from my old HDD. All good.
I wanted to change the name of the home folder, my name and nick-name. All good until I realised that I accidentally tabbed to section that contained my user status (staff/admin) and accidentally deleted it, not knowing what it was at the time, I left it blank : (
I realised what I had done and tried to create another admin account whilst I could, but it didn’t work.
I quickly backed up to Time Machine and copied my precious folders to an older G5 with 4HDD slots (thank God!).
The issue I now have is creating an admin account on a mac without an admin user to ‘approve’ the creation! I have tried a couple of command lines to trick the Mac, believing it’s a first run – that didn’t work. I’m now creating a bootable drive so hopefully I can start-up from that in an effort to erase the SSD and start again.
If you know a quick fix, it would be appreciated… but I’m guessing this is a grin and bear it moment where I hold up my hands and say ‘oops’.
We don’t know of any quick fix on this one. I’m surprised it let you leave your user status as blank! Anyway, your course of action seems right on target, though time-consuming!
Ok HELP!! This is going to be long. My mac went crappy might be the hard drive, I had a back up with time machine on a 1 TB drive. So I restored my drive but I used the wrong account! Not Apple ID, but account in my Mac. It was from when I first bought my Mac and transfer the data from an airbook, but I don’t use that account. I went through the restore process and it downloaded and found my two accounts on my Mac, but I uncheck the wrong one. So now my Mac is useless to me because I NEED everything on the other account, including bookmarks thousands of them! Tons of apps and software I paid for also! It’s all still on the original 500 GB drive, plus on a different partition on the 1 TB in my Mac, but how do I recover my other account? I’ve tried recovery a second time and it did not ask which account I wanted to restore like it did the first time! Yes I should have transferred it all, now I’m screwed! Please help!!!
so I have this problem of applications working on one admin account but not the other (which I just created) I am unsure of how to back up my whole entire computer to uninstall and reinstall Sierra as I do not have an external HD. I have never used time machine and I don’t know how I would set it up, do I need an external HD for that? I need to fix this issue but I don’t have a ton of extra money to dump into a tech call to support, but I could probably do more cloud storage? someone please help I am tech-tarred and I need a step by step instruction of how to fix this so I don’t lose all my pictures, movies and music.
It’s best to use Time Machine with an external drive. You can actually get them fairly inexpensively these days, even at your local electronics shop or via Amazon. However, we might be able to solve your problems by moving some applications from user folders.
Since you have two admin accounts, you may have installed Applications within a user folder rather than the Main Applications folder. Open your Macintosh HD and look in each of your user folders for the folder Applications. If an application is listed in only one folder, it may not work within another. The easiest way to fix this is to move the applications you want to use on both accounts to the Main Applications folder.
Log in separately to each admin account and then move the applications that are in User folders to the Main Applications folder.
Alternatively, reinstall all the applications that appear in your User folder but this time select the Main Applications folder as the destination.
Well at least this has helped me figure out where my problem is in Safari, thank you. I have El Capitan and when I got to Terminal and type in Reset password the reset menu appears but it doesn’t list a HD or any other disk??? Unfortunately, I can’t go anywhere from that point.
My current problem sounds similar but it’s only related to the current update of Sierra 10.12.1.
If I update, I can’t open any Apps that are part of the OS, or at least the ones I tried. Safari doesn’t open, Settings and iTunes.
I was able to revert the problem by “downgrading” with TimeMachine, still using Sierra but without the latest update.
As soon as the update is done, the problems come back. I even tried reinstalling but that didn’t help either, only the backup fixed the issue.
I noticed a problem with AFD too. My iTunes library is located on a network drive and my Mac somehow looses connection without actually disconnecting. It just can’t see the contents anymore. I switched over to a “Microsoft-Network” for now, that seems to help at the moment.
If has been working like a charm for so long and now this is happing out of the blue. It’s frustrating.
English is not my first language, so I hope the description is not too confusing.
Hi There!
Your English is great, and I’m sorry you are experiencing this problem. It sounds like you have a corrupt OS installation and need to reinstall in Recovery mode. And of course back up all data first–which you appear to do via Time Machine! That’s great.
My first thought is to to sign out of iCloud on all programs and in System Preferences (if you are able to get into these). This includes iTunes, App Store, Messages, FaceTime, etc. Try signing out of iCloud and all associated apps before you update to the latest version of macOS Sierra. And then reinstall in Recovery Mode.
Alternatively, hold off on updating macOS Sierra until the next update. I’ll keep looking into this issue and update you if we find out more information or hear from others experiencing similar issues.
What a pain!!! It must feel so frustrating, and I am sorry for that.
Cheers,
elizabeth
Someone at Apple needs to realize that corruption occurs in preference files, and that users will need to reset them, even with the new ‘protection’ scheme (which doesn’t work, experience talking here). Eliminating a tool which still works, is a good reason for wiping Sierra and going back to older OS iterations.
I truly believe in you but I just dont feel able nor willing to try this.
I hope I never get there but if I do I will prefer calling in a professional.
But many thanks for other Tool box fixes. Many were helpful.
Please keep them coming my way.
Merci.
Hi Serge,
Thanks for your comment. I totally understand your concern. We should always be 100% comfortable with anything we do with our Macs and iDevices. I hope this particular article will provide some guidance on whether the problem is your user account–all without actually changing anything. And of course, it also helps to have some working knowledge when speaking to a professional, so that they understand that you are knowledgable about your machine! I hope Apple ToolBox keeps bringing good tips and advice your way for all your Apple devices. I wish you the best. Cheers, Liz


Apple intentionally damages all non-apple applications with upgrades. They should be heavily fined for this practic. They do not inform you that the files are save in a file that I inadvertently located. I have not yet confirmed if they are usefull or if this will help yet. All saved passwords will not work even though the file that contains them includes all of the correct info. Other critical spreadsheet financial files will not open and the applications states that
Image Capture didn’t work for me anymore. After I deleted ~/Library/Preferences/com.apple.Image_Capture.plist it worked again!
Cut to the chase. Back up your Mac’s data files to an external Time Machine drive and reinstall your OS. Very simple. Just reset to factory.
I had an issue that would have pointed to a hardware failure (WiFi could not be turned on, refused to look for networks or “apply” any changes in the System Preferences for Network > Advanced).
At first it was blamed on third-party software but no amount of disabling helped. Then it was suspected that there was malware or a virus but no such issue was found. The natural thing to do is to blame it on failing hardware in the case of an older Mac (2009). But it just so happened I run a partitioned drive and the WiFi worked flawlessly on a pre-El Capitan OSX. Just the same, after troubleshooting extensively in every form mentioned on the web it was decided to just change the Wireless card out entirely. That solved nothing. Still no way to power on the WiFi interface. The only thing that has ever really gone wrong with my setup is some massive permissions issues between the two partitions. So I kept coming back to that but how to fix the permissions since that isn’t an option in El Capitan? Nonetheless I am trying that as a last ditch effort before I just write off El Capitan and attempt to upgrade the OS.
In my case, deleting various Preference plist files for the network/airport did nothing. The only thing left was to erase the partition entirely given that an “in place” install of El Capitan failed to resolve the issue.
I can’t say that third party software is a reasonable scapegoat because there is very little software for El Capitan released in the past five years and my hardware/software on the impacted partition hasn’t been changed, yet went from working to nonworking for no reason at all.
I can’t help but think that there are Airport, WiFi or WiFiProxy settings that are corrupt or don’t have the correct permissions given that I HAVE in the past done “Get Info” to alter the default permissions when other issues came up (like asking me to enter my password to move files between folders). So my money is on a corrupted file of some sort that is not being overwritten by an install of the OS.
I found this website after I Googled something I found burried deep in my “About this Mac” System Profile, in which SyncManager reported “Admin database corrupted. Resetting data directory.” This reaffirms my feeling all along that somehow corrupt system-level permissions are involved.
Afer searching for days, yours is the first article that looks like it will address my question of transferring files to another user account because my main account seems to be corrupted. The problem with my user account is the color/contrast is off. Darks are too dark, whites too white and all colors off a bit. Because I am a photography enthusiast, this is a huge problem, as you can imagine.
Fixing the corrupted user account would be a preferred solution, but does my problem sound like something that could be fixed or should I just put my time into sharing files?
Thanks!
Apple is absolutely correct. With Mojave and Catalina we no longer need to concern ourselves with user permissions. That is, as long as we don’t use Migration Assistant or Time Machine to populate our directory on a clean install to a version upgrade. So folks, its now fresh installs. Fresh installs of apps, prefs, settings and all that stuff we love to do. My OSX solution was to downgrade back to Mojave rather than face my 3rd fresh install of the year (cloned my way back on a T-2 chipped mini). My hardware solution has been to wean myself off OSX and move everything to an iPad. I’m not there yet but, other than serving media and photography, I’m off my one remaining Mac (from 3).
I can not find the Permissions directory in either Library.
Hi old sailor,
What version of macOS or Mac OS X do you use?
After many years, I’ve run across many issues with computers, so when I bought this one I just decided to install a dozen user accounts, just in case.
One for each member of my family in the event they needed to use it while I’m away, with their own backup account, and six for me.
It finally became necessary today, and I still have four left.
I set up a daily use account with some restricted permissions so I can use everything I need day to day, and can’t do some things inadvertently.
Hopefully, that also means a virus or malware or whatever can’t do those things either, I’m not sure. But if something does happen, Time Machine is great to have.
I also use two drives for Time Machine (OK, I have three, but I didn’t want to sound crazy).
I store two well away from my computer in secure boxes and one hooked up.
I rotate them every now and then. If somebody gets some sort of disk encryption ransomware or whatever onto my disk, well, I have another backup if it affected my backup, too.
I also bring one of my work computer’s backup home and bring one back the next day.
I don’t want any interruption of my A/R or special logos and things I paid people to create for me.
After a while, even if you own a top-end computer, your data can be worth a hundred times what your computer and software is worth.
Spent several hours with many Apple techs, FOR A YEAR, never came with soultions
I found your website and solved the problem in 10 minutes.
Cant appreciate it enough
Thanks
Hi Manuel,
Yippee! Glad we could help on this issue–it is indeed frustrating!
Thank you so much for letting us know it helped. We appreciate the feedback.
Liz
Thanks for the great writeup!
I have read through all the comments and have a slightly different issue which brought me here.
My Mac with Mavericks (10.9.5) crashed and I had to restore it from a Time Machine backup.
All went good except that my account preferences were reset to defaults for things like mouse preferences, screen saver, Finder sidebar items, etc. Not the end of the world, but annoying enough for me to look for a solution.
No problem I thought, just restore ~/Library/Preferences from Time Machine prior to the crash, right?
Well, that didn’t work, and now I’m that much more annoyed! What else can I try?
Hi Vince,
Sorry to hear about your mac crash, but glad it’s working again!
You did exactly what we would recommend in restoring the Preference folder from your user account from a previous backup.
If you inspect that folder, the personalized settings (.plist files) for things like your mouse, finder, and so forth are all there. So, in theory, it should work!
I assume you restarted after restoring these preferences…
So the next step would be restoring your user cache folder as well and see if that does the trick!
Keep us posted. I am curious!
Liz
Thank you. Thank you.
After running updates on High Sierra the other day, and running Microsoft Office updates too, Excel would not launch. Spent an afternoon with Microsoft support to no avail, but they then suggested that I set up a new user account, which I did, and Excel worked on that account.
The problem was a bad preference, just as you coached.
But, based on your article, here is a tip: Instead of just going through the Preferences brut force to find the corruption one, I sorted the preferences by date/time. Turns out there was one preference for MobileMeAccounts that had been changed RIGHT AT THE TIME I started having problems. Totally unrelated to Excel, of course, but when I deleted it and restarted, Excel fired right up!!
Harry, Thank you for sharing this tip around sorting preferences.
Thank you!! This information saved me from trashing a 5 year old iMac that I thought developed a faulty hard drive or memory. – As a last ditch effort, I first attempted to create a 2nd admin account with the intention of wiping sensitive info from the main admin account. What a surprise when my computer came back to life under the new user account.
That led me to search to see if it was a known issue, and that led me here.
Thank you.
I have mid 2012 mac pro retina
Running Mojave 10.14.2 and I’m getting blank screen after login … it loads 3/4 then it flickers and goes black screen keyboard is lit up …
I have tried all the reset things … Any suggestion would be good
Thank you for this article.
I migrated from an old MacBook pro to a new one running macOS Mojave. I had what appeared to be permissions problems and I could not create a second admin account due to permissions on the user folder. Thanks to your comment regarding the OS repairing itself on an update, I tried to update. Luckily one existed; I updated and it repaired the problem.
You really saved me!
My mac did behave so strange, I thought it was broken.
After Creating a new User Account with Admin rights everything worked superbly!!!!
I can’t say how Grateful I am for your hint!
Wolfgang
Very helpful! Thank you!
Thank you thank you thank you thank you!
I have been able to fix an issue with Adobe Animate not saving FLA files and a whole bunch of other issues that appeared out of nowhere on my mac by following your guide.
I can now sleep tonight
Terminal tells me that sudo /usr/libexec/repair_packages –repair –standard-pkgs /
sudo: /usr/libexec/repair_packages: command not found
/tellef
Hi Tellef,
What version of Mac OS X or macOS do you use?
If you are trying to repair permissions using macOS Sierra and above, there is a new command: diskutil resetUserPermissions / `id -u`
Check out this Apple support article on resolving permissions in the home folders for more info.
Sam
Huge huge thanks!! Command Line stuff worked on High Sierra, otherwise all my files were inaccessible!!
This was of great help, thank you very much.
I received messages about iCloud settings, Firefox profile has gone missing, Illustrator crashing at the start every single time, Mail not saving messages, etc.
I previously restored from Time Machine, but the issues came back. This latest issue came back just a day after a restore, so I was about to break every single breakable in the house, haha!
I performed the home permissions fix and Terminal command permissions fix. I’m on High Sierra.
Thank you so much!
JJ,
Thanks for letting us know. That’s awesome. And so glad you didn’t break the house down–but we’ve all been there at some time or another.
Sam
You are a legend Elizabeth!!
NO more of this message ‘Mail can’t open because you don’t have the necessary permissions to change the folder where it saves information.’
Life is back to normal again!
Thank you again!!
This worked splendidly to get my iMac back in shape. Once I Reset Home Folder Permissions things started to work again. Thanks
This worked perfectly (I’m on High Sierra, so the permissions repair wasn’t available in most of the usual places. Thank you for this!
I have an iMac, running on Yosemite 10.10.5
It started shutting down and restarting randomly a couple days ago, but would start back up and work fine. Then last night it happened again but this time on reboot I was greeted with a blinking grey folder icon with a question mark.
I’ve been trying to figure it out all day without much success. At first I thought it was my iCloud causing the problem, since when I logged on I kept seeing an iMessage error popup but none of the buttons were responsive and couldn’t access system preferences.
I’ve managed to login to my guest user account for now and set it up as admin, but still unable to access my main user account.
Also tried Safe Reboot with no luck.
Also tried logging out of all iCloud accounts and changing the password.
Any clue what to do??
thanks
Hi Natalya,
Sorry to hear about your iMac’s woes! Let’s try to reset your iMac’s System Management Controller (SMC for short)!
Choose Apple menu > Shut Down
After your iMac shuts down, unplug the power cord from the computer’s power port
Wait 15 seconds
Plug the power cord back in
Wait 5 seconds, then press the power button again to turn on your iMac
If that doesn’t do the trick, let’s also try resetting the NVRAM:
Shut down your iMac, then turn it on and immediately press and hold these four keys together: Option, Command, P, and R. Release the keys after about 20 seconds( right after the second startup chime–if your iMac model chimes).
Once restarted, open your System Preferences to adjust any settings that reset, like volume, screen resolution, startup disk selection, and your time zone.
If none of these helps, try rebooting and hold down the OPTION key–this opens up your iMac’s Startup Manager. Locate your main HD and select it and click the arrow below or press return.
Finally, if you’re still not in luck, run Apple Diagnostics or Hardware Tests to identify problems. Remove all connected devices except your keyboard and mouse, and Ethernet (if using that.) Reboot again, this time holding down the D key. This command runs through a series of tests on your Mac and then shows you results as well as actionable next steps. Follow the directions on-screen.
Hope something helps with your iMac–let us know.
Liz
I have a 2011 macbook air on Sierra. In the admin account it says it got full wifi and connected but when opening a browser states no internet connection but imessage works. In guest account wifi and browsing works fine. this is after a complete hard drive wipe and os reinstall from apple store, they said must be hardware issue. looking for help as it seems like a software issue and i don’t want to buy new one at this point.
Hi John,
Sorry to hear about your WiFi issues with your Mac. Have you tried forgetting all WiFi networks in your Admin account then adding in again? Forgetting wireless networks allow your computer to reset some settings, such as usernames, passwords, or configurations that may allow you to reconnect again.
To Do This:
1) Open System Preferences > Network or Tap on the WiFi symbol in your top menu bar and choose Open Network Preferences at the bottom of the drop down
2) Select WiFi in the left panel of the then click Advanced located at the bottom right
3) Select all your saved WiFi networks and click the minus sign to remove
4) Once all networks are deleted, restart your Mac
5) Go back to System Preferences > Network > WiFi > Advanced
6) Click on the plus sign and from the drop-down menu select your local WiFi Network(s) to set up the WiFi as a new connection (WiFi on Macs appears to work more reliably when WPA/WPA2 security is selected rather than WEP)
Hopefully that does the trick! If not, let us know.
SK
I am on Sierra. The problems I’m having seem relevant to this article, but none of this worked. Mostly because my lack of permissions prevents me from doing anything AS THE USER whose account is corrupted. And because many nice features have been disabled in Sierra.
BUT, I have learned a lot from this article and it makes me feel more and more comfortable dabbling around in the deep system. 😉
Really thanks for this detailed an useful brief.
It works perfectly.
Thanks for the great summary. The terminal resetUserPermissions option seems to have worked for me in Sierra. We’ll see what happens once the upgrade to HighSierra goes through…
Thank you the first step for mac os sierra/high sierra seems to have solved my problem.REST HOME FOLDER PERMISSIONS.
Awesome Mike. Yippee! Thanks for letting us know.
SK
I suffered from that iCloud password loop on my iMac/ EL Cap for weeks until I stumbled upon this article! I bit ago I did change folder permissions between users, moved files, then deleted an extra user which I think screwed up my system even more. Everything above “Tap More into Terminal” did the trick.. I can’t thank you enough, it was driving me batty! Thank you!
Alisa,
Yippee!!! We are so glad it the tips helped out–permissions are indeed such a pain–and often drive me batty too.
SK
I recently upgraded to Sierra, now running 10.12.6. The install process created another startup folder with all the attendant folders; Applications, Library, System and Users. I don’t seem to be having any problems, all apps installed are working normally, but I’ve never encountered a situation like this.
Model Name: MacBook Pro
Model Identifier: MacBookPro8,1
Processor Name: Intel Core i5
Processor Speed: 2.3 GHz
Number of Processors: 1
Total Number of Cores: 2
Memory: 16 GB
Hi Per,
Yup, Mac weirdness indeed! Is that new startup folder labeled any differently? Is it more like the update cloned the startup folder?
I would worry if you have two startup folders that are the exact same in every way—though problems aren’t seen now, there could be down the road.
Keep us updated and we’ll look out for any similar Mac user reports on this odd behavior.
Cheers,
Liz
Hello,
I’ve made a classic error. I installed an SSD in Macbook Pro which I dropped High Sierra on, so on first start-up I transferred the user from my old HDD. All good.
I wanted to change the name of the home folder, my name and nick-name. All good until I realised that I accidentally tabbed to section that contained my user status (staff/admin) and accidentally deleted it, not knowing what it was at the time, I left it blank : (
I realised what I had done and tried to create another admin account whilst I could, but it didn’t work.
I quickly backed up to Time Machine and copied my precious folders to an older G5 with 4HDD slots (thank God!).
The issue I now have is creating an admin account on a mac without an admin user to ‘approve’ the creation! I have tried a couple of command lines to trick the Mac, believing it’s a first run – that didn’t work. I’m now creating a bootable drive so hopefully I can start-up from that in an effort to erase the SSD and start again.
If you know a quick fix, it would be appreciated… but I’m guessing this is a grin and bear it moment where I hold up my hands and say ‘oops’.
Hi Chris,
We don’t know of any quick fix on this one. I’m surprised it let you leave your user status as blank! Anyway, your course of action seems right on target, though time-consuming!
Good luck.
Liz
Ok HELP!! This is going to be long. My mac went crappy might be the hard drive, I had a back up with time machine on a 1 TB drive. So I restored my drive but I used the wrong account! Not Apple ID, but account in my Mac. It was from when I first bought my Mac and transfer the data from an airbook, but I don’t use that account. I went through the restore process and it downloaded and found my two accounts on my Mac, but I uncheck the wrong one. So now my Mac is useless to me because I NEED everything on the other account, including bookmarks thousands of them! Tons of apps and software I paid for also! It’s all still on the original 500 GB drive, plus on a different partition on the 1 TB in my Mac, but how do I recover my other account? I’ve tried recovery a second time and it did not ask which account I wanted to restore like it did the first time! Yes I should have transferred it all, now I’m screwed! Please help!!!
Hi Edith,
Have you tried using Migration Assistant to restore that old user account?
Liz
so I have this problem of applications working on one admin account but not the other (which I just created) I am unsure of how to back up my whole entire computer to uninstall and reinstall Sierra as I do not have an external HD. I have never used time machine and I don’t know how I would set it up, do I need an external HD for that? I need to fix this issue but I don’t have a ton of extra money to dump into a tech call to support, but I could probably do more cloud storage? someone please help I am tech-tarred and I need a step by step instruction of how to fix this so I don’t lose all my pictures, movies and music.
Hi Jamie,
It’s best to use Time Machine with an external drive. You can actually get them fairly inexpensively these days, even at your local electronics shop or via Amazon. However, we might be able to solve your problems by moving some applications from user folders.
Since you have two admin accounts, you may have installed Applications within a user folder rather than the Main Applications folder. Open your Macintosh HD and look in each of your user folders for the folder Applications. If an application is listed in only one folder, it may not work within another. The easiest way to fix this is to move the applications you want to use on both accounts to the Main Applications folder.
Log in separately to each admin account and then move the applications that are in User folders to the Main Applications folder.
Alternatively, reinstall all the applications that appear in your User folder but this time select the Main Applications folder as the destination.
Good luck and keep us posted.
SK
Well at least this has helped me figure out where my problem is in Safari, thank you. I have El Capitan and when I got to Terminal and type in Reset password the reset menu appears but it doesn’t list a HD or any other disk??? Unfortunately, I can’t go anywhere from that point.
Thank you for the tutorial.
My current problem sounds similar but it’s only related to the current update of Sierra 10.12.1.
If I update, I can’t open any Apps that are part of the OS, or at least the ones I tried. Safari doesn’t open, Settings and iTunes.
I was able to revert the problem by “downgrading” with TimeMachine, still using Sierra but without the latest update.
As soon as the update is done, the problems come back. I even tried reinstalling but that didn’t help either, only the backup fixed the issue.
I noticed a problem with AFD too. My iTunes library is located on a network drive and my Mac somehow looses connection without actually disconnecting. It just can’t see the contents anymore. I switched over to a “Microsoft-Network” for now, that seems to help at the moment.
If has been working like a charm for so long and now this is happing out of the blue. It’s frustrating.
English is not my first language, so I hope the description is not too confusing.
Hi There!
Your English is great, and I’m sorry you are experiencing this problem. It sounds like you have a corrupt OS installation and need to reinstall in Recovery mode. And of course back up all data first–which you appear to do via Time Machine! That’s great.
My first thought is to to sign out of iCloud on all programs and in System Preferences (if you are able to get into these). This includes iTunes, App Store, Messages, FaceTime, etc. Try signing out of iCloud and all associated apps before you update to the latest version of macOS Sierra. And then reinstall in Recovery Mode.
Alternatively, hold off on updating macOS Sierra until the next update. I’ll keep looking into this issue and update you if we find out more information or hear from others experiencing similar issues.
What a pain!!! It must feel so frustrating, and I am sorry for that.
Cheers,
elizabeth
Someone at Apple needs to realize that corruption occurs in preference files, and that users will need to reset them, even with the new ‘protection’ scheme (which doesn’t work, experience talking here). Eliminating a tool which still works, is a good reason for wiping Sierra and going back to older OS iterations.
Unfortunately in macOS 10.12 – Sierra – the reset home folder permissions and ACLs option has been deprecated.
I truly believe in you but I just dont feel able nor willing to try this.
I hope I never get there but if I do I will prefer calling in a professional.
But many thanks for other Tool box fixes. Many were helpful.
Please keep them coming my way.
Merci.
Hi Serge,
Thanks for your comment. I totally understand your concern. We should always be 100% comfortable with anything we do with our Macs and iDevices. I hope this particular article will provide some guidance on whether the problem is your user account–all without actually changing anything. And of course, it also helps to have some working knowledge when speaking to a professional, so that they understand that you are knowledgable about your machine! I hope Apple ToolBox keeps bringing good tips and advice your way for all your Apple devices. I wish you the best. Cheers, Liz