This short article describes how to flush (or reset) the DNS cache. DNS queries (IP addresses) are usually cached, but sometimes it may be necessary to empty and flush the DNS cache. Clearing (or “flushing”) cache refreshes this data. For instance, if you experience a lot of 404 (cannot find server) error codes or you encounter issues where the named server is not resolving properly, you may want to reset your DNS cache. Luckily, this process is really easy.
macOS and OS X keep a local cache of resolved DNS queries for a time specified by the DNS server. Sometimes it’s necessary to reset the cache immediately and re-query a DNS server. For example, if your DNS server has recently changed, you might need to do this.
If your Mac isn’t using the latest DNS entries from your server, restarting your Mac usually updates its cached information. If you want to update DNS entries and you can’t restart your Mac or Server using macOS or OS X, use the terminal commands below (dependent on macOS or OS X version.)
Flush the DNS cache in macOS Monterey and older Mac OS X versions
macOS Monterey
Starting with macOS El Capitan and newer, Apple changed how you can manually flush the DNS cache. The following method requires the use of Terminal, along with an all-new command. Despite the new command, the end result will remain the same as it has always been with previous versions of macOS. Here’s how you can flush the DNS cache in macOS El Capitan and newer:
Open the Terminal app on your Mac.
The easiest way is to press CMD+Space on your keyboard.
The DNS cache will automatically be flushed, but you won’t see any prompts with Terminal confirming that the process has been completed. Instead, after the DNS flush is finished, Terminal will move to a new line item, at which point the command will have been carried out. In the event that you type the password into Terminal but don’t see the cursor move, don’t be alarmed. This is just how Terminal operates, and as long as you enter the password correctly, the DNS cache will still be taken care of. If you enter a wrong password, Terminal will tell you as much, allowing you to re-enter the password or requiring you to enter the command again.
macOS Sierra
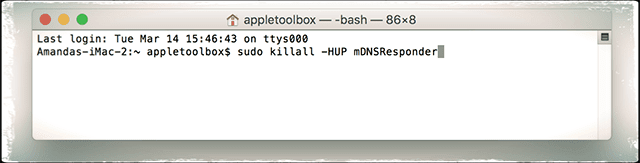
Open Terminal and enter the command below. This command clears MDNS and UDNS caches. DNS in macOS is handled through mDNSResponder, killing the process is the easiest way to reset your DNS cache on a Mac aside from rebooting and manually changing DNS settings.
sudo killall -HUP mDNSResponder The command sudodscacheutil -flushcache also works
OS X 10.10 Yosemite & El Capitan
Use the following Terminal command to reset the DNS cache in OS X v10.10.4 or later
sudo killall -HUP mDNSResponder
Use the following Terminal command to reset the DNS cache in OS X v10.10 through v10.10.3
sudo discoveryutil mdnsflushcache
Enter your admin password when prompted to perform the flush.
Launch the Terminal app (Applications > Utilities > Terminal) and enter (put in your admin password when prompted):
sudo killall -HUP mDNSResponder
Mac OS X 10.6 and 10.5
Open Terminal and type:
sudo dscacheutil -flushcache<c/ode>
Mac OSX 10.4 And Below
Launch Terminal and enter:
lookupd -flushcache
Verify Your DNS Issues Are Resolved
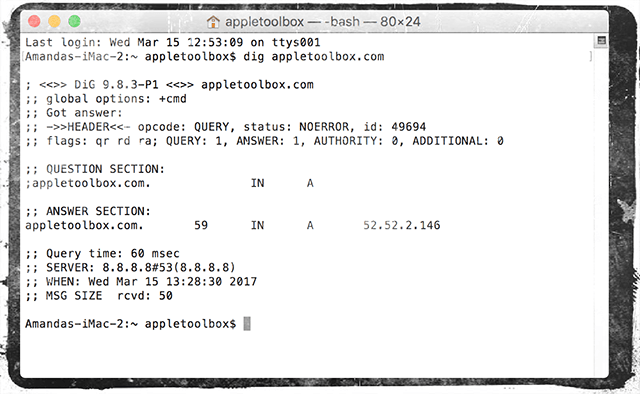
To check whether your DNS is now working normally, use the “dig” command. Stay in Terminal and type “dig appletoolbox.com.” Or the name of any website you regularly visit–just make sure you type dig before the web address.
The command dig is used for querying DNS name servers for information about host addresses, mail exchanges, nameservers, and related information. If speed is your issue, look under the ANSWER SECTION for the Query time.
If that number proves too high, meaning it’s taking too long for the site to load, change your computer’s, devices’, or router’s DNS settings to Open DNS Servers (208.67.222.222 & 208.67.220.220)or Google Public DNS Servers (8.8.8.8 and 8.8.4.4.)
Save a .scpt File to Your Desktop for Quick Access
Open “Script Editor” and add the following command and then save to your desktop (copy and paste the following line including quotes)
For macOS Sierra, do shell script “sudo killall -HUP mDNSResponder”
For El Capitan, do shell script “sudo dscacheutil-flushcache; sudo killall -HUP mDNSResponder”
Double-click that file anytime you need to flush the DNS
If you want a message in Terminal letting you know that the DNS was flushed add the following command to your line
Obsessed with tech since the early arrival of A/UX on Apple, Sudz (SK) is responsible for the original editorial direction of AppleToolBox. He is based out of Los Angeles, CA.
Sudz specializes in covering all things macOS, having reviewed dozens of OS X and macOS developments over the years.
In a former life, Sudz worked helping Fortune 100 companies with their technology and business transformation aspirations.
How do you find the password for this action? I put in the command and the password with a key appears. From this point I cannot type anything else. What should I do?
I located this ip 184.105.247.203 connected. To the mDNSresponder on a MacBook Pro, associated with hundreds of complaints. One person said they hacked and changed his Facebook account password. If they can see that. Imagine all the private photos and messages they hack into.
I can’t get anything on my safari so I’m trying your suggestion. When I open Terminal and enter your command nothing happens. Is a password required and if so when?
Thanks for your help!
Jan
1- What is the best/fastest way to learn Bash shell
2- Have you got more security codes, to either amplify or reduce whatever it might be
using terminal…. ex: How can you control ports being used without your permission,
and to disable them!
3- How to be able to see who snooping, or what could be regarded as so, and then block those
re-enabling files that keep on generating it’s self, ex: I’ve got a few: .plist preferences files,
that keep on re-appearing after secure deletion….or files that are invisible to you (The Administrator!!) and are not allowed access to!


strangley when I mentioned the etc hosts might be the issue (I’m afraid to type the full path) cloudflare thought I was a hacker and blocked me…
How do you find the password for this action? I put in the command and the password with a key appears. From this point I cannot type anything else. What should I do?
I located this ip 184.105.247.203 connected. To the mDNSresponder on a MacBook Pro, associated with hundreds of complaints. One person said they hacked and changed his Facebook account password. If they can see that. Imagine all the private photos and messages they hack into.
This works for flushing the DNS cache, but if you want to view the DNS cache on macOS Sierra, run:
sudo killall -INFO mDNSResponder
and it would dump the cache into the Console app.
You managed to explain all other OS except for El Capitan…dare I ask why?
I can’t get anything on my safari so I’m trying your suggestion. When I open Terminal and enter your command nothing happens. Is a password required and if so when?
Thanks for your help!
Jan
discoveryutil: command not found in Yosemite.
Continuation ……. few questions,
1- What is the best/fastest way to learn Bash shell
2- Have you got more security codes, to either amplify or reduce whatever it might be
using terminal…. ex: How can you control ports being used without your permission,
and to disable them!
3- How to be able to see who snooping, or what could be regarded as so, and then block those
re-enabling files that keep on generating it’s self, ex: I’ve got a few: .plist preferences files,
that keep on re-appearing after secure deletion….or files that are invisible to you (The Administrator!!) and are not allowed access to!
Thanks in advance….