In my most recent post here on AppleToolBox, I covered the basics of how you can use the Mac terminal. In that post, I briefly touched on how to navigate folders using the Mac terminal. I also promised that I would go into greater detail in a later post so that you can become an expert at navigating your Mac from the command line.
This is that post.
If you’re new to the command line, you may have never realized that the terminal considers which folder you’re currently located in. But this is actually a core concept behind how the terminal works. Again, you can read more about this in the previous post.
Today, we’re going to get our hands dirty and start experimenting with the command line. Below are several commands related to navigating your files and folders using the terminal, as well as commands that will allow you to create and delete files and folders.
Once we’ve covered all of these commands, we’re going to put them to practice with an exercise at the end.
How to navigate folders using the Mac terminal: Commands you’ll need to know
The list of commands below is not exhaustive. There are other commands you can use for navigating, but these are the commands you’ll be using every time you open the terminal. In my opinion, these are the bread and butter of not only using the terminal but understanding how it works, too.
So go ahead and launch your Mac terminal, and let’s get into it.
Using pwd to navigate folders using the Mac terminal
pwd is the fundamental Mac terminal command. Not only is it helpful when you need to navigate folders using the Mac terminal, but it’s necessary when checking that you’re executing a command in the right folder.
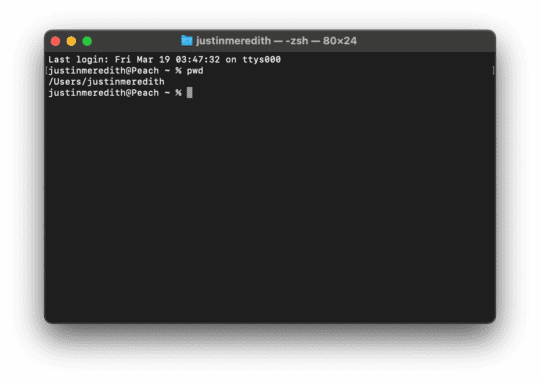
Go ahead and type pwd into your terminal and press return.
The line of text that appears in your terminal will tell you which folder (or directory) you’re currently in. In my case, I’m in the directory named after my Mac username, which also happens to be my name.
Not only will you see that, but you’ll also see the path it takes to get to your current directory. In the example above, you can see that I can get to the “justinmeredith” directory by first going into Users, and then justinmeredith.
If you’re several directories deep in the terminal, this can be a lifesaver. Not only will it tell you where you are, but where you’ve been, where a particular file might be, and so on. Anytime you feel lost or confused by the terminal, enter the pwd command.
Using ls to navigate folders using the Mac terminal
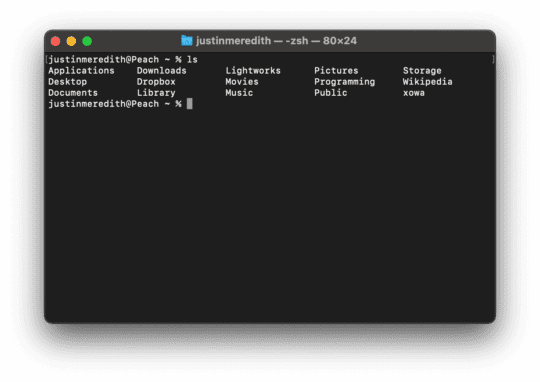
A command that’s very similar to pwd is ls (“LS”). Go ahead and type ls into your terminal and press return.
As you’ll see, this command is used to list the directories within your current directory. If you’re in your Desktop, you’ll see all of the folders and files located on your Desktop.
I tend to use this in conjunction with pwd. Together, they tell you where you are and can help you figure out where you want to go. Additionally, if you create a file or remove a file, using ls is a great way to confirm that the action was completed properly.
Using cd to navigate folders using the Mac terminal
cd is another fundamental command that you’re going to be using constantly. Unlike ls and pwd, however, cd allows us to navigate folders using the terminal. We’re not just listing our directories, but moving through them.
In the previous screenshot, you’ll see that when I entered the ls command, I saw a handful of directories presented to me. You probably did too on your machine. Let’s take a look at the Applications directory.
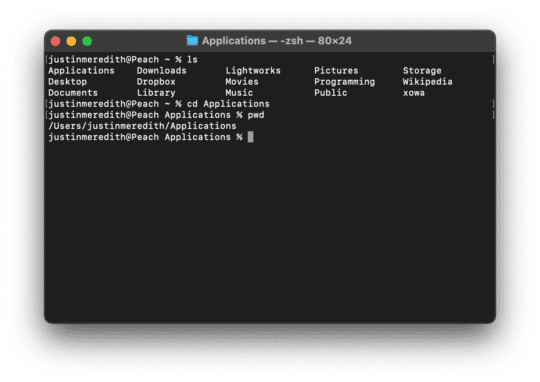
If I want to navigate into this directory using the terminal, I would enter cd Applications into my terminal.
To confirm that I’ve entered the appropriate directory, I can use the pwd command.
If you have a folder named something like My Stuff, you might get an error when using cd. That’s because the terminal treats a space as a separator, not as a normal part of language. Anytime you’re typing the title of something with a space, you want to close it inside of quotation marks. Like so: cd "My Stuff".
A note on using cd to navigate folders using the Mac terminal
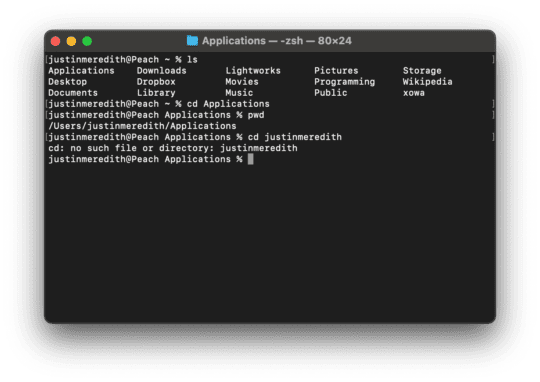
Now, there is something important to note here. You cannot enter any directory on your computer simply by using cd [directory]. The directory you want to move into has to be inside of the directory you’re currently in.
You can see this at work right now. When I try to return to the justinmeredith folder I was in before, I get an error.
The same goes for any other directory on my Mac. If I’m in my Desktop and I want to access an Essays directory inside of my Documents folder, I can’t use cd Essays to transport from my current location to my Essays directory.
That may sound like a pain, but it’s required. Otherwise, you wouldn’t be able to have any folders or files that share the same name. But since the cd command is limited in this way, you’re able to have folders in different locations that have the same name.
Using .. to navigate folders using the Mac terminal
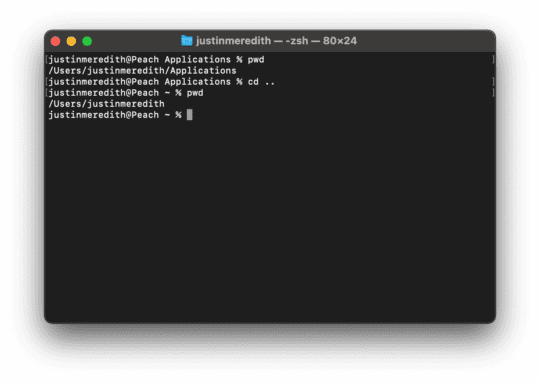
Ok, all of that is well and good, but you still want to go back to the folder you were in before you used cd. After all, if you can only go forward, then cd isn’t a very useful command.
That’s where cd ... The .. acts as a back button, sending you to the directory enclosing the directory you’re currently in. Go ahead and try it out, then use pwd to see where you are.
It’s a really simple command to navigate folders using the Mac terminal that you’ll use without thinking about it.
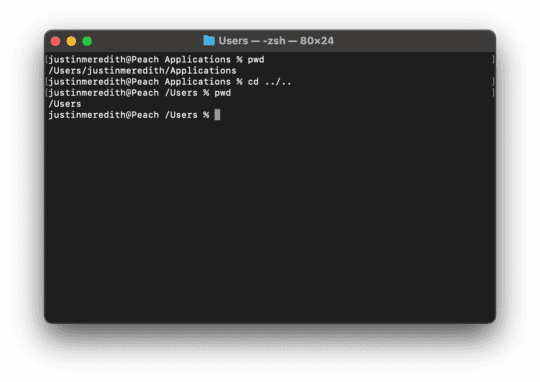
If you want to go back more than once at a time, you can do that too. Let’s say I go back to my Applications directory using cd, then want to go back to my Users directory. To do this, I would use the command cd ../..:
You can use the ../.. syntax to go back by as many levels as you want. Just keep adding /.. each time you want to go back an additional level.
Using ~ to navigate folders using the Mac terminal
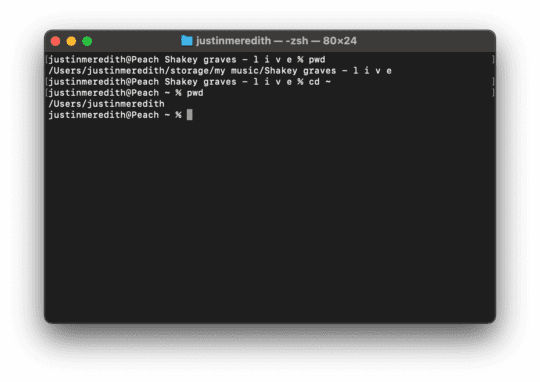
Ok, the last up on our navigation commands is ~. This little squiggly symbol should be next to the number 1 key on your keyboard. You probably have to press shift to type it.
This symbol represents your home directory. Your default home directory might be different from mine (which is justinmeredith). But whatever it is, entering cd ~ into your Mac terminal will instantly bring you back to it.
Pretty handy! Just keep in mind that this command can’t be undone with cd ... Using cd .. after you use ~ will just take you to the folder enclosing your home folder. So if you’re hundreds of directories deep in your terminal, you can’t jump back to your place after entering cd ~.
Use mkdir to make new folders
Ok, now we’re briefly going to touch on the creation and deletion of files and folders within the terminal. I feel this goes hand in hand when you navigate folders using the Mac terminal.
First up is mkdir, which stands for (you guessed it) “make directory”. Whenever you use this command, it will create a new folder inside of whichever folder you’re currently in.
To use this command, type mkdir "New Tutorial Folder" in your terminal and hit return, then use the ls command to view your creation.
If your directory name doesn’t have any spaces, you don’t need to use quotation marks. You can also use underscores in place of spaces (your_folder_name_here) so that you don’t have to use quotation marks. This is a pretty common practice in programming.
Use touch to make new files
Next up, we’re going to be using the touch command. While the name may sound a little odd, it’s a pretty simple command.
Basically, touch allows you to create a blank file of any file type. You can even create files for apps you don’t have (such as a .PSD file when you don’t have PhotoShop).
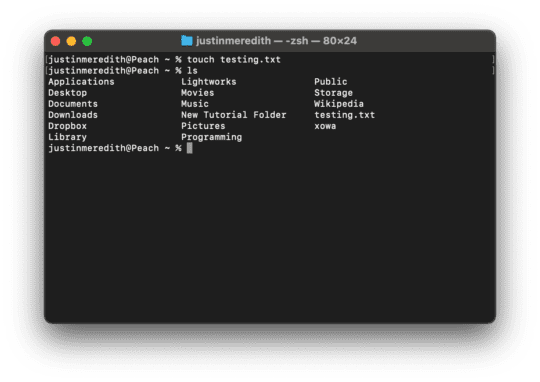
To do this, enter touch testing.txt. This will create a blank text file name “testing” in whatever directory you’re currently in. Use ls to confirm that this file was created.
To change the file type, just change the extension at the end of the file name. For instance, use .jpg to create a JPG, .mp3 to create an MP3 file, and so on. And remember that to create a file with spaces in the name, you’ll need to use quotation marks (touch "File Name.txt").
Use rm, rm -R, and rm -i to delete files and folders
Ok, now let’s say you want to delete the files and folders we’ve just created. This is different from moving a file to your trashcan, which you can easily recover if you change your mind. Files deleted in the terminal are permanently deleted.
There are three ways to do this.
The first and simplest way is to use rm, short for “remove”. This will delete any file you ask it to without asking for your permission first. For this reason, I recommend using this command sparingly.
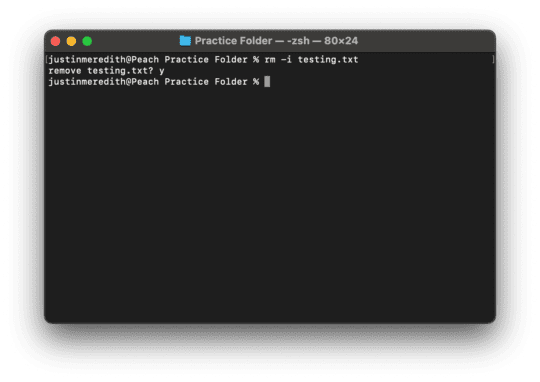
Instead, use rm -i. This command does the same thing, but it’ll ask you for confirmation first. For example, if I want to delete the testing.txt file we just created, I would use the command rm -i testing.txt.
As you can see in the screenshot above, the command asks me first before deleting the file. Type y for yes or n for no, then press return.
Now, rm and rm -i won’t work on directories. For that, you’re going to want to use rm -R and rm -R -i. Know, however, that this will permanently delete all of the files inside of a directory as well as the directory itself.
Additionally, you can use the * symbol to delete everything inside of a particular folder. For instance, if you’re in your Desktop and use rm *, all of the files on your Desktop will be permanently deleted.
In case it hasn’t become clear, this is a command you want to use with caution. There are tons of horror stories of users who accidentally sent an rm command. Always back up your Mac using Time Machine, and use these commands carefully and sparingly.
Navigate Folders Using The Mac Terminal: Putting it all together
Alright! You’ve now learned everything you need to know to navigate folders using the Mac terminal. Now it’s time to put all of these things together.
Here we go!
Step 1. Create a practice folder
The first thing we’re going to do is create a practice folder. This way, we don’t affect anything on our Mac that matters.
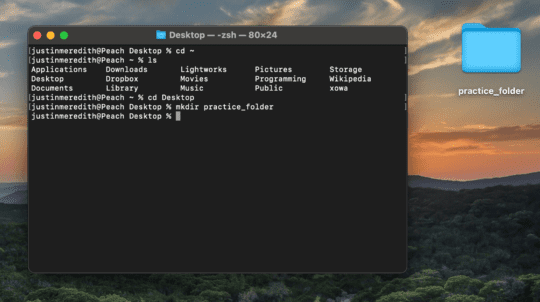
By default, you should be in your home directory. Go ahead and use cd ~ to make sure you’re there.
Next, we want to move to our Desktop. That way, you can see the folders and files we’ll be creating as you work. To navigate to your desktop, type ls into your terminal.
You should see a directory called Desktop in the list of directories displayed. Use cd Desktop to navigate into your Mac’s Desktop.
Next, we’re going to create our practice folder. To do this, enter mkdir practice_folder and press return. You should not only see this directory when you use ls, but you should also see it appear on your Desktop.
And that’s it for Step 1!
Step 2. Place a file in your practice folder
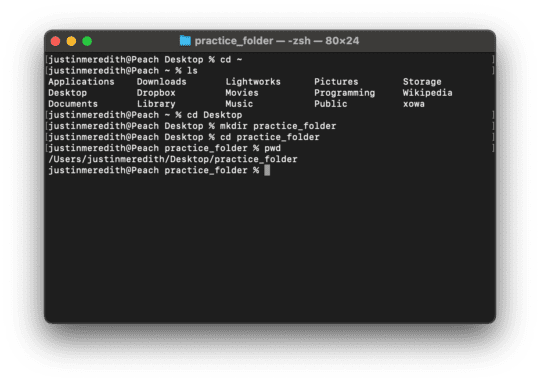
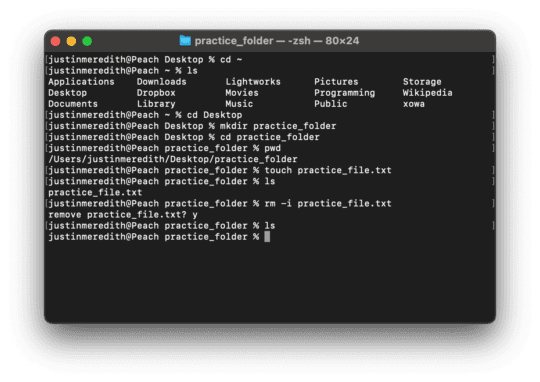
Next, we’re going to place a file inside of our practice folder. But before we can do that, we have to move into our practice folder. Use cd practice_folder to do so, then confirm you’re in the right folder with pwd.
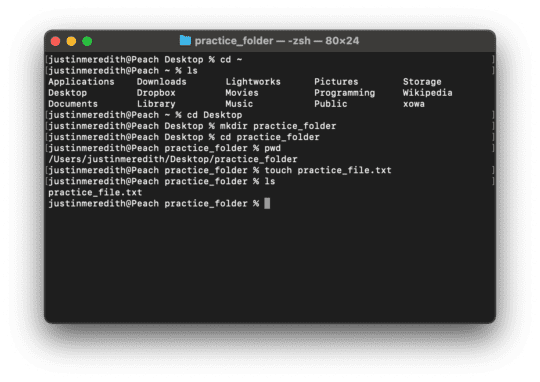
Next, we’re going to create a practice text file. To do this, type touch practice_file.txt and press return. Use ls to confirm that the file is there.
You can also open the folder on your Desktop using your mouse to see the blank text file.
That’s it for Step 2!
Step 3. Delete your practice files and folders
Ok, so of course, we don’t need to keep these files or folders. So we’re going to go ahead and delete them, starting with practice_file.txt.
To delete this file, type rm -i practice_file into your terminal and press return. When asked for confirmation, make sure that you entered the correct file name, type y, then press return again.
When you open the folder on your Desktop using your mouse, you should see that the file is gone. You can also confirm this with ls.
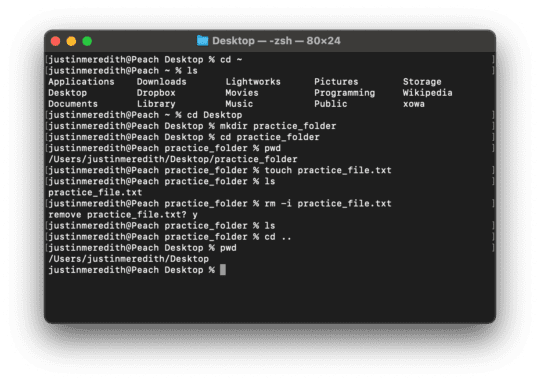
Next, we’re going to delete the practice_folder directory. To do that, we need to be in its enclosing directory, which is the Desktop. Use cd .. to go back to your Desktop, then confirm you’re in the right place by using pwd.
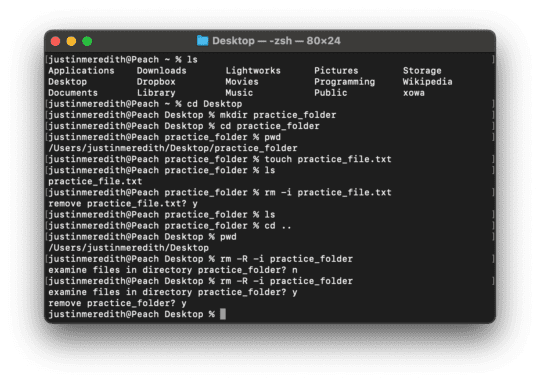
Use ls to list all of the directories and files currently on your Desktop. One of them should be the practice_folder we created in Step 1. To delete this folder, use rm -R -i practice_folder. Again, when the terminal asks for your confirmation, make sure you’re deleting the right folder and not something vital, such as your Desktop.
Since we know we just deleted the only file in that directory (practice_file.txt), examining the files won’t do anything. Just use y to examine the empty folder, then y again to delete the folder.
Use ls to confirm that the directory is gone (or your mouse and keyboard). If it is, you’re done!
You can now navigate folders using the Mac terminal to your heart’s content
And that’s it! You’ve now mastered the basics of how to navigate folders using the Mac terminal. I hope you’ve learned a lot of useful skills and leave with a better understanding of how the terminal works. I’ll be covering more tips and tricks for the terminal in future posts, so be sure to stick around for that!
Still useful content today. Thanks I’m normally working on PC so this has really helped navigating on the mac trying to repair the flashing question mark boot up issue.
Great articles Justin. I have been using Macs almost since the beginning, and terminal to a very limited degree but not really understanding it because I was usually just following some instructions.
Your ability to explain things clearly are exceptional. Can’t wait for further installments.
I just wanted to let you know that your comment made my night. It’s always hard to tell from the writing end of things just how clear and easy-to-follow the material I’m writing is. I’m very glad to hear you were able to follow it! Tinkering with computers and learning something new is not only useful, but a real joy.
Thank you for your kind words, and for being one of our readers – you’re the reason I’m here!
– Justin Meredith.


Still useful content today. Thanks I’m normally working on PC so this has really helped navigating on the mac trying to repair the flashing question mark boot up issue.
Great articles Justin. I have been using Macs almost since the beginning, and terminal to a very limited degree but not really understanding it because I was usually just following some instructions.
Your ability to explain things clearly are exceptional. Can’t wait for further installments.
Hi Douglas!
I just wanted to let you know that your comment made my night. It’s always hard to tell from the writing end of things just how clear and easy-to-follow the material I’m writing is. I’m very glad to hear you were able to follow it! Tinkering with computers and learning something new is not only useful, but a real joy.
Thank you for your kind words, and for being one of our readers – you’re the reason I’m here!
– Justin Meredith.