Welcome back to AppleToolBox automation fans! Today, in honor of Shortcuts launching on macOS Monterey, we’re going to be covering the best Shortcuts for beginners.
You may remember my previous post on the best Shortcuts routines (read here). In that post, it was my goal to cover what I thought were the best routines that Shortcuts had to offer. I wasn’t necessarily planning on anyone going out of their way to create those Shortcuts.
Instead, it was a compilation of Shortcuts that had already been created and shared by other users. I just wanted to bring great Shortcuts to light that I hadn’t seen covered elsewhere. I was proud of the post since the majority of “Best Shortcuts” articles just copy and paste from one another, whereas I worked hard to make sure each Shortcut was one that most users wouldn’t have seen before.
Contents
- What is the Shortcuts app?
- The best iPhone and Mac Shortcuts for beginners
- Schedule your texts and emails in advance using Shortcuts for beginners
- Download photos and videos from (almost) anywhere
- Show me a random photo/quote/video/GIF
- Split the bill with your partner using Shortcuts for beginners
- Add a song to your playlist of choice
- Create an automated morning/evening/work/etc. routine
- Get the news from any RSS feed
- Text the last picture you took to one of your contacts
- Automatically remind yourself when it’s time to charge your iPhone
- Start creating your own Shortcuts for beginners
Today, my goal is different.
In this post, we’re going to specifically hone in on Shortcuts for beginners. These are meant to be simple Shortcuts that anyone can make on their own after tinkering around with the Shortcuts app for a few minutes. They’re also meant to be useful in their own right as well as building blocks for more complex Shortcuts.
If you’re a more experienced Shortcuts user, then you’ll likely find that nothing in this post is particularly new. Don’t worry! I’ll be covering pro Shortcuts in an upcoming post.
For now, I wanted to provide a resource that green automators can come to. If you’ve never used the Shortcuts app, just noticed it on your Mac over the last few days, or have opened it before and given up trying to figure out how to use it, this is the post for you! Since each breakdown of the Shortcuts in this post are lengthy, feel free to try one or two at a time and then come back tomorrow.
To kick things off, let’s cover the basics.
What is the Shortcuts app?
The Shortcuts app is a digital automation service. If you’re familiar with Zapier or IFTTT, it’s nearly the same thing except for your Apple devices.
For those that don’t know what digital automation is, it’s exactly as it sounds! It’s a way to automate digital stuff.
- Do you email your boss the same report every Friday? What if you had an app that would write and send that email for you?
- Do you text your friends and family every time you arrive at work? With Shortcuts, you can send that text whenever you arrive at work automatically.
- Are you a fan of memes? Shortcuts can put a button on your Home Screen that randomly shows you one of your favorite memes whenever you press it.
In other words, Shortcuts allows you to create little automatic actions. The majority of Shortcuts run whenever you press the Shortcuts button to make them run or ask Siri to run them. However, you can create some that run automatically based on your location, the time of day, your iPhone’s battery level, etc.
The Shortcuts app has been on iOS since 2018. Since then, it’s been added to the iPad and, most recently, the Mac.
The best iPhone and Mac Shortcuts for beginners
If that explanation hasn’t completely sunken in, don’t worry! As we work through the Shortcuts for beginners below and you begin tinkering with them, the idea behind Shortcuts should click quickly.
Again, none of the Shortcuts below are meant to be groundbreaking. If you’ve messed around with Shortcuts at all, then you probably already know about each of these.
Instead, these Shortcuts are routines that I think every user should have. They’re also (for the most part) super easy to build and customize on your own. This will allow new users to latch onto the core concepts of Shortcuts and start creating their own. You can even mix and match some of the Shortcuts below.
If you are new to Shortcuts but aren’t interested in creating your own, you can easily find these Shortcuts online. RoutineHub is a site where users upload Shortcuts for others to use. So you can just find Shortcuts there that do the same thing as the Shortcuts listed in this article. There’s a gallery in the Shortcuts app that works similarly to RoutineHub. It’s heavily moderated, though, so you won’t find all of the Shortcuts listed below.
Alright, let’s get started!
Schedule your texts and emails in advance using Shortcuts for beginners
The first item on our list of Shortcuts for beginners is what I would consider the first digital automation routine everyone should learn: Automatically messaging someone.
The reason I consider this kind of automation to be so fundamental is:
- It’s something each of us does every day
- It’s a repetitive task, which is the best kind of task to automate
- Texts and emails are really easy to automate, especially with Shortcuts
For example, I use the Shortcuts app to automatically send Apple Pay requests to the friends and family that I split my phone bill with. At the start of each month, they all receive a pre-written message and Apple Pay request for their portion of the bill. Not only does this save me time, but it keeps me from forgetting the amounts or sending these requests at all.
So how would you go about automating your texts and emails? There are a few options:
- You can schedule your message to send at a specific day/time
- You can create a Shortcuts button that sends a message whenever you press it
Since we have a Shortcut that does the latter later in this post (Text the last picture you took to one of your contacts) we’re going to focus on scheduling.
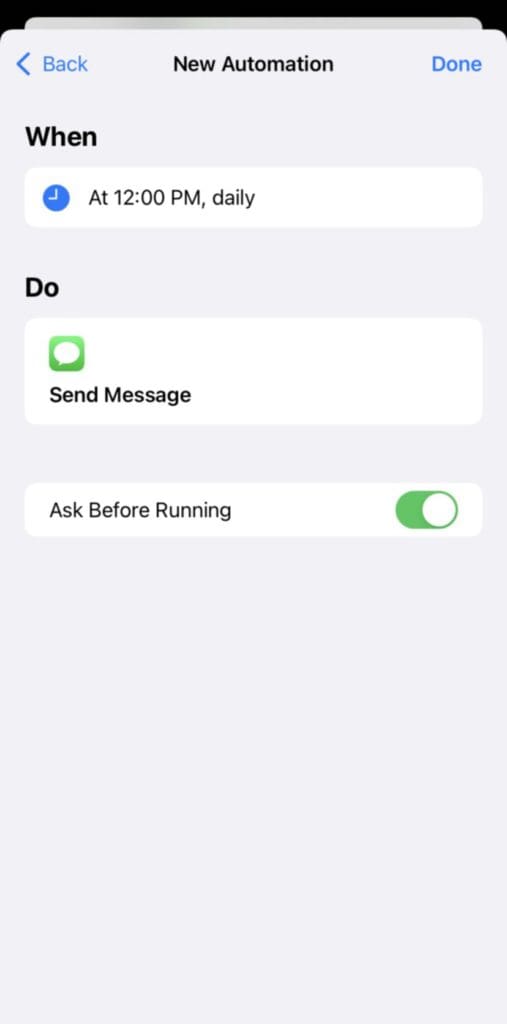
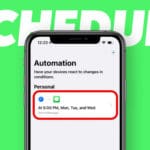
To schedule a text message (or email; the process is the same) open the Shortcuts app on your iPhone. Automations aren’t supported on macOS yet, so you’ll have to create this one on your phone.
Once you’ve opened the app, tap the Automation tab at the bottom of the screen, then tap the + icon in the top-right. Tap Create Personal Automation, and choose Time of Day.
Here, you’ll see that you can schedule a one-time message to send or a recurring one by choosing from the REPEAT options at the bottom of the screen.
Once you’ve set the schedule how you want it, tap Next, then Add Action, then type “Send Message” into the search bar.
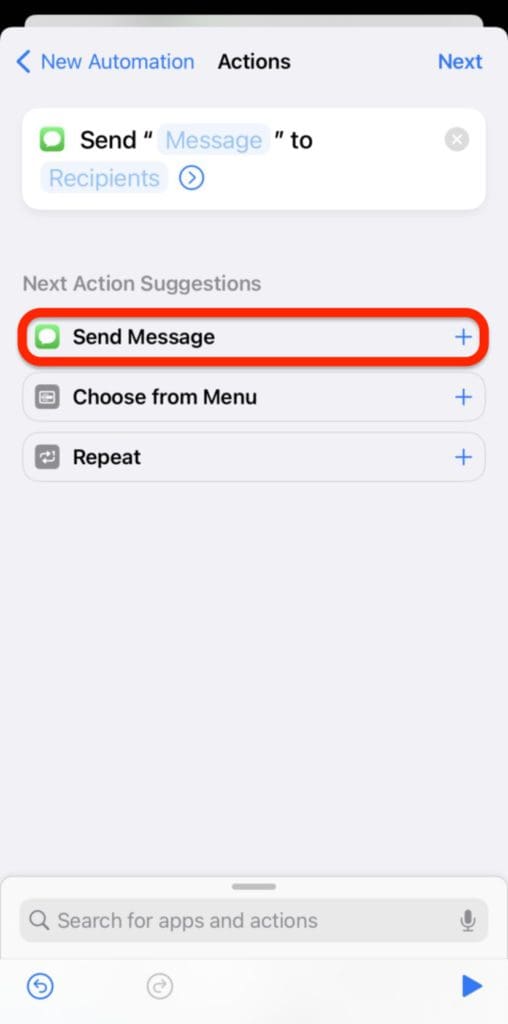
In the “Message” field, you’ll type out the message you want to send. And in the Recipients field, you’ll put the phone numbers (or contacts if they’re stored in your Contacts app) of the people you want to send this message to.
You can tap that arrow at the end of this action to reveal the Show When Run option. If enabled, this will show you the message before sending it. It’s a bit less automatic, but it’s helpful for those who don’t feel comfortable letting the message send without their knowledge.
Once you’ve done this, tap Next again. Here, you’ll see the summary for your Shortcut.
You can tap Done to finish it, however, I recommend turning Ask Before Running off. If you leave it on, it’ll stop this Shortcut from running without your permission. I like leaving this setting off so that I don’t have to do anything for this Shortcut to work – it’ll do everything without me lifting a finger. But, again, if you don’t feel comfortable with messages sending themselves to your contacts just yet, you can leave this switch enabled until you trust this automation.
And that’s it for this item on our list of Shortcuts for beginners!
Download photos and videos from (almost) anywhere
Next up on our list of Shortcuts for beginners is one (and the only one on this list) that I don’t expect any of you to create on your own. It takes some programming and web-scraping know-how. And besides, tons of users more talented than myself have already created their own versions of this app, so there’s no reason to reinvent the wheel. Unless you’re a developer looking for a challenge, in which case, why are you reading this post??
Anyway, these Shortcuts allow you to download photos and videos from any website you want. On sites like Google Images or static sites, that may not be that impressive. If you want to save photos and videos from Instagram, Facebook, or YouTube, though, then the value of a Shortcut like this quickly becomes obvious.
This is a great Shortcut for downloading YouTube videos (assuming you’re not using one of these methods on Mac). You can scour RoutineHub for Shortcuts that work with other apps. Some are even all-in-one downloaders for nearly every platform on the web.
Just be aware that most of the sites don’t approve of users downloading content (that’s why Shortcuts like this exist in the first place). Use at your discretion!
Show me a random photo/quote/video/GIF
Another simple idea that’s one of the great Shortcuts for beginners is showing yourself a random photo, quote, video, GIF, or anything else whenever you want. I used to use Shortcuts like this to show myself motivational quotes and cute pictures of animals whenever activated. That way, whenever I was feeling down, a quick tap on my iPhone would bring a little sunshine into my day.
We’re going to use the example of showing a random photo from one of your albums in Photos. However, you can set this up for showing you other random items in other collections. Explore the Shortcuts app on your own as you learn to use it!
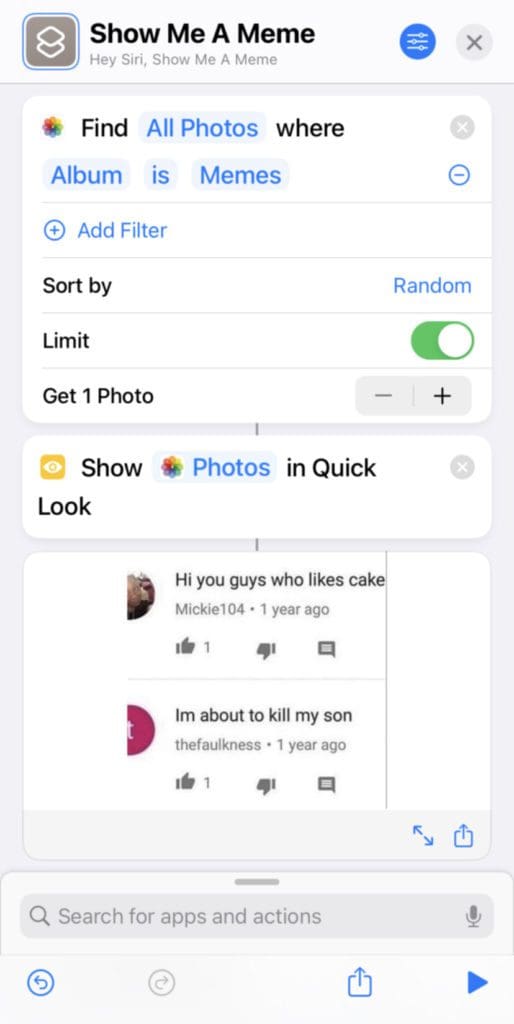
To get started, open the Shortcuts app, make sure you’re in the Shortcuts tab, and tap the + icon in the top-right of the screen. In the search bar, type “Find Photos” and tap the corresponding action. Then, return to the search bar, type “Quick Look”, and again, tap the corresponding action.
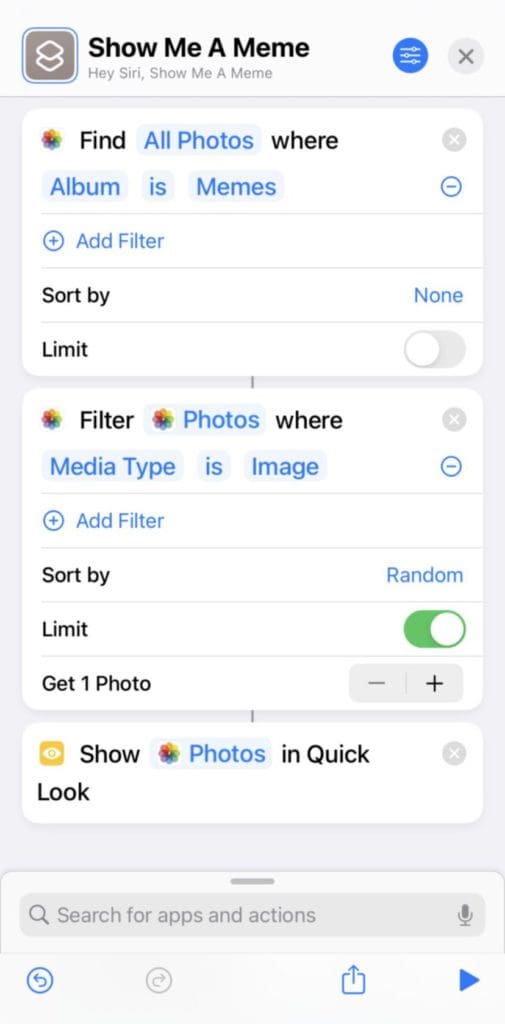
As you’ll see, I’ve already configured this Shortcut to show me a random meme from my Memes album in Photos. You can copy this exactly as I’ve set it up, or you can read through this next bit to better understand how it works.
First, let’s look at the actions. The Find Photos action looks for photos in the Photos app that match certain criteria. This could be photos in a specific album like we’ve used. Or you could tap the Album option and swap it out to search for photos with a specific height, width, or frame rate, based on when they were taken, whether or not you’ve favorited them, the orientation of the image, and whether or not it’s a screenshot.
You can also put Find Photos actions back-to-back to narrow your search even further. For example, say I want to randomly see a meme from my Memes album. But I don’t want to see memes I’ve saved that are videos. So I add another Find Photos action (which Shortcuts automatically retitles as “Filter Photos”) that removes any files that aren’t images (i.e., videos are excluded).
You also notice that I have the Random option applied and have limited the photos to just one photo. This prevents me from seeing every picture in my Memes album all at once (that would be hundreds of photos, probably breaking my iPhone for a few minutes while they all load).
You’ll also notice that in the version of this Shortcut where I have two Find Photos filters applied, I only limit and randomize the photos in the second filter. That’s because I want all of my Memes to load in the first action, and then I want to narrow that selection down in the second action. If I start with one random file in the first action, then it might get removed by the second filter (if it’s a video, for instance) which would cause the Shortcut to fail.
The second action is a lot simpler. Quick Look just does exactly as it says – it shows you whatever you feed into it. It works with basically any kind of file or data, which can help test your Shortcuts. In this case, though, I just want it to show me a meme.
And that’s it for this one!
Split the bill with your partner using Shortcuts for beginners
Next up, we’re going to be looking at a Shortcut that combines math with something we’ve already covered before: Sending a pre-written message to someone. This is the first Shortcut on this list of Shortcuts for beginners that’s going to include variables, so brace yourself!
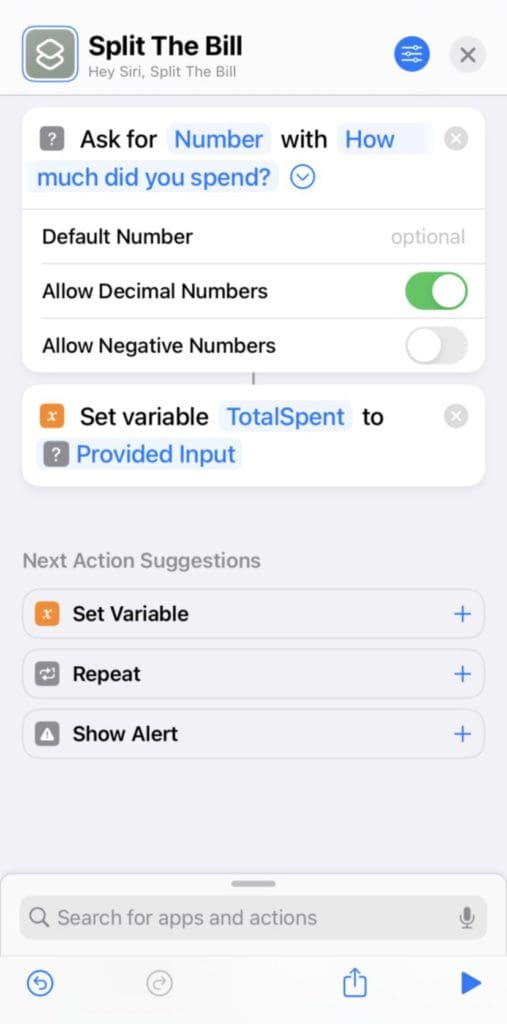
I created this Shortcut shortly after moving in with my partner. We split the tab on groceries, food, coffee, and anything else we buy 50/50. It’s impractical to have cashiers and waiters split the bill every time you buy something. So instead, I made this Shortcut! It asks me for the total cost of our bill, what we purchased, then it requests half of that amount from my partner with Apple Pay and sends them a text labeling what the request is for.
So if we buy coffee for $8, this Shortcut will ask me how much it costs ($8) and what we bought (coffee). Then it’ll text her a request for $4 with the accompanying text “coffee”. I also have this app open my budgeting app and paste in the $4, but that’s only relevant for those using a budgeting app – so we’re going to skip that in this explanation.
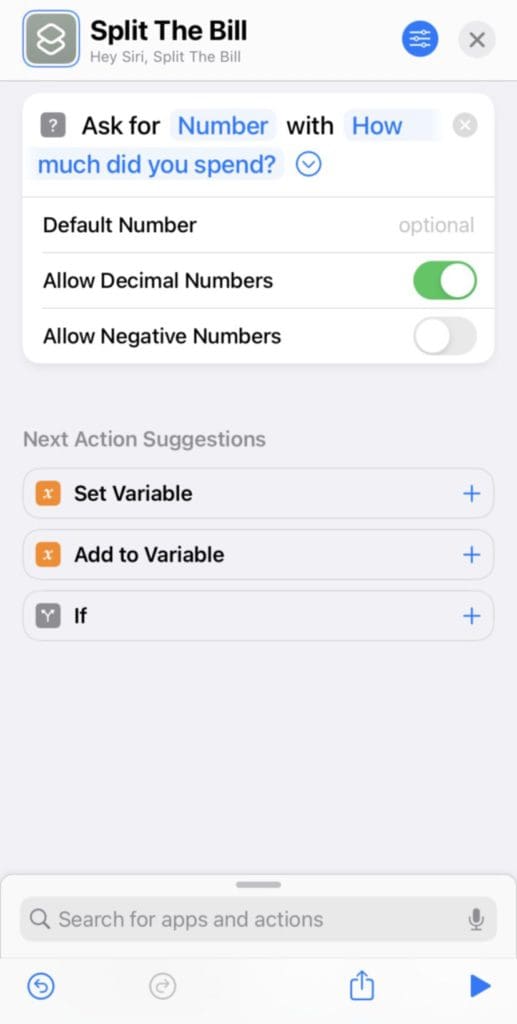
To create this Shortcut, open the Shortcuts app and tap the + icon. In the search bar, type “Ask for Input” and tap the corresponding action. The first option, Text, specifies the kind of input you want the user to give, and the second option, Prompt, is the text the person will see.
In our case, we want a number since money amounts are, you guessed it, numbers! And for the prompt, we want to type something obvious like “How much did you spend?”
Next, we want to set the answer to this question (which will be the dollar amount that you spent) to a variable. Variables are data points that change each time you run the Shortcut. They’re super helpful, and without them, the majority of Shortcuts would not be possible.
Anyway, we’re going to set the total amount of money you spent on the bill to the variable “TotalSpent”. You can do this by adding the Set Variable action as the next step in your Shortcut.
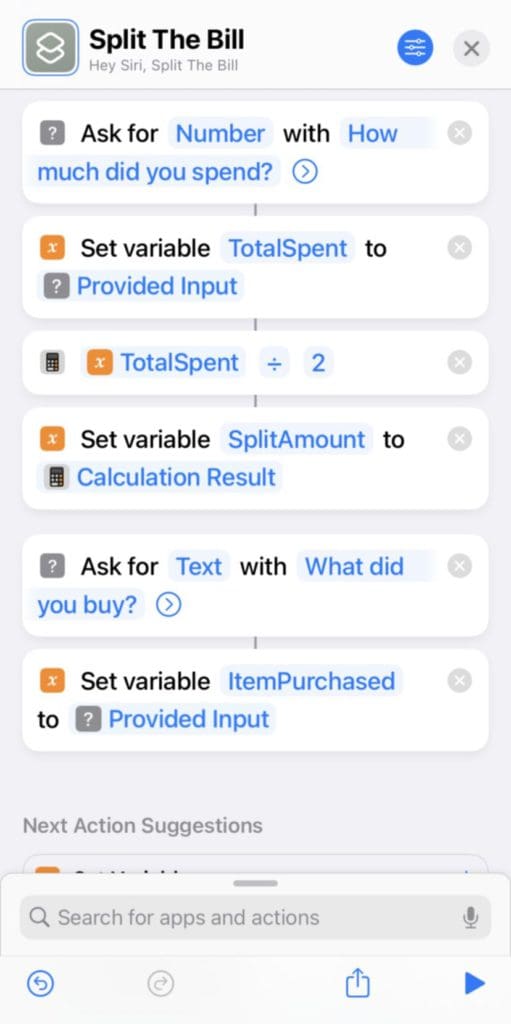
Next, we want to divide this amount by two since you’re going to be splitting it with your partner/roommate/etc. For that, grab the Calculate action from the search bar and add it to your Shortcut. Once added, set it up so that it divides your “TotalSpent” variable by two.
Now we want to set this split amount to a new variable. This is the variable we’re going to send to your partner/roommate automatically. So set this to a new variable called “SplitAmount”. Again, you can technically name these variables whatever you want – I’m just trying to keep things simple!
Next, we’re going to add a new Ask for Input action that asks for what the bill is for. This time, it’ll be asking for Text rather than a Number, so be sure to specify this in the options. For the Prompt, I would ask something like, “What did you buy?” Set the answer to a variable called “ItemPurchased”.
The Shortcut might look complicated now, but remember, it’s pretty straightforward! We’re asking what the person (i.e., you) spent, then dividing that amount by two. Then we’re asking them what they spent that money on. And then we’re storing those answers in variables so that the Shortcut doesn’t forget them.
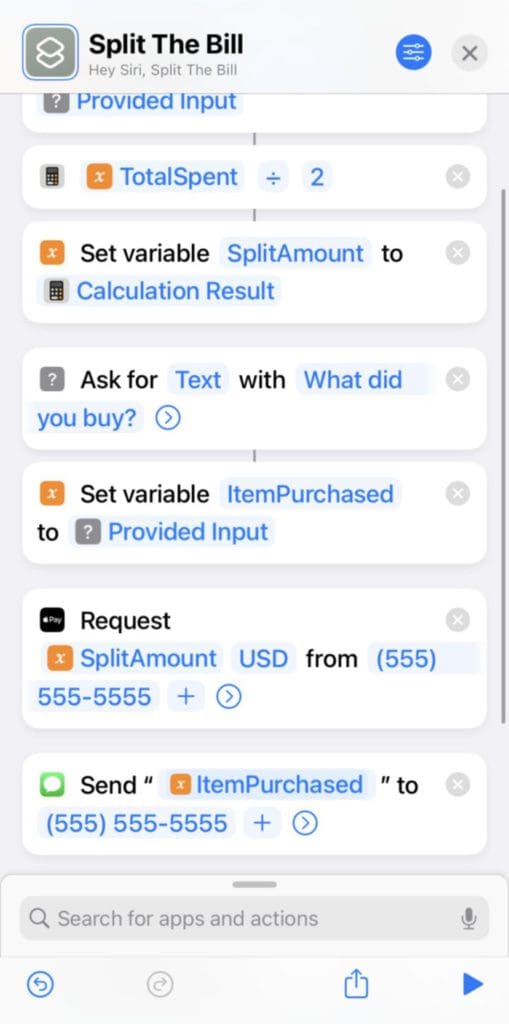
Now, we just need to send this to your partner as an Apple Pay request and a text message letting them know what the request is for.
To do this, add the Request Payment option from the search bar. For the Amount option, tap the “SplitAmount” variable we created earlier.
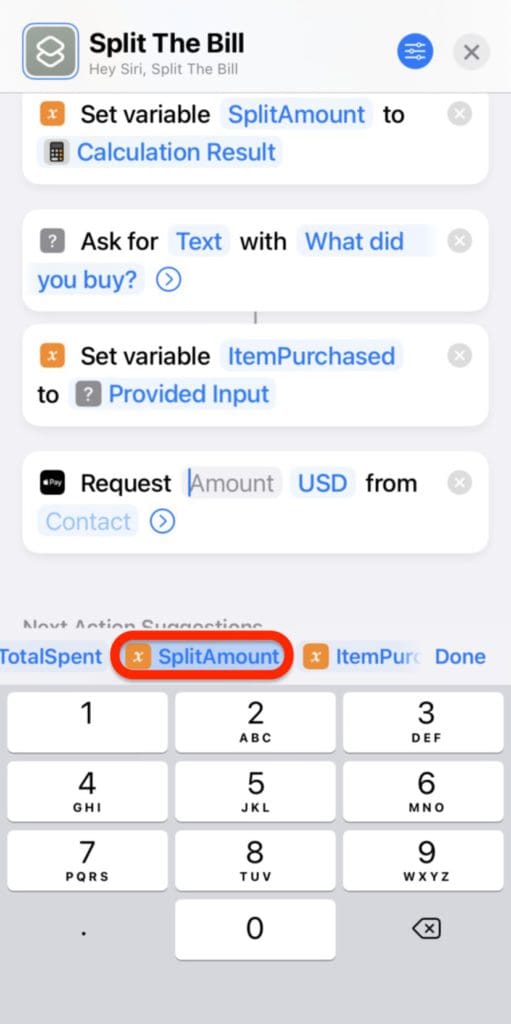
Then just add the contact you want to request the amount from in the Contact option.
Finally, add the Send Message action with the text being your “ItemPurchased” variable and the Contact being the same as in the Request Payment action. Like before, you can disable the Show when run switches by tapping the dropdown arrow. That way you won’t have to manually press the send button whenever you run this Shortcut.
And that’s it! Even though that was a bit long-winded, I’m sure most of you didn’t struggle too hard to understand what was going on. After all, it is one of the Shortcuts for beginners.
That said, this is a pretty sophisticated automation. It’s working with variables, running calculations, and performing multiple actions in sequence.
This is basically programming without writing any code. You’re starting to think like an automator!
Add a song to your playlist of choice
The next example on this list of Shortcuts for beginners is one that everyone can use. It accomplishes something that you can already do with a simple Siri request. But if you don’t like using Siri or if you want to do more complex routines when it comes to sorting your music, then learning how to manipulate your music is a big deal.
Also, it should be noted that Shortcuts doesn’t work with Spotify or Soundcloud, so you’re mostly out of luck if you want to automate things with either of those apps. There are intricate workarounds on RoutineHub, but we’re not going to be exploring these for our purposes. Pandora does have Shortcuts support, though, if that’s your thing!
Regardless, we’re going to be focusing on Apple Music since that’s the most supported (and it’s the one I know how to use, ha). We’re going to start with a basic Shortcut and then explore some ways you can build on it.
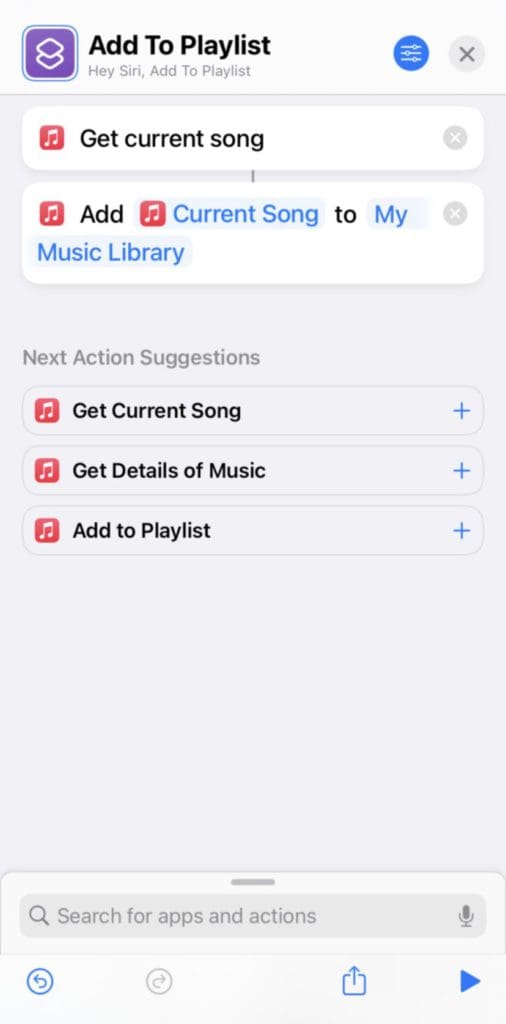
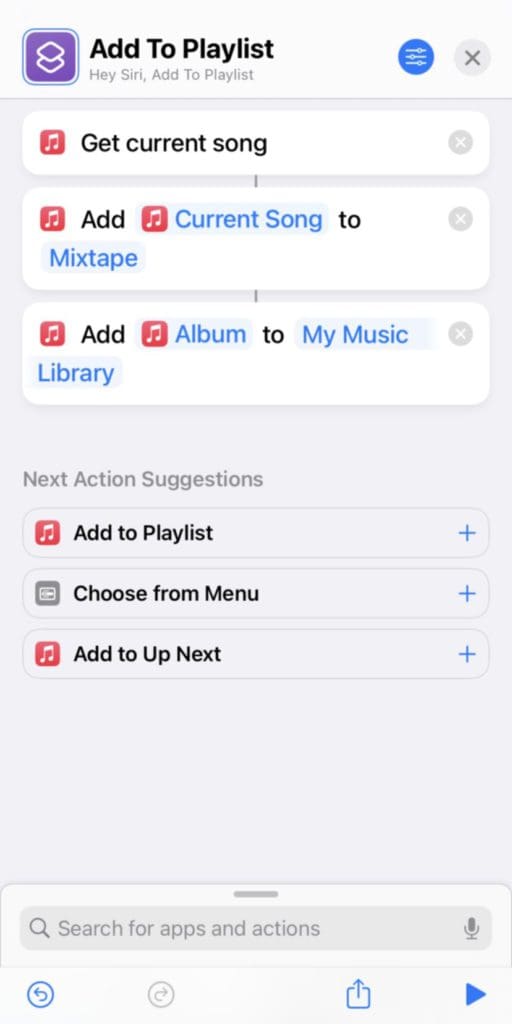
Create a new Shortcut and add the Get Current Song action as your first step in the routine. Next, add the Add to Playlist action. This action should automatically take the current song from the previous action and feed it into whatever playlist you like. Choose the playlist you want to add the current song to and you’re done!
You can now add this Shortcut as a widget on your Home Screen. Whenever you notice that you’re playing a song you want to add to your playlist/library, tap the widget and that song will be instantly added to your playlist.
And that’s it! A super basic routine that makes a perfect addition to this list of Shortcuts for beginners. I used to use this as a way to keep track of albums that I wanted to listen to by adding them to a playlist called “Listen Later”.
Of course, this is also pretty basic. It’s something you can already have Siri do for you – this is just a way to avoid talking to Siri. That might be helpful if you have a playlist whose name Siri never recognizes.
But, as promised, we’re now going to look at a few ways you can make this Shortcut more interesting. It’s not comprehensive, but it should be enough to get your creative juices going.
So, the first thing I would do to make this Shortcut more interesting is to have this add to multiple playlists at once. This way, you can still add songs to playlists individually with Siri (or manually, I guess). But when you want to add a song to all of your playlists, or a sub-set of playlists (e.g., all of your hip-hop playlists), you can just tap this Shortcut and instantly add it to as many playlists as you want.
To do this, just keep adding more Add to Playlist actions, with each connecting to another one of your playlists. You could also have this Shortcut add a song to your playlist and the album that song is in into your library.
Even still, this feels a bit simple. Let’s take it up one more notch.
What if I wanted to have one button that will add the currently playing song to the correct playlist, without me needing to specify what playlist that is? I want to tap this button, and have each song automatically added to the playlist it best fits under.
Well, you can do this. It won’t work for every playlist – I add songs to playlists based on vibes, and unfortunately, you can’t automate vibes (yet). But if you sort your playlists by artist, era, whether or not they’re explicit, or even how many times you’ve played that song, then you’re in luck.
For this example, we’re going to sort our playlists based on the genre. But if you follow along, you should see how you can easily adapt this idea to whichever criteria you like.
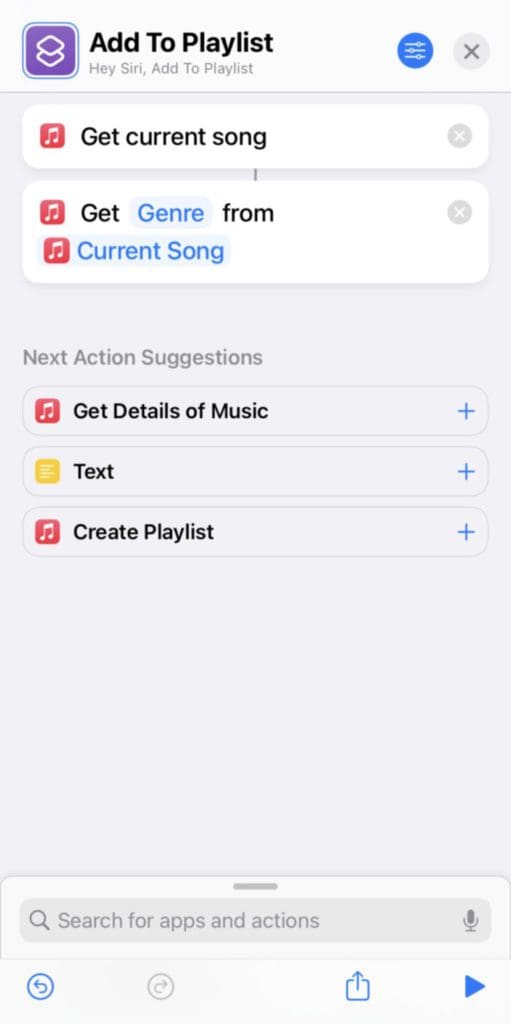
To get started, keep the Get current song action, remove all other actions, and then add the action Get Details of Music. Set it to get the Genre from the Current Song.
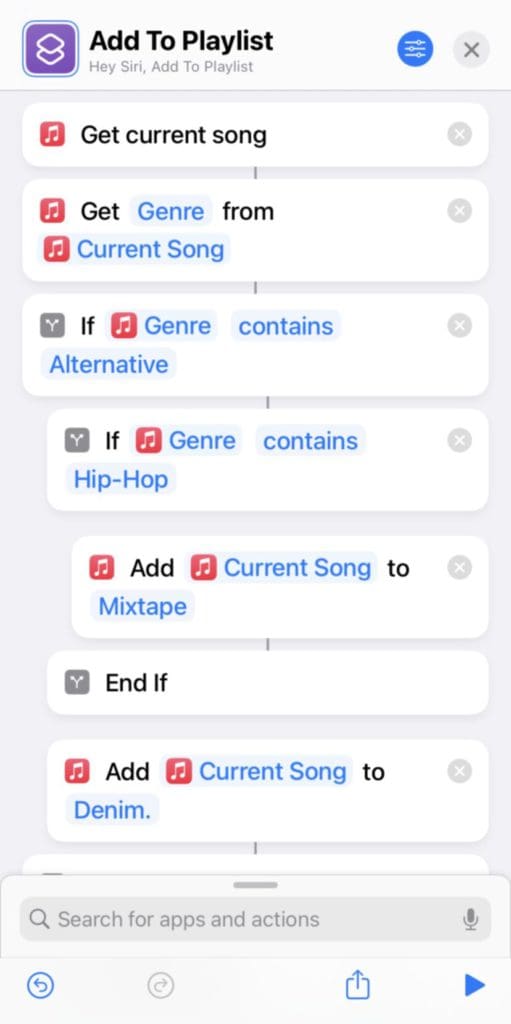
Next, we’re going to add an If action. “If” actions are actions that only do something if something is true. For instance, if the song is an alternative song, add it to my alternative playlist. Otherwise, do something else.
Let’s say you have a playlist for alternative music. First, go to Apple Music and make sure that you know how that app spells and writes “Alternative”. This is super important because if you have any typos this won’t work.
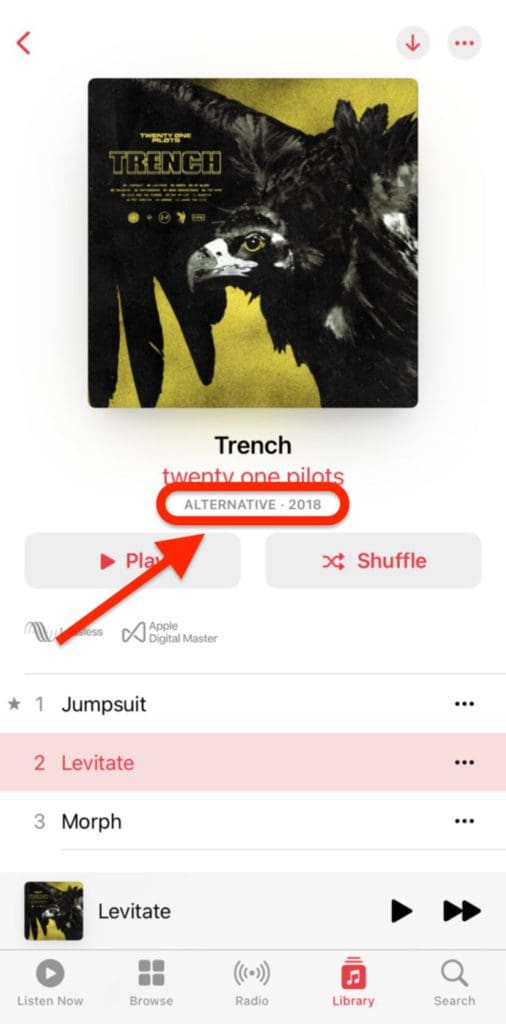
Once you see how Apple Music writes the genre out, return to Shortcuts and add an If action. Set it to If Genre contains Alternative and add a Add to Playlist action that adds the song to the corresponding playlist. You can remove the “Otherwise” field by tapping the x next to it – we don’t need this action.
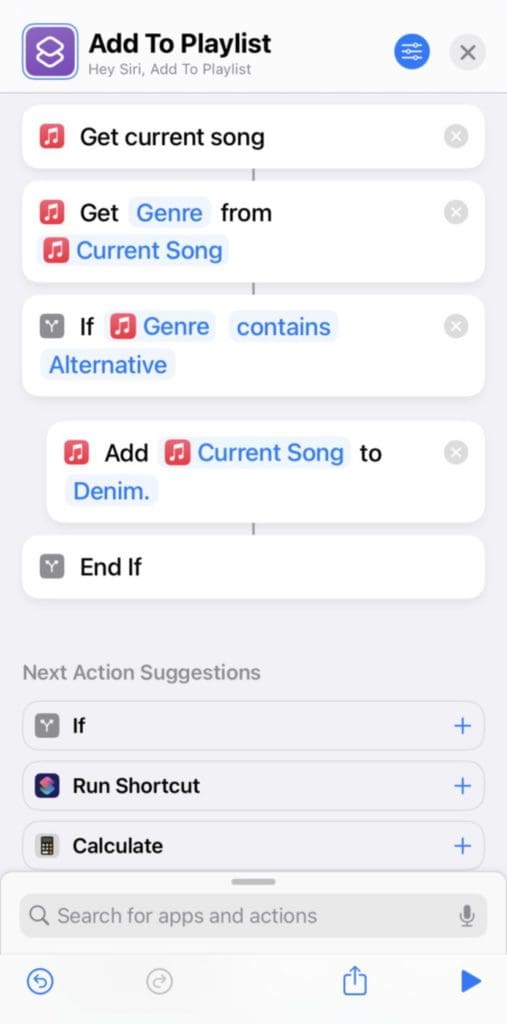
By the way, if you need to use a variable like “Current Song”, which was used earlier in the app, choose Select Magic Variable from the list of possible inputs. Then just scroll back up and tap the “Current Song” variable to insert it into as many actions as you want.
It also speeds the process up to duplicate each nested If action. You can do this by tapping the small icon in each If action (it looks like a road splitting in two directions) and selecting Duplicate.
Here’s an example of mine that checks if a song is an alternative song or a hip-hop song. If it’s alternative, it’s added to my “Denim.” playlist, and if it’s a hip-hop song, it’s added to my “Mixtape” playlist. If it’s not either of these, then my Shortcut does nothing.
There’s one extra idea you can throw in here to make this routine more ideal. As it is now, this Shortcut doesn’t have any way to deal with a song that doesn’t match either genre. It just does nothing.
Instead, if this Shortcut can’t automatically sort the song for me, then I want it to ask me which playlist I want to add the song to. That way, the song is added to a playlist no matter what. So it’ll sort most songs for me, and if it can’t, then I’ll do it.
To do this, I would create a variable called “AddedToPlaylist” with the text value “No” at the very beginning of this Shortcut. This happens before any other actions have run.
Then, inside of each successful If action (where I currently only have Add to Playlist actions) I would add another action that changes the variable “AddedToPlaylist” to “Yes”. This way, this variable will tell my Shortcut whether or not the song was matched to a playlist automatically.
Finally, at the end of this Shortcut, after all of my nested If actions, I would add an independent If action – one that’s not connected to any of the other actions in this Shortcut. This If action would check if AddedToPlaylist is still No. If it is, then this will execute an Add to Playlist action that asks me which playlist I want to add the song to. Otherwise, it does nothing and ends the Shortcut per usual.
I’m not going to go too deep into detail on how this works, because that could easily be its own article. But as you start to tinker with the Shortcuts for beginners in this post, you should start to get an idea of how this Shortcut works. The point that I want to get across is that just because we’re looking at simple Shortcut ideas, that doesn’t mean they have to stay simple. You can expand on them and create some really sophisticated routines.
Create an automated morning/evening/work/etc. routine
Admittedly, I got a bit carried away on the last example. But we also covered a lot of key concepts, like carrying variables, making decisions with If trees, and how you can gradually expand on a Shortcut’s functionality over time.
Now, we’re going to cool off with a simpler option from these Shortcuts for beginners. We’re going to create an automated daily routine.
These routines (often called “Morning routines”) are meant to be something that you run at a certain time of day to execute a bunch of actions in sequence. You can create one for when you wake up, are about to fall asleep, arrive at work, or just got back home.
We’re going to focus on creating a morning routine to avoid making this post too much longer. But just know that you can modify this concept to work in a variety of situations.
So what does a morning routine Shortcut do? Typically, a morning Shortcut will show you a “Good Morning!” message, let you know what the weather will be for the day, starts a relaxing playlist, and if you have smart home devices it will tweak those to fit your morning routine (like turning on all of your smart lights).
For ours, we’re just going to:
- Have our iPhone/Mac read us a “Good Morning” message
- Tell us the weather for the day
- Read off your calendar events for the day
- Start playing your favorite playlist
Morning Shortcuts are great Shortcuts for beginners because even though there are a lot of actions taking place, there’s usually not a lot of logic required. You can just run the steps in order and it’ll function properly.
There’s also a bunch of different ways to go about creating one of these things, though we’re just going to have your iPhone announce them to you. You could have them pop up as notifications or alerts, too, if that’s your thing.
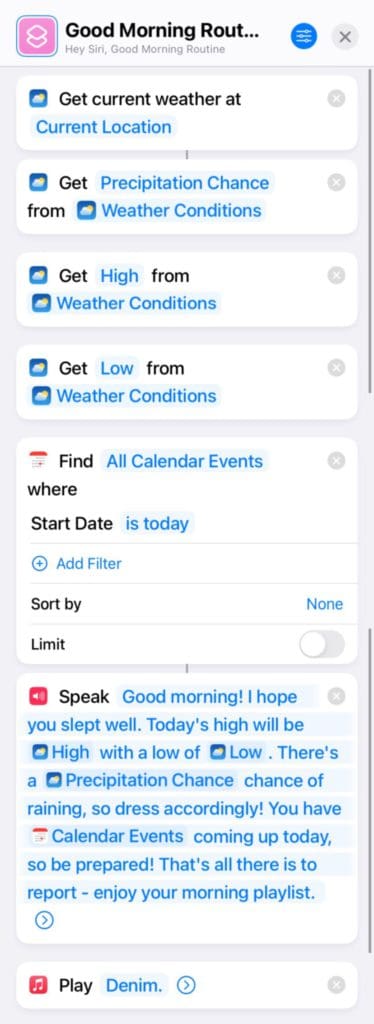
Since we’ve already covered most of the methods used to create this Shortcut (adding actions, incorporating variables into other actions, etc.) I’m not going to go into a super thorough explanation. Instead, we’re just going to quickly look at the screenshot of the morning Shortcut I just created:
So as you can see, this Shortcut starts by collecting all of the information I want. I specify that I want the current weather from my location, then I get each detail from the weather that I want. Next, I grab my calendar events, specifying that I only want the calendar events that are happening today.
Finally, I add the Speak Text action. This uses Siri’s voice to read out whatever you want (use responsibly). Just incorporate the information you collected leading up to this step in a natural paragraph. You can even copy mine word for word if you like – I won’t sue you.
All that’s left to do is run this Shortcut whenever you wake up! You can even set it to run each morning by creating a scheduled automation (using the Automations tab in the Shortcuts app). Pick your time and then add a single action that runs this Shortcut. Then you won’t even need to run this Shortcut by hand – just wake up, and you’re done!
Get the news from any RSS feed
Another useful item on this list of Shortcuts for beginners involves RSS feeds. For those that don’t know, an RSS feed is more or less a notification system that a website can set up. It’s typically used by news outlets and blogs as a way to share notifications for articles that they’ve published.
This one’s not complicated at all – there’s a built-in Get RSS Feed action in the Shortcuts app. Just copy the link for the RSS link(s) you want to use and paste it into this action. Here’s the link for AppleToolBox’s RSS feed.
Where this kind of Shortcut really gets creative is how you decide to deliver that RSS feed to you. You can email it to yourself once a week, see it as a list whenever you run your morning automation, or get a notification every time a particular RSS feed is updated.
You can also use the Filter Articles action in Shortcuts to only see certain items from an RSS feed. For instance, if you only wanted to see AppleToolBox articles that are related to Shortcuts, you could use the Filter Articles action to only show you articles with “Shortcuts” in the title. You can also filter by an article’s author, word count, and so on.
And that’s it! There used to be (and still are) entire apps dedicated to bringing an RSS feed to you. With Shortcuts, you can do it yourself.
Text the last picture you took to one of your contacts
Next on this list of Shortcuts for beginners is yet another popular Shortcut. This one will instantly send the last photo you took to a contact of your choosing. We’re going to look at two ways to accomplish this. The first will send it to the same contact every time, and the second will prompt you to choose a contact instead.
Once again, if you don’t feel like making this one yourself, there are plenty of downloadable Shortcuts you can use instead. We’re going to continue learning more about Shortcuts, though, so here’s a quick breakdown of how this works!
Grab the Get Latest Photos action and drop it into a new Shortcut. Follow it up with a Send Message action, and you’re pretty much done!
You can specify a contact (or set of contacts) to who you want to send your last images. Then, whenever you run this Shortcut, it’ll instantly send your last message to them. Super helpful if you’re constantly sending memes to your friends and family.
Just know that if you set this Shortcut to message multiple contacts at once, it’ll send your message as a group message, not as a bunch of individual messages. I’ll cover a workaround in a second.
First, though, we need to solve another problem: Sending this message to a variable contact rather than a fixed contact. This will allow you to choose who you send your last photo to whenever you run this Shortcut.
To my surprise, I could not set this up on my iPhone. Whenever you tap the “Recipients” field in the Send Message action, you can only choose from your list of contacts. There is no option to select a variable.
This didn’t seem right to me, so I looked for an explanation online. I didn’t find one, but I did find forums where people were talking as if this were an option – and all of them were from 2019 or older.
My guess is that Apple removed variable contacts in a recent update. Most likely as a way to combat robo-texting, which is admittedly on the rise.
Luckily (or I guess unluckily if you’re worried about robo-texters), you can get around this by using the Mac version of Shortcuts. You will need to do this on Mac if you want to avoid sending a group message to multiple contacts, too. So if you don’t have a Mac with the Shortcuts app, for now, it looks as if you’re out of luck.
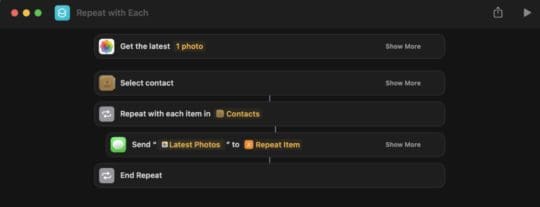
As you can see in the above screenshot, I’ve opened the Shortcut on my Mac and made a few changes. I’ve added the Select contact action, which allows me to specify which contacts I want to text every time this Shortcut runs.
Then, to use my selected contacts as a variable in the Send Message action, I’ve right-clicked the “Recipients” field, clicked Select Magic Variable, and then I’ve chosen the output variable of the Select contact action.
Alright, so that solves the missing variable feature for the Send Message function. But what about sending messages to multiple contacts individually rather than through a group text?
To do this, you’re going to add the Repeat with Each action. Drag the Send Message action inside it so that it looks like the below screenshot.
This will repeat the Send Message action with every contact that you select in the Select contact action. You will want to swap out the “Contacts” variable in the “Recipients” field, though, with the “Repeat Item” variable from the Repeat with Each action. This way, the Send Message action will send to each contact once rather than all of the contacts every time the Repeat with Each loop runs.
And that’s all for this Shortcuts for beginners Shortcut!
Automatically remind yourself when it’s time to charge your iPhone
As we near the end of this list of Shortcuts for beginners, I’ve included yet another simple one. This one will give you a customized notification whenever you need to charge your iPhone. It’s going to be tied to your iPhone’s battery level, so whenever your battery level reaches a certain point, you’ll get a notification.
This is useful for those who don’t want to wait until their iPhone reaches 20% to get a notification. If you have a job that keeps you away from a phone charger, for instance, you can use this as a way to better manage your battery life.
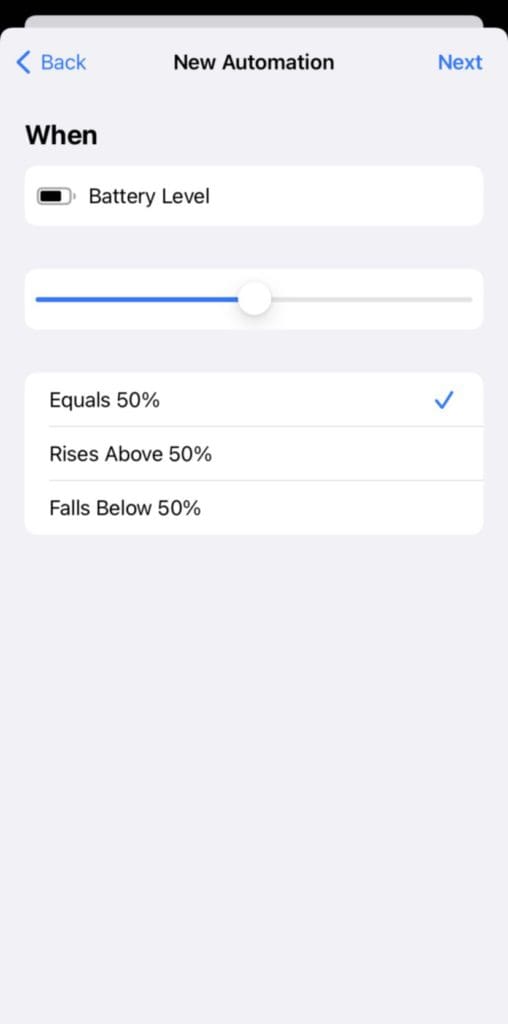
This is going to be an automation, so open the Shortcuts app and go to the Automation tab. Create a new Personal Automation and choose Battery Level as your trigger.
On this screen, you’ll see a slider with the options Equals, Rises Above, and Falls Below. Move the slider to the percentage you want it at (I’m going with 30%) and then choose Falls Below or Equals. Rises Above won’t be helpful for our use case, as that will only happen when you’re iPhone is already charging.
Next, add the Show Notification action. Type in a message of your choosing, like “Charge me!”. You can click the dropdown arrow and also choose whether or not this notification plays a sound.
And that’s it! You can also have this Shortcut automatically put your iPhone in Low Power Mode, which I have done.
Start creating your own Shortcuts for beginners
And that’s it! Those are the best Shortcuts for beginners on iPhone and Mac. I hope you not only found some new Shortcuts to add to your repertoire but more importantly, that you also learned a lot about what’s possible with the Shortcuts apps.
Digital automation with the Shortcuts app is one of those things that’s only limited by your imagination. Continue to explore and tinker with it, and you’ll find your devices doing things you didn’t think possible.
If you want to continue learning more Shortcuts, stay tuned here at AppleToolBox! As promised, I’ll be covering a similar article over Shortcuts for pros. There, you’ll learn how to create even more advanced Shortcuts. There are also a plethora of forums online that you can follow to share and steal ideas at your leisure.
You can check out the rest of the Shortcuts articles we’ve written on this blog, too, for those that don’t want to wait for the next installment in this series.
For more insights, news, and guides on all things Apple, check out the rest of the AppleToolBox blog.
See you next time!






![The Best Automation Apps For Mac [2022] pexels-digital-buggu-171198](https://appletoolbox.com/wp-content/uploads/2022/01/pexels-digital-buggu-171198-140x140.jpg)




Write a Comment