Welcome back to another post in my series of Automator tutorials. This is the second post in this series, and today, we’re going to be covering the best Automator routines for Mac.
Automator is an app I’ve started using over the last few months, and it’s already simplified my Mac usage to a significant degree.
Today, I want to share with you some of the routines that have helped make that possible. If you’re excited about using Automator but aren’t sure where to start, this post is for you!
I also wanted to add that I’ll be including descriptions as well as tutorials for each routine in this article. In researching for this post, I found that other similar articles just listed ideas for Automator routines rather than showing you how to do them. I’m going to be explaining both, so this is part tutorial, part inspirational list.
First, in case this is your first stop in my series of Automator tutorials, I wanted to give you a quick explanation of what the best Automator routines are.
For those that don’t know, Automator is a built-in Mac app. You get it for free whenever you buy a Mac, just like Pages or Numbers.
Unlike those apps, though, Automator has a pretty unique function. It allows you to create automated routines (also known as “workflows”).
For example, say you send out an email to a client every Friday billing them for work. You can create a routine in Automator that will automatically send this email for you.
There’s a lot more to Automator than just that, but that’s a simple explanation. If you want a more in-depth description of how Automator works, check out this previous post I wrote on the subject!
The best Automator routines for Mac
Alright, with that out of the way, we’re ready to explore the best Automator routines for Mac. While there may be Automator routines that are better for you that aren’t on this list, I think the workflows listed below will be helpful to the most amount of users.
These are all really simple routines, so don’t be intimidated! Let’s get our feet wet and learn some of the basics of automating your Mac.
Automatically change your desktop background
First up is one that I consider to mostly be for fun. That said, it’s still pretty cool.
Essentially, this item on our list of the best Automator routines will automatically change your desktop background to whatever you want, whenever you want.
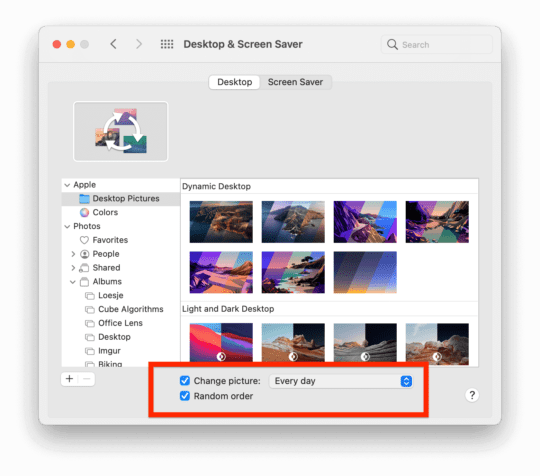
Now, it’s worth mentioning that you can set your Desktop background to shuffle in System Preferences based on a few basic factors, like changing each time you log in.
With this Automator routine, however, you’ll be able to set it to change without needing to open System Preferences.
For example, you can create a right-click option that lets you change to a specific background whenever you want. Or, you can create a folder that automatically changes the background to whatever image you just dropped into that folder.
How to change your Mac background with the best Automator routines
I’m going to walk you through both of these options, starting with adding a right-click option to change your background.
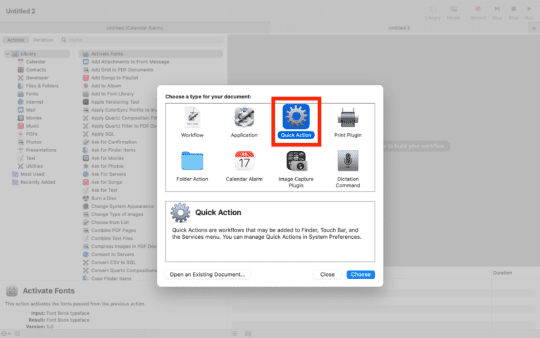
Open Automator and create a New Document with the Quick Action type.
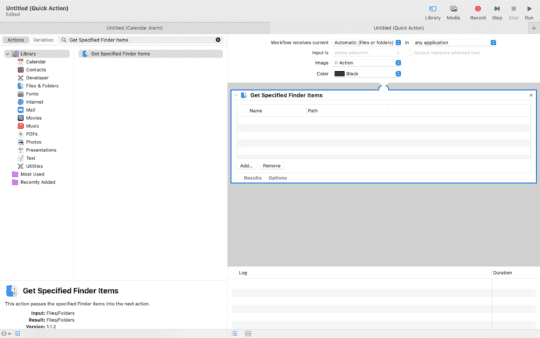
In the search bar, type “Get Specified Finder Items” and drag the corresponding action into the editor.
Click the Add… button, then navigate to the photo you want to map to this routine. This is the photo that your background will change to whenever you run this routine.
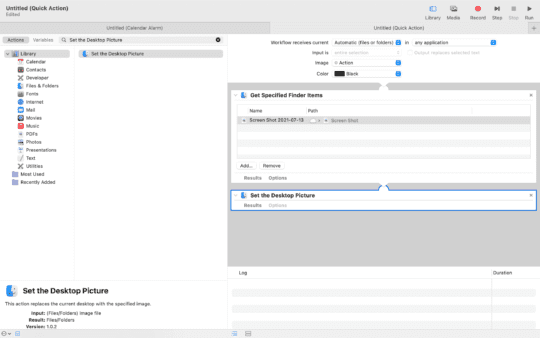
Next, type “Set the Desktop Picture” into the search bar and drag the corresponding action into the editor. This will take the photo you just selected and set it as your background.
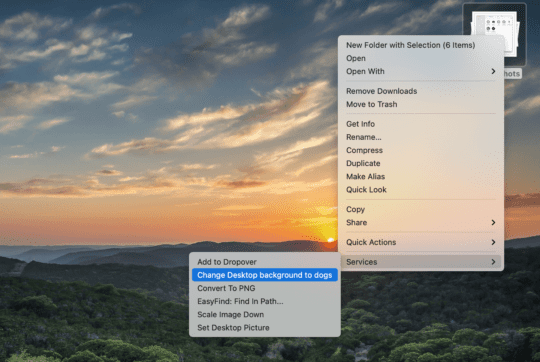
Next, select File, Save, and title your new Quick Action accordingly. It’s going to appear as a right-click option, so make sure you name it something you’ll remember. For instance, if it’s mapped to a photo of dogs, name it something like, “Change Desktop background to dogs”.
And that’s it! You should now be able to right-click almost anywhere on your Mac, go to Services in the right-click menu, and choose your newly created routine.
One thing to know about Quick Actions is that you generally have to right-click on a file, folder, or text for them to appear in the right-click menu. Otherwise, they won’t be available.
For maximum customization, I would recommend adding another Quick Action for a different photo – let’s say it’s a wallpaper of cats. You can then save that Quick Action as “Change Desktop background to cats”, allowing you to switch between the two whenever you want from the right-click menu.
Copy your clipboard to a text file
Second on our list of the best Automator routines is one that will help you visualize and store the contents of your clipboard. For those that don’t know, your clipboard is where the items you copy/cut are stored until you paste them.
This Automator workflow will take the text you’ve copied and store it in a new text file on your Desktop. You can modify it to save the file wherever you like, we’ll just be using the Desktop for simplicity.
One thing to note is that this routine will create a new text file each time you run it. It won’t be adding everything you copy to the same text file; that would require some scripting, which is a bit more advanced than we plan on getting in this post.
How to copy your clipboard to a text on your Mac desktop
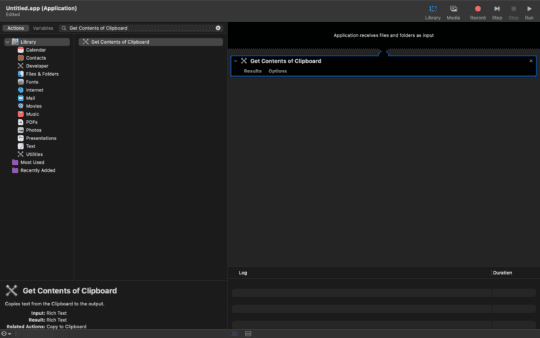
First, create a New Document in Automator that uses the Application type.
Next, in the search bar, type “Get Contents of Clipboard” and drag the corresponding action into the Automator editor.
Then, type “New Text File” into the search bar, and again, drag this action into the editor underneath Get Contents of Clipboard.
In the Save as: field, you can set the name of the file. I would choose something like “Clipboard Contents”. In the Where: field, you can choose where the file is saved. Again, we’re going to leave this set to Desktop for simplicity, but feel free to move it wherever you like.
Next, click File, then Save. Unlike the previous routine, which was a Quick Action in the right-click menu, this workflow is going to be an app icon that you save. To run this workflow, you’ll double-click the app icon.
With that in mind, I recommend titling it and saving it to a location that’ll make it easy to use this thing. Honestly, the Desktop isn’t a bad option. And you can drag it onto the Dock if you want, too.
Once you’ve saved it, copy some text and double-click the workflow’s app icon. You should see a new text file appear on your desktop in just a few seconds.
And that’s it!
Open a group of websites all at once
Third on our list of the best Automator routines is one of my favorites. It’s worth mentioning that this is a feature that will be added in macOS Monterey this Fall (Tab Groups). So it’ll only be useful for the next few months unless you don’t want to or can’t upgrade to Monterey.
That said, it’s still pretty great!
This workflow will open a group of pre-set websites whenever you want. For instance, you could set it to open all of your social media accounts. Or, if you use a set of websites for work, you could open all of those in an instant.
It’s another easy one to create, so let’s get into it!
How to open a group of websites using one of the best Automator routines
Create a New Document in Automator and choose the Application workflow type. You know what to do!
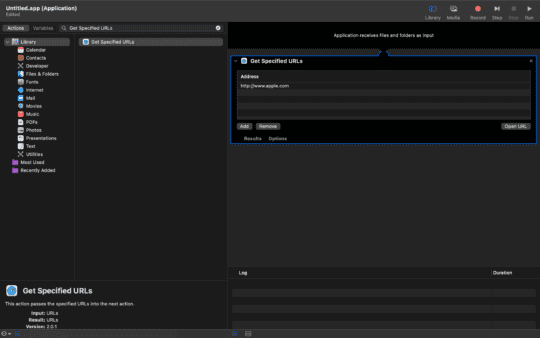
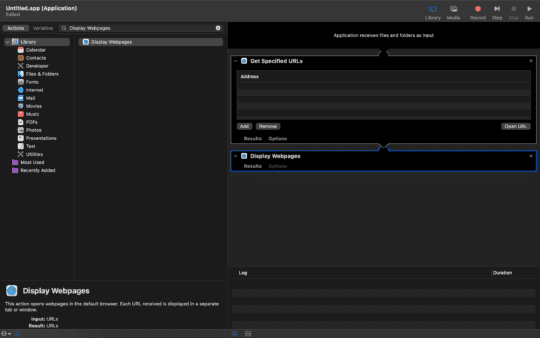
In the search bar, type “Get Specified URLs” and drag the corresponding action into the Automator editor.
Also, in case you haven’t figured it out yet, you can browse all of the actions in Automator by clicking through the options in the left-hand pane of Automator. I just think it’s faster to type it into the search bar if you already know what action you need. Anyway – back to the tutorial!
As you can see in the above screenshot, www.apple.com is included in your list of websites by default. If you don’t want it there, select it and click the Remove button.
Likewise, you can add the websites you want to open by clicking the Add button. If you already have Safari open, the Add button will automatically paste the URL of your current tab into this section.
Once you’ve listed all of the websites you want this workflow to open, type “Display Webpages” in the search bar and drop the corresponding action after the Get Specified URLs action.
All that’s left to do is File, Save, and name this workflow. Then, double-click the app icon for this workflow (it’ll be located wherever you decided to save it) and make sure it works.
And that’s it! Although this will soon be replaced by a built-in macOS feature, I’m sure you can see why it’s one of the best Automator routines.
Copy all URLs from a section of text
This is one of my favorites on this list of the best Automator routines because I made it! That’s right, you probably won’t find this super-original, one-of-a-kind Automator workflow anywhere else.
Just kidding, of course! This is another simple routine that you’ll find yourself using all the time. I do, at least.
This one is going to be another Quick Action, which means it’ll be in the right-click menu. It allows you to select a block of text and copy all of the URLs in that block of text into a list. You can then paste those URLs – without the rest of the text – in a neat list.
The one limitation of this is that it doesn’t copy hyperlinks, just URLs. For those that don’t know the difference, here it is:
This workflow will copy the URL above, but not the hyperlink. Still, I use this almost every day!
If that doesn’t sound useful to you, don’t worry! You can easily set this routine to copy dates, email addresses, addresses, or phone numbers instead. Here’s how!
How to extract URLs from a block of text using Automator
Open a New Document in Automator and select Quick Action for your workflow type.
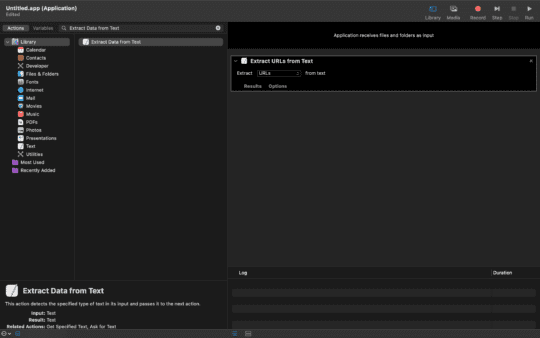
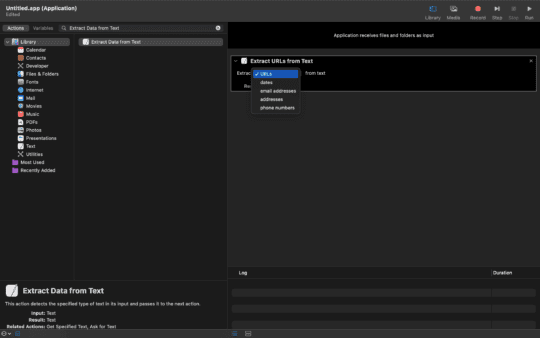
In the search bar, type “Extract Data from Text” and drag this action into the editor.
In the Extract field, you’ll find a dropdown menu that has the options I just listed above – URLs, dates, email addresses, addresses, and phone numbers. I’m going to stick to URLs, but feel free to choose whichever you’ll use the most. And, of course, you can always create a separate Quick Action for each of these.
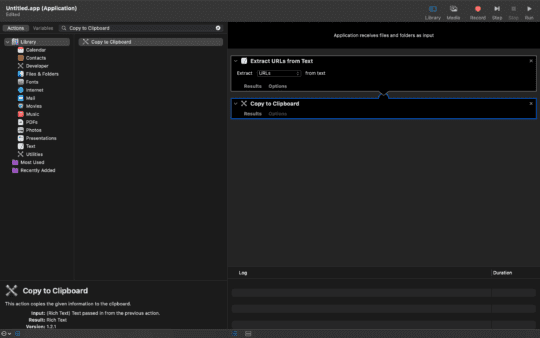
Next, type “Copy to Clipboard” and drag this action to the editor as the last step.
Finally, File and Save this action with a title that’s easy to remember. I used “Copy URLs”. Once saved, you can highlight a bunch of text and choose this from the Services section of the right-click menu.
And that’s it!
Easily send a new email using one of the best Automator routines
Alright, I know I said the last one was my favorite, but in actuality, it’s probably this one. This truly is one of the best Automator routines. Regardless of who you are, you can probably make some serious use out of this one.
This workflow will automatically send an email to your person of choice whenever you run it. You can also choose the subject and content of the email, giving you a lot of control.
And I’ll be adding in a bonus step that I like to use, which is adding an attachment to the email automatically. I use this for sending invoices each week, so this extra step is particularly useful to me!
How to send an email using Automator
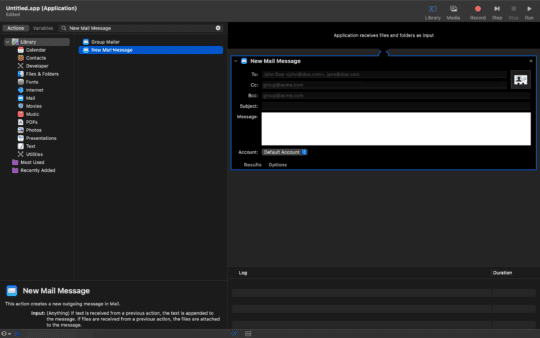
First things first, create a New Document in Automator using the Application workflow type.
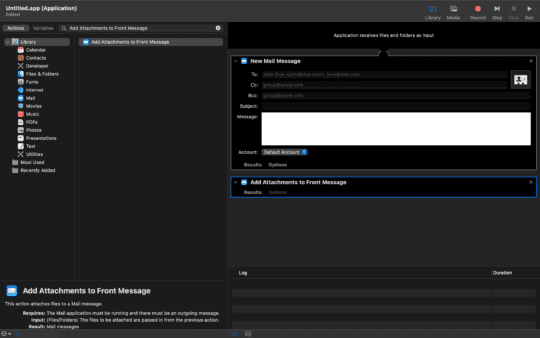
Next, type “New Mail Message” and drag the corresponding action into the editor.
Whenever you run this workflow, it’s going to popup a draft of your email before sending it. So if you leave any of these fields blank, you’ll have an extra opportunity to fill them in before sending the message.
That said, the goal is to fill in as many as you can ahead of time to increase the automative power of this workflow.
For me, that means filling in the To: and Message: fields. I also fill in the Subject: field using variables for the current date. That way, this email will look a little less automated than it is.
You can find variables by clicking Variables in the top left corner of the screen. I use the Current month variable, followed by a space, then the Current day, followed by a comma and a space, then the Current year. I put this in the Subject: field, so the email always looks current.
And that’s about it! You can save this workflow wherever you like. I use mine to send invoices, so I have it saved to the “Invoices” folder in Finder.
As mentioned, I wanted to include a bonus step for sending attachments automatically. I use this to automatically attach an invoice, though you can of course use it however you like.
To do this, type “Add Attachments to Front Message” in the search bar and add this in the editor after the New Mail Message action.
And that’s it!
All you have to do from here is drag and drop the file you want to attach to your email onto the application icon for this workflow. For example, I named this workflow “Send Invoices”. So each week I drag the PDF invoices for my clients onto this icon and press the Send button.
And that’s it!
Instantly resize a photo with a right-click
Nearing the end of our best Automator routines list is another workflow that I use every day. It’s a routine that allows you to right-click a photo and reduce/increase the size by whatever percentage you decide.
To upload images to my articles, I generally compress them using TinyPNG. It’s a great way to shrink file sizes down without losing any noticeable quality. The problem with this website, though, is that it won’t accept any files larger than 5MB. So I used to scale images down in Photoshop before compressing them with TinyPNG.
Now, I just use this! I haven’t opened Photoshop in months thanks to this Quick Action. It’s a serious time-saver.
The one thing I want to make a note of is that I wouldn’t recommend this as an alternative to compression. It’s just squishing (or stretching) the images without an intelligent compression algorithm. So unlike a compression service like TinyPNG, this will lead to a noticeable drop in quality. Keep this in mind whenever you use it!
How to resize photos from the right-click menu using one of the best Automator routines
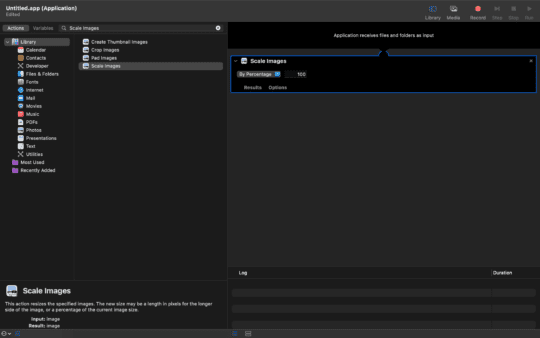
Create a New Document in Automator using the Quick Action type. In the search bar, type “Scale Images” and drag that action into the editor.
You might see a popup warning you that this will change the images you perform this action on. That’s letting you know that once you scale your images files to a new size, they’re going to be permanently changed by this workflow.
To me, that’s the goal of this workflow since I’m trying to save space on my computer. So I click Don’t Add. But if you want to preserve the original photo on your computer, click Add to automatically add a step that will preserve your originals.
Once you’ve gotten through that popup, you’ll notice that this action is set to the option To Size (pixels). If you have an exact pixel size in mind for resizing your images, go ahead and stick with this. My goal is to scale images down to half their size, though, so I change this option to By Percentage.
You’ll also see that in the above screenshot I changed the percentage from “100” to “50”. That scales the image down by 50%. If you want to increase the size, add the percentage you want to increase it by to 100. So if you want it to be 50% bigger, use “150”. If you want to double the size of an image, make it “200”.
Once you’ve done that, File, Save, and name this workflow whatever you like. I went with “Scale Image Down”. Once saved, right-click an image, go to Quick Actions, and you should see your workflow available there.
And that’s it!
Keep your Downloads folder tidy
Last but not least on this list of the best Automator routines is one that will keep your Downloads folder organized. This workflow will move files from your Downloads folder after they’ve been there for a long time and place them in the Trash.
This routine is also going to use a new workflow type that we haven’t covered yet, and that’s Folder Actions.
Unlike Quick Actions and Applications, this kind of workflow will run itself. You don’t have to do anything to make it run; it’ll do its thing in the background all the time.
Think of it like you would iCloud Mailbox rules. Whenever you add a new file or folder into the folder you apply Folder Actions to, your Folder Actions will run automatically.
And, of course, you can apply this routine and others like it to whichever folder you like.
Alright, let’s go!
How to keep your Downloads folder clean with one of the best Automator routines
First things first, create a New Document in Automator and choose Folder Actions for your workflow type.
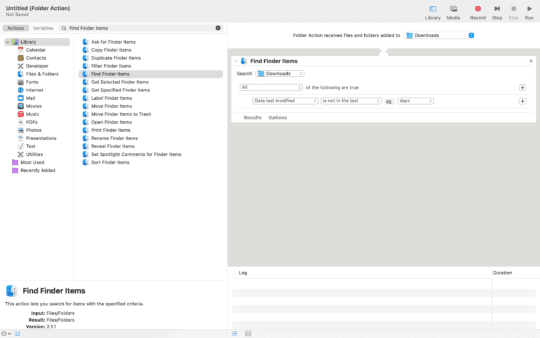
In the search bar, type “Find Finder Items” and drag it into the editor.
You’ll probably notice in the screenshot above that some of my options look different from yours. Let’s change them to match!
First, change the dropdown menu next to Folder Action receives files and folders added to to the Downloads folder. You can do this by clicking Other… from the dropdown menu and navigating to the Downloads folder.
After that, change the Search dropdown menu to the Downloads folder.
Next, change the Any Content dropdown menu to Date last modified. In this routine, this option will delete any files/folders that haven’t been modified in the last X days. You could change it to Date created or Date last opened if you like. Both will delete your files/folder after X days, but based on different factors. We’re going to leave it at Date last modified!
When you change that dropdown menu to a date-based option, you’ll get a new dropdown menu to choose from. It’ll say is today to start. Change it to is not in the last.
A new box will appear after that. You can change it to however many days/months/years you like. I recommend 45 days, but you can set it to whichever amount you like. That’s how long your files will remain in the Downloads folder before they’re deleted.
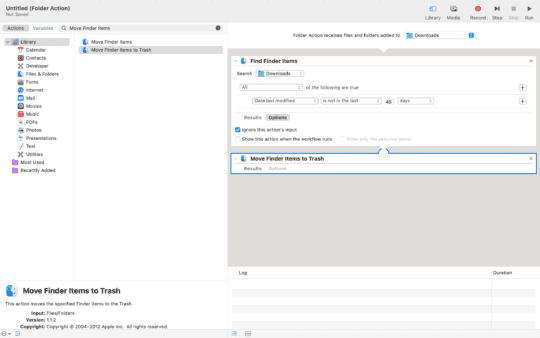
Before we add the next action, we want to modify this one once more. Click the small Options button and check the Ignore this action’s input box. If you don’t check this, this routine will immediately delete all files/folders in your Downloads folder that haven’t been modified in 45 days. If you check it, though, it’ll start counting from when you save the routine.
The last step is to type “Move Finder Items to Trash” into the search bar and drag the corresponding action into the editor.
File, Save, and finish!
How to delete Quick Actions and other best Automator routines from your Mac
And that’s it! Those are, in my opinion, the best Automator routines for day-to-day Mac use.
Of course, there may come a time when you’re ready to delete these routines from your Mac.
For routines saved as Workflows and Applications, you can delete these by locating them in Finder and dragging them into the Trash bin. Easy!
If you’re trying to delete Quick Actions, though, that can be a bit trickier. It took me a while to find any information for deleting these online, so don’t feel bad if you aren’t sure how to do it! Apple made it a bit of a pain.
First, open Finder. Then, in the Menu Bar, click Go, hold the option key and choose Library. It’s a secret option, so you’ll see it disappear and reappear as you press the option key.
Once you’re in the Library, scroll down and open the Services folder. Here, you’ll see all of the Quick Actions you’ve created.
To delete them, drag them into the Trash bin. Or, you can rename them just like you would any other file. And if you want to edit them in Automator, right-click them, click Open With, and choose Automator.
And that’s it! Now you know how to delete the best Automator routines as well as create them.
Will you be able to keep using the best Automator routines after Shortcuts comes to Mac?
If you watched WWDC21, then you know that the Shortcuts app on iPhone is coming to Mac. I covered this story in detail here if you want to know more.
For those that don’t know, the Shortcuts app has been around on iOS for a few years now. It allows users to create simple automations that integrate with the iOS system.
Sound familiar?
It’s true – Shortcuts is, in many ways, just a visual update for Automator. My experience has been that Shortcuts is, at least on the surface, more limited than Automator. However, you can use scripting in each, which gives you nearly unlimited options. So if you can code, the limitations of either app are pretty superficial.
If you’re worried that Shortcuts is going to replace Automator completely, you can rest easy. This next macOS update is going to run both apps concurrently – Automator isn’t going anywhere yet. You’ll even be able to import your existing Automator workflows into Shortcuts.
That being said, I do think that Apple will eventually replace Automator with Shortcuts in a version of macOS after macOS Monterey. Again, I explore this in more detail in my full post on the subject here!
Start using the best Automator routines today
Thank you for checking out this post on the best Automator routines for Mac. I have been saving more and more time as I explore Automator in new ways. Hopefully, this post not only gave you a few workflows you can use, but the inspiration to start creating your own, too.
For more guides, tips, and news on all things Apple, check out the rest of the AppleToolBox blog. I’ll be covering more tutorials and guides for Automator as well as Shortcuts, so be sure to stay tuned!
I use Automator to make using a specific application on a virtual machine a breeze. I use voice dictation in order to get stuff done, but the built-in voice control on Mac OS Ventura isn’t up to snuff – especially when writing fiction. So I use Nuance Dragon Professional in a virtual machine. Normally I would load the app, dictate, copy to the Mac writing tool of my choice (normally Scrivener) and edit.
This was annoying since I was “using two computers at once.” Plus the usual performance hit of using 4gb of ram on an 8gb M1 system… So, I looked into Dragon and saw it could automatically transcribe recordings placed in a designated folder.
This lead to a lightbulb moment. What if I used the voice memo app to record everything I wanted to dictate, had the files moved to the specific folder, and just loaded the virtual machine when I wanted to transcribe it? Instead of wrestling with a virtual machine all day, I could dictate to my heart’s content and then load the VM for the 15 minutes or so it takes to transcribe a day’s worth of dictation.
The problem was getting the files from the Voice Memo app to the OneDrive folder that will be synced to the VM. Automator made that a cinch, after I learned how to use it. I wound up putting an action in the folder that looks for new music files and automagically copy it to the relevant transcription folder.
The results will land in another folder, which I had an automator action copy over the transcribed document to a “scratch” folder that allows me to simply add the text to the Scrivener project of my choice.
Thus, I can use my Mac to its fullest without having to worry about wasting system resources or fighting a virtual machine to get it to recognize my microphone. A win-win.
Loved the article and was wondering if you can expand advanced Automator setup such as Copy your clipboard to a single text file rather than creating new one each time or merge all into a single file and others? I would love to see what’s possible with Automator and shortcuts tool on Mac. Thanks again for sharing these !