Welcome back to another edition of our ongoing automation series. Over the past few weeks, I’ve been writing about the Shortcuts app on iPhone and the Automator app on Mac. Today, I’m going to build on that series by breaking down the different Automator workflow types.
Oddly enough, this is the first post I’ve written so far where research hasn’t been much help. I can’t find anything on this topic, not even from Apple. All the more reason to write this, though, so that you have the information handy!
Understanding the various document types available to you in Automator is super important. After all, the first thing Automator has you do when creating a workflow is choose the type of workflow you want to create. If you don’t understand the differences between them, then you’re going to have a hard time making workflows that run as you expect them to!
This is going to be a pretty straightforward post. I’m going to start by explaining what I mean by “Automator workflow types”, then I’m just going to go through each of the available options. I’ll explain what each type is and when you should use it.
You can think of this post as more like a cheat sheet than a typical article. Just bookmark this post and come back to it as you need.
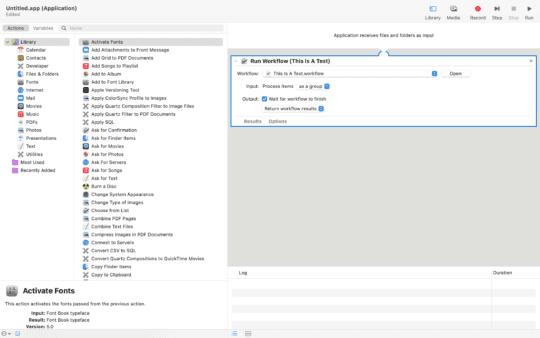
If you’re new to Automator, you might not know that there are different workflow types, or even what I’m referencing. Whenever you first open Automator to create a new workflow (not edit an existing one), you’ll be presented with the following screen:
As you can see in the above image, there are eight options to choose from:
Workflow
Application
Quick Action
Print Plugin
Folder Action
Calendar Alarm
Image Capture Plugin
Dictation Commands
Each one creates a different kind of Automator routine. The one you’re probably most familiar with is the Application type. However, each one has a role that will more likely than not come in handy at some point.
Understanding what each one is for is not only important for choosing between them, but it can also broaden what you thought Automator was capable of. For instance, you might not have known that you can map Automator routines to voice commands. I’ll be covering how that works later on in this article!
For now, let’s get into the first of the Automator workflow types – Workflows!
Automator workflow types: Workflows
The first of the Automator workflow types is, fittingly, the Workflow.
Workflows are the most basic file type that you can create in Automator. All they do is hold a set of actions. You can only run a Workflow from within Automator. So it’s a self-contained set of actions.
You can think of this as a Photoshop file. You can export a Photoshop file to a bunch of different image types, and you can use those image types in all kinds of ways. You can also save your image as a Photoshop file, but if you do that, you can only use that file inside of Photoshop.
In other words, Workflows are the most limited of the workflow types. But that doesn’t mean they’re useless.
Far from it, actually! Workflows can be used to organize and create subsets of actions. For instance, if you create a clever sequence of steps, you can save them as a Workflow and then use them in other Automator routines.
Part of what makes Workflows useful is that they’re the only workflow type that can be placed in the middle of another Automator routine as an action. You can save a Workflow, then create a new routine, then drag and drop your original Workflow file into the middle of your new routine.
When to use Workflows in Automator
Although Workflows are a basic and flexible workflow type, you may find yourself only using them on rare occasions.
That’s because Workflows are made significantly less useful by the power that the other Automator workflow types bring. While the other types can be run in certain situations, from context menus, or even by your voice, Workflows are limited to the Automator app.
Even though the Automator app is great (that’s why I’m writing about it) the goal is to spend as little time using the Automator app as possible so that it can do all of the work for you. For that reason alone, you’ll probably avoid making Workflows for most of your time in Automator.
In my opinion, there are two times to use Workflows.
The first is want to add a custom action to Automator. For instance, say you have ideas for multiple Automator routines that will need to get a copy of every phone number in your Contacts list. That might require a little scripting as well as some actions.
Rather than creating this set of actions over and over again, you could just make a single Workflow and drag it into your future workflows. That can save you a lot of time and can also make Automator a more powerful app.
The second scenario that I see Workflows being helpful in is when you want to create routines that will help you while using the Automator app. For instance, if you want to get file names while using Automator, running a Workflow from the Automator app will be less annoying.
Automator workflow types: Applications
Next up on the list of Automator workflow types is Applications. Though there’s no evidence on this as far as I know, I would assume that this is the most popular workflow type. Think of Applications as your bread and butter in Automator.
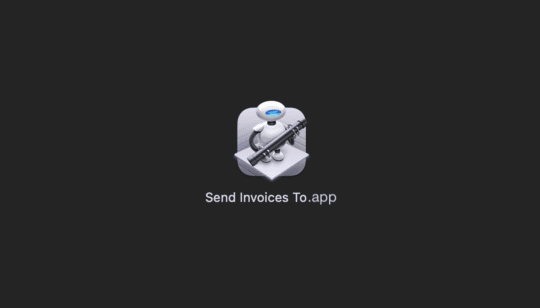
Applications give you an application icon that you can double-click to run it. You can place these icons in Finder, on your Desktop, or even in your Dock.
You can even drag-and-drop files/folders onto these icons to use them as input for that workflow.
For instance, the routine in the above screenshot takes files as input. It then attaches those files to an email and sends them to a client of my choosing.
When to use Applications
I think you should be using Applications all the time in Automator. If you don’t know what type to choose, choose Applications from the list of Automator workflow types.
They’re versatile, straightforward, and easy to keep track of. If you decide you don’t want them anymore, you can drag them in the trash. If you want to edit them, you can open them in Automator.
You can place Application workflows next to relevant content. For instance, my Invoices Application is in the folder where I keep my invoices. Easy!
You can also copy and paste Application workflows wherever you want. So if I wanted to, I could use different invoice folders for each of my clients, and just copy/paste that Application icon into each of those folders.
The only drawback to Applications is that they aren’t as specific as other workflow types. You can’t access them from the right-click menu, they can’t run on their own, they can’t sync with your calendar, etc. So I would avoid them when there’s another type that will better suit your needs.
Otherwise, they’re a great default!
Automator workflow types: Quick Actions
The third workflow type we’re going to cover is Quick Actions. Quick Actions were my favorite of the Automator workflow types, and they’re still high up there. I’ve probably created more Quick Actions than any other Workflow type.
Quick Actions are workflows that can be run from the right-click menu. They appear whenever you right-click a file, folder, image, or text selection.
Generally, they’ll use whatever you’ve right-clicked as the input for the workflow. So if you right-click on an image, then that image will be passed into the Quick Action. You can create Quick Actions that don’t do this, though this feature is part of what makes Quick Actions so powerful.
While Quick Actions can be a bit more limited than some of the other types, they’re incredibly convenient. Rather than automating processes on your Mac, I think of Quick Actions as a way to add new features to your Mac.
Wish you could right-click an image and scale it down by 50%? Now you can!
Want to convert between file types without needing to open any applications? Just use a Quick Action!
Want to change between wallpapers without digging through your settings? Just right-click anywhere!
When to use Quick Actions
As I just explored briefly, you’ll want to use Quick Actions in contextual situations. By that, I mean that these Automator workflow types work best when applied situationally.
These are routines that you aren’t going to be using all the time. But when you do want to use them, you want them readily available.
That’s because Quick Actions are accessed through the right-click menu. And like everything else within the right-click menu, they should be implemented with context in mind. After all, the right-click menu’s secondary name is the “context menu”.
You can think of Quick Actions as “doing something” to files and folders on your computer. Want to change that file type? Or modify that document? Or reorganize that folder? Then you’ll probably want to do so by right-clicking rather than looking for an icon to double-click.
You may think that mapping all of your workflows to Quick Actions is the way to go. I can see why your brain might go there. However, this can lead to a cluttered and confusing right-click menu.
Also, Quick Actions are more difficult to edit and delete than Applications or Workflows. That’s because you won’t have a file or icon that you can easily find and tweak. The files for Quick Actions are buried in hidden folders on your Mac. You’re not meant to be editing and tweaking them after they’re created.
For all of these reasons, Quick Actions are best suited to just that: Quick actions! Short one- or two-step routines that you want easy access to. And that’s it!
Automator workflow types: Print Plugins
The next item in our list of Automator workflow types is one that I admittedly haven’t used before. I don’t print things very often nor do I even own a printer. They’re too much hassle! So the following information will be a secondhand experience.
Print Plugins are workflows that you run from within the print dialog box. That’s the box that appears whenever you try to print a document. It has options like choosing how many copies to print and choosing between black and white or color.
If that sounds a little useless, it’s because it kind of is. In my opinion, anyway. Unless you work in an office where you’re printing things all day, this seems like an odd choice for Automator.
Still, you’ll have access to the full range of Automator actions. You can Do things that are completely unrelated to printing if you want. And you don’t get access to any special options specific to printing, either.
The only unique feature that Print Plugins have is that they pass the documents in the print dialogue box to Automator as a PDF input.
So if you want to do something like save all of your printed documents to a specific folder on your Mac, convert them to images, or add an extra page to the end of a document before printing it, this is for you.
When to use Print Plugins
Print Plugins are, in my opinion, the most limited of the Automator workflow types. If you don’t print things very often, you’ll probably never need or want to ever create a workflow with this type. So if you have a hard time thinking of why you would want to use this type, then you probably don’t need to use it.
On the other hand, if you’re someone who is already getting a few ideas for this workflow type, then you’re probably the target user.
Specifically, I think the target user for this workflow type is someone who prints documents frequently. And if you are that person, then you probably have several repetitive printing tasks you can automate. After all, printing is already a pretty tedious and nearly autonomous process.
There isn’t much else to say here! Use Print Plugins whenever you want to create print-related workflows. Otherwise, choose anything else.
Automator workflow types: Folder Actions
Contrasting Print Plugins is one of the Automator workflow types that I use the most. Folder Actions are super helpful for all sorts of things, though it took me a while to come around on them.
This workflow type is truly automated. It runs in the background, so you never manually run it.
Instead, you attach Folder Actions to a folder of your choosing. Whenever new folders or files are added to that folder, the attached Folder Actions will run.
Not only will this cause Folder Actions to run, but they’ll also use the added files/folders as input.
For example, I have a Folder Action that will automatically scale down any images on my Desktop that are larger than 5MB. So whenever I add images to my Desktop that are larger than that file size, they are automatically shrunk. I don’t have to do anything to make this happen.
When to use Folder Actions
There are two situations where Folder Actions are the best choice out of the Automator workflow types.
The first is more obvious. If you want to automate certain actions within a folder, then you’ll want to use Folder Actions! This includes things like:
Automatically renaming files inside of a certain folder
Creating a new folder within another folder every month
Altering all files within a folder that meet certain criteria
Deleting files within a folder after two months
etc.
The second scenario is a bit indirect. It’s for when you want to create a fully automated routine.
Folder Actions are unique in that they’re one of the only Automator workflows that are truly autonomous. They don’t need you to make them run. You don’t have to remember or do anything. They just work.
This allows you to create some pretty complex Automator workflows that run in the background of your machine. It’ll take some creativity, but there are possibilities unique to this workflow type.
Automator workflow types: Calendar Alarms
That brings us to Calendar Alarms. Calendar Alarms are workflows that are added to your Apple Calendar.
It took me a while to figure out exactly how these worked. I wasn’t sure if they attached to your Calendar Events, were actions that you could perform on Calendar Events, or if they ran on time of your choosing.
The answer ended up being the last option! Whenever you create a Calendar Alarm, it’s added to your Calendar at the time you created it. To view it, you’ll need to open the Calendar app on Mac.
Once you’ve decided what this Calendar Alarm is going to do, you can then decide when it’s going to do it. You can do this by manipulating it just like you would any other Calendar Event. Drag it around, change the date and time, choose how long it’ll last, set how often you want it to repeat (if you want it to repeat), and more.
When to use Calendar Alarms
Calendar Alarms are great for when you want to create routines that are going to run every day, week, month, or year.
Going back to my invoice example, I could create a Calendar Alarm that sends my invoices for me each week. I could create another Calendar Alarm that makes a new invoice for me at the start of each week, too, if I knew how to write the script for it.
You can also use Calendar Alarms to do things like close and open certain apps at specific times. For instance, you can open Slack while you’re working and close it when you’re done without needing to interact with it.
Another situation in which Calendar Alarms become useful is when you want to set automations around non-repeating Calendar Events. Maybe you have an appointment coming up, a presentation at work, or plans for next weekend. You can create an automation that will send you and event participants a notification, add something to your Notes, and so on.
Automator workflow types: Image Capture Plugins
In the three years that I’ve been a Mac user and writer, I’ve never once encountered Image Capture, let alone Image Capture Plugins. So for this one, too, I want to be clear that I haven’t had much experience with this workflow type.
For those that (like me) aren’t aware of Image Capture, it’s a feature on Mac that appears whenever you’re moving images to your Mac from a device. That means you’ve connected a camera directly to your Mac and are moving files from it to your Mac. That can be a literal camera as well as an iPhone or iPad.
Similar to Print Plugins, Image Capture Plugins are automations that are only available in the Image Capture dialogue box. They’re very specific.
However, if you import images to your Mac often, then you’ll probably be kicking yourself that you didn’t know about this.
You can use Image Capture Plugins to automatically rename images as you import them, convert them to a different image type, crop them, resize them, apply filters to them, move them to specific folders, and much more.
Despite being so niche, I can see Image Capture Plugins being one of the most useful Automator workflow types. For photographers, this could be a godsend.
When to use Image Capture Plugins
Again, there isn’t much to say here. It’s pretty clear when to use Image Capture Plugins over other Automator workflow types.
The best time to use Image Capture Plugins is when you want to automate part of your routine when using Image Capture. If you find yourself renaming files constantly, cropping certain images all the time, or organizing the files you’re importing, you can probably speed all of this up with Image Capture Plugins.
Otherwise, you should not be using Image Capture Plugins!
Automator workflow types: Dictation Commands
The last of the Automator workflow types is Dictation Commands. We’ve been referencing these throughout this post, and we’ve finally arrived at them.
Dictation Commands are workflows that run whenever you say their key phrase into your Mac’s Dictation feature. To activate this feature, press the fn key twice. Approve the dialogue boxes that appear, then speak to your Mac.
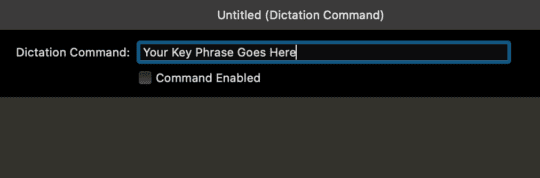
When creating a Dictation Command, you can choose a key phrase at the top of the editor.
Speaking that key phrase after activating Dictation will trigger the workflow you attach to that phrase.
Beyond that, there is no difference between Dictation Commands and other Automator workflow types. It’s the activation that’s distinct.
When to use Dictation Commands
There are a few reasons why you might want to use Dictation Commands in place of more common Automator workflow types like Quick Actions and Applications.
The first is the cool factor. You can set up a fun Dictation Command and then run it later in front of your friends to impress them.
For example, you could map this Terminal command, which plays Star Wars in the Terminal app, to a Dictation Command. Then, to impress your friends, you can say, “Computer, play Star Wars Episode IV”.
You could also use this Terminal command to have a conversation with your Mac. Just set a key phrase like, “How are you doing Computer?” Then have an automated response say, “Just fine, and yourself User?”
If you’re asking yourself, “Why would anyone want to do that?” you may be on the wrong blog.
Another use for Dictation Commands is adding voice commands that Siri doesn’t yet have. To be clear, you can’t run Dictation Commands from Siri. But since Siri and Dictation are activated in similar ways, you can approach Dictation Commands from a similar mindset.
Lastly, Dictation Commands can be used for accessibility purposes. If you or someone you know relies on voice commands to use their Mac, this can be extremely powerful for that person.
Use Automator workflow types to change the way you use your Mac
And that’s it! Those are the eight different Automator workflow types and the various situations they’re best used in. By choosing and combining them in creative ways, you can maximize your productivity on Mac.
As mentioned, I’ve been covering and will continue to cover more tips, tricks, and guides on using the Automator and Shortcuts apps on Mac and iPhone over the next few weeks. So be sure to tune into the AppleToolBox blog for those posts!
Also, we’re approaching August and September, which means iPhone 13 rumors are about to start pouring in. Make sure to subscribe to our newsletter to get the latest news on all of that!


Write a Comment