Today, we’re going to talk about what might be the most under-used app on Mac (aside from Photo Booth): The Automator app.
I’ve owned a Mac for about three years now and for a long time had only ever interacted with this app once. And that was to create a global keyboard shortcut on my Mac for getting a word count.
Lately, though, I’ve been sinking my teeth into the Automator app. I’ve had a ton of experience on platforms like Zapier and Integromat. But for whatever reason, Automator continued to slip under my radar until recently.
In this post, I want to raise some awareness for this great app and encourage you guys to start trying automation out! I’ll cover what Automator is, how it works, go through its basic components, and even give you a short tutorial on automating the Light/Dark Mode on your Mac.
Without further ado, let’s get into it!
Note: When I initially wrote this article, I was under the impression that the Shortcuts app coming to macOS Monterey would be replacing the Automator app on Mac. However, it looks like both apps will be simultaneously supported. So disregard any comments in this article about Shortcuts replacing Automator – for now, it looks like you’ll have both in macOS Monterey.
The Automator app on Mac is an app that allows you to create automated workflows. If you have any familiarity with apps like IFTTT or Shortcuts on iOS, or even services like Zapier and Integromat, then you more or less already know how Automator works.
The difference between Automator and these other digital automation apps is that Automator is integrated with macOS. So you can use it for things like changing system settings, managing your files, and adding keyboard shortcuts to your Mac.
It’s a great tool for saving time and also adding functionality to your Mac that might not otherwise be there.
I do feel I should mention that there are plenty of other automation tools for macOS that are better than Automator. I highlighted one in my recent Best June Apps For iOS and macOS post, Keyboard Maestro, that I recommend for more advanced automation fiends. Automator has the benefit of being simple and free, though, which is ideal for most users.
A quick explanation of digital automation
If this all sounds like Greek to you, don’t worry! It’s probably because you’re unfamiliar with the concept of digital automation. Let’s change that.
The kind of automation most of us are familiar with takes place in factories. Material is passed into the opening of a factory, and machines automatically carry it through the factory, modifying it with minimal or no human interaction, and eventually, it spits out of the factory as a finished product. Steel comes in, and out goes a spoon.
Digital automation works much the same way, but has a few differing elements:
Digital automation is generally more focused on reducing the amount of work you have to do rather than creating “product” or “output”. It can do these things, however.
It is completed by a standard computer rather than some sophisticated machinery. So anyone with a computer can use digital automation!
You can use digital automation to automatically organize your files, send out the same email every Friday, or shrink images by half their size. These are all things you can do with the Automator app once you understand how it works.
How does the Automator app on Mac work?
I’m glad you asked! There are two general ways that the Automator app completes its tasks. One is pretty straightforward, while the other can take a bit of learning to get the hang of.
Complete repetitive tasks automatically with workflows
The first of these approaches is workflows. Workflows are Automator’s equivalent of what is sometimes called a “routine” or “automation” by other apps.
When creating a workflow in the Automator app, the first thing you’ll do is choose what kind of workflow you want to create.
This will determine what form your workflow ends up taking as well as when and how it runs. For instance, you can choose between adding an option to the right-click menu or setting workflows to run based on your calendar.
Next, you’ll create the actions you want to run in your workflow. For this part, you’ll be stringing together various steps and actions to run whenever your workflow starts. This can be one step or several steps long.
If you don’t know how to write code, these are the kinds of automations you’ll be creating!
Write script for custom Automator actions
For those that do know how to write code, you have that option, too. This allows you to build custom automation routines that integrate with macOS. So you aren’t constricted by the standard workflow options that come with the Automator app.
The drawback here is, of course, that you need to know how to write code! You can use AppleScript, JavaScript, and even shell commands to run your workflow.
Because you’re going to be writing your own scripts, you’re going to run into a lot of the typical pitfalls of writing code. You’ll have to make sure it works, you might find yourself Googling a bunch throughout the process, etc.
What makes this process a little easier is that you can mingle your script with the built-in Automator actions. So if there’s something you want to do with your code that Automator can already do, you can skip writing that piece of code.
How useful is the Automator app?
Now that you have a basic idea of how the Automator app works, I want to spend a minute discussing how useful this app is.
I have pretty mixed feelings on this, honestly, and recent decisions by Apple lead me to believe it has mixed feelings on Automator, too. Let’s break this down.
Pretty solid as a basic Automator app
It’s important to note that the Automator app isn’t bad by any means. It’s a decent app for digital automation.
For those willing to explore and tinker with it, you’ll be able to come up with plenty of new features and time-savers for your Mac. And you’ll probably find that a lot of third-party utility apps can easily be replaced by experimenting with Automator.
This is especially true if you know how to write AppleScript or JavaScript. It won’t allow you to do anything automatically, but pretty close. Apple gives you a lot of freedom here, including nesting workflows. So the possibilities are abundant!
It is pretty dated, though
Although I do think the Automator app has a lot of merits, it isn’t perfect. In an era before platforms like Zapier and IFTTT, Automator might’ve seemed unbeatable. But it has been beaten, and beaten well.
The interface is dated, and it’s clear that Apple hasn’t given any TLC to Automator in many years. It’s also missing some pretty basic functionality. Night Shift, for example, is absent from Automator.
Automator’s age can make it intimidating for newcomers, too. A platform like Zapier is made to be as accessible as possible. But Automator is more challenging to pick up, which I think makes it less useful to the average user.
Automator on Mac is about to be replaced by Shortcuts
The age and complexity of Automator seem to have been noticed by Apple. And in retrospect, I don’t think the neglect this app faced was completely unintentional.
Apple announced at WWDC21 that the Automator app would be replaced by Shortcuts in macOS Monterey. For those that don’t know, Shortcuts (originally Siri Shortcuts) is an iPhone app that allows users to create automations.
Shortcuts has a simpler and more modern user interface than Automator. Although in my experience, the iOS version of Shortcuts is significantly more limited than Automator.
That said, Apple claimed in its announcement of Shortcuts coming to macOS that you would be able to migrate your Automator workflows to Shortcuts. Considering that the iOS version of Shortcuts wouldn’t be able to support anything but the most basic Automator workflows, I have to think that the macOS version of Shortcuts is going to be more robust than its iOS counterpart.
Ideally, Shortcuts on macOS is going to be a visual revamp and close successor to Automator. The other route I can see Apple taking is only allowing some Automator workflows to be transferred to the macOS Shortcuts app. Anything too complicated may be ditched.
I hope Apple doesn’t choose to do this, but we’ll see! If Apple does water down built-in automation on macOS with the replacement of Automator, then I think most people serious about automating should switch to an option like Keyboard Maestro. We’ll see how it plays out, though!
The basics of the Automator app
One of the last things I wanted to cover in this post is the building blocks of an Automator workflow. If you’ve never used an automation app before, this will give you an idea of how to dip your toes in the Automator app.
Actions
The first component of workflows in the Automator app is actions. Actions, as the name implies, are the things your workflow is going to do.
For instance, let’s say Copy Text is a workflow you create, and you bind it to cmd + C. When you highlight text and press cmd + C, your workflow will execute the action of copying that text.
If you create a keyboard shortcut that switches to Dark Mode, your action is switching to Dark Mode.
This is separate from the trigger, which is the thing that triggers your workflow to run. In both of the above examples, the trigger is a keyboard shortcut. But it could also be a calendar day or manually running the workflow from within Automator.
You can create a workflow that only has one action or links together tens of actions. It’s up to you and how complex you want your workflows to be!
Variables
The second piece of a workflow in the Automator app is variables. Variables are placeholders in your workflow that change depending on the context the workflow is being used in.
For instance, if I want to copy the first letter of a word and automatically create a new file named after that letter, you’ll need a variable. That variable could be called, “First Letter Of A Word”. Each time you run the app, that variable will change to represent whatever the first letter of a word is.
If you’re familiar with algebra, then you can compare it to the way “x” is used in algebra. It’s a placeholder that changes each time you use the workflow.
Unlike actions, variables are not required to create a workflow. You never have to use them. However, they allow you to create more complex workflows, as your workflows will work in more broad contexts. They’re also helpful when you need to take information or data from one thing and transfer it to another.
Scripts
I already mentioned this before, so I’ll keep it brief here.
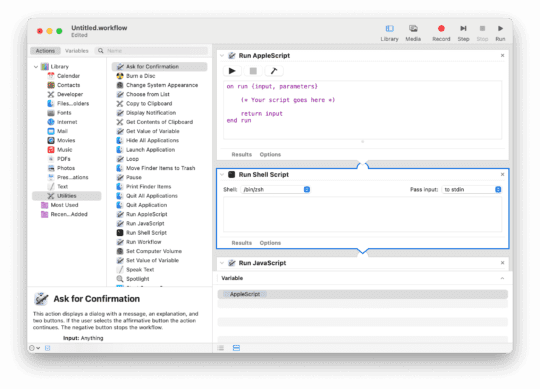
Another optional component of workflows in the Automator app is scripts. Scripts are an action that you can fill with code. On their own, they don’t do anything. But type some code into them, and you can start to do some pretty impressive stuff.
Automator only allows you to use JavaScript, AppleScript, and shell commands. So you’ll need to be familiar with one of those to be able to use this feature.
If you can write in these languages, however, you can turn Automator from a basic automation tool into something truly powerful. You can also mix your script with other Automator actions. It isn’t either/or.
Third-party actions
Lastly, we have third-party actions. These are actions that are added to the Automator app by non-Apple apps that you install on your Mac. For example, if you install Microsoft Word on your Mac, you’ll see actions appear in Automator for Microsoft Word.
Apple has made this possible through the use of an Automator API. Developers that choose to take advantage of this API can expand the usefulness of Automator.
Unfortunately, this has to be added by the developers themselves. So if you can’t find any support for actions from your favorite app, then you’re probably out of luck.
How to automate Light/Dark mode on Mac with the Automator app
Before closing out this article, I wanted to leave you with something simple that you could accomplish in the Automator app. That way, you can get some hands-on experience with it before I send you off on your way.
Also, I’ll be adding more Automator posts to AppleToolBox over the week, so be sure to tune in if you want to learn more!
Specifically, we’re going to create a workflow that lets you switch between Dark and Light Mode at any time from the right-click menu. Useful and simple!
Step 1: Open the Automator app
Pretty simple! Press cmd + spacebar, type “Automator”, and press return. The Automator app should open.
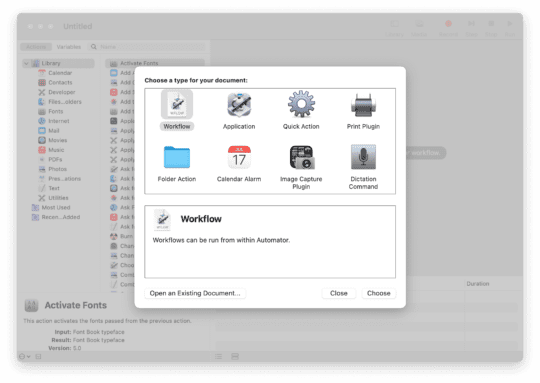
Double-click New Document. That should bring you here:
Choose Quick Action.
Step 2: Configure your workflow
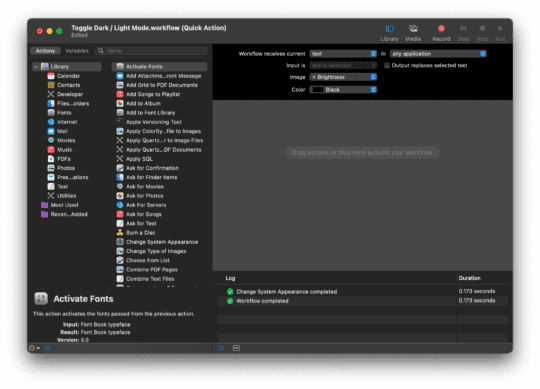
Next, we’re going to tell our automation what we want it to do. To start, choose text for the Workflow receives field at the top of the screen. For the Image field, I chose the Brightness option. You can choose whatever Image you like, though – this is the icon that will show next to this item in the right-click menu.
In the search field at the upper-left of this window, type “Change System Appearance”. You should see an action popup by that same name.
Drag-and-drop that action into your workflow.
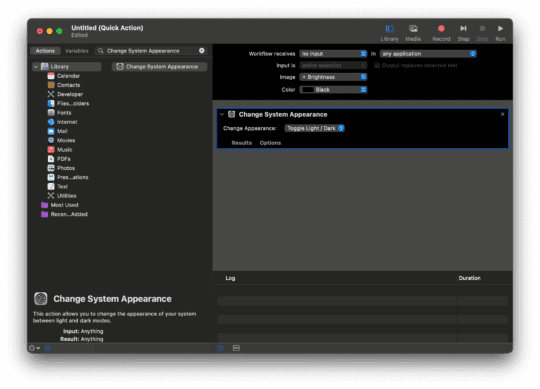
Make sure that the Change Appearance field is set to Toggle Light / Dark, like in the screenshot above. You can click the Run button in the top-right of this window to see your workflow in action!
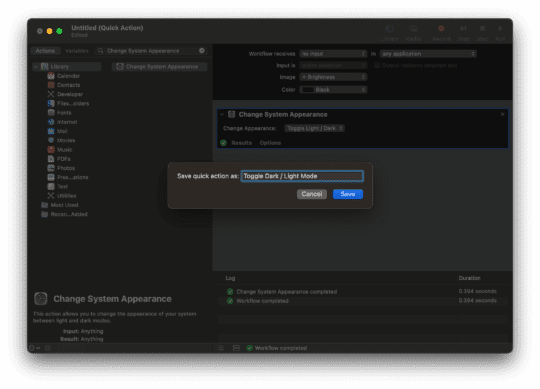
Step 3: Save your workflow in the Automator app
Lastly, we’re just going to save this workflow so you can start using it. To do so, click File, then Save. Name your workflow something appropriate, like so:
After you click Save, highlight some text anywhere on your Mac and right-click. From the right-click menu, choose Services, and you should see your workflow titled there. Click it!
At first, you may get a notification asking you to permit that app to be able to change the theme. Allow it, since you’re the one who created the workflow. You know it isn’t malicious!
Once you allow it, you’ll be able to switch between Dark and Light Mode on Mac just by highlighting some text and choosing that option from the right-click menu. Pretty cool!
Make your life easier and more efficient with the Automator app on Mac
And that’s it! That’s most of the basics you’ll need to know to understand and use the Automator app. It’s a hidden gem on Mac that’s soon to be replaced by Shortcuts. So learning it now can prepare you for using Shortcuts on macOS, and you should be able to transfer your Automator workflows to Shortcuts when macOS Monterey comes out.
Until then, be sure to experiment with it and come back to the AppleToolBox blog. We’ll be covering more Automator tutorials as well as the usual blend of news, tutorials, and reviews that we always do.


You should update this to cover Alfred 5