Thanks to Apple’s FaceTime, Mac and iOS device users can make video and audio calls from anywhere in the country. Because of the app’s portability, your location settings ensure that incoming calls use the correct code and exchanges for your region — wherever you may be!
If you plan on travelling and need to switch your location settings on FaceTime, you may be confused as to where these settings are actually kept. The interface of the app, especially on Mac, is pretty bare-bones, and there is no true “Settings” option on any of the drop-down menus. But it’s not that hard to find. In fact, there are two ways you can change your location settings on FaceTime — lucky you. One, through your Apple ID and two, through Preferences.
This method is useful for iPhone/iOS device users in particular.
To begin, go to your iPhone’s Settings.
Next, go to FaceTime and toggle the slider button on to activate it.
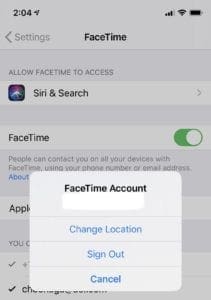
You will want to use your Apple ID for FaceTime, so select the option directly below.
After you’ve signed in with your ID email and password, tap on the ID. You won’t have to change this screen; the ID will appear where the option to sign in once was.
A small pop-up menu will give you the option to Change Your Location > Region. Select this.
Pick the region in which you are located and Save.
You’ve now changed your location under your Apple ID. In theory, because things hiccup all the time, all apps connected to your Apple ID should recognize the change in location. You can always go back into your Apple account and change your location settings again.
Change Location Under Apple ID, iOS
If you want to change your location settings through your iOS device once more, do not go back to FaceTime under Settings.
Open Settings > Apple ID.
Then select iTunes & App Store.
Tap Apple ID. Select your Apple ID.
Tap Country/Region > Change Country or Region.
Once you choose a new region, the device will ask you to agree to its terms and conditions.
Select Agree, and you’re done!
Not so hard, is it?
Changing Location on FaceTime, Mac
If you’re a Mac user, you may find this method more of a streamlined process.
First, of course, open the FaceTime app.
Under FaceTime in the toolbar, select Preferences.
You have to sign in to your Apple ID account if you have not already.
If your location settings are already what you need them to be in your Apple ID settings, FaceTime should preload the region. If not, go to the Location drop-down menu on the screen.
Select your region.
Change Location Under Apple ID, Mac
Changing your location settings under your Apple ID on a Mac is similar to doing the same thing on your iPhone (except you’re using the full desktop version of the apps).
Open iTunes.
On the toolbar, go to Account > View My Account.
Sign in with your Apple ID if the app prompts you to do so. Click View Account.
Now that you’re on the Account Information page, you can Change Country or Region.
Choose your new region from the Select Country or Region drop-down menu.
Agree to the terms and conditions, and click Agree once more to save your changes.
If you have a new billing address you need to use, now is the time to enter the new info.
And you’re done!
Wrapping Up
Is it strange that Apple technically now knows where you are at all times — or at least the region? I mean, strange? No. Anytime you adjust location settings, some third-party will have access to your location. That’s just how it is. The important thing is that the people trying to call you, or at least their FaceTime software, knows where you are. This way, they can properly dial your number.
When you are making calls, you will still have to dial in the area code if the receiver is outside of your region or area code. This is typical of your standard phone call rules. However, you don’t necessarily have to enter a country’s code. You can manually if you wish, but FaceTime’s location settings are supposed to eliminate this step for you.


")


Write a Comment