When you launch your Windows 10 virtual machine, Parallels Desktop may occasionally throw an annoying “Network initialization failed” error. The program informs you that “Your virtual machine will continue working normally but will have no network connection“. Simply restarting your Mac won’t fix the problem. Pursue the troubleshooting solutions below to get rid of the error.
How Do I Fix “Network Initialization Failed” on Parallels Desktop?
Kill NetworkInterfaces and Disable Internet Sharing
Launch Finder, go to Applications and select Utilities.
Double-click on Terminal to launch the tool.
Run the sudo rm /Library/Preferences/SystemConfiguration/NetworkInterfaces.plist && sudo killall -9 configd command.
Restart your computer.
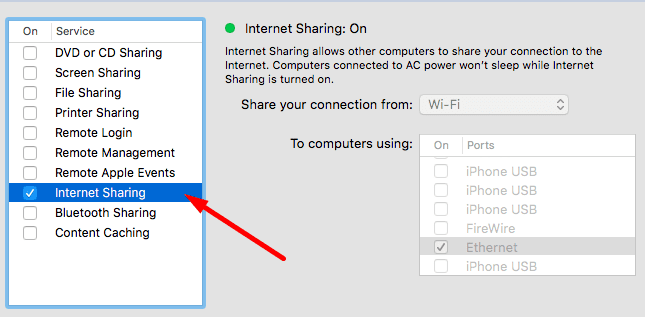
Then, go to System Preferences, and locate the Sharing preference pane.
Disable Internet Sharing.
Launch Parallels Desktop again and checks the results.
Run the Client With Superuser Rights
If the error persists, run the Parallels Desktop client as a superuser.
Close your virtual machine, and exit Parallels completely.
After that, launch Terminal and run the following command: sudo -b /Applications/Parallels\ Desktop.app/Contents/MacOS/prl_client_app
⇒ Note: Some users complained the command worked, but they lost the integrity of the Home folders. If you’re experiencing similar issues, reinstall Parallels.
Use the Wi-Fi Adapter
The “Network initialization failed” error may also indicate that Parallels Desktop is not reading the adapters correctly. In other words, Parallels automatically pushes Ethernet to the top of the Service Order list, disabling your wireless connection.
As a workaround, if you’re using Ethernet as your primary connection, tweak your Service Order settings, and select the Wi-Fi adapter. Of course, if Wi-Fi is your primary connection, select the Ethernet adapter.
Follow these steps if you’re using a wired connection:
Enable Wi-Fi and wait until your device connects to the network. You should now have two IP addresses.
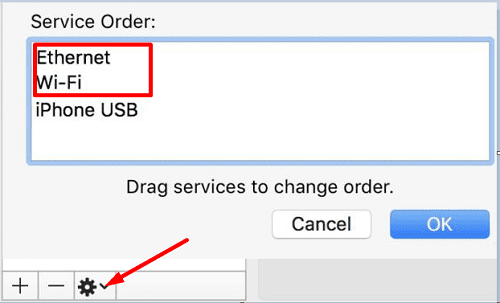
Go to System Preferences, click on Network, and select Service Order (the gear icon). Check if your Ethernet connection is still the first on the list (main connection). Drag the Wi-Fi network to the first position.
Launch Parallels, and select Wi-Fi as the network to use on your virtual machine. Sometimes, you may need to select the wireless network twice on your VM.
Other users fixed the problem by switching from Shared Network to Bridged Network. Check which of these methods works best for you.
Edit Parallel Desktop Preferences
Exit Parallels completely. Launch the Activity Monitor and close all the Parallels processes that might still be running in the background.
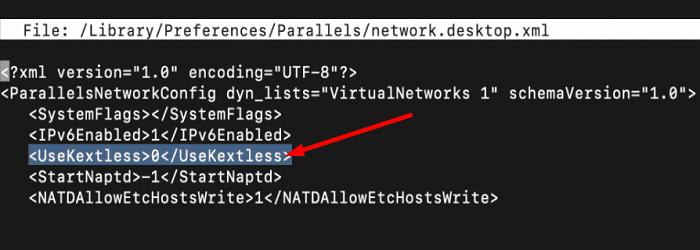
Launch Terminal and run the sudo nano /Library/Preferences/Parallels/network.desktop.xml command.
Locate the <UseKextless>1</UseKextless> line.
Then change it to <UseKextless>0</UseKextless>.
Press CLT and O to save the changes, and then CLT and X to exit the XML file.
Restart your Mac. Launch Parallels again and check if Wi-Fi is available on your Windows 10 virtual machine.
Conclusion
If your Windows 10 virtual machine is unable to connect to the Internet, launch Parallels with superuser rights using this Terminal command: sudo -b /Applications/Parallels/Desktop.app/Contents/MacOS/prl_client_app. Don’t forget to disable Internet Sharing. If the issue persists, edit the Network.desktop.xml file, and change the <UseKextless>1</UseKextless> string to <UseKextless>0</UseKextless>.
Which of these methods worked for you? Let us know in the comments below.
Madalina has been a Windows fan ever since she got her hands on her first Windows XP computer. She is interested in all things technology, especially emerging technologies — AI and DNA computing in particular.
I tried the Edit Parallel Desktop Preferences method and I got an error: “To complete Parallels Desktop setup, please restart your Mac”
I restarted multiple times but Parallels didn’t work :<<
I tried this command "sudo rm /Library/Preferences/Parallels/network.desktop.xml" as Google instruction, but Win 10 on Parallels doesn't have WiFi connection.
Non, tried all in this page and when installing windows 10 64 bit at the beginning I get network initialization failed. MacBook Pro 16 2019, macOS Monterrey. parallels desktop 17.1.2.51548 please help
Running the Client With Superuser Rights worked for me but I experienced the issue mentioned and when I reinstalled Parallels, lost access to internet again. So tried the last step of changing to 0 (mine was -1 and not 1) and this worked fine.
Thanks a million
I am using macOS Monterey with Windows 11 on Parallels 17
Hi thanks for the suggestions.
Sadly none of them worked. The Problem persists Parallels simply doesn’t want to connect to the internet anymore. worked flawlessly before. I hope i get a refund for the 17 version. It’s unusable for me in this state. Are there alternatives ? vmware virtualbox ?
Hello there. The first method did the trick! I must have disabled Parallel Network Initialization while resetting my internet settings with Big Sur Cache Cleaner. I did find after restart that I did not enable Internet Sharing, so I simply restarted the Parallels Destop app and launched the Windows 11 Pro Preview build (current) and the eth0 (Ethernet) came up nominally.


I tried the Edit Parallel Desktop Preferences method and I got an error: “To complete Parallels Desktop setup, please restart your Mac”
I restarted multiple times but Parallels didn’t work :<<
I tried this command "sudo rm /Library/Preferences/Parallels/network.desktop.xml" as Google instruction, but Win 10 on Parallels doesn't have WiFi connection.
Please help me :(( Thank you!
The kettles thingy works for me!
The first and the last method described work fine
The last one is better, since I don’t have to repeat the procedure every time I execute Parallels
Neither did I have that line on the file network.desktop.xml. Adding it resolved my issue too!
Just added:
0
macOS 11.6.7
parallels 17.1.4
Tall flowers of thanks
Edit Parallel Desktop Preferences
So i didnt have the line 0
i added it
it worked
i feel like im a hacker
Edit Parallel Desktop Preferences
this one worked.
Non, tried all in this page and when installing windows 10 64 bit at the beginning I get network initialization failed. MacBook Pro 16 2019, macOS Monterrey. parallels desktop 17.1.2.51548 please help
omg u r such a genius! Setting to 0 works for me! So happy!
Running the Client With Superuser Rights worked for me but I experienced the issue mentioned and when I reinstalled Parallels, lost access to internet again. So tried the last step of changing to 0 (mine was -1 and not 1) and this worked fine.
Thanks a million
I am using macOS Monterey with Windows 11 on Parallels 17
How can I change -1
to 0?
Setting 0 worked for me on macOS 11.6.4 and Parallels 16.0.1, thanx a lot!
Parallels 16 on Monterey, change of UseKextless value worked.
Thank you _very_ much.
Hi, the last trick worked for me as well! Thanks!
The last tip actually worked. Thanks so much.
Hi thanks for the suggestions.
Sadly none of them worked. The Problem persists Parallels simply doesn’t want to connect to the internet anymore. worked flawlessly before. I hope i get a refund for the 17 version. It’s unusable for me in this state. Are there alternatives ? vmware virtualbox ?
The last method did the trick! Thanks.
Changing UseKextless to 0 also worked for me, thank you!
The last method of setting UseKextless 0 was the one that worked for me !!! Thank you 😀
Changing UseKextless to 0 worked for me, thank you!
Hello there. The first method did the trick! I must have disabled Parallel Network Initialization while resetting my internet settings with Big Sur Cache Cleaner. I did find after restart that I did not enable Internet Sharing, so I simply restarted the Parallels Destop app and launched the Windows 11 Pro Preview build (current) and the eth0 (Ethernet) came up nominally.