After an extremely disappointing launch in 2019 with Catalina, Apple looks to rebound in 2020 with macOS Big Sur. Catalina has been riddled with bugs and is arguably one of the company’s worst releases in years. But Big Sur looks to turn the tide for Mac enthusiasts.
Related Reading
- All the New Safari features for iOS 14, iPadOS 14, and macOS Big Sur
- What Does It Mean for Apple to Create Its Own Processors for the Mac?
- macOS: How to Use Pinned Tabs in Safari
- Apple Silicon: What To Expect During The Apple-Intel Transition
- Apple Takes Accessibility Features to the Next Level in iOS 14
Contents
What’s coming to the Mac with macOS Big Sur?
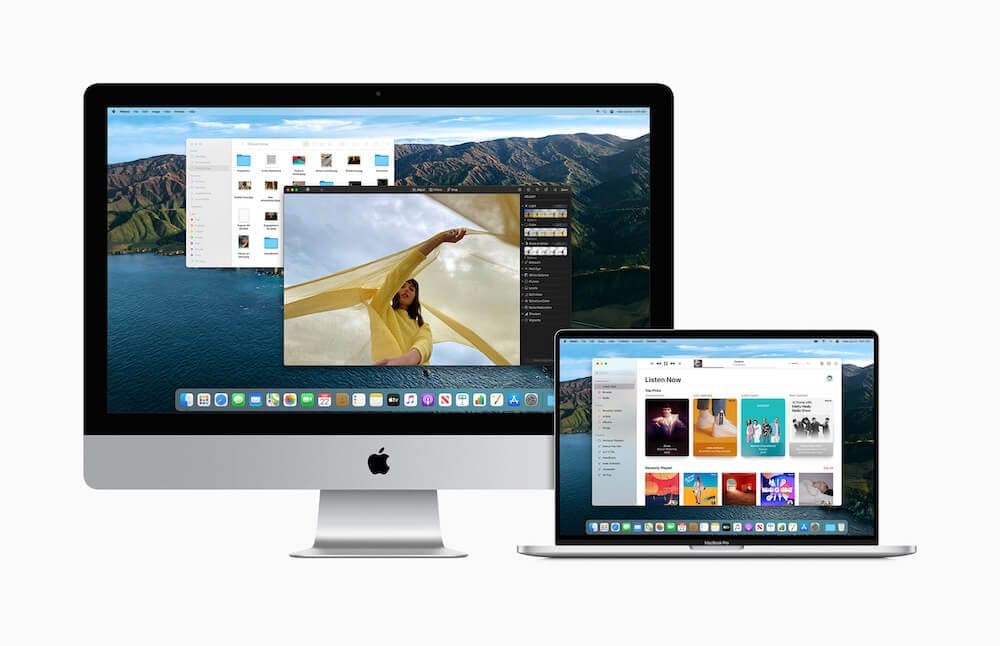
macOS Big Sur is loaded with new features, including an all-new design. At first glance, you’ll notice larger touch-areas for buttons and more spacing in your menus. Plus, Apple has redesigned its app icons to pop-out at you more, almost making you want to touch them. In fact, these remind us of the icons from the old days of iOS, before the flat design of iOS 7.
Here are some of the key features and highlights that you’ll find across macOS Big Sur.
Messages
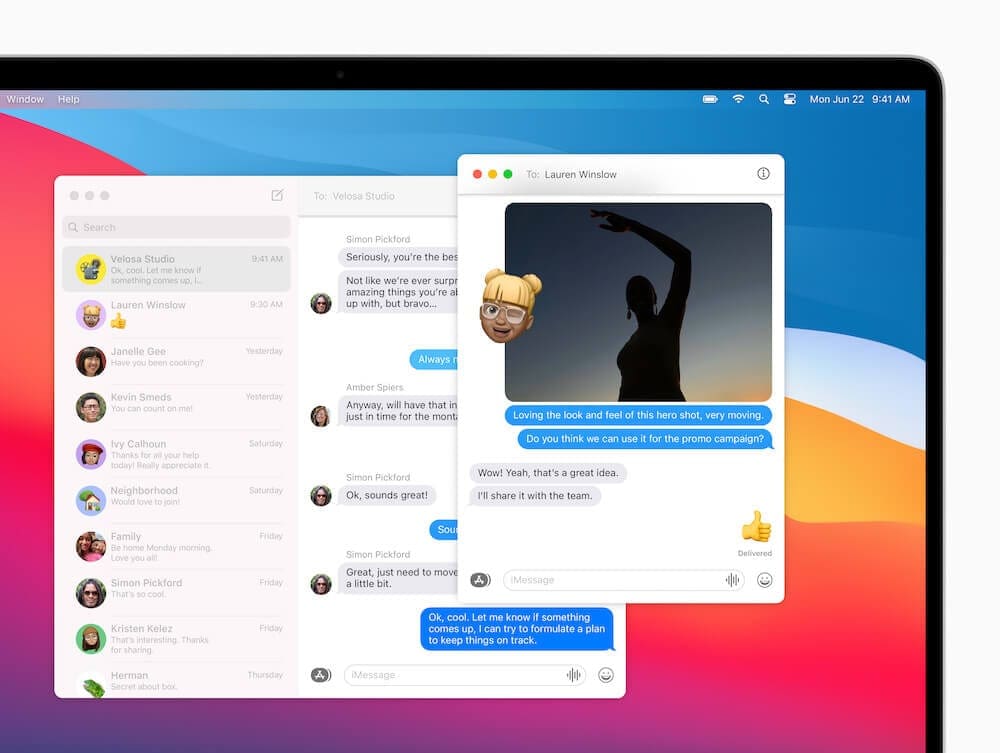
Apple’s Messages app has gotten a major overhaul, and along with the release of iOS 14/iPadOS 14, brings feature parity. The app has been redesigned and is now a Catalyst app, which follows the same development as the Music app and others.
- Pin Conversations – You can now pin your most-used conversations to the top of the Messages app. This will give you quick access to those fun group chats, or act as a reminder to text your Mom every once in a while. You can have up to nine pinned conversations accessible at the top of the app.
- Mentions – Are you in a group chat and worried someone might have notifications turned off? Mention their name in the chat, and they will be notified that you messaged them. This goes both ways, so be prepared if you’re the one without notifications turned on.
- Inline replies – Just about every other major messaging app already has inline replies. Right-click the message you want to reply to, tap Reply and have a separate conversation from the rest of the group.
- Search for image and GIFs – Being able to search for images and GIFs has always been a pain in Messages. Open the #images app and send that perfect response.
- Memoji updates – Memoji is still hanging around, with Apple adding a slew of new hairstyles, headwear, and even masks. Then, you can customize and create your perfect Memoji sticker to send in the chat.
Safari
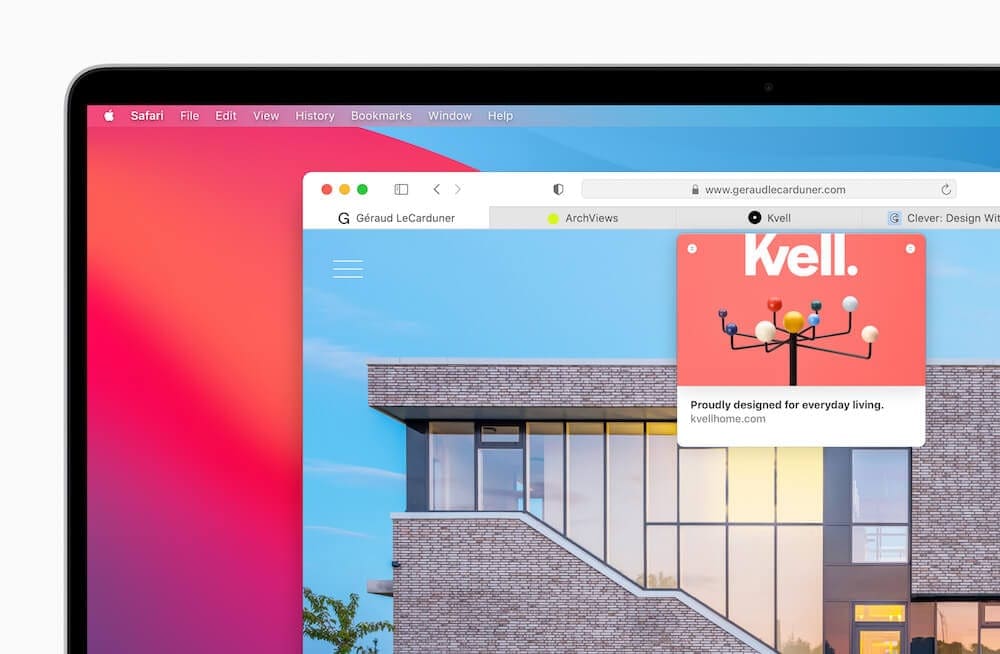
- Customize Safari Start Page – Gone are the days of boring start pages in Safari. Now, you can customize it to your liking, adding your own background image or one from a curated list. You can even choose which sections are displayed, including your Favorites, Reading List, and more.
- Improved tabs – With Big Sur, the Favicons for tabs will automatically be displayed. This makes it easy to figure out which tab is which, without having to click around. The updated tab bar design also provides the ability to see more tabs. And hovering over a tab will give you a preview of what the page is showing.
- Improved extensions – Along with improvements to the API for developers, Safari Extensions is now in the Mac App Store. There is a dedicated section with categories, and those exquisite “Developer Spotlights” showcasing new and unique extensions.
- Privacy Report – Privacy is the name of the game in 2020, and Safari for Big Sur hits a homer. With its new “Intelligent Tracking Prevention”, Safari can identify and stop trackers from following you around. Then, the app provides a Privacy Report for each website you visit.
Odds & Ends

- Battery Usage – Despite a questionable icon being used, Apple is attempting to improve battery life for MacBook owners. Optimized Battery Charging is designed to reduce the wear on your battery, and extend its lifespan. The new Battery Usage History panel shows your usage over the past 24 hours and up to the past 10 days.
- Startup & System Sounds – The default chimes and alerts on your Mac have been the same for years. With Big Sur, these have been updated and are “more pleasing to the ear”. Apple did this by creating snippets from the familiar chimes of macOS releases in the past and using them across Big Sur.
- Photos app – The Photos app finally lets users edit videos, complete with adjustments, filters, and cropping. There are also improved tools for editing your photos, including a revamped Retouch tool.
- Updated Maps app – Trying to figure out where to go for dinner? Let the Apple Maps help you with the new “Guides” section. Or maybe you need to plan out a trip and have an electric car. There’s now Electric vehicle routing, so you can calculate what stops need to be made when it’s time to get more juice.
How to Open Notification Center on Mac
The Notification Center is a feature on Mac that provides a quick overview of updates from your installed apps, calendar events, reminders, and more. It’s a convenient way to keep track of notifications and widgets without having to navigate away from your current task.
Accessing the Notification Center on your Mac is a straightforward process. Here’s a step-by-step guide:
- If you’re using a trackpad, the easiest way to open the Notification Center is to place two fingers at the right edge of the trackpad and swipe to the left. This gesture will bring the Notification Center into view.
- If you’re using a mouse, you can open the Notification Center by moving your cursor to the top-right corner of the screen and clicking on the date and time.
- If you prefer using keyboard shortcuts, you can open the Notification Center by pressing the F12 key.
The Notification Center is a powerful tool that can help you stay organized and informed. By understanding how to access, navigate, and customize the Notification Center, you can make it work for you and enhance your Mac experience.
Remember, the Notification Center is designed to be a convenient tool, not a distraction. Be mindful of the notifications and widgets you enable to ensure that the Notification Center remains a helpful feature, not a source of constant interruptions.
Customize your Control Center in macOS Big Sur
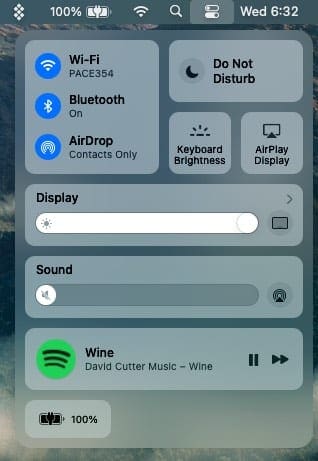
Now that macOS Big Sur has been redesigned, this gave Apple a chance to go back to the drawing board. But instead of releasing something brand new, different, and possibly unintuitive, Apple pulled its ideas from iOS and iPadOS. The new Control Center features bigger buttons and looks familiar to iOS users everywhere.
Tapping the “Switch” icon in the Menu Bar will reveal the new Control Center. This is complete with individual blocks for your various settings, including Wi-Fi, AirPlay, Now Playing, Battery, and Display. There’s even a block for your keyboard backlighting if you are using a MacBook or Apple Magic Keyboard.
In order to customize this to your liking, here are the steps:
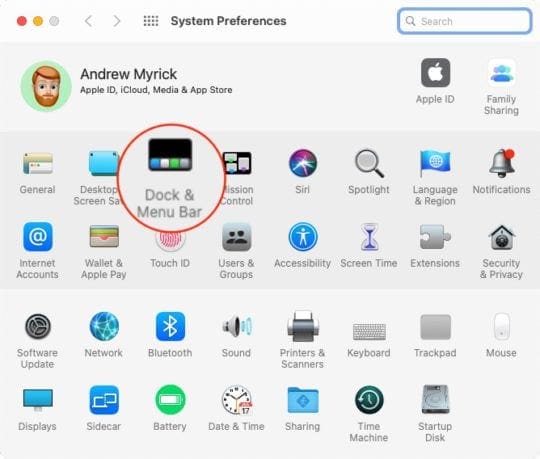
- Open System Preferences on your Mac.
- Tap Dock & Menu Bar in the second section.
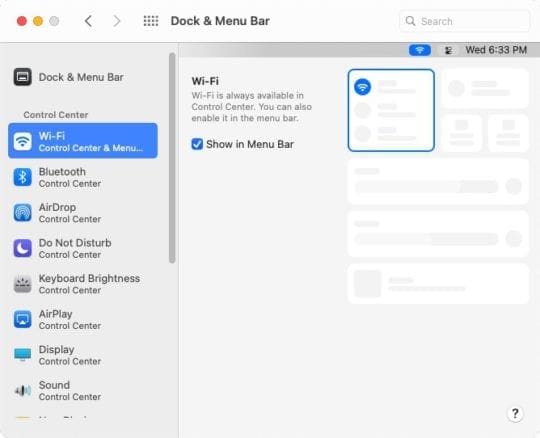
- Under Control Center, tap Wi-Fi.
- Tap the checkbox next to Show in Menu Bar.
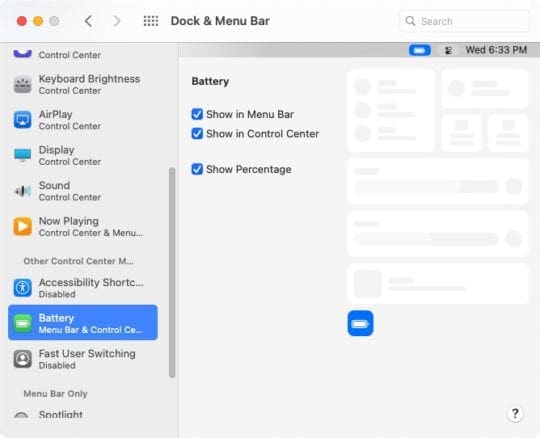
- Repeat for all of the Control Center options.
Here is everything that you can add to the Menu Bar in Big Sur:
- Wi-Fi
- Bluetooth
- AirDrop
- Do Not Disturb
- Keyboard Brightness
- AirPlay
- Display
- Sound
- Now Playing
- Accessibility Shortcuts
- Battery
- Fast User Switching
Just go through and select which options you want to be shown, and they will be right at your disposal. The great thing about this is that if you don’t want your “Sound” to show in the Menu Bar, it will still appear in the Control Center. And some options, like Fast User Switching, can be disabled completely. Unfortunately, you can’t disable all of the options from appearing in either the Menu Bar or Control Center.
Customize your Notification Center in macOS Big Sur
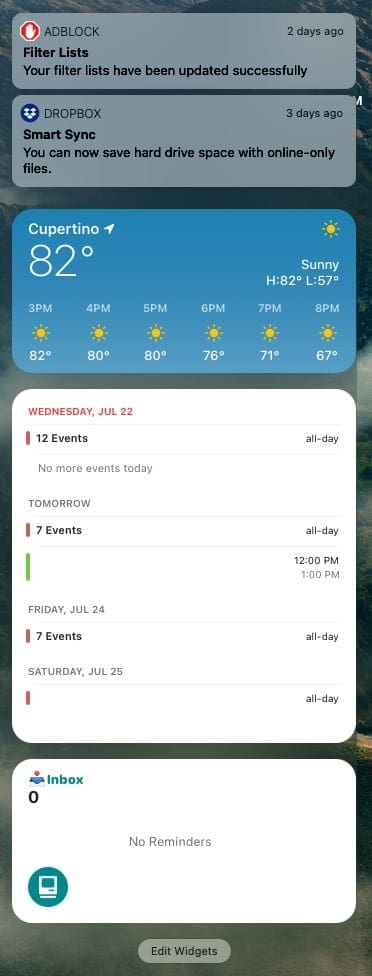
Notification Center on previous iterations of macOS has always been a useful dumpster fire. Apple is finally getting its act together with Big Sur and has also given it the redesigned treatment. Instead of a dedicated Notification Center icon, just tap on the “time” in the menu bar. This reveals your notifications, along with some familiar-looking widgets.
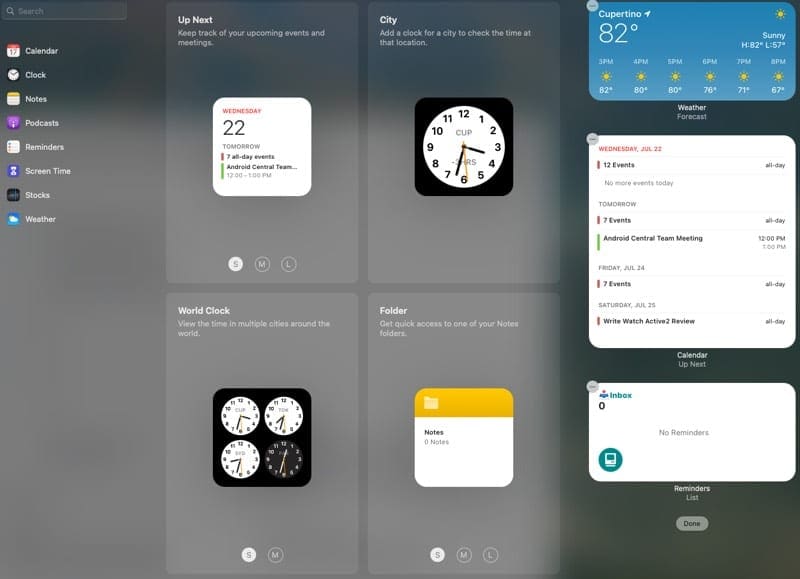
Widgets in Notification Center now look exactly like their iOS and iPadOS counterparts. And now your notifications will be stacked neatly and organized, without you needing to scroll for days if you forget to look at them. Then, just tap the “X” in the top left-hand corner to clear them.
As for those widgets, you can customize which ones are shown, and where they are placed. Plus, you’ll get the added benefit of having multiple widget sizes to combine. Here’s how you can customize Notification Center Widgets:
- Click the “time” in the Menu Bar.
- At the bottom of Notification Center, tap Edit Widgets.
- Locate a widget you wish to add and click on it.
- If you want to move the widget, click and drag the widget to the location you wish to have it placed.
As you can see from the screenshot, some widgets are available in different sizes. If applicable, you will see bubbles underneath the widget for S (small), M (medium), or L (large). We are expecting developers to take advantage of this once macOS Big Sur is available for everyone.
Andrew Myrick is a freelance writer based on the East Coast of the US. He enjoys everything to do with technology, including tablets, smartphones, and everything in between. Perhaps his favorite past-time is having a never-ending supply of different keyboards and gaming handhelds that end up collecting more dust than the consoles that are being emulated.





I miss the calculator in the notification drop down and it does not appear in widgets. How can I add it?
Also, the bin has been moved to the centre of the sceen on mail. Awkward to use, it should have been left where it was.