The 2020 iPad Air is one of the biggest upgrades to the budget-friendly iPad in a long, long time. And it’s easily one of the best. From the new design to the bezel-less screen to the Apple Pencil 2 support, there’s a lot to love. But lost in the mix of these exciting features is a new addition that you probably didn’t notice: Focus Pixels.
Focus Pixels have been used in iPhone since the iPhone 6. However, this feature has had a slow rollout to the iPad. And since most people have probably never heard of this feature, they might not know what it means for the new iPad Air. Seeing how the previous iPad Air (Gen 3) didn’t have this feature, it’s good for new iPad Air owners to understand what it is and how it works.
“Focus Pixels” is Apple’s name for a popular smartphone feature known as PDAF. PDAF (or Phase-Detect Auto Focus) is an autofocus technique in digital cameras that allows your device to automatically focus on a subject.
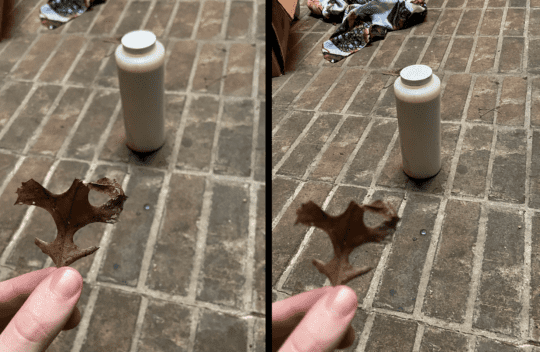
For instance, take your iPhone (or 2020 iPad Air) and point it at another person. You’ll notice that the viewfinder automatically blurs out the background while sharpening the person. If you tap an object in the background, however, the person will be blurred and the object will appear sharp. Here’s how this looks in action:
In a traditional camera with a long, manual lens, there are two twistable rings around the lens. The first ring is for manually zooming in and out, and the second ring is for setting the focus. These two rings work together to bring the photographer’s subject into a sharp, clear focus by manually maneuvering the lenses.
Since iPhones, iPads, and other mobile devices don’t have big adjustable lenses, the Camera app needs to be able to focus on a subject digitally. Focus Pixels uses the latest and greatest means for doing this on a mobile device – a.k.a., PDAF.
How Focus Pixels (or PDAF) works
So now that we know what Focus Pixels refers to, you’re probably wondering how it works? How does your iPad instantly adjust the focus to whatever you tap on or point your iPad camera at without physically manipulating the lens?
The answer is complicated
I am by no means an expert in this area, so forgive me if this isn’t the most accurate breakdown. Here are the sources (One, Two, Three, Four) I used to understand this concept if you want more in-depth reading.
Basically, Focus Pixels (and other PDAF systems, found in most smartphones) work by masking off a portion of certain pixels in your iPad’s camera. In other words, part of a pixel is covered up, then another part of a different pixel is covered, and so on for hundreds (or thousands) of pixels.
Your iPad then compares the light entering each of these masked-off pixels to one another as well as to unmasked pixels to determine if an object is in focus or not. When used in conjunction with object/person recognition, your iPad can instantly tell how sharp a subject is appearing in your viewfinder.
If you’ve ever watched an Apple keynote, you’ve heard them talk about the neural engine they use to make your device better at photography. Focus Pixels is one example of how the neural engine on iPad and iPhone can make thousands of calculations in an instant to provide you with a great photo every time.
Focus Pixels (and the annual improvements to this feature) are also behind the improvement in night photography on iPhones and iPads. It allows devices to take better low-light photos while reducing the level of noise in these photos.
How to use Focus Pixels on the new iPad Air: Tap vs Autofocus
Ok, so with all of the technical stuff out of the way, let’s get into how to use Focus Pixels on your new iPad Air. Luckily, using Focus Pixels is significantly easier than understanding how they work.
There are two ways to use Focus Pixels on iPad Air.
The first is by simply opening the Camera app on the iPad and pointing your iPad at an object, person, or pet. As long as the subject of your photo (i.e., the thing you’re trying to take a photo of, not the background) is fairly obvious, the iPad should have no problem focusing on it.
For instance, if someone is standing in front of a brick wall, your iPad should automatically bring that person into focus while slightly blurring the background. This is called “autofocus” because your iPad is automatically focusing on the subject. Pretty straightforward.
The second method is just as simple. Instead of letting your iPad Air decide what should be focused on, you can tap on the object or area you want your iPad Air to focus on.
For example, if there’s a light pole in front of a building you’re trying to take a picture of, your iPad Air might autofocus on the light pole. When you tap on the building, your iPad will redirect its focus to the building, making it sharp while blurring out the light pole in the foreground.
Adjusting focus and exposure on the new iPad Air
Whenever you’re adjusting your iPad Air’s Focus Pixels, you should see a yellow box with a sun next to it. This yellow square is about the size of your fingertip and represents where your iPad is trying to focus.
The yellow sun next to it represents your iPad’s exposure, or how much light is being let into your lens. Like your iPad Air’s focus, the camera will try to manage this on its own. However, you can manually adjust it by sliding your finger up or down on the yellow focus box repeatedly.
That said, I find it’s best to let the iPad handle exposure automatically unless you know what you’re doing. You can always increase or decrease exposure afterward in editing. But if you set your exposure when you take the photo, editing it after you take the photo will usually end in poor results.
Take better photos on iPad Air with Focus Pixels
And that’s it! That’s everything there is to know about Focus Pixels on iPad Air. Hopefully, you learned a bit more about the new iPad Air’s camera. I’d love to see it developed so that night photography on iPad is just as robust as it is on iPhone.


Write a Comment