Backing up your Mac can come with a number of benefits. You can have a backup in case something goes wrong with the computer. If you switch computers, you can more easily transfer files. You can also share files between devices easier. Below we’ll into backing up your Mac using a cloud-based option.
One of the most popular ways to back up to a Mac is to use Apple’s cloud service, iCloud. This is one of the easiest methods because iCloud settings are built right into the Mac. The free option gives you an automatic 5 GB of storage. The paid version unlocks 50 BG or more on different pay scales starting at $0.99 per month.
To save using iCloud, to have to turn on Desktop and Documents:
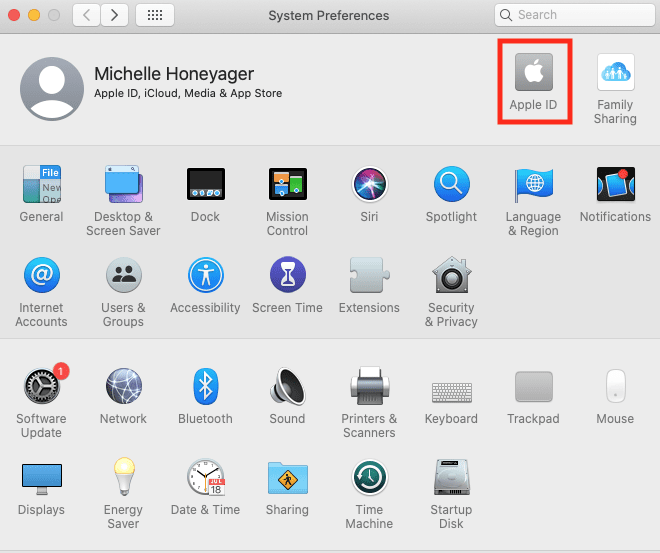
Click on the Apple icon on the top left of the screen.
Select System Preferences.
Click on Apple ID.
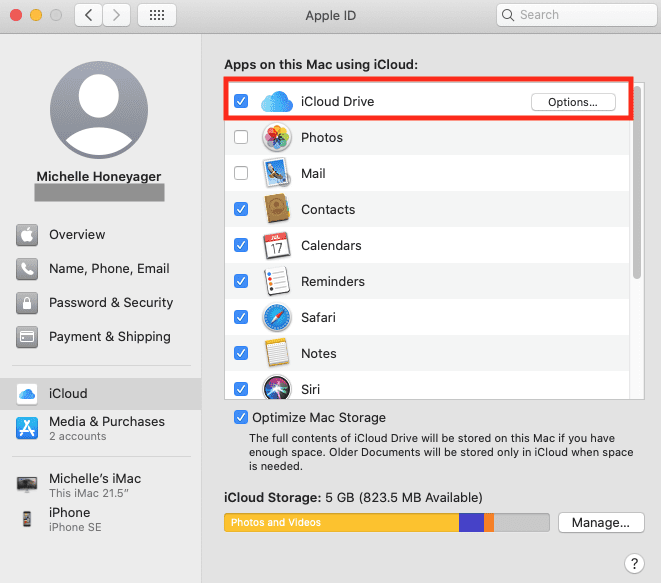
Make sure iCloud Drive has a check in the box next to it so that’s turned on.
Click Options… next to iCloud Drive.
Make sure there is a check next to the Desktop & Documents apps.
Click Done.
This automatically stores any files you create and store on the desktop and documents folder into the iCloud.
Other Cloud Storage Options
There are also other services that you can use to back up your Mac using cloud services.
One option is Google Drive. For this option, you would need to sign up for a Google account. That will give your 15 GB of free storage. Additional storage can have monthly costs starting at $1.99 per month.
Dropbox is another popular option. You can sign up for this site and get 2 GB for free. More storage is also paid through this service. You can manually upload files and whole folders to this service.
Microsoft also has its OneDrive service, where you would need a Microsoft account to access it. With this option, you download the OneDrive App. A OneDrive folder stores locally to your Mac and you can drag and drop files into the OneDrive folder.
How to Backup Time Machine Backup to Cloud
Time Machine, the built-in backup feature of macOS, is a crucial tool for Mac users, safeguarding data against loss. But why stop at local backups? Extending your Time Machine backups to the cloud adds an extra layer of security, ensuring data protection even in catastrophic situations like hardware failures or natural disasters. With that being said, there’s no such thing as having too many backups, so we’re going to take a look at how to backup your Time Machine backup to the cloud.
Why Back Up Time Machine to the Cloud?
Data Redundancy: Local backups can fail if the physical drive or NAS system is damaged or corrupted. Cloud backups add another layer of protection.
Off-Site Safety: Cloud storage ensures your data is safe in a different location, protecting it against theft, fire, or other local disasters.
Accessibility: Cloud backups can be accessed from anywhere, making it easier to retrieve data if your local machine is unavailable.
How to Backup Time Machine to Cloud
Using MSP360 Backup with Cloud Storage:
Requirements: MacOS 10.8 or later, configured Time Machine, external drive or NAS supporting Time Machine, MSP360 Backup for Mac, and a cloud storage account (like Amazon S3).
Process:
Configure MSP360 to back up the Time Machine repository (typically Backups.backupdb on the external drive) to your chosen cloud service.
Choose backup options such as compression, encryption, and storage tiers.
Set a backup schedule and configure notifications
Cloud Backup Solutions for Time Machine
IDrive: Offers a cost-effective solution with strong end-to-end encryption, multiple device backup, and file versioning. Time Machine data can be included in backups by adjusting settings in IDrive.
IBackup: Focuses on small business backup with robust encryption. It supports Time Machine backups and is available on mobile devices.
CloudBerry: A customizable backup service with support for various cloud providers. It requires configuring the Time Machine’s backup drive as the backup source in Cloudberry.
DollyDrive: Provides a cloud backup alternative to Time Machine with a feature called DollyClone, which creates a complete system backup in the cloud.
Transmit: Allows manual backup of the Time Machine folder to various cloud services using its Synchronize feature.
How to Back Up Time Machine to Backblaze
To back up your Time Machine backups to Backblaze, you would typically need to use Backblaze’s B2 Cloud Storage, as Backblaze Personal Backup doesn’t directly support backing up from Time Machine backups. Here’s a general approach:
Set Up Time Machine: First, ensure your Time Machine backups are properly configured and stored on an external drive or NAS.
Sign Up for Backblaze B2: Create an account for Backblaze B2 Cloud Storage, which is a separate service from Backblaze’s personal backup solution.
Use a Third-Party Tool: Employ a third-party backup tool compatible with both Time Machine and Backblaze B2. This tool will be responsible for transferring your Time Machine backups to Backblaze B2. Tools like Arq Backup, MSP360, or similar can be configured to read from your Time Machine backup location and upload it to your B2 bucket.
Configure the Backup Tool: Set up the backup tool to point to your Time Machine backup folder (Backups.backupdb) on your external drive or NAS as the source. Then, configure it to back up to your Backblaze B2 account.
Schedule Regular Backups: To keep your cloud backup up-to-date, schedule regular backups. Remember, the initial backup might take a significant amount of time depending on the size of your Time Machine backup and your internet speed.
Monitor and Maintain: Regularly check to ensure that backups are occurring as scheduled and that your Backblaze B2 storage is not running out of space.
Conclusion
Backing up your Time Machine backups to the cloud is a smart strategy for comprehensive data protection. By choosing a cloud backup solution that fits your needs, you can ensure that your data remains secure, accessible, and protected from local hardware failures or disasters. Remember, the key to data safety is redundancy, and cloud backups provide an essential layer in safeguarding your digital life.


Write a Comment