The Dock is a key feature of the macOS user interface, providing a convenient place to access apps and files. However, over time, it can become cluttered or experience issues. In this blog post, we’ll guide you through the process of resetting the Dock on your Mac. Let’s get started!
Regardless of what kind of Mac that you use, the possibilities are truly endless when it comes to customization. You can add widgets to the Notification Center, download apps that were previously only available for the iPhone and iPad, and so much more.
The amount of customization goes even further once you dive into the Dock and want to try and get your Mac looking and working just the way you want it. Thankfully, you don’t need to go through and download third-party dock replacement apps any longer, as Apple has added quite a few options right into the system.
The first step that we take after going through the initial setup process is to essentially de-clutter the Dock. One of my biggest complaints comes in that Apple wants to treat your Mac Dock like the one found on the iPad. This means that there is an additional section that houses applications that you recently opened. Thankfully, you can easily remove that section entirely:
Open the System Preferences app.
Click Dock & Menu Bar.
Click the checkbox next to Show recent applications in Dock.
Once the checkbox is clicked, that extra section in the Dock will disappear, leaving you only with the apps that you want, the Downloads folder, and the Trash Bin.
Change Position of the Dock
For years, macOS users needed to rely on Terminal commands to move where the dock was actually placed. Those days are finally gone, as you can change the position of the Dock right from System Preferences.
Right-click on the divider between your apps and downloads.
Highlight Position on screen with your cursor.
Select one of the following:
Left
Bottom
Right
You can also head into System Preferences to change the position of the dock:
Open the System Preferences app on your Mac.
Click Dock & Menu Bar.
Next to Position on screen: select one of the following:
Left
Bottom
Right
Moving the Dock to the left or the right means you have to sacrifice a bit of screen real estate in the width department, but it will extend the pages that you view vertically. This is why many macOS users opt to use the dock in the two places other than the bottom, so you can see more of the page.
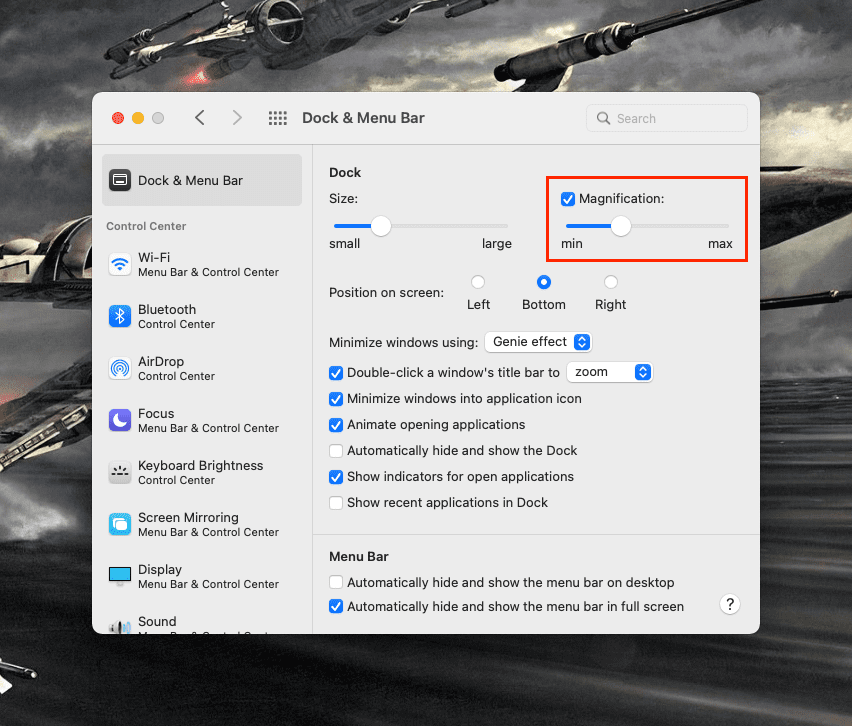
Adjust Magnification
One nice touch when it comes to the macOS Dock is that you can have the applications magnified whenever hovering your cursor over them. By doing so, you can lower the size of the dock, but still are able to click and open the right apps when you need them.
Open the System Preferences app.
Click Dock & Menu Bar.
Click the checkbox next to Magnification.
Adjust the slider as needed.
When using Magnification on the Dock, you’ll want to try and make sure that the slider is higher than that of the “Size”. This ensures that the icons will actually magnify when the cursor hovers over them in the Dock.
Add and Remove Apps From the Dock
Another basic feature when it comes to customizing the Dock is adding or removing apps. This ensures that only the apps that you use most frequently appear when all of the rest of your apps are closed. Here’s how you can add apps to the dock and keep them there:
Open Launchpad from the Dock.
Locate the app that you want to add to the Dock.
Drag and drop the app into your preferred location on the Dock.
If you want an app to remain in the Dock, right-click, highlight Options, and click Keep in Dock.
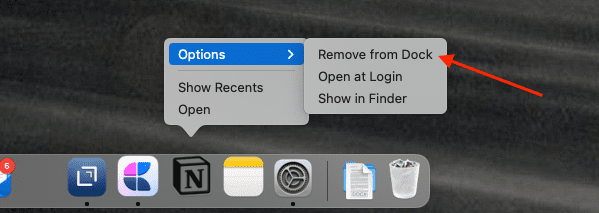
Naturally, to truly make the Dock yours you’ll want to get rid of any apps that you don’t want to use. Here’s how you can remove apps from the Dock.
Locate the app that you want to remove from the Dock.
Right-click the app.
Highlight Options with your cursor.
Click Remove from Dock.
If an app that you want to remove from the Dock is already open, then click and hold, drag, and drop the app off of the Dock to remove it.
Add Folders To The Dock
By default, Apple includes the Trash Bin and Downloads folders to the Dock. But, did you know that you can add other folders to the Dock for easy access? Here’s how you can do it:
Open the Finder app on your Mac.
Navigate to the folder that you want to add to the Dock.
Right-click the folder.
In the drop-down menu, click Add to Dock.
As a reminder, not every folder can be added, but most of the ones found in Finder’s sidebar can if you follow the steps above.
Automatically Hide and Show The Dock
Another way to maximize the screen real-estate on your Mac is to have the Dock automatically hidden when you’re not interacting with it. After this is enabled, the dock will only appear when you move your mouse cursor to the area of the screen that the Dock is usually shown.
Open the System Preferences app.
Click Dock & Menu Bar.
Click the checkbox next to Automatically hide and show the Dock.
Resize the Dock
Keeping with the trend of maximizing screen real-estate, not only can you magnify the icons in the dock, but you can also change the actual size. There are actually two methods for doing so, with the first being controlled through the System Preferences.
Open the System Preferences app.
Click Dock & Menu Bar.
Under Size, adjust the slider until you reach the preferred Dock size.
The second method for resizing the Dock doesn’t require you to open any other apps at all! But, it does require a bit of precision in order to make sure that your cursor is in the right place.
Hover your cursor on the vertical divider between docked apps and the Downloads folder.
After the cursor transforms into an up-and-down arrow, click and drag towards the top of the screen.
Release after you have reached your preferred Dock size.
Add a Spacer to the Dock
One of the best-hidden features when it comes to customizing the Dock on macOS is the ability to add spacers. This makes it much easier to organize apps by type, or just to group apps together since you can’t add plain-old folders for each type of app. Here’s how you can add a spacer to the Dock:
Open the Terminal app on your Mac.
Enter the following command:
defaults write com.apple.dock persistent-apps -array-add ‘{“tile-type”=“spacer-tile”;}’; killall Dock
Press Enter.
After you press the Enter key, your Dock will temporarily disappear, and any minimized apps will appear on the screen. After the process is completed, you’ll see a little blank space at the end of your dock. Then, you can drag the spacer around as you see fit, placing it in between different apps to group them together. On macOS Monterey, we were only able to add a total of four spacers, so you will be limited in the number of spacers.
How to Reset Dock on Mac
Over time, you might have added a lot of apps to the Dock, making it cluttered and difficult to navigate. Resetting the Dock removes all the apps you’ve added, leaving only the default apps.
Additionally, the Dock can sometimes experience issues, such as disappearing off the screen or failing to show new app icons. Resetting the Dock can often resolve these issues.
The Terminal app provides a way to control your Mac using text commands. You can find it in the Utilities folder within your Applications folder.
In the Terminal window, type the following command and then press Return: defaults delete com.apple.dock; killall Dock. This command does two things. The first part (defaults delete com.apple.dock) deletes the current settings for the Dock. The second part (killall Dock) restarts the Dock so that the changes take effect.
And that’s it! Your Dock should now be reset to its default state.
Conclusion
The Dock is a central part of the macOS user interface, providing a convenient place to access your apps and files. By understanding how to reset and customize the Dock, you can keep it tidy and functional, enhancing your Mac experience.
Remember, while resetting the Dock can resolve some issues and declutter your interface, it’s also a powerful tool for customization. Don’t be afraid to experiment with different apps and settings to make the Dock work for you.
Andrew Myrick is a freelance writer based on the East Coast of the US. He enjoys everything to do with technology, including tablets, smartphones, and everything in between. Perhaps his favorite past-time is having a never-ending supply of different keyboards and gaming handhelds that end up collecting more dust than the consoles that are being emulated.
In the guest account, I remove most apps from the dock so it’s not cluttered with apps that don’t get used – but next time I open the guest user, they are all there again! How to make them stay “deleted” from the dock?
I have the same problem as Mista Len, with the same error message. I am using Big Sur on an Intel iMac. The error message goes on to suggest adding single quotes, but the command already has single quotes.


In the guest account, I remove most apps from the dock so it’s not cluttered with apps that don’t get used – but next time I open the guest user, they are all there again! How to make them stay “deleted” from the dock?
I can’t add any spaces to my Dock on MacBook Air Safari Monterey
This 2-stage approach in terminal worked for me + I created 7 spaces not just 4.
defaults write com.apple.dock persistent-apps -array-add ‘{“tile-type”=”spacer-tile”;}’ (press enter)
killall Dock (press enter)
Spacer in Terminal doesn’t work: Error: Could not parse: ‘{“tile-type”=“spacer-tile”. Try single-quoting it.
I have the same problem as Mista Len, with the same error message. I am using Big Sur on an Intel iMac. The error message goes on to suggest adding single quotes, but the command already has single quotes.