Getting ready to sell your Mac computer and upgrade to a new machine? Before letting it go into someone else’s hands, you need to make sure all your data is wiped. This is for the sake of your security and privacy — and common courtesy to the new owner.
Several things need to be done to thoroughly wipe your Mac computer. This is not because erasing the hard drive takes a long time, but because there are things you must make sure are deleted and disconnected.
First and foremost, create a backup of your files. This saves your files for whatever device will be replacing your Mac.
Back-up with Time Machine
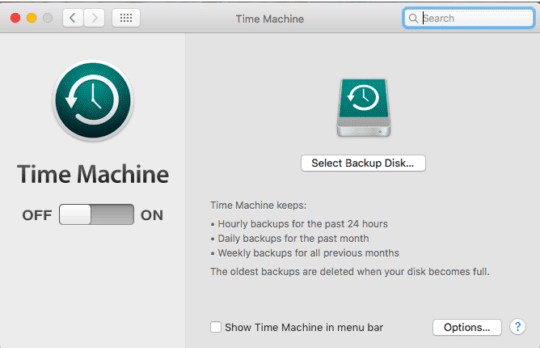
You can backup files using Time Machine with an external hard drive or large thumb drive.
Connect the external storage device to your Mac.
If this is your first time using Time Machine, you will be asked if you want to use the drive for the backup. Select Confirm.
Select Encrypt Backup Disc. This is highly recommended.
Click Use as Backup Disk.
To start a manual backup, select the menu bar in Time Machine and click on Back Up Now.
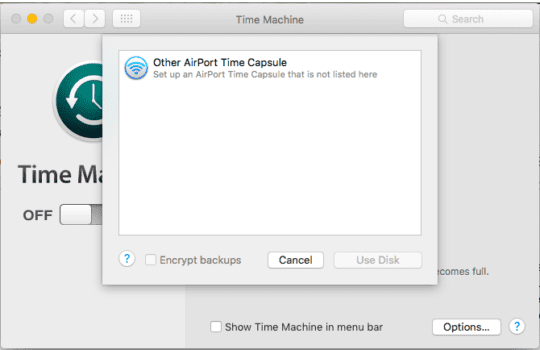
If Time Machine does not prompt you about using your drive for backups then you can add it manually.
Open the Time Machine app.
Select the Time Machine menu in the menu bar.
Click on Preferences > Select Backup Disk.
Select your external drive from the list provided.
Check the Encrypt backups box. Once again, this is highly recommended.
Click Use Disk.
If the disk is not formatted according to Time Machine’s standards, you will be asked to erase it first. Click on Erase to allow Time Machine to erase all the information that is already on the backup drive.
Back-Up with iCloud
You can also use iCloud to backup your files. Using iCloud means you do not need an external drive.
Go to the Apple menu and select System Preferences > Apple ID. If you are using macOS Mojave or earlier you do not need to do this.
Select iCloud.
When prompted, sign in with your Apple ID.
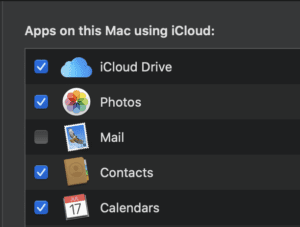
Select iCloud Drive.
Update your Mac to macOS Sierra or later if you want to add files from your Mac Desktop and Documents. You will then need to turn on Desktop and Documents in iCloud.
2. Sign out of iTunes
If running macOS Mojave or earlier you will need to sign out of iTunes.
Open the iTunes app.
Select Account from the menu bar.
Go to Authorizations > Deauthorize This Computer.
Enter your Apple ID and password to confirm the action.
3. Sign out of iCloud
Next, sign out of your iCloud account. This will prevent any confusion between your new device and the computer you are selling.
macOS Catalina or Later
Click the Apple menu.
Select System Preferences > Apple ID > Overview > Sign Out.
macOS Mojave or earlier
Click the Apple menu.
Select System Preferences > iCloud > Sign Out.
Regardless of your OS, you will be asked if you want to retain a copy of your iCloud data on the Mac you are working on. Select “yes” — you will be erasing the data anyway. Your data will remain in iCloud and any other devices signed into iCloud.
4. Sign out of iMessage
If you are using OS X Mountain Lion or later, sign out of iMessage.
Open the Messages app.
Select Messages > Preferences > iMessages.
Select Sign Out.
5. Reset NVRAM
This will clear User Settings from the memory and restore any security features that might have been changed.
Shut down your computer and then turn it on again.
Immediately press and hold Option, Command, P, R. Hold for about 20 seconds.
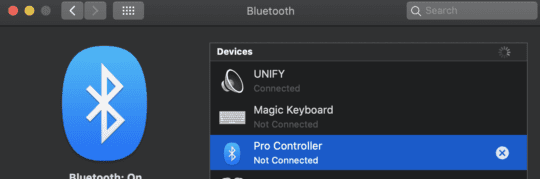
6. Unpair Bluetooth Devices
If you have any connected Bluetooth devices, such as a keyboard, mouse, or trackpad, unpair them. Once you have unpaired these devices, plug in a USB keyboard and mouse to finish wiping your Mac.
Choose the Apple menu.
Select System Preferences > Bluetooth.
Click the Remove button, it will look like an ‘x’ next to the device you want to unpair.
7. Erase your Hard Drive and Reinstall macOS
By completing the steps below, you will set your computer back to the factory settings and erase all data on the computer.
Turn off your computer and turn it on again. Immediately press and hold Command and R.
Once you see the startup screen, release the keys.
When the macOS Utilities screen appears, select Disk Utility > Continue.
Select the View menu at the top of the screen.
Click on Show All Devices.
A new window will open. Your Mac’s startup disk will appear at the top of the list.
Select the disk you want to erase. Usually, the default drive is called Macintosh HD.
Make sure its format is set to Mac OS Extended (Journaled).
Click Erase.
Close the Disk Utility window.
Click on Reinstall macOS. It will take a while for the installation to finish. Once it is finished it will open the Setup Assistant.
Press Command and Q to shut down your computer.
Several things must be completed to wipe your computer and have it ready for sale. Making sure all of these things are done will ensure that no one can, or will have, access to your data or Apple ID. Now go and enjoy your new purchase!


Write a Comment