Maybe you were trying to free up storage on your Mac, deleting a large batch of old files, and didn’t notice that something important was among them. Or perhaps you deleted a file on purpose and only later realized you still needed it. Whatever happened, you may still be able to get them back. Keep reading to learn how to retrieve accidentally deleted files or how to restore permanently deleted files, even after you’ve emptied the Trash.
If you deleted files without using the Option + Command + Delete shortcut, which permanently deletes them, and haven’t emptied the Trash yet, here are two simple ways to get your files back.
Undo the Deletion
If you realized you removed the wrong file immediately after deleting it and haven’t performed any other actions in Finder, you can use the Undo command to quickly bring it back. If you have already moved, renamed, copied, or deleted other files, the Undo command will reverse one of those newer actions instead.
Step 1. Open Finder from the Dock.
Step 2. Click Edit in the menu bar and select “Undo Move of [File Name]”. Check the file name shown in the command to make sure Finder is about to restore the item you need. Alternatively, press Command + Z immediately after deleting the file.
Step 3: Check the file’s original folder. It should appear there again.
Recover Deleted Files on Mac from Trash
If some time has passed since you deleted the file or you’ve already performed other actions in Finder, you can restore it from the Trash instead. This method works for files deleted from your Mac’s internal storage and for files removed from an external drive while it was connected to your Mac.
If the missing file came from an external HDD, SSD, or USB drive, reconnect that device before checking the Trash. macOS keeps trashed items associated with the drive they came from, so they won’t be available when the external storage device is disconnected.
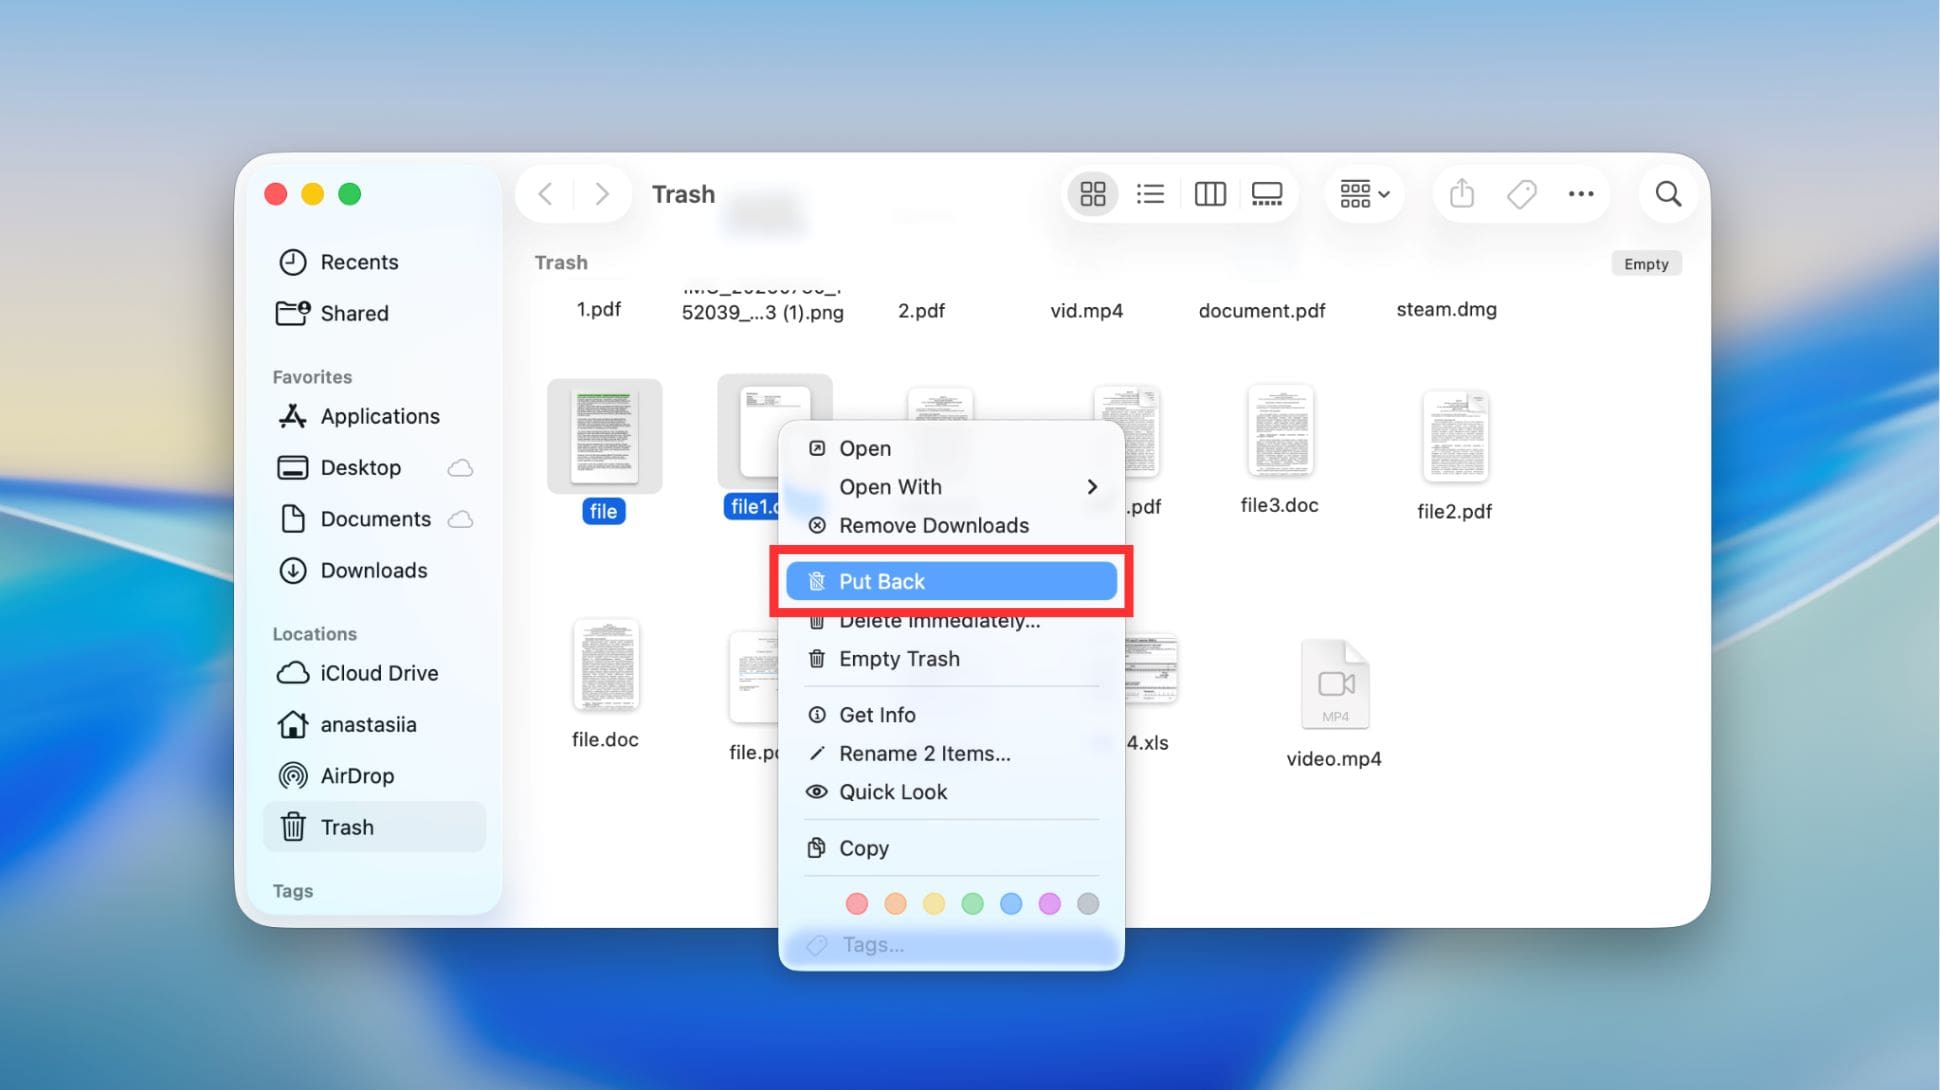
Step 1. Click the Trash icon in the Dock. Or open Finder and select “Trash” from the sidebar.
Step 2. Choose the files or folder you want to recover. If there are many items in the Trash, switch to list view and use information such as the file name, type, or deletion date to help identify the correct ones.
Step 3. Right-click it and select “Put Back”. They will return to their original location.
Note: If your files were synced with iCloud Drive before you deleted them from your Mac, you can also try to restore them from iCloud. Go to iCloud.com > Drive > Recently Deleted, choose the files you need, click the three dots next to them, and select “Recover”. Deleted files are typically kept there for up to 30 days.
If you can’t find the files in Recently Deleted, try iCloud’s data recovery feature. Go to iCloud.com, click the grid icon in the top-right corner and select “Data Recovery”. Then choose Restore Files, select the files you want to retrieve, and click “Restore”.
How to Recover Permanently Deleted Files on Mac
If you’ve already emptied the Trash or permanently deleted files using a shortcut, the methods above won’t help. But don’t worry. Below, I’ll show you how to recover permanently deleted files, whether you have a backup or not.
Restore Permanently Deleted Files with Data Recovery Software
If you permanently deleted your files and don’t have a backup, Mac data recovery software is an effective option to try. The most important thing to remember is to stop using your Mac as soon as possible. Every new file you create, app you install, or download you make can overwrite the space where your deleted files are still stored and make recovery less likely.
There are plenty of data recovery tools to choose from, whether you need to restore files from your internal drive or recover data from external hard drive on Mac. Personally, Disk Drill has saved the day for me more than once. It has an easy-to-understand interface, is consistently recommended by many users, has solid recovery performance, file previews, and a recovery-chance indicator that helps you see which files are more likely to be restored successfully.
It supports hundreds of file formats, including common documents such as DOCX, PDF, PPTX, and XLSX; images such as JPEG, GIF, TIFF, and PSD; videos such as MP4, AVI, M4V, and MPG; audio files such as MP3, AIFF, and WMA; and archives such as ZIP, RAR, DMG, and 7Z. You can use it to recover data from your Mac’s internal storage as well as HDDs, SSDs, USB drives, SD and CF cards, digital cameras, and other supported storage devices.
One more thing to keep in mind is TRIM. Most modern Macs use SSDs with TRIM enabled, which can clear the blocks that contained deleted data. If TRIM has already erased those blocks, even recovery software won’t be able to bring the files back. That’s why the sooner you try to recover your files, the better your chances are. Fortunately, if you’re recovering files from external drives, TRIM isn’t a concern. Deleted data can remain on these devices until it is overwritten by new data, giving recovery software a better chance of finding and restoring it.
Here’s how to retrieve permanently deleted files with Disk Drill:
Step 1. Download Disk Drill from the official website and install it on your Mac. If you have an external drive available, it’s better to install the software there rather than on the drive where your deleted files were stored.
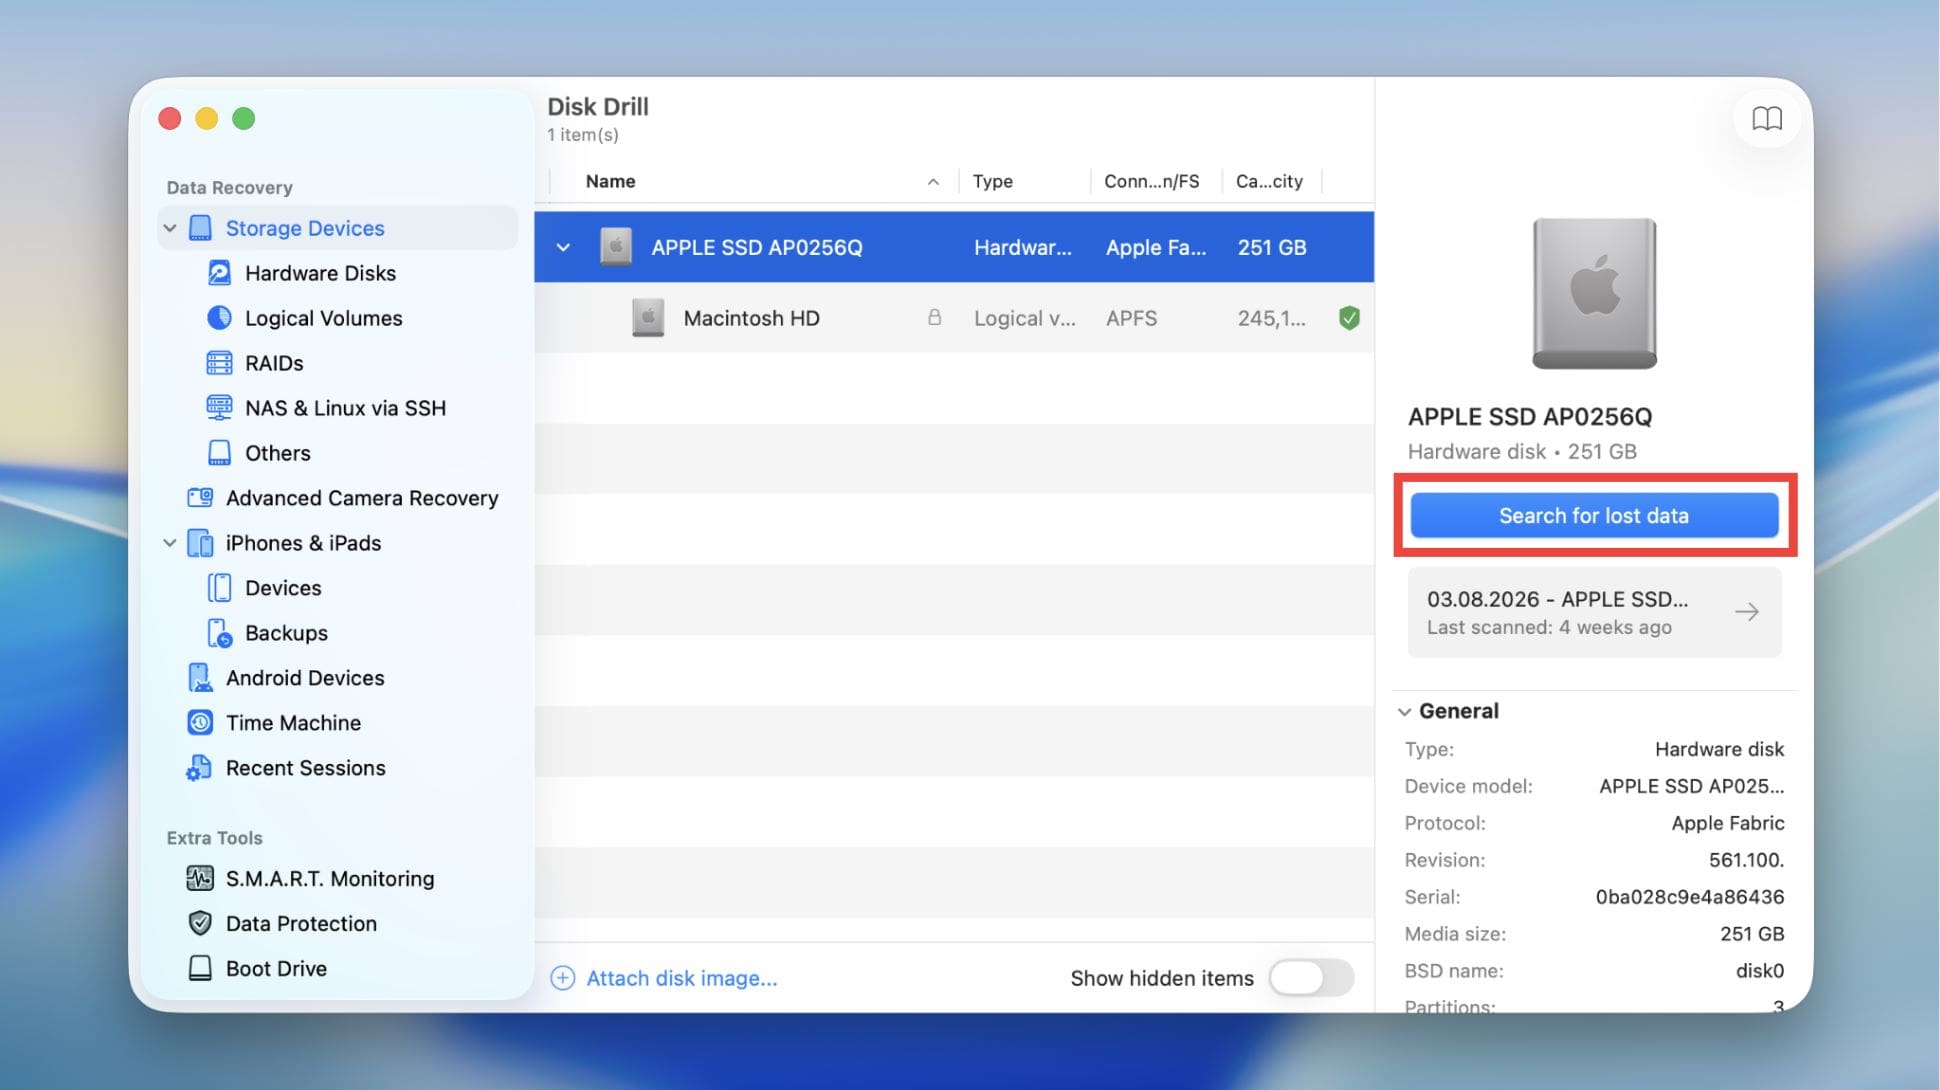
Step 2. Open Disk Drill and choose the storage device where your deleted files were located. If you’re recovering from an external HDD, SSD, USB flash drive, or memory card, connect it to your Mac first and wait until it appears in the device list. Double-check that you’ve selected the correct drive before starting the scan.
Step 3. Click “Search for lost data” to start the scan. If prompted to choose a scan method, select “Universal Scan”.
Step 4. Wait for the scan to finish. This may take some time depending on the size of the drive and the amount of data being scanned.
Step 5. Once the scan is complete, you’ll see a pop-up at the bottom stating “All recovery methods complete”. You can close it and click “Review found items” to see what Disk Drill found.
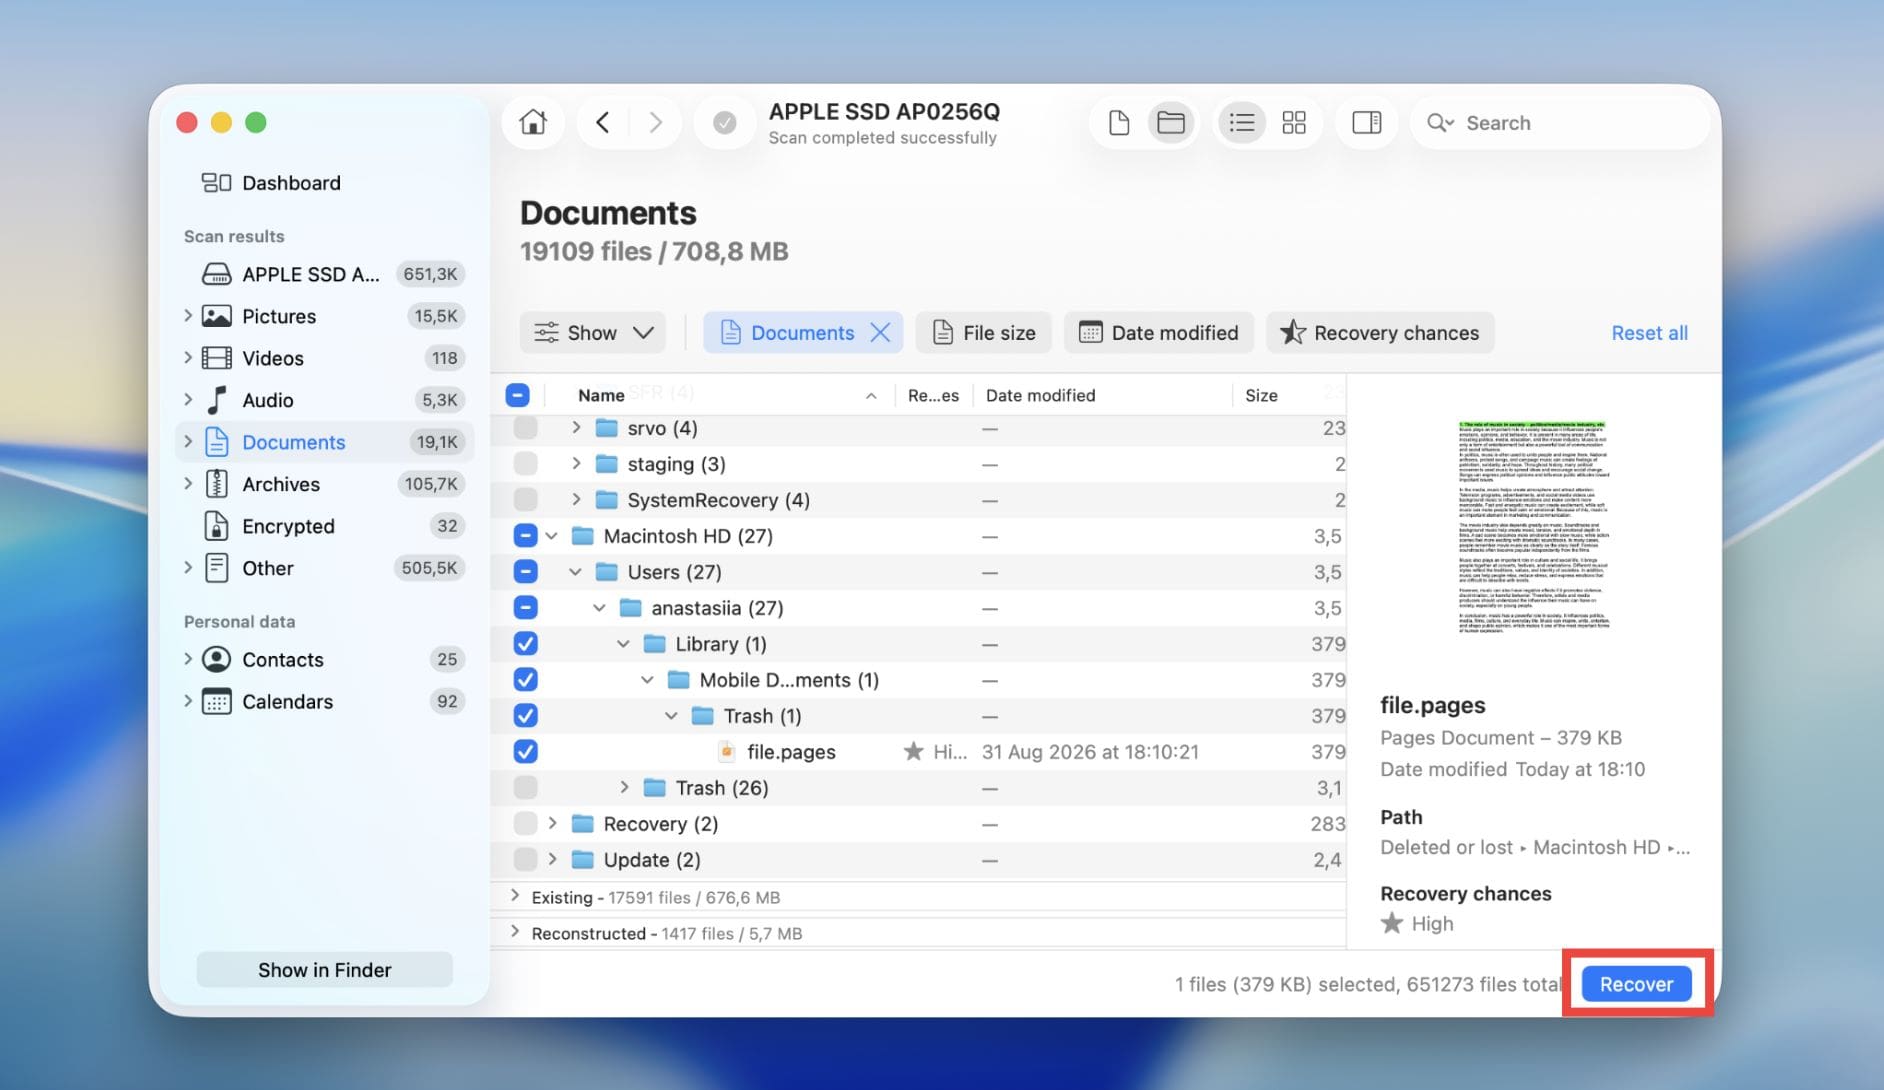
Step 6. Use the categories on the left to choose the type of files you want to recover. To narrow down the results, click “Show” and select “Deleted or lost,” or use filters such as “File size” and “Date modified” if you know the approximate size or modification date of the missing file. Disk Drill also displays the recovery chance next to found files, so you can see how likely they are to be recovered successfully.
Step 7. Before recovery, preview the files to make sure you’ve found the right ones. Right-click a file and choose “Preview,” or select it and click the magnifying glass icon in the preview pane. Once you’ve found the files you need, select them and click “Recover.”
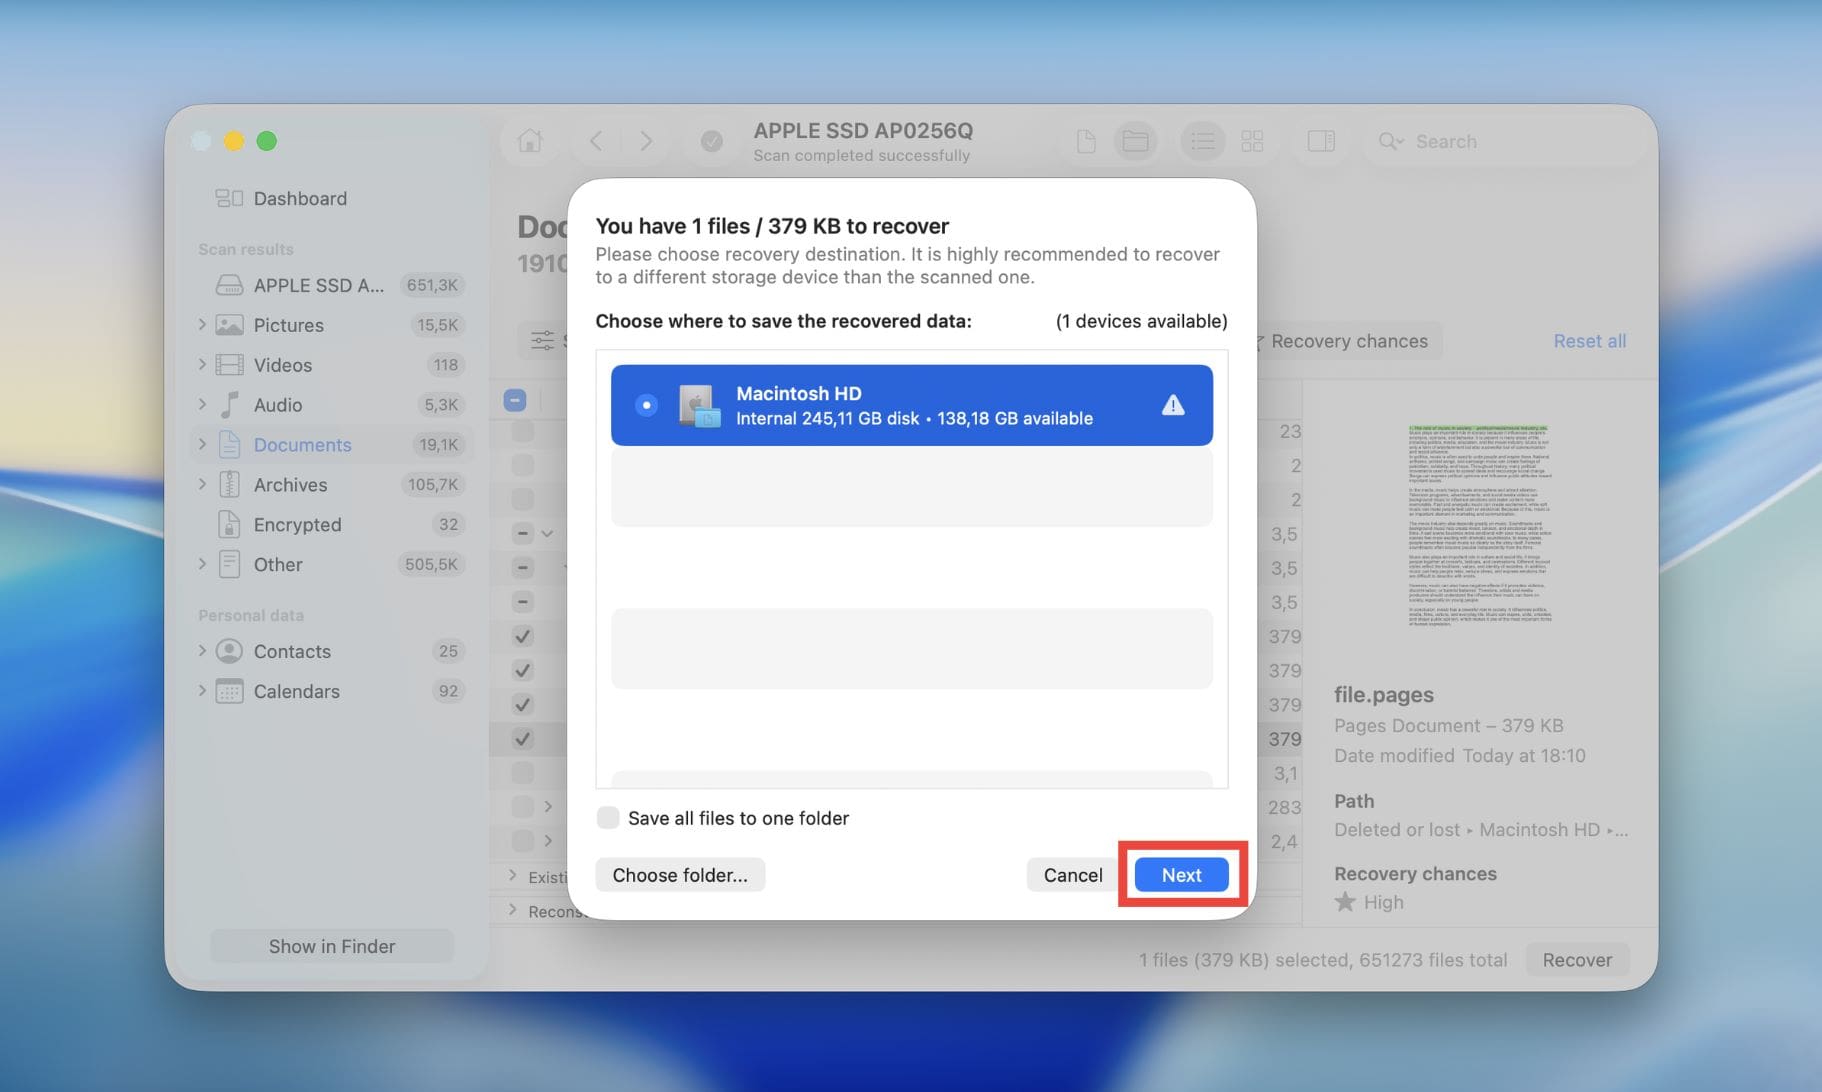
Step 8. Select a safe recovery destination on your computer, an external drive, or another storage device. It’s best to save recovered files to a different storage device from the one you scanned. Saving them back to the same drive may overwrite deleted data that you haven’t recovered yet. And click “Next”.
Step 9. Wait for the recovery process to finish, then open the recovered files and check that they were restored correctly.
Note: On macOS, Disk Drill lets you scan drives and preview recoverable files for free an unlimited number of times. However, if you want to actually recover and save the found files, you’ll need to upgrade to a paid license.
Restore Permanently Deleted Files with Time Machine
If you had Time Machine set up before deleting your files, you can recover them from there. Time Machine is a built-in macOS feature that automatically creates backups on an external drive or supported network storage, so an older copy of your deleted file may still be available.
Step 1. Connect the drive you use for your Time Machine backups to your Mac.
Step 2. Open Finder and go to the folder where the deleted file was originally stored.
Step 3. Click the Time Machine icon in the menu bar and choose “Browse Time Machine Backups”. If you don’t see the icon, go to System Settings > Menu Bar, scroll down until you find Time Machine, and check the box next to it.
Step 4. Use the timeline or arrows to go back to a backup created before the file was deleted.
Step 5. Choose the file or folder you want to recover and click “Restore”.
Recover Permanently Deleted Files from Cloud Storage
If you backed up or synced your files with a cloud storage service such as Google Drive or Dropbox before deleting them from your Mac, check your cloud account. Deleted files are often kept in a separate Trash folder for a limited period, giving you another chance to restore them.
Here’s how to restore files from Google Drive:
Step 1. Open Google Drive in your browser and sign in to the same Google account that was used to sync or upload the missing files.
Step 2. Click “Trash” in the left sidebar. Look through the deleted items for the file or folder you need. If there are many files, use the available sorting and search options to narrow down the list.
Step 3. Choose the files or folders you want to recover.
Step 4. Right-click the selected items and choose “Restore”. Google Drive will move them out of Trash and return them to their previous location in Drive.
Step 5. If you need them stored locally on your Mac again, download them or allow the Google Drive desktop app to sync them.
Note: Google Drive doesn’t keep files in Trash indefinitely. For personal accounts, items in Trash are automatically deleted after 30 days. Because cloud retention policies can vary between services and account types, check the Trash as soon as you realize a file is missing.
AppleToolBox is tech resource website that delivers informative content related to everything Apple. We’re one of the leading voices in providing insightful and authoritative how-tos, news, reviews and tips to Apple aficionados worldwide.













Write a Comment