Your macOS system or Mac OS X El Capitan features a security measure known as the System Integrity Protection. This feature helps you from unintentional modification of any of the system files on your Mac–only Apple-signed system processes can write to system locations. SIP is enabled by default.
Apple designed SIP to protect most of your Mac’s system locations, system processes, and Kernel extensions from being written to, modified, or replaced. System Integrity Protection (SIP) also shields the files and system processes from any malware.
According to Apple, System Integrity Protection is a security technology in all versions of macOS and OS X El Capitan that’s designed to help prevent potentially malicious software from modifying what Apple deems as protected files and folders on your Mac.
In earlier versions of Mac OS X, the “root” user account previously had no permission restrictions and could access any system folder or application on your Mac. The software gained root-level access when you entered your administrator name and password to install it and could then modify or overwrite any system file or application.
System Integrity Protection restricts the root account and limits the actions that the root user can perform on protected parts of macOS and OS X.
System Integrity Protection protects these parts of your Mac’s system:
/System
/usr
/bin
/sbin
/var
Apple’s native apps that come pre-installed with macOS and OSX
You and any third-party apps or installers can continue to write to these paths:
/Applications
/Library
/usr/local
System Integrity Protection also prevents certain software from selecting your Mac’s startup disk. To manually select a different startup disk, go to System Preferences > Startup Disk. Or use startup manager by holding down the Option key when restarting, then choosing from the list of startup disks available.
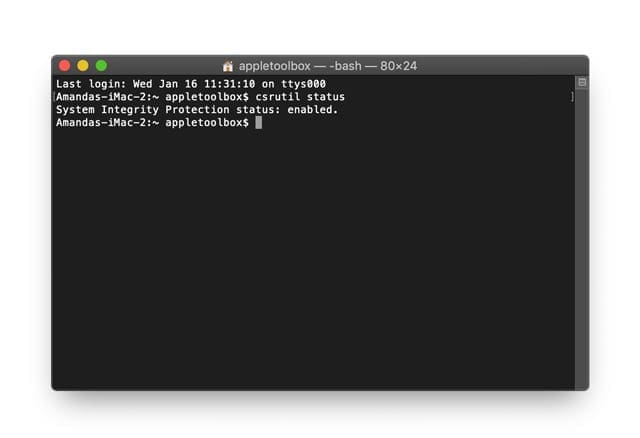
How to check your Mac’s current SIP status
Launch Terminal from /Applications/Utilities
Type in this command: csrutil status
Press Enter
Terminal responds with either “System Integrity Protection status: enabled” or “System Integrity Protection status: disabled”
SIP in macOS Mojave and above
Apple upgraded SIP in macOS Mojave to include not only its own apps but also third-party apps. That means that SIP now protects third-party apps. So malicious software can not tamper with, insert code, modify, or overwrite Apple’s own apps OR your third-party apps.
SIP conflicts with third-party apps
If you are using software such as Winclone or Totalfinder, you might experience some issues due to this feature.
Winclone is often used by Mac users as it allows you to easily image your Bootcamp partition on your Mac. Whether you need to change the size of the Bootcamp partition to give more space to your Mac or PC or migrating the data from one Bootcamp partition to another. If you have the System Integrity Protection enabled on your Mac, you may experience an issue with using the utility.
You can disable the integrity protection feature temporarilyin order to accomplish your tasks and then go back and enable this protection feature on your Mac. Please follow the simple steps below to accomplish this.
How to disable SIP (System Integrity Protection)
Step-> 1
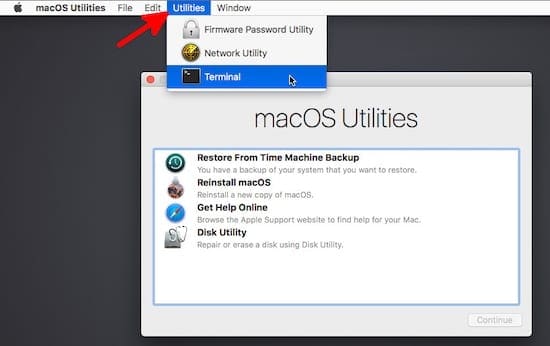
Start your Mac in Recovery mode by holding control + r key during the startup chime
Access the Terminal in from the Utilities menu bar
Step-> 2
Go to Utilities > Terminal and then enter “csrutil disable; reboot.’
Step ->3
Perform what you need to do and then return to your recovery system and enable the protection feature by typing ‘csrutil enable; reboot.’ on your terminal command prompt
Step-> 4
To check if your system integrity protection feature is working again on your mac
Open your terminal on your mac and type ‘csrutil status’
By using Step 4 above, you can make sure that you have turned on the System Integrity Protection back on after you have completed your root level tasks
Obsessed with tech since the early arrival of A/UX on Apple, Sudz (SK) is responsible for the original editorial direction of AppleToolBox. He is based out of Los Angeles, CA.
Sudz specializes in covering all things macOS, having reviewed dozens of OS X and macOS developments over the years.
In a former life, Sudz worked helping Fortune 100 companies with their technology and business transformation aspirations.
OS X El Capitan is not ready for Prime time. At least not on Mac Books without intermittent problems with the USB ports. I went back to Yosemite till they are worked out.
Thank you Chris. We are running two iMACS Retina in El Capitan and one Macbook pro as well. So far so good! Keeping our fingers crossed that it stays that way. Hopefully the USB issues will be resolved soon for folks that are experiencing it.


")


OS X El Capitan is not ready for Prime time. At least not on Mac Books without intermittent problems with the USB ports. I went back to Yosemite till they are worked out.
One of dozens of documented issues.
https://forums.macrumors.com/threads/usb-not-working-in-el-capitan.1903290/
Thank you Chris. We are running two iMACS Retina in El Capitan and one Macbook pro as well. So far so good! Keeping our fingers crossed that it stays that way. Hopefully the USB issues will be resolved soon for folks that are experiencing it.