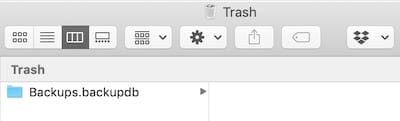
Do you have a Time Machine backup stuck in the Trash? That’s the worst. It will still take up space on your external drive and you can’t empty the Trash either! Well, you’re not at the end of the line yet as deleting Time Machine backups from the Trash isn’t as complicated as it first seems.
If only those backups would go out with the rest of the Trash!
Error message when trying to delete Time Machine backup
Making regular backups of your Mac is a smart idea, and Time Machine offers the best way to do that. It’s quick to set up, it stores multiple versions of your data, and it should automatically delete old backups to make space for new ones.
However, it doesn’t always work perfectly. Occasionally, you might be told you don’t have enough space to make a new backup. If that happens, it’s tempting to drag old backups to the Trash manually. That’s what I did! But when I tried to empty the Trash afterward I couldn’t. This error message appeared instead:
“Some items in the Trash cannot be deleted because of System Integrity Protection.”
Don’t believe it, none of those options will help you!
System Integrity Protection (SIP) is a security protocol that was introduced in recent releases of macOS. Essentially, it locks important system files so that malicious software — or users — can’t do damage to the Mac or compromise its data.
SIP is a good thing! Most of the time you won’t even realize it’s there, working away in the background keeping your Mac safe. But with Time Machine backups stuck in the Trash, you are going to have to turn it off for a little bit.
Check the Status for your Mac’s System Integrity Protection
To know the status of your Mac’s SIP before restarting your Mac into the Recovery Move, open Terminal app from Applications > Utilities and use the following command: csrutil status.
You can also check in the Apple menu by holding the option key and choosing System Information. Scroll down the left sidebar list and choose Software and look in the Details panel on the right to see if System Integrity Protection is enabled.
How do you delete Time Machine backups from the Trash?
To delete Time Machine backups from the Trash, you first need to turn off SIP. It’s very important to note that doing so will make your Mac temporarily vulnerable so you should try to make another backup (if you’re able to) before starting. Whether that’s using the same external drive or a different one doesn’t really matter.
Also, make sure you turn SIP on again once you’ve deleted the backup. Otherwise, your Mac will be permanently at risk. We’ll show you how to do that below as well.
Keep your Mac safe by ensuring you turn SIP on again.
How do you turn off System Integrity Protection?
Follow the steps below to turn SIP off. They involve booting your machine into Recovery Mode and entering a command into the Terminal. Make sure you enter the command exactly as it’s written below.
Shut down your Mac using the Apple icon in the menu bar.
Once the Mac has completely powered down, turn it on and hold command+R.
Maintain holding command+R until the Apple logo and progress bar appears on-screen
Wait for the Mac to boot into Recovery Mode.
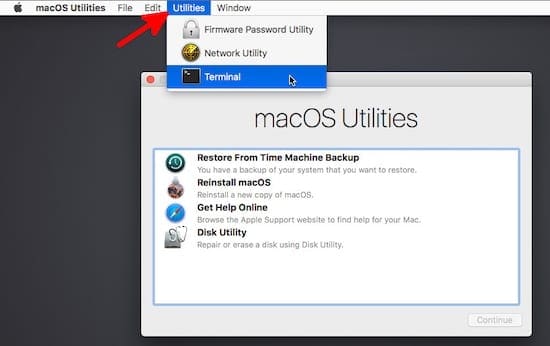
From the menu bar, go to Utilities > Terminal.
Enter csrutil status to verify the current status of SIP
To disable it, type the following command into Terminal and hit enter: csrutil disable; reboot
Access the Terminal in from the Utilities menu bar.
Wait for the Mac to restart automatically
Delete your Time Machine backups from the Trash while SIP is off.
After entering the code above, your Mac will reboot as normal. However, SIP is now turned off. Lot on to your account and empty the Trash, removing that pesky Time Machine backup with it.
Depending on the size of the backup, it could take a lot of time for the Trash to empty. Be patient and avoid using your Mac for anything else in the meantime — remember, it’s currently unprotected since SIP is turned off.
With SIP off you should be able to successfully empty the Trash.
How do you turn System Integrity Protection on again?
Once you’ve emptied the Trash, turn SIP on again before using your Mac for anything else. Do so following the steps below.
Shut down your Mac using the Apple icon in the menu bar.
Once the Mac has completely powered down, turn it on and hold command+R.
Mac boots into Recovery Mode.
From the menu bar, go to Utilities > Terminal.
Enter csrutil status to verify the current status of SIP
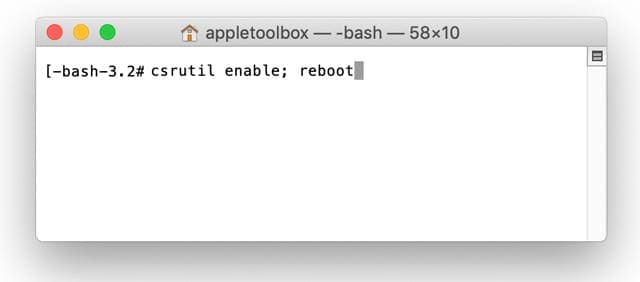
Type the following command into Terminal line and hit enter: csrutil enable; reboot Ensure you enter the command exactly as it’s written.
Wait for the Mac to automatically restart
So there it is: turn off SIP, delete Time Machine backups from the Trash, and turn SIP on again. Not too complicated. Let us know how you got on with it all!
Dan writes tutorials and troubleshooting guides to help people make the most of their technology. Before becoming a writer, he earned a BSc in Sound Technology, supervised repairs at an Apple Store, and even taught English in China.
Thanks for this. Had to free up some space on my backup disk and dragging some older TM files seemed a quick win, until I ran into the problem you have solved. Worked a treat. Thank you.
Thank YOU… it worked! Patience… it takes awhile for the Trash to empty. Once done I restarted the computer then checked that the SIP was enabled. All systems go!
Hi
Having had a huge number of Time Machine files stuck in trash I followed this, and left the machine to run over night. Then followed the instructions to restart SIP.
Trash is still full.
Hit empty trash again and there is now a deflationary process in train – still going after 30 minutes.
Hmm……
took forever to locate the solution…I didn’t ask the correct question…but finally it worked thanks to your simple and easy instructions…thank you Dan!!
As easy as, “how-do-you-delete-time-machine-backups-from-the-trash!!!!!!!!!” simple when asking the correct question….
My iMac does not “reboot into Recovery mode.” When I reboot with CMD-R it only gives me a few options. Restore form a back up
Access Disk Utility
I don’t recall the other, but there is literally no way for me to actually access use of the system without choosing a backup to restore from. Of course, if I do a restore from backup, once it’s done it will restart and it will not be in Recovery mode.
I’ve tired this many times.
Anyone got any ideas about how I can turn off my SIP?
You don’t have to access the desktop etc. Look in the task bar items and you will find a way to access Utilities. I can’t remember exactly which menu it falls under, but you will find the Terminal utility there.
Bit of a late response, but figured i’d mention this in case others have the same issue.
Thank you very much for this excellent advice. Found myself in this position after manually deleting some Time Machine backups. Worked perfectly, though I had to hold Cmd-R until the Apple logo and progress bar appeared to be sure Recovery kicked in. Just a thought.
When I brought up System Information “System Integrity Protection” did NOT show up on my list. Next, when I got to step 5, “csrutil status”, I got back “csrutil: command not found” which also happened in step 5 of turning SIP back on. And the biggie, I still could NOT empty the trash with Time Machine backup files in it.
Hi Dan,
OS Catalina, 10.15.1, MacBook Pro 2014.
I want to try the above solution for deleting backups .
Couple of questions- i deleted backups from Time Machine because it didnt appear to be doing so.
Also they only show in Trash when Time Machine is connected…thats probably normal.
So if I do your suggested method I would also have to have T M connected .
Hi Elizabeth,
I have done the steps as outlined above. The computer tells me its deleting 209 items.
Started this process about 2 hours ago. As yet no visable progress.
I will leave for another few hours in the hope something good happens!
Thinking if this doesnt work I could wipe/erase the whole External HD. Then do a new backup.
I have photos backed up to other external drives.
Have you got steps to achieve a reformat/erase of the External HD.
Many thanks,
Wendy
I hope it worked for you. But if not, erasing your TM drive is pretty easy–I’ve done it many times to start fresh!
Open Finder > Applications > Utilities > Disk Utility
Select your external drive
Choose Erase
Enter new name and format (Mac OS Extended (Journaled) formats or Xsan formats are supported for TM)
If needed, select GUID for Scheme
Choose Erase
Once complete, the drive is ready to use with Time Machine!
Hello, I have had the same type of issue as described above but I have gotten so frustrated at this point that I am thinking about giving up and wiping the whole thing to start new.
I had around 900GB of a 1TB Time machine drive full yesterday.
When I deleted all but only the most recent backups (on purpose), I tried to delete the old backups from the TM drive.
After my trash goes to “3,000,000 items deleted” I figured something was up.
I left my mac on overnight to keep emptying the trash with the TM drive still plugged in.
I woke up this morning and found that almost all of the old backups were gone sans about 4 or 5 backups, but that my TM drive still only had 500GB “available”.
If I unplug the TM my trash is completely empty, but If I plug it back in and try to empty the trash of some of the old residual TM backups, I am afraid that it will take too long since those are probably many many GB and will take forever.
Any idea how long it would take to just wipe it and start clean?
I really only care about keeping my most recent backup, so I would like to get rid of older backups but don’t trust that I am deleting them right and don’t want to wait around for them to be deleted.
It’s likely the TM backup drive won’t update available storage until all items in the trash are removed–hence why it’s showing 500GB available on that drive still.
To start fresh, you need to either erase that TM drive via Disk Utility or continue dumping all items in the trash and deleting. Certainly, using Disk Utility to erase the drive is faster than using the trash can to delete files.
If you are okay with losing those backups and also confident that your Mac is not a risk at the moment of needing a backup, then erasing that TM drive and starting fresh is a good idea. How long it takes to create the new backup depends on how much data it needs to backup. Since it will be a copy of your entire system, the first backup will take at minimum a few hours and possibly even a few days.
What we suggest, if possible, is using a different drive for your TM backup so you have the redundancy of the current TM drive if something happens while creating the new TM backup.
Dave Williamssays
Hi,
I am running Sierra and this command didn’t work for me:
csrutil: disable;reboot
For me, the command that worked was:
csrutil disable;reboot
Likewise for the enable command:
This command worked for me:
csrutil enable;reboot
I did the three steps in your procedure but during the trash empty step, I got messages saying ‘Macintosh HD in us, SIP error message and ‘folder’ in use.
Clicking the ‘Continue’ button each time I got a message (there were many backups I want to delete) continued the empty process but did not empty the trash.
BTW: I then did use Time Machine to delete a, just one, backup from January 2017. However, ALL backups were deleted except the backups made today Aug. 21, 2019.
Got plenty of disk space now on my backup drive but I limited the number of backups and the trash has some of the total disk files from backups made in 2017.
Try powering off your Mac, waiting 30 seconds or so, and powering back on. Then, check if any apps open automatically if so, close all open apps. Then try emptying your trash.
I assume SIP is still off. If not, follow the article steps to turn SIP off and repeat my instructions above.
Thank you for your article, ” How do you delete Time Machine backups from the Trash?”
Very straight forward and extremely helpful. I’ll be following your other articles for sure!!


 Ensure you enter the command exactly as it’s written.


whatr do I do when terminal relies with operation not permitted after waiting for my mac to reboot
Thanks for this. Had to free up some space on my backup disk and dragging some older TM files seemed a quick win, until I ran into the problem you have solved. Worked a treat. Thank you.
Worked seamlessly. Great solution. Thank you so much for posting this. Even the Apple support guy did not know this.
Thank YOU… it worked! Patience… it takes awhile for the Trash to empty. Once done I restarted the computer then checked that the SIP was enabled. All systems go!
Thanks so much!
Laurie
Whoopee – it has worked & I now have an empty Trash my desk top.
Thanks
T
Hi
Having had a huge number of Time Machine files stuck in trash I followed this, and left the machine to run over night. Then followed the instructions to restart SIP.
Trash is still full.
Hit empty trash again and there is now a deflationary process in train – still going after 30 minutes.
Hmm……
Thanks!! Found plenty of suggestions but only your instructions worked!! Good Karma to you!!
It worked eventually after rebooting again. Now sip is on again as well…
took forever to locate the solution…I didn’t ask the correct question…but finally it worked thanks to your simple and easy instructions…thank you Dan!!
As easy as, “how-do-you-delete-time-machine-backups-from-the-trash!!!!!!!!!” simple when asking the correct question….
Thank you very much!
This worked for me. I appreciate the help so much!
My iMac does not “reboot into Recovery mode.” When I reboot with CMD-R it only gives me a few options. Restore form a back up
Access Disk Utility
I don’t recall the other, but there is literally no way for me to actually access use of the system without choosing a backup to restore from. Of course, if I do a restore from backup, once it’s done it will restart and it will not be in Recovery mode.
I’ve tired this many times.
Anyone got any ideas about how I can turn off my SIP?
Thanks.
You don’t have to access the desktop etc. Look in the task bar items and you will find a way to access Utilities. I can’t remember exactly which menu it falls under, but you will find the Terminal utility there.
Bit of a late response, but figured i’d mention this in case others have the same issue.
Thanks so much!
Took a few days to delete a few years worth of old backups ( from a mac I no longer had).. but I got it done!
Thanks you knew exactly what to do about getting time machine remnants out of trash
Thanks! It worked.
Thank you very much for this excellent advice. Found myself in this position after manually deleting some Time Machine backups. Worked perfectly, though I had to hold Cmd-R until the Apple logo and progress bar appeared to be sure Recovery kicked in. Just a thought.
When I brought up System Information “System Integrity Protection” did NOT show up on my list. Next, when I got to step 5, “csrutil status”, I got back “csrutil: command not found” which also happened in step 5 of turning SIP back on. And the biggie, I still could NOT empty the trash with Time Machine backup files in it.
Hi Dan,
OS Catalina, 10.15.1, MacBook Pro 2014.
I want to try the above solution for deleting backups .
Couple of questions- i deleted backups from Time Machine because it didnt appear to be doing so.
Also they only show in Trash when Time Machine is connected…thats probably normal.
So if I do your suggested method I would also have to have T M connected .
Is this correct?
Thank you in advance.
Hi Wendy,
Yup, your assumptions are correct–you need to have the TM backup drive connected to make any changes to your backups including deleting them!
Hi Elizabeth,
I have done the steps as outlined above. The computer tells me its deleting 209 items.
Started this process about 2 hours ago. As yet no visable progress.
I will leave for another few hours in the hope something good happens!
Thinking if this doesnt work I could wipe/erase the whole External HD. Then do a new backup.
I have photos backed up to other external drives.
Have you got steps to achieve a reformat/erase of the External HD.
Many thanks,
Wendy
Thank you . I have it sorted.
HI Wendy,
I hope it worked for you. But if not, erasing your TM drive is pretty easy–I’ve done it many times to start fresh!
Open Finder > Applications > Utilities > Disk Utility
Select your external drive
Choose Erase
Enter new name and format (Mac OS Extended (Journaled) formats or Xsan formats are supported for TM)
If needed, select GUID for Scheme
Choose Erase
Once complete, the drive is ready to use with Time Machine!
I hope it all works out for you!
Liz
Hello, I have had the same type of issue as described above but I have gotten so frustrated at this point that I am thinking about giving up and wiping the whole thing to start new.
I had around 900GB of a 1TB Time machine drive full yesterday.
When I deleted all but only the most recent backups (on purpose), I tried to delete the old backups from the TM drive.
After my trash goes to “3,000,000 items deleted” I figured something was up.
I left my mac on overnight to keep emptying the trash with the TM drive still plugged in.
I woke up this morning and found that almost all of the old backups were gone sans about 4 or 5 backups, but that my TM drive still only had 500GB “available”.
If I unplug the TM my trash is completely empty, but If I plug it back in and try to empty the trash of some of the old residual TM backups, I am afraid that it will take too long since those are probably many many GB and will take forever.
Any idea how long it would take to just wipe it and start clean?
I really only care about keeping my most recent backup, so I would like to get rid of older backups but don’t trust that I am deleting them right and don’t want to wait around for them to be deleted.
Any help is appreciated.
Hi Drew,
It’s likely the TM backup drive won’t update available storage until all items in the trash are removed–hence why it’s showing 500GB available on that drive still.
To start fresh, you need to either erase that TM drive via Disk Utility or continue dumping all items in the trash and deleting. Certainly, using Disk Utility to erase the drive is faster than using the trash can to delete files.
If you are okay with losing those backups and also confident that your Mac is not a risk at the moment of needing a backup, then erasing that TM drive and starting fresh is a good idea. How long it takes to create the new backup depends on how much data it needs to backup. Since it will be a copy of your entire system, the first backup will take at minimum a few hours and possibly even a few days.
What we suggest, if possible, is using a different drive for your TM backup so you have the redundancy of the current TM drive if something happens while creating the new TM backup.
Hi,
I am running Sierra and this command didn’t work for me:
csrutil: disable;reboot
For me, the command that worked was:
csrutil disable;reboot
Likewise for the enable command:
This command worked for me:
csrutil enable;reboot
Thanks,
Dave
My Mac is running OS 10.12.6.
I did the three steps in your procedure but during the trash empty step, I got messages saying ‘Macintosh HD in us, SIP error message and ‘folder’ in use.
Clicking the ‘Continue’ button each time I got a message (there were many backups I want to delete) continued the empty process but did not empty the trash.
BTW: I then did use Time Machine to delete a, just one, backup from January 2017. However, ALL backups were deleted except the backups made today Aug. 21, 2019.
Got plenty of disk space now on my backup drive but I limited the number of backups and the trash has some of the total disk files from backups made in 2017.
Do you have any solutions I may try?
Hi Neil,
Try powering off your Mac, waiting 30 seconds or so, and powering back on. Then, check if any apps open automatically if so, close all open apps. Then try emptying your trash.
I assume SIP is still off. If not, follow the article steps to turn SIP off and repeat my instructions above.
Thank you for your article, ” How do you delete Time Machine backups from the Trash?”
Very straight forward and extremely helpful. I’ll be following your other articles for sure!!