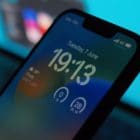
When the iPhone 14 Pro and iPhone 14 Pro Max were announced, one of the big new features was the inclusion of an “Always On Display”. This is meant to help save you some battery life, while being able to glance at your phone to see notifications without actually picking up the phone or tapping the screen.
How to Turn Off Always On Display at Night on iPhone 14 Pro
While the addition of the Always On Display is an excellent new way to keep an eye on notifications that arrive on your iPhone without needing to actually turn on the screen, it’s not the most-perfect implementation. Shortly after the iPhone 14 Pro and iPhone 14 Pro Max were released, it was discovered that the Always On Display would continue to show even at night. As you can probably guess, this isn’t great, especially for those who are sensitive to lights being on while they are trying to sleep. Unfortunately, there’s no specific way to turn off Always On Display at night on iPhone 14 Pro. However, there are a couple of workarounds that you can use instead.
Enable Low Power Mode
When iOS 9 was announced, Apple introduced Low Power Mode, as a way for users to try and squeeze a bit more battery life out of their devices. The feature has remained one of the best options if you need to ensure that your iPhone doesn’t, run out of juice before you can make it to a charger. The feature has since made its way to the Mac, iPad, and even the Apple Watch, but here’s how to use Low Power Mode with your iPhone 14:
Open the Settings app on your iPhone 14.
Scroll down and tap Battery.
Tap the toggle next to Low Power Mode.
When enabled, Low Power Mode will “temporarily reduce background activity like downloads and mail fetch until you can fully charge your iPhone.” And while this is useful, there’s an even easier way to access Low Power Mode if you need to make your iPhone 14 battery life last a bit longer.
Open the Settings app on your iPhone 14.
Scroll down and tap Control Center.
Under the More Controls section, look for Low Power Mode.
Once located, tap the + button on the left.
Scroll back up to the Included Controls section.
Using the three horizontal lines on the right side of each option, drag and drop the Low Power Mode toggle to your preferred location.
Exit the Settings app.
From the Home Screen, swipe down from the top right corner to reveal Control Center.
Tap the Low Power Mode button (looks like a half-empty battery indicator).
As soon as you enable Low Power Mode on your iPhone, the battery indicator in your status bar will go from white to yellow. With this enabled, you should be able to extend the battery life of your iPhone long enough for you to make it to a charger.
Set Up a Sleep Focus Mode
The other option if you want to turn off Always On Display at night is to use Apple’s built-in Focus Modes. Out of the box, there’s a Sleep Focus mode that will turn the Always On Display, off, when the mode is enabled. Here’s how you can quickly do so:
Swipe down from the top right corner of your iPhone to reveal Control Center.
Tap the Focus button on the left side.
From the list of options, tap Sleep.
However, if you want to take full advantage of the Sleep Focus Mode and customize it to your liking, here’s how you can set up a Sleep Focus Mode. By following the steps below, this ensures that the Always On Display will not be turned on when you are trying to get some much-needed rest.
Open the Settings app on your iPhone or iPad.
Tap Focus.
In the top right corner, tap the + button.
From the list of options, tap Sleep.
Tap Customize Focus.
Scroll down until you reach the Schedule section.
Tap the Next Schedule section.
At the top of the page, tap the toggle next to Schedule.
If you want to make any adjustments to your Sleep Schedule, tap the Schedule and Options button below the Full Schedule section.
Once the changes are made, tap < Sleep Focus in the top left corner to go back to the previous page.
Scroll up to the Customize Screens section.
Tap the Options button.
Tap the toggle next to Sleep Screen to the On position.
This simplifies your iPhone Lock Screen and Apple Watch display to reduce distractions.
Determine whether you want the time to be shown when using the Sleep Focus.
Tap the toggle next to Show Time based on your decision.
In the top left corner, tap < Sleep Focus to go back and save your changes.
Finish customizing your new Sleep Focus mode, including the Allow Notifications and Focus Filters sections.
Once you are finished, tap the < Focus button to go back and save the changes.
It may seem a bit convoluted to have to perform either of these steps, but this is just what we’re “stuck” with for the time being. On the bright side, Apple is continuing to make improvements to the Always On Display, as evidenced by the ability to toggle whether you want the wallpaper to be shown or if you prefer to just have a black background when the Always On Display is activated.
Andrew Myrick is a freelance writer based on the East Coast of the US. He enjoys everything to do with technology, including tablets, smartphones, and everything in between. Perhaps his favorite past-time is having a never-ending supply of different keyboards and gaming handhelds that end up collecting more dust than the consoles that are being emulated.






Write a Comment