Nobody likes to enter all their personal details on iPhones and others iDevices again and again. So if you’re one of those users who regularly fill out various forms, then you’ve got to use Autofill.
This feature is pretty handy in remembering all your personal information. So now you don’t have to type in your name, email, phone number, credit card details, and so forth every time you fill out a form.
To get things started, check that your own personal details and information is saved on your iPhone, iPad, or other iDevices as a contact. If you don’t have your contact already, it’s really easy to create.
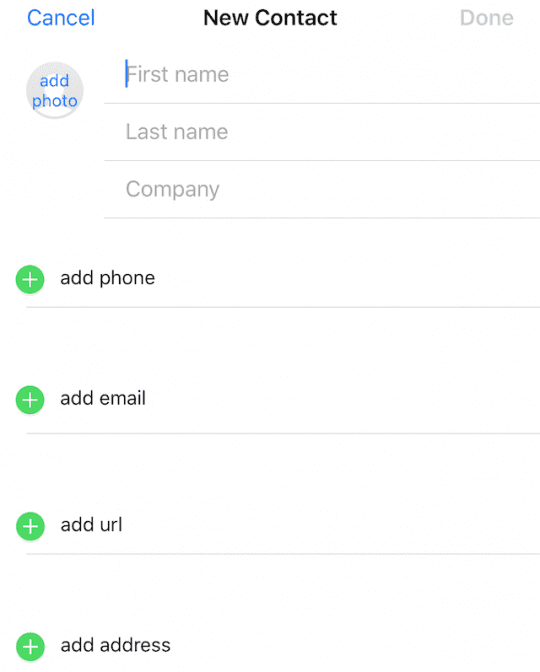
To Create a New Contact
Open Contacts
Tap +
Add your information (addresses, phone numbers, email addresses, and anything else relevant)
Press Save to create a new contact for yourself
Remember to fill in at least the most important fields like “name,” “email IDs” and “phone numbers.” If you’re confident about your iPhone’s security and privacy, fill in more sensitive information like credit card numbers and information. Once you enter all this data, tap “done.”
As a reminder, if you already have your contact saved but the information is out of date, it’s easy to change. Tap on “edit,” and you make any necessary changes to your contact. And then tap “done.” That’s it!
Enabling Autofill
This feature works hand in hand with Apple’s proprietary browser Safari. So once your contact is ready, update your Safari settings to get autofill working for you.
To Get Contact Info Working
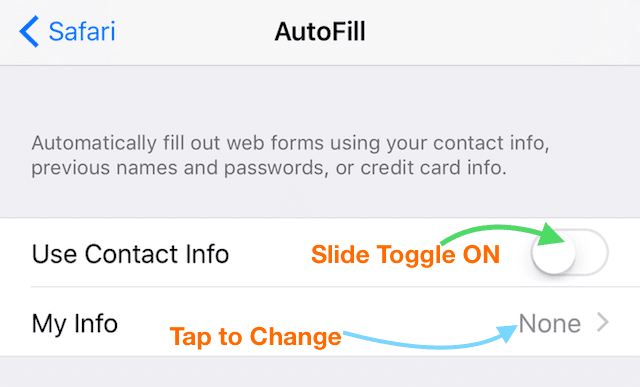
Go to Settings
Scroll down to Safari
Select “Autofill”
Turn the slider “Use Contact Info” ON
Tap “My Info”
Select Your Contact
Now your iPhone or another iDevice can use all the information stored in “My info.” To change to a different contact, simply tap on “my info” and update it with the new contact.
Concerned About AutoFill and Privacy?
Autofill is a way to save time typing things like your name, email, phone, and address out. While you can save information like passwords, usernames, and credit cards, you don’t have too.
To limit autofill information, go to Settings > Safari > Autofill and toggle off Names and Passwords and Credit Cards.
We also suggest you remove any saved credit cards.
Autofill Passwords
Another great feature is Safari’s ability to save IDs and passwords automatically.
To save IDs and passwords
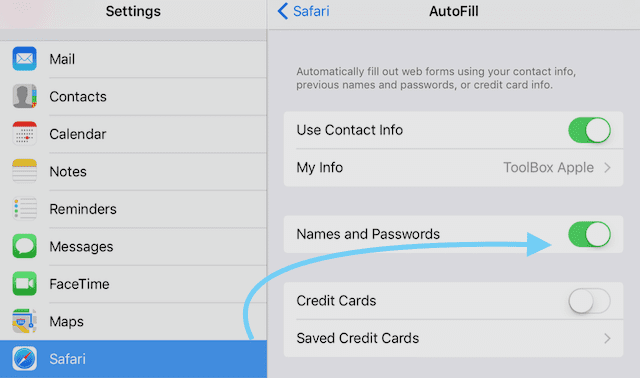
Go to Settings
Scroll down to Safari
Select “Autofill”
Turn the slider “Names and Password” ON
Autofill Credit and Debit Cards
For your credit card or debit card information, you have some options for either manually entering every time you fill out a form or having this information stored in your iPhone autofill.
To save your credit and debit card
Go to Settings
Scroll down to Safari
Select “Autofill”
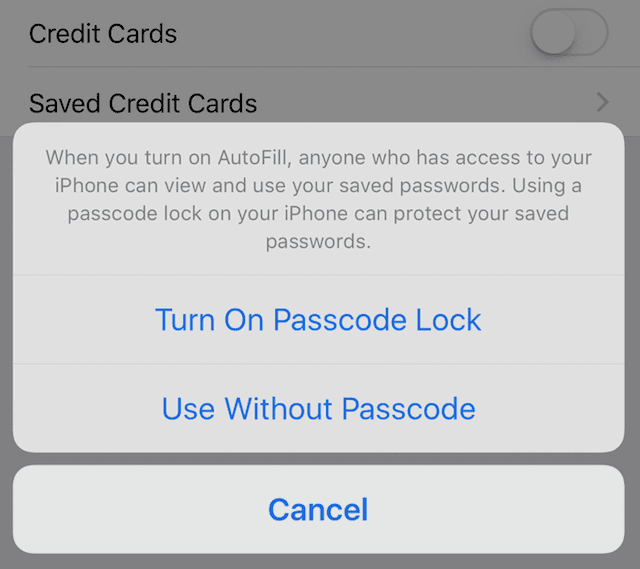
Turn the “Credit Cards” Slider ON
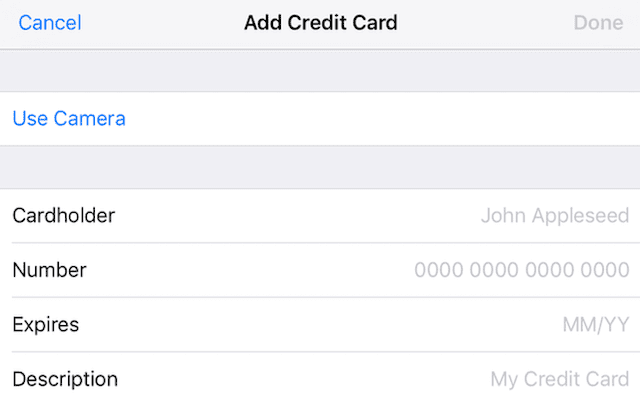
Tap Saved Credit Cards
Enter in iPhone passcode or Touch ID if asked
Select Add Credit Card
There are two options
Enter your credit card information manually
Have your iPhone extract the relevant information by taking a photo of the card
As an FYI, debit cards are added the same way.
Protect your phone
If you decide to use autofill, it’s best practice to password protect your iPhone or another iDevice Without password protection, anyone with access to your iPhone also has access to your confidential data.
To Passcode Protect
Go to Settings
Select Touch ID & Passcode
On devices without Touch ID, go to Settings > Face ID (Touch ID) & Passcode
Tap Turn Passcode ON
Enter a Six digit passcode or your Touch ID/Face ID
Or tap Passcode Options to switch to a four-digit numeric code, a custom numeric code, or a custom alphanumeric code
Enter your passcode again to confirm it and activate it
Autofill stores your information on your specific iDevice when enabled. iCloud Keychain syncs that information across all your iDevices and your Mac(s) if turned on in iCloud Settings or Preferences. So autofill and iCloud Keychain work hand in hand, sharing information and storing it on your iDevices and computers. If you have more than one iDevice or Mac, it’s a great idea to use iCloud Keychain to keep your passwords, contact information, and other information, so it’s synced across all your devices and computers.
To Turn iCloud Keychain On
Tap Settings
Select iCloud
Choose Keychain
Set iCloud Keychain to ON
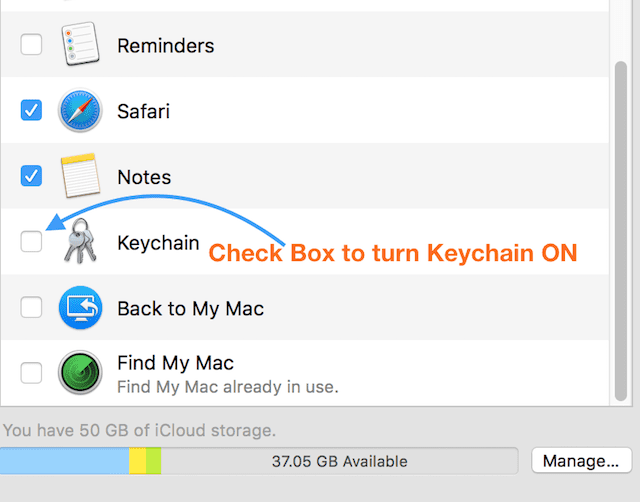
For Macs
Go to System Preferences
Select iCloud
Check on Keychain
Set Up iCloud Keychain on ALL Devices
You need to set iCloud Keychain to ON for all your iDevices and Macs. You now need to enter your Apple ID and Password and approve the sync for all other iDevices and macs that are logged in using the same Apple ID and Password.
Summary
Autofill makes working with your iPhone or another iDeviceeasy and convenient, especially when filling out form information for online ordering. With this feature enabled, your iPhone logs into websites automatically, without the need to enter any credentials. When you visit a site that needs your information, use the option called AutoFill.
AutoFill saves and automatically fills out personal information to websites. It just makes online browsing and shopping on your iPhone, iPad, or another iDevice a much easier and calmer experience. Use it and save yourself a lot of time!
For most of her professional life, Amanda Elizabeth (Liz for short) trained all sorts of folks on how to use media as a tool to tell their own unique stories. She knows a thing or two about teaching others and creating how-to guides!
Her clients include Edutopia, Scribe Video Center, Third Path Institute, Bracket, The Philadelphia Museum of Art, and the Big Picture Alliance.
Elizabeth received her Master of Fine Arts degree in media making from Temple University, where she also taught undergrads as an adjunct faculty member in their department of Film and Media Arts.
Hi,
I have followed this advice and saved my email address to my contact info but it still will not fill in the email in Autofill . It works for my name and number but never the email . I am so sick of typing it in 10 times a day ! What am I doing wrong ?? I
Thanks for any help here .
C.J.
First, check that you are not using Safari in Private Browsing Mode. Open Safari. If the navigation bar in Safari is black or dark instead of white or light gray, turn off Private Browsing.
It may be that iCloud syncing is getting in the way. So check your iCloud Settings for both Contacts and Safari–if they are toggled on, toggle them off. If they are toggled off, try toggling them on.
Then turn off Settings > Safari > Autofill > Use Contact Card. Then delete your current Contact Card and create a new one. And finally, toggle back on Use Contact Card.
If your name doesn’t automatically appear next to My Info, tap on My Info and select your name from your Contacts App (the new card you just created.)
Also, toggle on Names and Passwords in the Autofill Settings for Safari (Settings > Safari > Autofill > Names and Passwords.)
It’s also possible that iCloud Keychain is causing problems, so if the above didn’t work–take a look and see if iCloud Keychain is toggled on or off. If off, toggle it on. If on, toggle it off.


Auto fill inputs my name as “Last First” instead of “First Last”. How do I fix this?
Hi,
I have followed this advice and saved my email address to my contact info but it still will not fill in the email in Autofill . It works for my name and number but never the email . I am so sick of typing it in 10 times a day ! What am I doing wrong ?? I
Thanks for any help here .
C.J.
HI CJ,
First, check that you are not using Safari in Private Browsing Mode. Open Safari. If the navigation bar in Safari is black or dark instead of white or light gray, turn off Private Browsing.
It may be that iCloud syncing is getting in the way. So check your iCloud Settings for both Contacts and Safari–if they are toggled on, toggle them off. If they are toggled off, try toggling them on.
Then turn off Settings > Safari > Autofill > Use Contact Card. Then delete your current Contact Card and create a new one. And finally, toggle back on Use Contact Card.
If your name doesn’t automatically appear next to My Info, tap on My Info and select your name from your Contacts App (the new card you just created.)
Also, toggle on Names and Passwords in the Autofill Settings for Safari (Settings > Safari > Autofill > Names and Passwords.)
It’s also possible that iCloud Keychain is causing problems, so if the above didn’t work–take a look and see if iCloud Keychain is toggled on or off. If off, toggle it on. If on, toggle it off.