There are so many different weather apps available on the App Store that it can be really tough to pick. Almost every app offers a different experience from the next, but it’s tough to trust the reliability of the information.
When it comes to an app like The Weather Channel, it’s a service and channel that everyone has heard of. Regardless of whether it’s from “back in the day” when you would just turn it on to see what the weather would be, or to using the app, everyone has used TWC at some point.
Back in 2018, the company unveiled an all-new update to the application which saw a complete redesign. Over time, the developers have continued to add new features, turning this into your one-stop shop for all things weather related.
A big feature for those who care about the weather is getting real-time alerts. This will let you know, within minutes, whether you can expect some type of precipitation in the area. With The Weather Channel app, you can set up and customize these alerts to your liking.
Open The Weather Channel app on your iPhone or iPad.
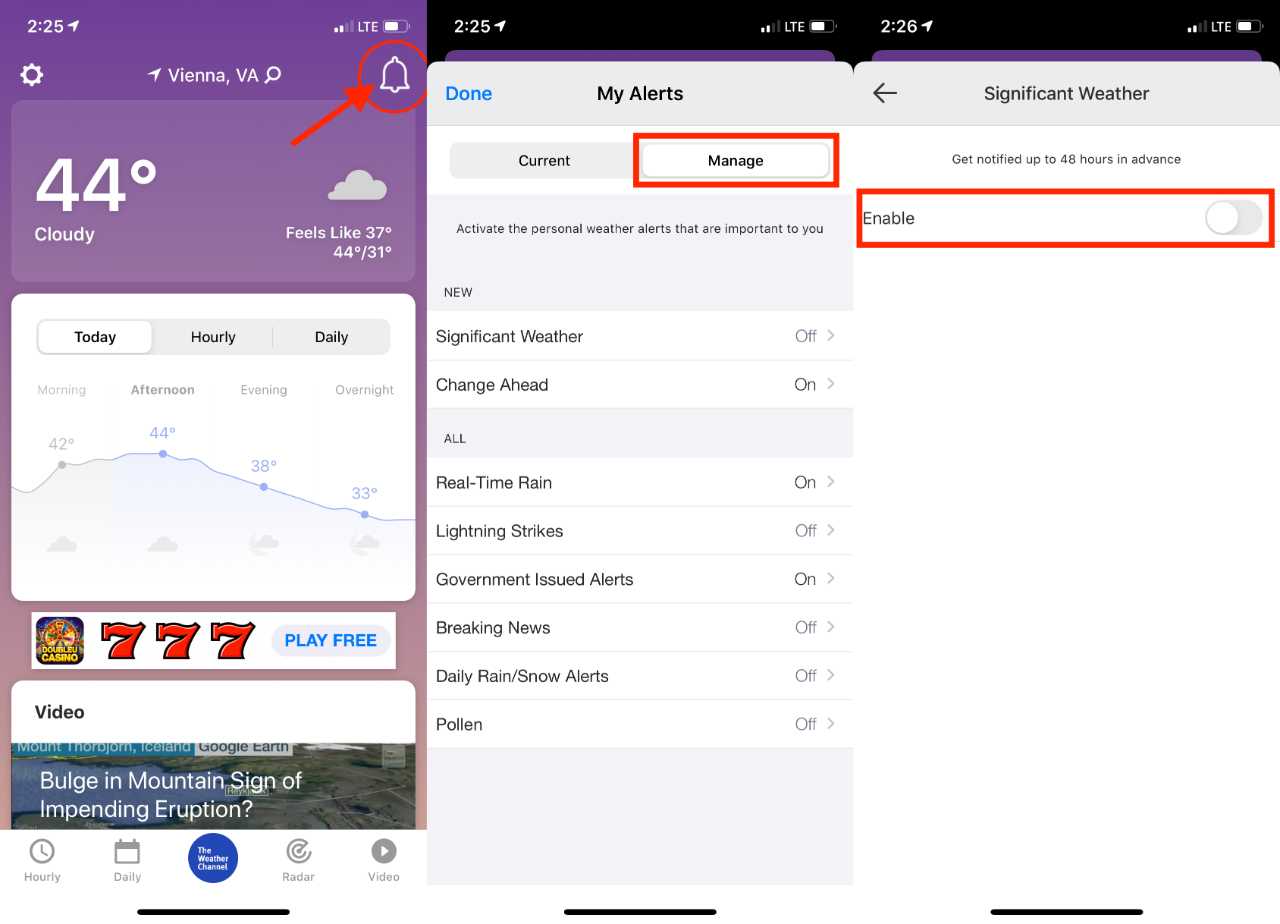
Tap the Alert Bell icon in the top right-hand corner
Select Manage
From here, you are given options for the following alerts:
Significant Weather
Change Ahead
Real-Time Rain
Lightning Strikes
Government Issued Alerts
Breaking News
Daily Rain/Snow Alerts
Pollen
After you have reached this portion of the interface, you can go through and enable each option. Tapping each section takes you to another panel with a simple “on/off” toggle switch that you can turn on or off.
Plan ahead with Radar
It’s all fine and dandy for your weather app to tell you that rain or precipitation is on the way. However, it’s rather difficult with just that information as to where the storm is heading. That’s why The Weather Channel implemented the dedicated Radar section.
This allows you to view a time-lapse of weather in your area, based on wherever you are at. Or you can tap the search button in the title area of the page (above the radar itself) to look for a specific location.
The Weather Channel App even sports integration with Siri. Meaning that you can say a catch phrase to Siri, and have the Radar information presented to you easily. Here’s how to set that up:
Open the Weather Channel app on your iPhone
Tap the Radar section at the bottom
Tap on the Add to Siri button
Set the shortcut name
Tap Add to Siri
When looking at the Radar itself, you are provided with a blue dot in the middle of the map. This simply gives you your currently location, and you can pinch to zoom or pinch out to change the area.
In the middle of the page, there is a timeline, showing you what the precipitation looks like up to 6 hours into the future. Tapping on the rewind icon on the left, lets you go back in time to see what the weather pattern looked like leading up to now.
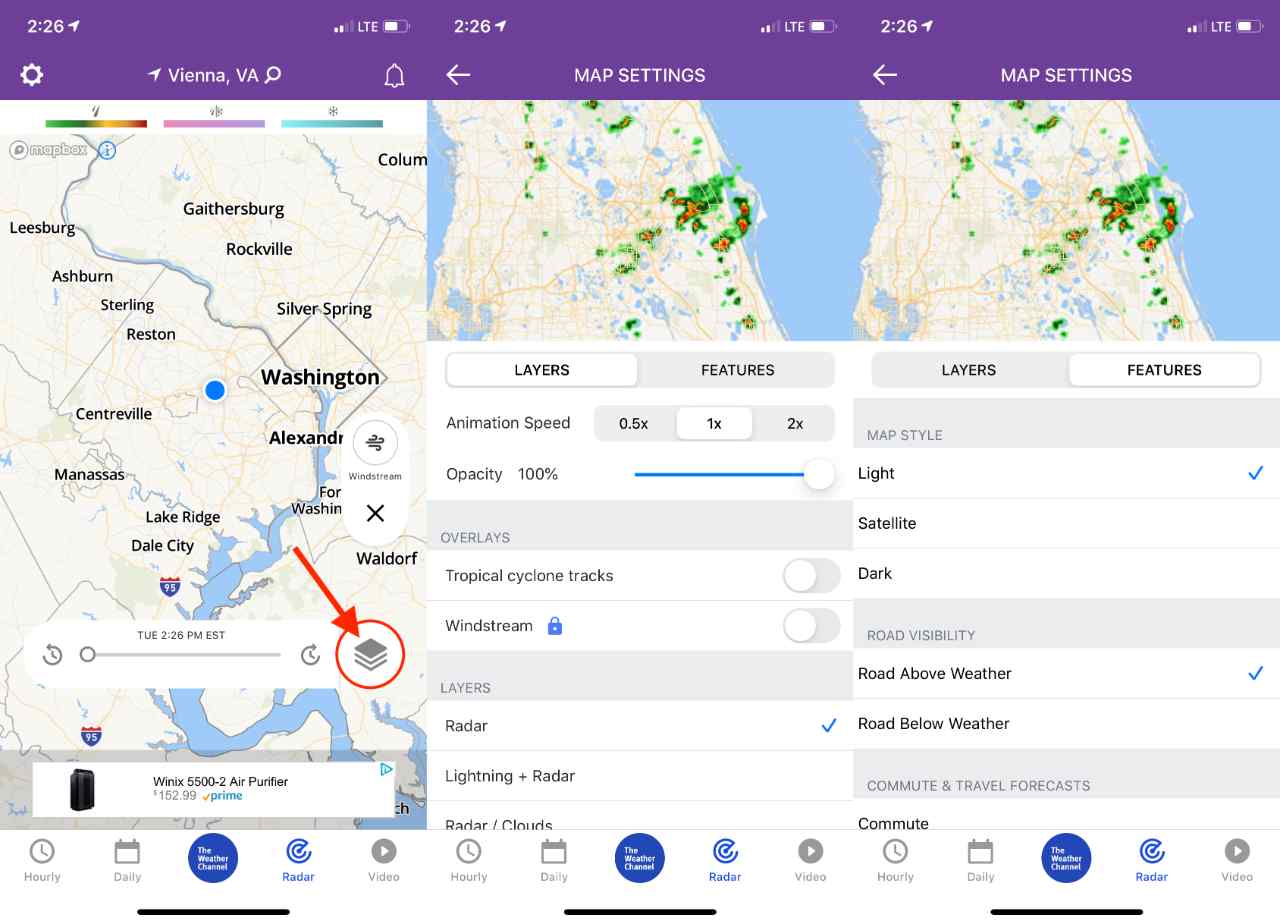
Adjust Radar Layers
One icon we failed to mention before was the Radar Layers button. This is found to the right of the timeline and gives you more fine-tuned control over what you see on the Radar maps.
These range from animation speeds, to Clouds, Temperature, “Feels Like”, and even the UV Index. Then, there’s another tab, named Features, which gives you options for the following:
Map Style
Light
Satellite
Dark
Road Visibility
Road Above Weather
Road Below Weather
Commute & Travel Forecasts
Commute
Travel
Tapping any of these will adjust how your radar looks. Plus, you get a live preview at the top, showing you what the Radar will now look like after the changes have been made.
After you have made all of your changes and adjustments, just tap the back arrow icon in the top left-hand corner. All of your changes are automatically saved, as you make them from the Layers panel.
View Health risks in your area with ease
Sometimes it’s not enough to just know how the weather will progress throughout the day. In some cases, you want to know different pieces of information that aren’t readily available from other competing weather apps.
The Weather Channel App changes all of that with its “home screen”. Tap the blue icon at the bottom of any page, and you are taken to the main home screen for the app.
Obviously, you are provided with the regular bits of information like the upcoming forecast. But there are additional features for up-to-date news reports about different weather-related situations.
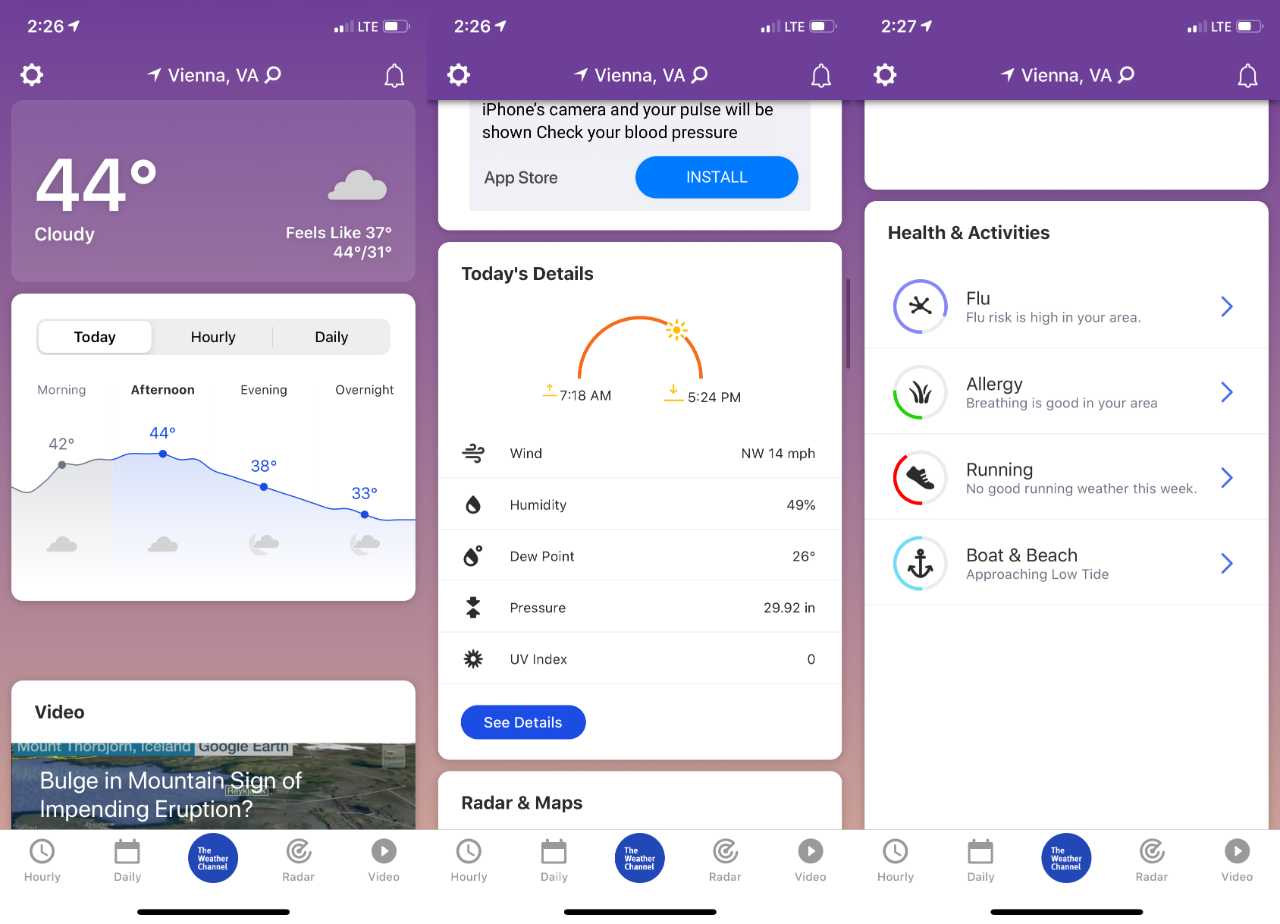
Scroll down even further, and there’s a section for “Today’s Details”. This section includes the following pieces of info:
Sunrise/Sunset
Wind
Humidity
Dew Point
Pressure
UV Index
Scrolling past the familiar Radar & Maps section brings you to the Health & Activities area. From here, you can see even more information about what’s going on in your area:
Flu Risk
Allergy
Running
Boat & Beach
Tapping each section gives you predictions of what the weather will be look moving forward. For example, the app shows an “Extended 15-day Flu Forecast” showing the risk in your area.
The Running section takes advantage of the “GoRun Index” providing information about how weather will affect your run. Each hour (or day) is provided with a number ranking, ranging from 1 to 10. This will give you an idea of whether you should strap on your Nike’s, or just take a break for the day.
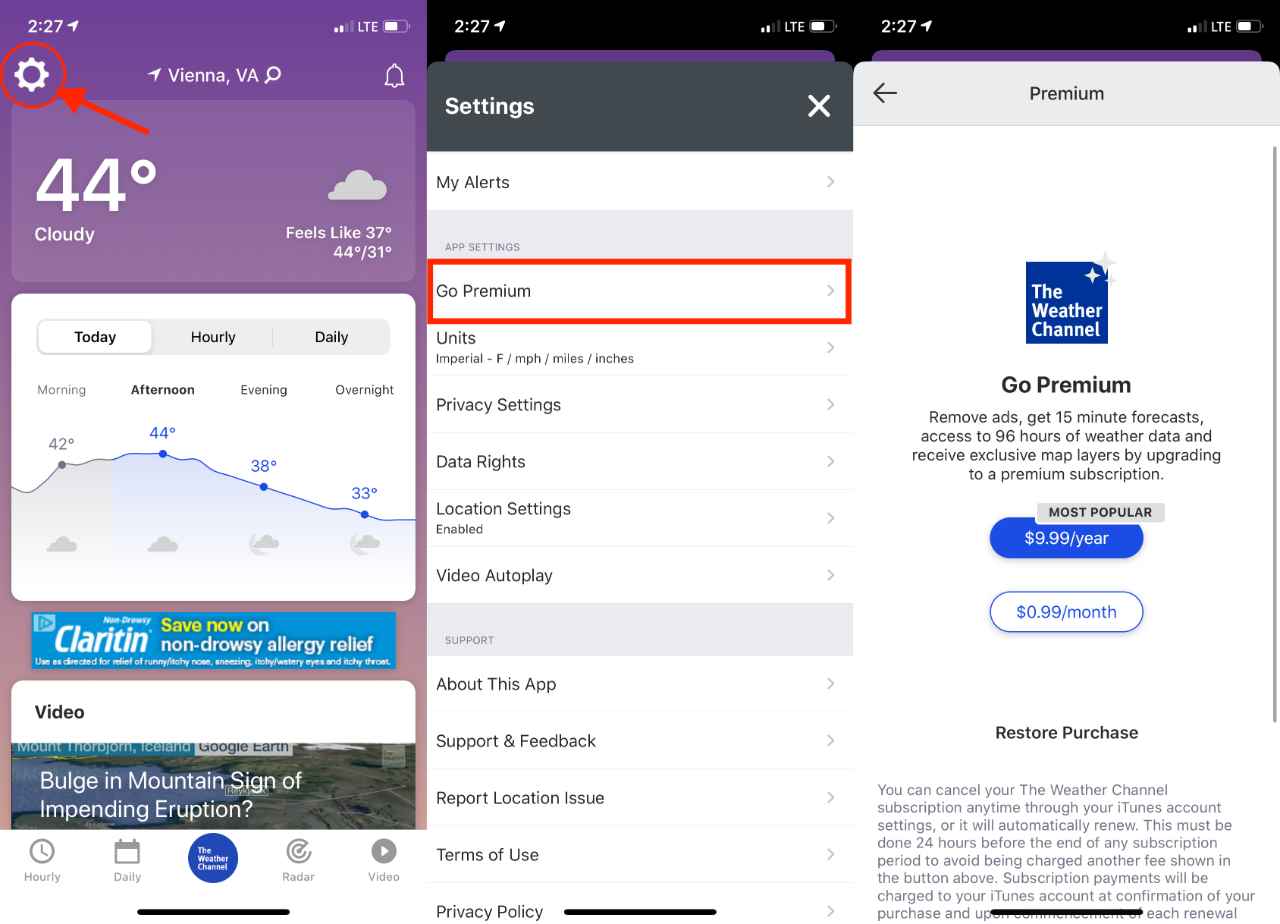
How to “Go Premium” with The Weather Channel
So many apps nowadays are heading to a subscription model, removing the need to purchase up front. The Weather Channel is no different, offering the ability to unlock a few other features not available in the “free” version. Here’s what you get:
Remove ads
Get 15 minute forecasts
Provided access to 96 hours of weather data
Receive exclusive map layers
In the event that all of those features sound like something you want, here’s how to sign up for the Premium subscription:
Open The Weather Channel app on your iPhone or iPad
Tap the Gear icon in the top right-hand corner
Select Go Premium
Choose your subscription
Confirm your choice
If you have already subscribed with your Apple ID previously, there is a Restore Purchase button at the bottom. This will activate the App Store and will restore your subscriptions. As a note, there are two subscriptions available; $0.99 per month or $9.99 per year.
Weather Channel App crashing or freezing?
Regardless of the developer, applications go through growing pains as new updates and features are released. The Weather Channel app is no different, as many users have been reporting issues after recent updates. Here are a few options that you can pursue:
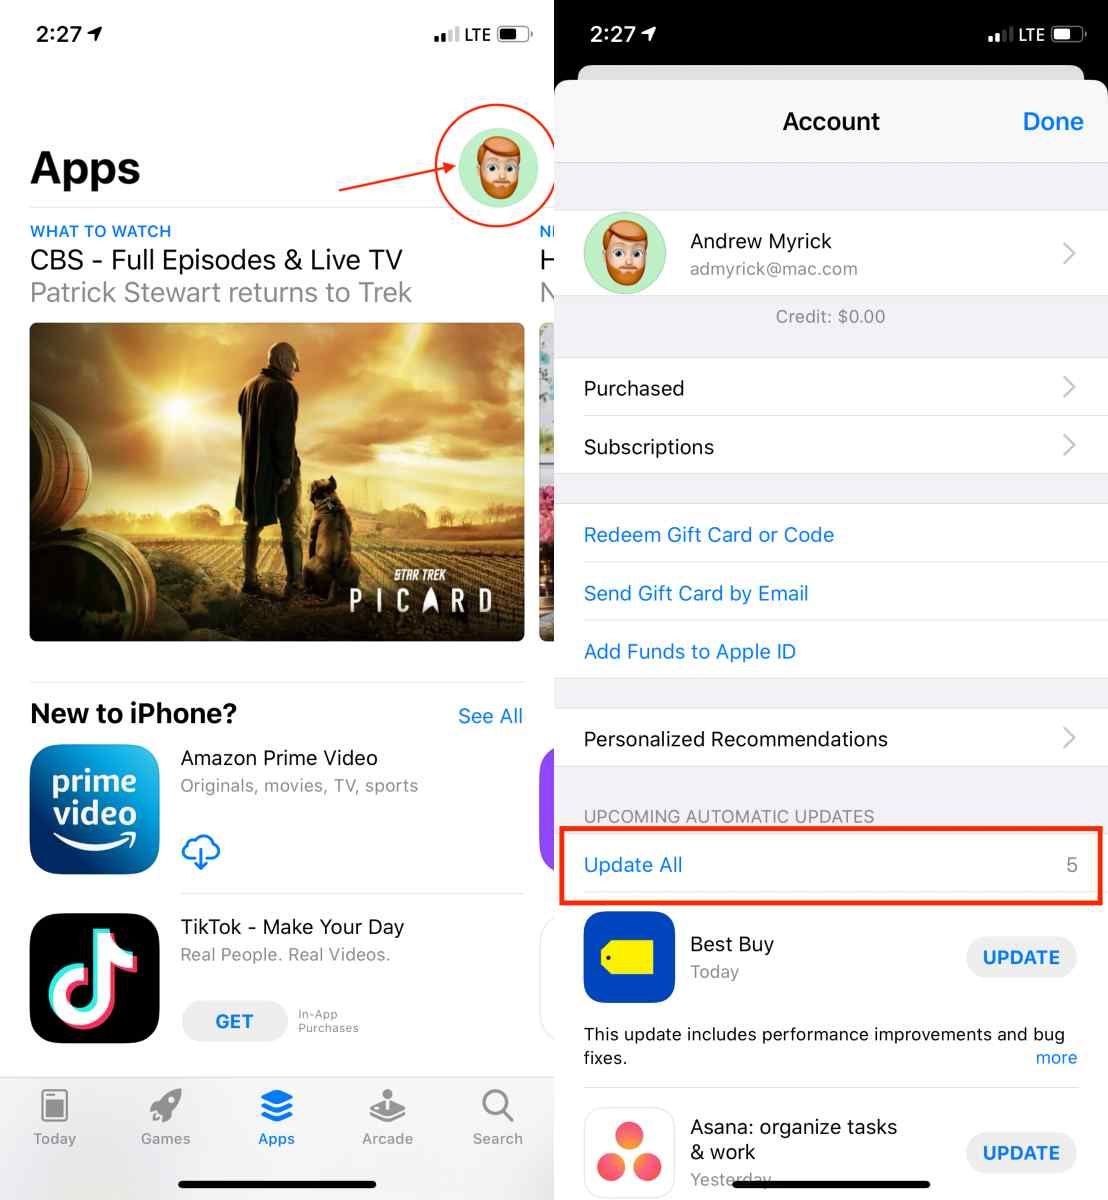
Make sure that your app is updated to the latest version
Open the App Store on your iPhone or iPad
Tap your Apple ID profile image in the top right-hand corner
Scroll down and tap Update All
If an update is available, it will be downloaded automatically
Toggle location access
Open The Weather Channel app on your iPhone or iPad
Tap the Gear icon in the top left-hand corner
Select Location Settings
Scroll down and select The Weather Channel
Tap Location
Select Never
Exit the Weather Channel app
Go back to Settings and toggle your preferred location access
Check and toggle your notification settings
Open The Weather Channel app on your iPhone or iPad
Tap the Gear icon in the top left-hand corner
Select My Alerts
Tap Manage
Go through your list and toggle the pertinent notifications off and then back on.
Close and restart the application
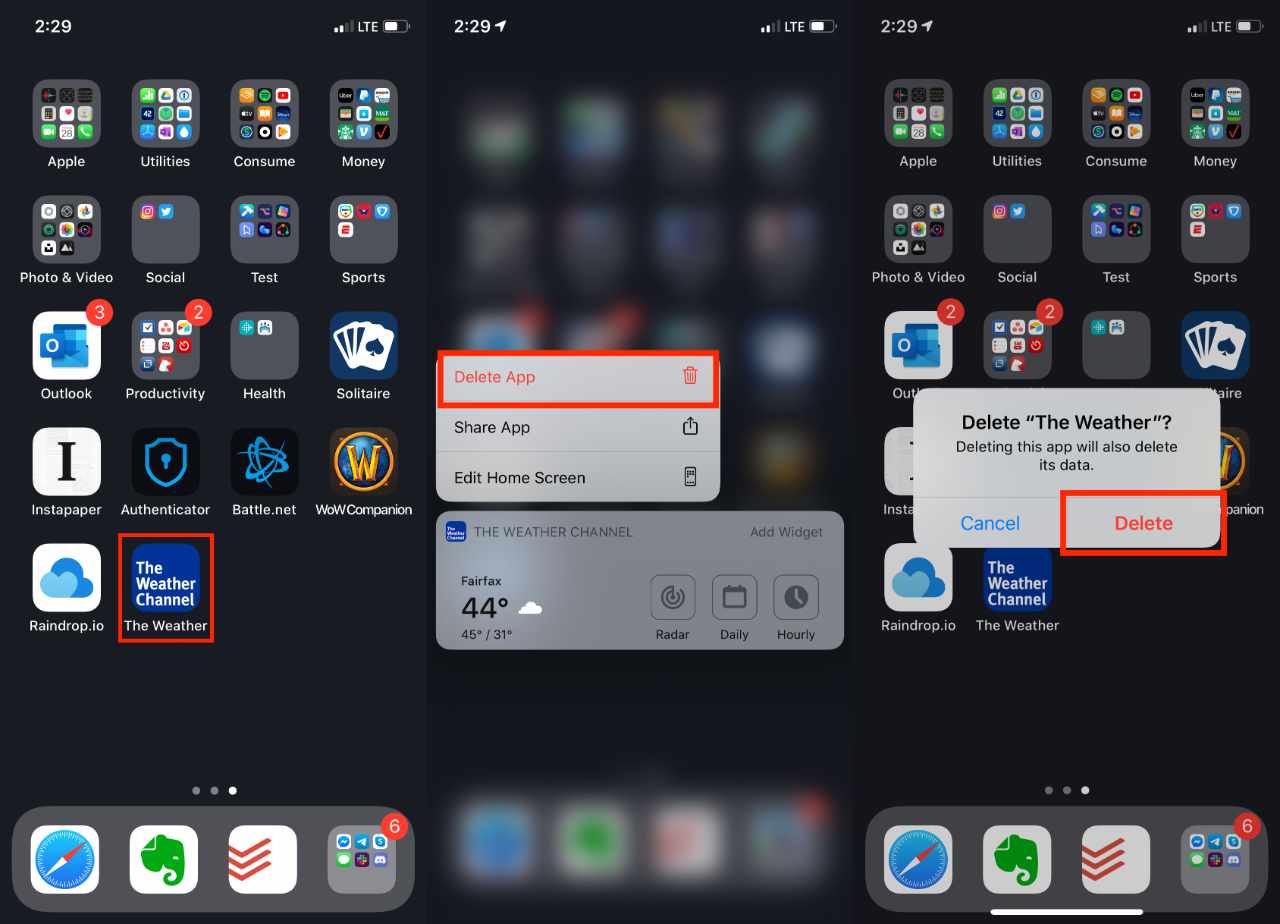
Delete and re-install
Locate The Weather Channel App on your home screen
Press and hold the icon to bring up the menu
Tap Delete App
Press Delete
Open the App Store
Search for The Weather Channel
Re-download the app by tapping the cloud icon
If you are on the latest app version and have tried deleting and re-installing the app but still experiencing issues, you may want to reach out to the app developer. Also check out Apple’s guidance around this issue.
Conclusion
The Weather Channel App combines beauty and brains with a wonderful experience. You can get up-to-the-minute notifications and alerts for all kinds of situations. Plus, you can get an idea to see if there’s a flu “outbreak” in your area to plan accordingly.
If you have any other tips and tricks, or have run into any other issues, let us know! We’ll be sure to help out, or add solutions/tips to the list above! If you don’t use The Weather Channel app, sound off in the comments and let us know your favorite weather app.
Andrew Myrick is a freelance writer based on the East Coast of the US. He enjoys everything to do with technology, including tablets, smartphones, and everything in between. Perhaps his favorite past-time is having a never-ending supply of different keyboards and gaming handhelds that end up collecting more dust than the consoles that are being emulated.
I have paid for the weather app for my tv. When watching, there is a split screen. The large screen has rotating screens of the track on the hurricane, radar, etc. The small screen shows the live coverage with the weather channel meteorologist. Is there any way to change the view so that at least the large screen shows the live coverage?
Thanks,
Terry
Do you have any idea how to manage/turn off the notifications for “Top Stories” (the trending videos, etc. that the Weather Channel pushes out that are only sometimes weather related)?
Why does the ongoing weather button keep turning off on my phone? This would be a great app if I didn’t have to keep turning it back on. Last week it was 40 degrees all week according to my phone. Even though I knew it was in the 70s during the day.
I like the Weather Channel app’s forecasting of when precipitation is expected to begin and end. But I can’t find where it lists what the total amount of precipitation will be. Does it provide that and if so where can I find it?
When I try to manage alerts, I get a message that states that I need to add favorite locations. How do I do that? Can it be done with location setting set to never?
To add a favorite location inside the weather channel app, open the app and tap the location listed at the top. If you want to add a location, type in the name of the location in the search bar.
Scroll down to Recents, and tap on the star icon next to the location’s name–this adds it to your “favorites.”
You can add alerts for favorite location when setting location services to never–you won’t get the most accurate alerts since many alerts relay on this data.
Tap the location that’s currently listed and then add in locations one-by-one in the search bar. Once the app looks up the weather for that location, it’s saved under Recents. To see the weather of a saved Recents location, tap the location name currently listed in the app and choose one of your Recent locations.


I HATE the landscape view on the weather channel app, how do I change my view back to a portrait view.
Turning my iPad does not change view.
I have paid for the weather app for my tv. When watching, there is a split screen. The large screen has rotating screens of the track on the hurricane, radar, etc. The small screen shows the live coverage with the weather channel meteorologist. Is there any way to change the view so that at least the large screen shows the live coverage?
Thanks,
Terry
Why is my radar showing a red line/ section that has the severe tab ans red radar always showing?
How to use my subscription for wether channel on my other Android phone, ?thx
Any idea how to turn off the ‘trending’ video notifications? It’s incredibly annoying.
I set a location but it still won’t let me get alerts. Please advuse
Do you have any idea how to manage/turn off the notifications for “Top Stories” (the trending videos, etc. that the Weather Channel pushes out that are only sometimes weather related)?
Why doesn’t it allow pinch to zoom? The type is really small, and accessibility on my iPad doesn’t work on this app.
There’s a place to change F to C, which apparently only works if you first change English/US to English/UK.
But once you back out of the app, it defaults back to F and to English/US.
Is there a way to get it to save the change from F to C?
Why does the ongoing weather button keep turning off on my phone? This would be a great app if I didn’t have to keep turning it back on. Last week it was 40 degrees all week according to my phone. Even though I knew it was in the 70s during the day.
I like the Weather Channel app’s forecasting of when precipitation is expected to begin and end. But I can’t find where it lists what the total amount of precipitation will be. Does it provide that and if so where can I find it?
I have noticed recently on the 15 minute weather increments some of them are shaded gray. What is the significance with this?
How many locations can I store in the weather channel app? I travel frequently and would like to know the weather in various locations.
When does the Precipitation total reset to zero?
When I try to manage alerts, I get a message that states that I need to add favorite locations. How do I do that? Can it be done with location setting set to never?
Hi Mich,
To add a favorite location inside the weather channel app, open the app and tap the location listed at the top. If you want to add a location, type in the name of the location in the search bar.
Scroll down to Recents, and tap on the star icon next to the location’s name–this adds it to your “favorites.”
You can add alerts for favorite location when setting location services to never–you won’t get the most accurate alerts since many alerts relay on this data.
I have iPhone 11 and bought Weather Channel Premium and there is no bar on the radar map to activate the interactive map. The bar is on my iPad.
Where do you Save your location so that you can get severe weather alerts?
Tap the location that’s currently listed and then add in locations one-by-one in the search bar. Once the app looks up the weather for that location, it’s saved under Recents. To see the weather of a saved Recents location, tap the location name currently listed in the app and choose one of your Recent locations.