I share my iPad Pro (and sometimes my iPhone) with my grandmother, so setting up some accessibility features is mission-critical in our household. Without features like Larger Dynamic Type, Bold Text, Touch Accommodations, and Zoom, my grandma won’t get much use out of that shared iPad. That’s why accessibility matters in my household.
Related:
- These new multitasking and UX features in iPadOS will bump your productivity
- Everything in the new Files app for iPadOS
- How to turn off the iPadOS floating keyboard on your iPad
- iOS 13 could help you curb spam and robocalls automatically
- From speed to battery life, these 7 iOS 13 features will improve your digital ‘quality of life’
- Here’s everything new in Photos and Camera in iOS 13
- 11 things you can do in iOS 13 that you couldn’t do in iOS 12
The first thing I do after updating my iPad’s iOS (or in this case, iPadOS) is visit the usual Settings App > General > Accessibility, just to make sure all my grandma’s settings carried over.
But after updating to iPadOS and iOS 13, I followed that usual routine, only to discover those accessibility settings weren’t there!
The good news is that it was easy to find them–they’ve been relocated (moving on up) to the main Settings Menu. And I think this is just awesome!
So, to cut to the chase, to find your accessibility settings in iOS 13 or iPadOS, just go to Settings > Accessibility! 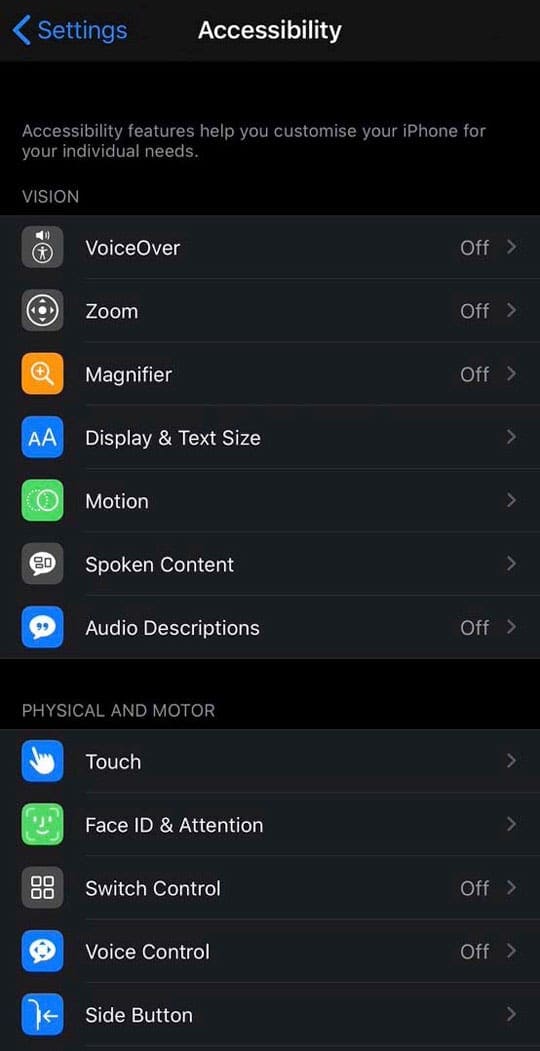
There you find all the common accessibility features, set-up in a new menu with feature specific icons. Plus, Apple gives us some excellent accessibility additions for iPadOS and iOS 13.
So let’s get to it!
Contents
- What’s new in Accessibility with iOS 13?
- Game changer: mouse support comes to the iPad and iPhone
- Where is the auto-answer calls feature in iOS 13?
- iPadOS and iOS 13 Voice Control gives everyone a seat at the table
- iOS and iPadOS 13 Voice Control allows users to:
- How to set-up and turn on Voice Control with iPadOS and iOS 13
- How to turn off voice control?
- How to create commands and speak to iPadOS and iOS voice control
- There’s a whole new bunch of voice control commands available in iOS13 and iPadOS!
- Check out Apple’s video on how iOS13 and iPadOS improve accessibility with the new voice control!
- iOS and iPadOS Accessibility is good for everyone!
What’s new in Accessibility with iOS 13?
In short, A LOT!
Here’s the quick rundown of the top new features in accessibility that comes with iOS 13 and iPadOS 13
- New accessibility menu, submenus, and icons
- Expanded voice control features
- Support for pointing devices, like a mouse (wireless and wired included!)
- Haptic feedback for Face ID where the device vibrates slightly when your iPhone unlocks
- A toggle to disable Auto-Play Video Previews
- New options to Differentiate Without Color for folks with color-blindness
- New prompt screens for accessibility features when you first set-up an Apple device from day one
Game changer: mouse support comes to the iPad and iPhone
Hidden inside Accessibility’s new Touch menu is an AssistiveTouch feature called Pointer Devices which allows iPhone and iPad users to connect both wireless and hard-wired mice to their devices!
That includes trackpads like Apple’s Magic Trackpad and may even include your old USB wired mouse and your more recent Bluetooth mice. For example, I connected an old Dell USB Mouse to my iPad Pro 11 inch with no problem!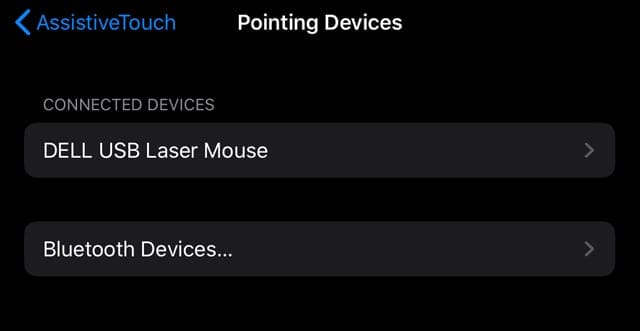
Say what?
Yup, we finally get mouse support in iOS13 and iPadOS. And yes, while Apple designed this option for folks who have trouble touching their screens, it is a welcome feature for everyone.
We think this is a game-changer for folks who use apps like Excel on their iPads!
How to connect a mouse to your iPad or iPhone using iPadOS or iOS 13 and above
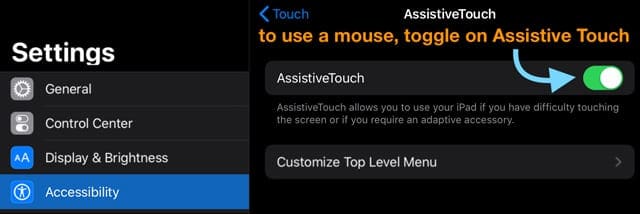
- Go to Settings > Accessibility
- Choose Touch
- Tap AssistiveTouch
- Toggle on AssistiveTouch

- Scroll down to the Pointer Devices subheading
- Tap Devices
- To add a USB wired mouse, connect the mouse to your iPad or iPhone, and if supported, it shows up
- To add a Bluetooth mouse or trackpad, choose Bluetooth Devices
- Select your mouse or trackpad
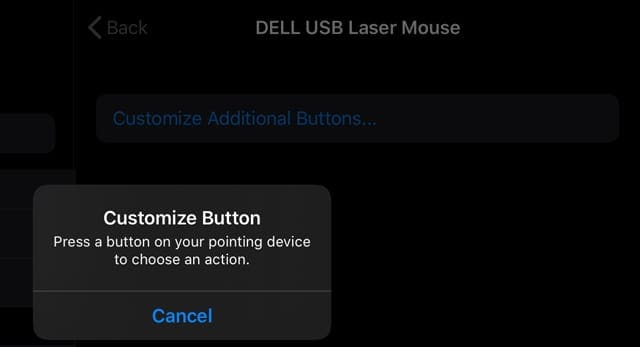
- Once connected, a message appears to press one of your mouse’s buttons to your first action

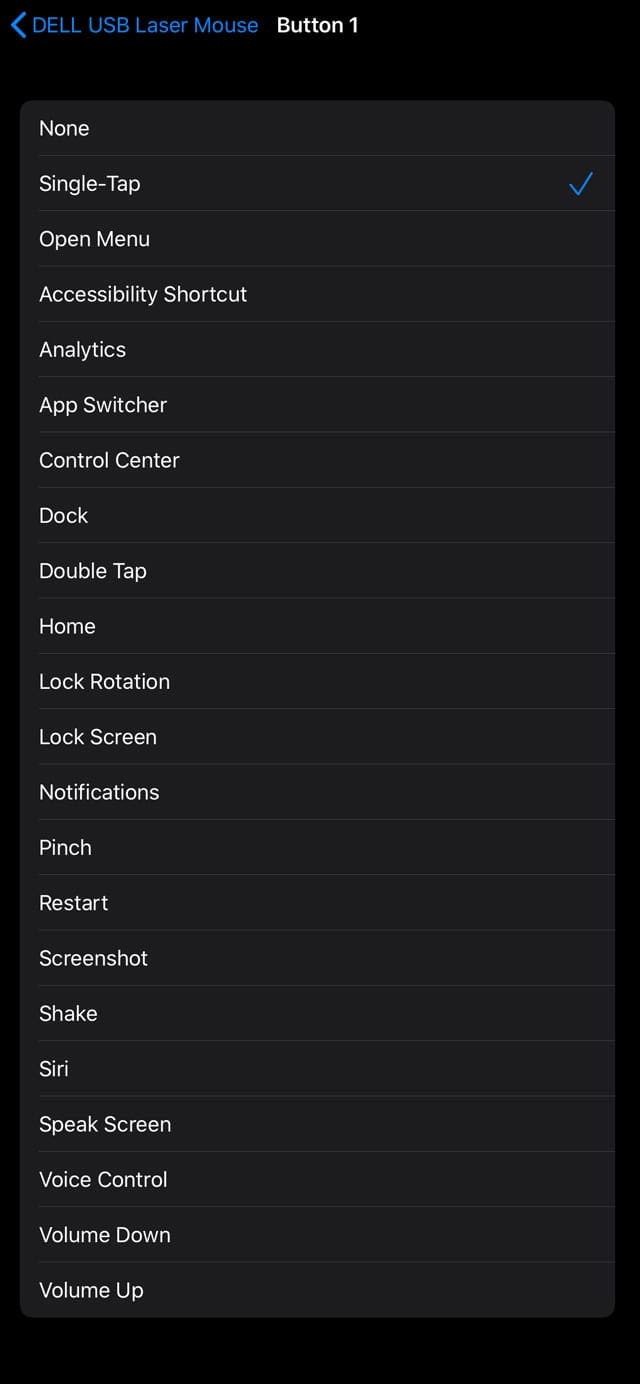
- Choose button 1’s action from the list of available actions–this list features the same actions as AssistiveTouch

- Tap Customize Additional Buttons to add additional actions–each action requires another button. You cannot have multiple actions assigned to a single mouse button
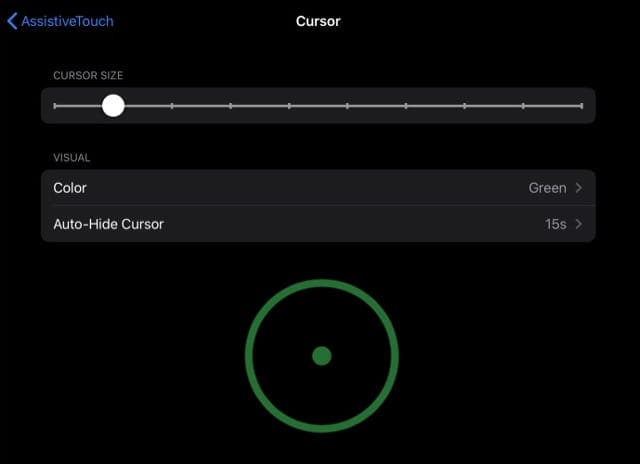
- Go to Settings > Accessibility > Touch > Assistive Touch > Pointer Style to customize the pointer’s appearance for cursor size, color, and how long the cursor remains on screen before it hides due to inactivity

It’s critical you pair your mouse or trackpad in Accessibility Settings and NOT using in the Bluetooth settings.
The ins and outs of iPadOS and iOS 13 mouse support
It’s not a perfect match to your Mac’s or PC’s mouse, and it’s certainly not pretty. Instead of a helpful arrowed pointer or cursor, the iOS mouse pointer shows up as a big target-like circle.
Think of your iPad or iPhone’s mouse as a finger!
iPadOS and iOS13 mouse support simulates your finger and your touch, so any app that you tap with your finger will work with a mouse, trackpad, or another pointing device.
Selecting text is more than a little awkward!
Instead of a simple drag, you need to double-click your mouse (and have single-tap set up as the button’s action) and then drag it or click it to select the text you want.
I had a hard time getting this to work! 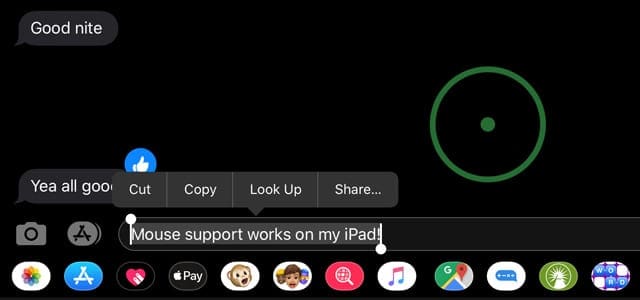
Need to scroll?
If your mouse has a scroll wheel, awesome! Scroll wheels work really well with iPadOS.
But if your mouse doesn’t have a scroll wheel? Bad news!
To scroll, you need to set one of your mouse’s buttons to single-tap and then press and hold that mouse button to scroll on-screen.
So, right now scrolling on the iPadOS is click & drag, which isn’t ideal!
Quick shortcut to Home!
When you use iPadOS with a mouse, just click on one of the bottom corners of your iPad with your mouse to get to your home screen.
Mouse support is way better with a keyboard!
And for iPad users, when you combine a mouse AND a keyboard, you get even more ways to navigate using keyboard shortcuts!
And yes, you can still touch your screen AND use a mouse or trackpad!
For me, this didn’t work at first. But after a restart, it worked!
Trouble connecting Apple’s Magic Mouse or Trackpad to iPad?
If you are not able to successfully pair your Magic Mouse or Trackpad to iPadOS, we have some tips for you!
- Make sure you toggle AssitiveTouch on and pair using Accessibility > AssistiveTouch > Pointing Devices
- If it asks for a PIN code, enter 0000 to pair your magic mouse or trackpad
- Remove and then replace your mouse’s or trackpad’s batteries to force it into discovery mode. Once the batteries are removed and replaced, restart your iPad
- If your mouse or trackpad has a lightning port, connect a Lightning to USB Cable or a USB-C to Lightning Cable to the Lightning port on the mouse/trackpad and connect the other end to your iPad to help pair to two devices
Where is the auto-answer calls feature in iOS 13?
This is another area where you notice changes. If you use the auto-answer call feature and the answer calls through the speaker automatically, you notice that the location of these settings has been changed in iOS 13 when compared with iOS 12.
In iOS 12, the auto-answer call was available in General > Accessibility > Call Audio Routing.
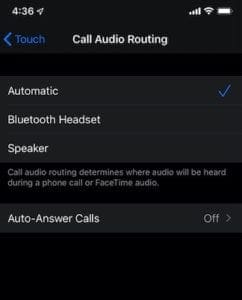
In iOS 13, this moves to Settings > Accessibility > Touch. The feature to auto-answer alls is located at the bottom of the screen when you scroll down.
iPadOS and iOS 13 Voice Control gives everyone a seat at the table 
Okay, voice control has been around for quite a while. It allows you to use voice commands to make calls and control music playback, without asking Siri. Best of all, voice control works even when you don’t have an internet connection.
For years, voice control was a limited accessibility feature–used by some, but not by many. And it had a lot of limitations and disadvantages–in particular, voice commands often weren’t recognized and quite a few folks had trouble getting voice control to do much of anything.
But no more! With the introduction of iOS and iPadOS 13 AND macOS Catalina, a revamped Voice Control helps users navigate and control their devices without touching the screen and even without an internet connection or Siri. 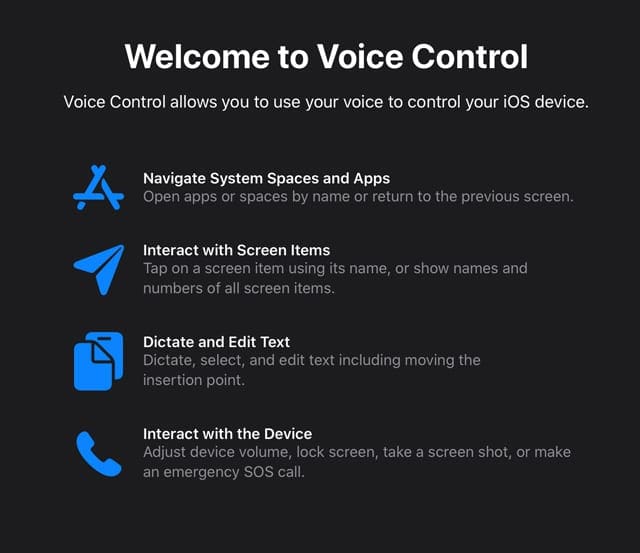
iOS and iPadOS 13 Voice Control allows users to:
- Wake up your device and put it to sleep
- Open and interact with screen items, apps, sharing option, AND system settings
- Return to previous screens and apps
- Control and navigate the entire iOS and iPadOS using only the sound of a voice
- Utilize rich text editing tools, such as dictating and editing words on-screen, including moving the cursor to different points
- Change the volume, adjust lock screen settings, take screenshots, or make emergency calls
How to set-up and turn on Voice Control with iPadOS and iOS 13
- Go to Settings
- Tap Accessibility
- Under Physical and Motor subheading, choose Voice Control
- Tap Set Up Voice Control, if needed

Once you set-up voice control, you don’t need to revisit these settings again. Just as Siri to “turn on voice control,” and you are on your way to controlling your device with just your voice. Nice!
How to turn off voice control?
To turn off voice control, you can ask Siri to turn off voice control OR with voice control on, you can just use the voice command “turn off voice control.”
How to create commands and speak to iPadOS and iOS voice control
There’s a difference between how we speak to Siri and how we speak using voice control!
With Siri, we just say a command, like “text Sonya.”
But with voice control, we need to follow a step-by-step procedure, using voice commands for the things that usually require a touch.
So, for example, to text Sonya using voice control, we use the following commands:
- Say “open Messages.”

- Once the Messages app populates, say, “tap Sonya.”

- To voice type a message, say, “meet me at five instead of four this afternoon.”

There’s a whole new bunch of voice control commands available in iOS13 and iPadOS! 
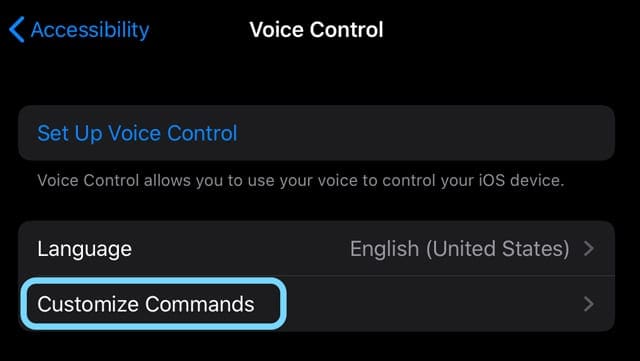
Find and learn about them in Settings > Accessibility > Voice Control > Customize Commands.
What’s even more awesome is that you can create your own unique commands using the function Create New Command–so everything is literally possible! 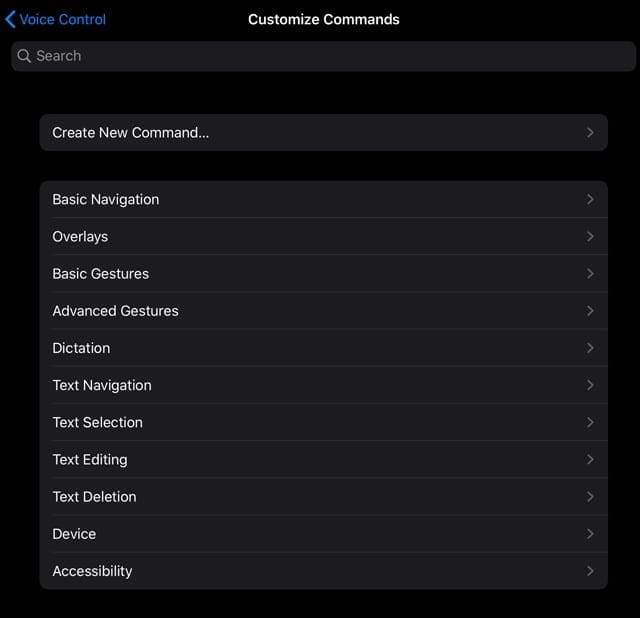
Check out Apple’s video on how iOS13 and iPadOS improve accessibility with the new voice control!
https://youtu.be/v72nu602WXU
iOS and iPadOS Accessibility is good for everyone!
Accessibility features can help us all if we take the time to see what’s offered.
Some of us want bolder or larger text, limit the apps our children spend time on, need to increase screen contrast or adjust for color blindness, or simply want to use a mouse with our device. There are so many options in our device’s accessibility, it’s mind boggling!
Apple continues to impress with its commitment to making its device easier to use, for all types of people.
So, what’s your favorite accessibility feature? What can’t you live without?
Let us know in the comments!

For most of her professional life, Amanda Elizabeth (Liz for short) trained all sorts of folks on how to use media as a tool to tell their own unique stories. She knows a thing or two about teaching others and creating how-to guides!
Her clients include Edutopia, Scribe Video Center, Third Path Institute, Bracket, The Philadelphia Museum of Art, and the Big Picture Alliance.
Elizabeth received her Master of Fine Arts degree in media making from Temple University, where she also taught undergrads as an adjunct faculty member in their department of Film and Media Arts.




im being hacked through apples create commands accessabilty features and nobody at apple can seem to help me.
Thanks for assistive touch
Voiceover is vital to me.
Braille access is also important.
Being able to read with a Braille display as well as to input Braille both with a display and with Braille Screen Input are necessary for my profession.
Not only does using Braille help me communicate professionally, but it also helps me to convey my message with the tone I want.
Reading something is a lot different than listening to it. I like to experience what my recipient is going to experience when he/she reads what I have written.
I hope this will be fixed in IOS13.1
Thank you.
Hi,
I just want to know how to disable 3 fingers gesture on ios 13
because i can not play games with it.
HI Mustafa,
Go to Settings > general > multitasking & dock and toggle off Gestures.
This turns all gestures off–there isn’t a current way to disable just one type of gesture.
Liz
Has anyone found that Mouse Support disables or bugs out the Smart Keyboard or external Bluetooth keyboard?
I was hoping to be able to use the ipad with both mouse and keyboard, but it seems that you can only use the onscreen keyboard with Assistive touch mouse support.
Does anyone have both working?
If so what settings are necessary? Thanks!
Hi David,
This should work!
Are you using an Apple smart keyboard or a BT keyboard?
Some folks report problems with connecting the BT keyboard when the battery charge is low–try replacing or recharging the battery on the keyboard and see if this makes a difference.
Liz
I have the same problem.
I want to use both mouse and keyboard, but (half) the keyboard controls the cursor (and some other stuff)…
Is there a way to disable keyboard from the assistive touch?
I am using the apple smart keyboard.
Thanks
HI Michael,
Sorry to hear you have issues with the Apple Smart keyboard when using a mouse.
It should work–but there are still a lot of bugs in the software. Since iPadOS is still in beta testing, we suggest you submit a bug report using the Feedback app that comes with any beta version.
We’re also having trouble getting both a keyboard and mouse to work properly on our iPad Pro (11 inches)–sometimes it works and other times it doesn’t with no rhyme or reason!
We’re continually testing and if we discover anything new, we’ll let you know and update this comment and article.
Cheers,
Liz
Thanks, I thought I was the only one having this issue.
When using the BT mouse and BT keyboard at the same time half the keys on the right do not work.
I reported the issue through feedback, and Apple closed the case saying it works as designed.
I hope they fix this because it defeats the purpose.