If your iPhone keeps returning to Recovery Assistant after an update, losing your photos may be a bigger worry than the update itself. Dr.Fone System Repair has a Standard Repair mode for iOS software problems that aims to keep your data. But first, check which recovery screen you’re seeing so you can choose the right fix.
Start with Wi-Fi if Recovery Assistant is still running. If it keeps returning, try updating iOS from a computer. Choose Update before Restore. Update tries to keep your data, while Restore erases the iPhone.
Look at the screen before pressing anything. The recovery screens below may look related, but the buttons and next steps are different.
Recovery Assistant screen with Continue: Your iPhone is trying to fix a startup problem locally. Check your Wi-Fi connection and let the recovery process finish.
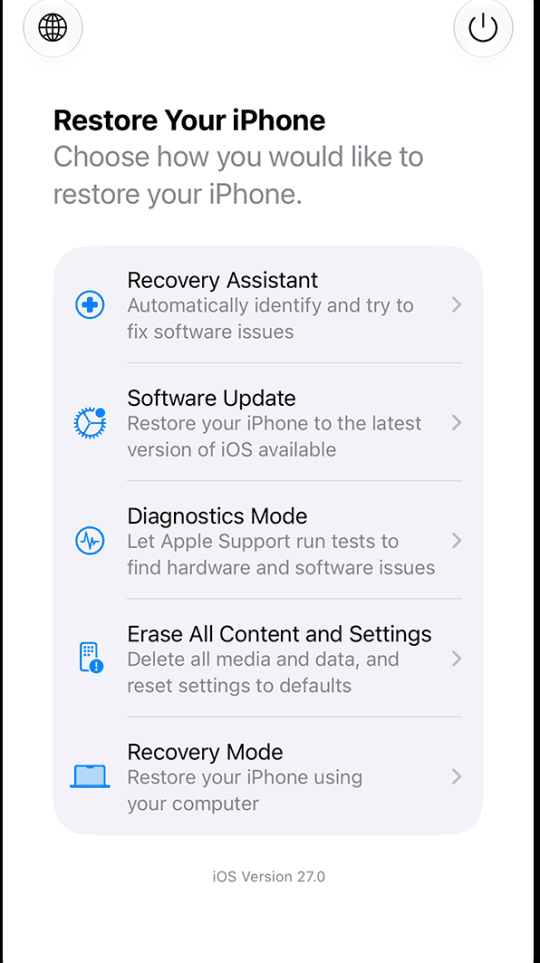
Restore Your iPhone menu with Software Update: This is the iOS Recovery menu on iOS 27. Follow the nearby-device update steps using a secondary Apple device.
Cable pointing to a computer, or Connect to computer: Your device is in Computer Recovery Mode. Connect it to a Mac or Windows PC to run Finder or Apple Devices.
If you see Continue under a Recovery Assistant message, start with the Wi-Fi checks below. If you see a menu headed Restore Your iPhone, look for the options on that screen. A cable pointing to a computer means it’s time to connect your iPhone to a Mac or PC.
When iOS 27 Offers a Nearby-Device Software Update
Some iPhones running iOS 27 show a Restore Your iPhone menu with a Software Update choice. You may be able to use a second iPhone or iPad to update the phone that’s having trouble. This is different from the Recovery Assistant screen with the Continue button.
If Software Update appears, select it, enter your passcode if asked, and follow the on-screen instructions. Have another unlocked, up-to-date iPhone or iPad nearby and connected to Wi-Fi. The option depends on the devices involved. If you don’t see it, move on to the instructions for the screen you do have.
What to Try When Recovery Assistant Fails
Recovery Assistant can fix some startup problems without a computer. What matters is whether it can connect to Wi-Fi, whether the recovery is still running, and what happens when it finishes. If updates stall early in the process, reviewing steps for an iOS update stuck on estimating time remaining can help you tell normal delays apart from genuine software freezes.
Check Wi-Fi and Let an Active Recovery Finish
Tap Continue: If the phone starts downloading or working on recovery, give it several minutes. A screen that hasn’t changed for a short time isn’t necessarily stuck.
Check your Wi-Fi network: Recovery Assistant needs Wi-Fi and doesn’t work with networks that ask you to sign in through a browser or use 802.1X authentication. This can affect hotel, school, and workplace networks. Use a regular home Wi-Fi network if you can.
Let recovery finish: Keep the phone connected to power when practical. Avoid forcing a restart while it is actively downloading or repairing. If you’re asked to share diagnostic data, you can accept or decline.
Check the phone after it restarts: If it starts normally, open Settings > General > Software Update. Install any remaining update when it’s safe to do so, then back up your iPhone.
If Recovery Assistant can’t connect, try another suitable Wi-Fi network. If it finishes but comes back to the same screen, move on to the computer steps instead of running it over and over.
What to Do If Recovery Assistant Freezes or Keeps Returning
Match what you see on your screen to the right action:
Can’t connect to Wi-Fi: Switch to a standard home Wi-Fi network without a browser login page.
Recovery is still making progress: Leave the phone plugged in and let recovery finish uninterrupted.
Screen is frozen, and no recovery is active: Perform a manual force restart using your model’s button sequence.
Recovery finishes but starts again: Stop looping and update iOS from a Mac or Windows computer.
Connect to computer is already on screen: Plug your iPhone into a computer and open Finder or Apple Devices.
Only force-restart the phone when it has stopped responding, and no download or repair appears to be active. On iPhone 8 and later, including iPhone SE (2nd generation or later), quickly press and release Volume Up, then Volume Down.
Hold Side until the Apple logo appears. On iPhone 7 or 7 Plus, hold Side and Volume Down together. On iPhone 6s or earlier, including iPhone SE (1st generation), hold Home and Side/Top together. Release when the Apple logo appears.
A force restart won’t reinstall iOS. If the same screen keeps returning, use a computer instead of repeating the button sequence.
Use a Computer to Update Your iPhone Without Erasing It
If Recovery Assistant keeps coming back, try updating the iPhone with a computer. You’ll need a working USB cable and a Mac or Windows PC with up-to-date software. Use Finder on a current Mac or Apple Devices on Windows. Older Macs may use iTunes.
Enter Computer Recovery Mode
Connect your iPhone to the computer: Plug in your cable and open Finder or Apple Devices. If the phone already shows Connect to Computer, leave it on that screen and continue.
Enter Recovery Mode: If the phone doesn’t already show the cable-and-computer screen, keep it connected and use the buttons for your model:
iPhone 8 and later (including iPhone SE 2nd gen or later): Press and release Volume Up, then Volume Down. Keep holding Side past the Apple logo until Connect to computer appears.
iPhone 7 or 7 Plus: Hold Side (or Top) and Volume Down together until Connect to computer appears.
iPhone 6s or earlier (including iPhone SE 1st gen): Hold Home and Side (or Top) together until Connect to Computer appears.
Select your iPhone in Finder or Apple Devices: A message should offer Update and Restore. If the phone isn’t detected, try a different USB port or cable and check that the computer software is up to date.
Choose Update Before Restore
Click Update, not Restore: This attempts to reinstall iOS while keeping your photos, messages, and other data. Leave the iPhone connected while the update runs, even if it restarts.
Check the result: When the phone starts, confirm that your important files are still there. Make a fresh backup before trying anything else.
Don’t confuse Update with Restore. Restore erases the iPhone. If you haven’t backed up your photos or messages, stop before clicking that button. Once your phone boots back up, it is also worth checking for secondary glitches like CarPlay not working after an iOS update so you know all system connections are healthy.
What If the Download Stops or Update Fails?
If the download takes longer than 15 minutes and your iPhone leaves Recovery Mode, let the computer finish downloading. Then put the iPhone back into Recovery Mode and continue the update.
If you get an error, write down the exact code. Update Finder or Apple Devices, then check the cable and USB port. A different Apple-certified cable or port may help with connection errors. If the same error returns, stop repeating the attempt and get help identifying the cause.
If Update finishes but the phone still won’t start, what you do next depends on whether you have a backup. Before selecting Restore, compare the choices below.
What to Try Before Choosing an Erasing Restore
If your iPhone holds photos or messages that you haven’t backed up, the next button matters. Here is how each recovery path affects your stored files:
Update in Finder or Apple Devices: Tries to reinstall iOS while keeping your personal files intact. Always try this method first.
Dr.Fone Standard Repair: Designed to preserve personal files while repairing deeper iOS software glitches when computer updates fail.
Restore in Finder or Apple Devices: Permanently erases your iPhone. Only choose this if you have a reliable backup or accept data loss.
Apple support or repair: Best when software steps fail repeatedly or hardware damage is suspected; data recovery depends on the underlying fault.
Check whether any important photos or files are already in iCloud or another syncing service. That can save individual items, but it isn’t the same as a complete iPhone backup. Don’t assume an erase can be undone.
Try Dr.Fone Standard Repair Before Choosing Restore
If the iPhone still won’t start after the update, Dr.Fone System Repair (iOS) can help fix software problems such as boot loops, failed updates, and iPhones stuck on a recovery screen. Its Standard Repair mode is designed to keep your photos and other personal data, so it’s worth trying before you erase the phone.
Dr.Fone is available for Windows and Mac. Check that it works with your iPhone model and iOS version, and review the price before starting. Choose Standard Repair rather than Advanced Repair if you want to avoid an erase. Standard Repair is designed to preserve data, although no repair can guarantee the result. Hardware problems need a different fix.
Open Dr.Fone: Go to Toolbox > System Repair. Connect the iPhone, then choose iPhone > iOS Repair. The Mac layout may look a little different.
Choose Standard Repair: Select Standard Repair, as Advanced Repair is the option that erases data.
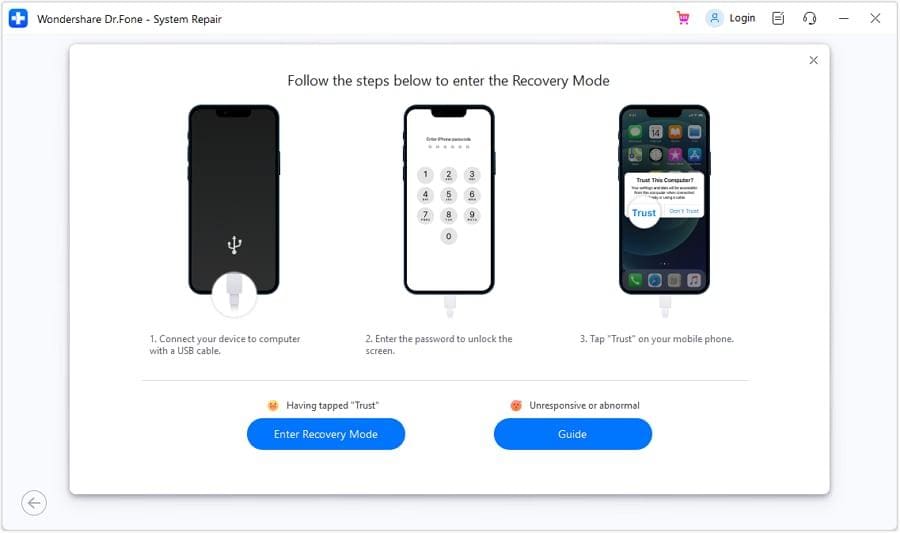
Enter Recovery Mode: Follow the Recovery Mode instructions if Dr.Fone asks you to enter it. Use the button sequence for your iPhone, or select Enter Recovery Mode if prompted. If the phone is already in Recovery Mode, continue from that screen.
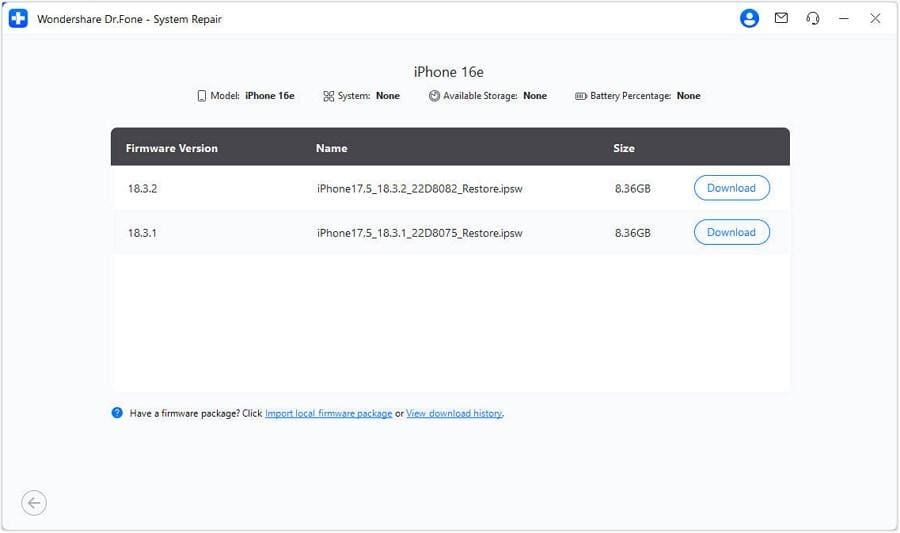
Download Firmware: Check the suggested firmware for your iPhone, then click Download. Let Dr.Fone finish downloading and verifying the file.
Run the Repair: Click Repair Now once the download has been checked. Keep the phone connected until Dr.Fone finishes. When you see Done, check whether your iPhone starts and your files are still there.
If Standard Repair can’t finish, don’t switch straight to Advanced Repair unless you’re prepared to erase the phone. You can ask Apple about other options first.
When Apple Restore May Be Necessary
If Update and the other steps haven’t fixed the problem, Restore may be necessary. In Finder or Apple Devices, put the iPhone in Recovery Mode and choose Restore. Wait for iOS to reinstall, then set the phone up again. If you have a backup, you can restore it during setup.
If you don’t have a backup, check your options with Apple or an authorized repair provider before erasing the phone. They may be able to identify a hardware issue, although they can’t promise to recover your files.
When to Stop Troubleshooting and Contact Apple
Contact Apple Support or an authorized repair provider if the iPhone still won’t update, the computer can’t recognize it after you try another cable and port, or the buttons are damaged. Repeated failures can point to a problem that can’t be fixed with more software attempts.
Tell them which recovery screen you see, which update failed, and any error code shown on the computer. If you don’t have a backup, say so before agreeing to Restore. Once your device is running smoothly again, you can also check for post-update quirks like GPS issues on iPhone after the latest iOS upgrade to confirm all sensors work properly.
Conclusion
When Recovery Assistant keeps failing, start with the screen in front of you. Check Wi-Fi and let any active recovery finish. If the phone comes back to the same screen, try Update from a computer. Before using Restore, consider what will happen to your files. If the iPhone still won’t start or you suspect damaged hardware, get help from Apple.
AppleToolBox is tech resource website that delivers informative content related to everything Apple. We’re one of the leading voices in providing insightful and authoritative how-tos, news, reviews and tips to Apple aficionados worldwide.














Write a Comment