iOS is arguably the greatest mobile operating system on the planet today. There are so many different ways for you to take advantage of the software, or use it just as it is without issue.
However, there are some nuances about the software which can cause frustrations, mainly in the notifications department. Recently, more users have been finding a bug which will not let badges be cleared from the Messages app.
It seems that this has been primarily affecting those responding to messages on an iPad. Luckily, there are a few different steps you can take to get these notification badges to disappear.
Turn off ‘Messages’ Notifications
The first, and easiest, way to try and get Messages notifications to go away is by simply toggling them. Here are the steps in order to do so:
Open Settings
Select Notifications
Scroll down and tap Messages
Toggle Allow Notifications to “Off”
While the badge is the problem, toggling all of the notifications off should be of some assistance. Once this has been done, return to your home screen, and restart your device.
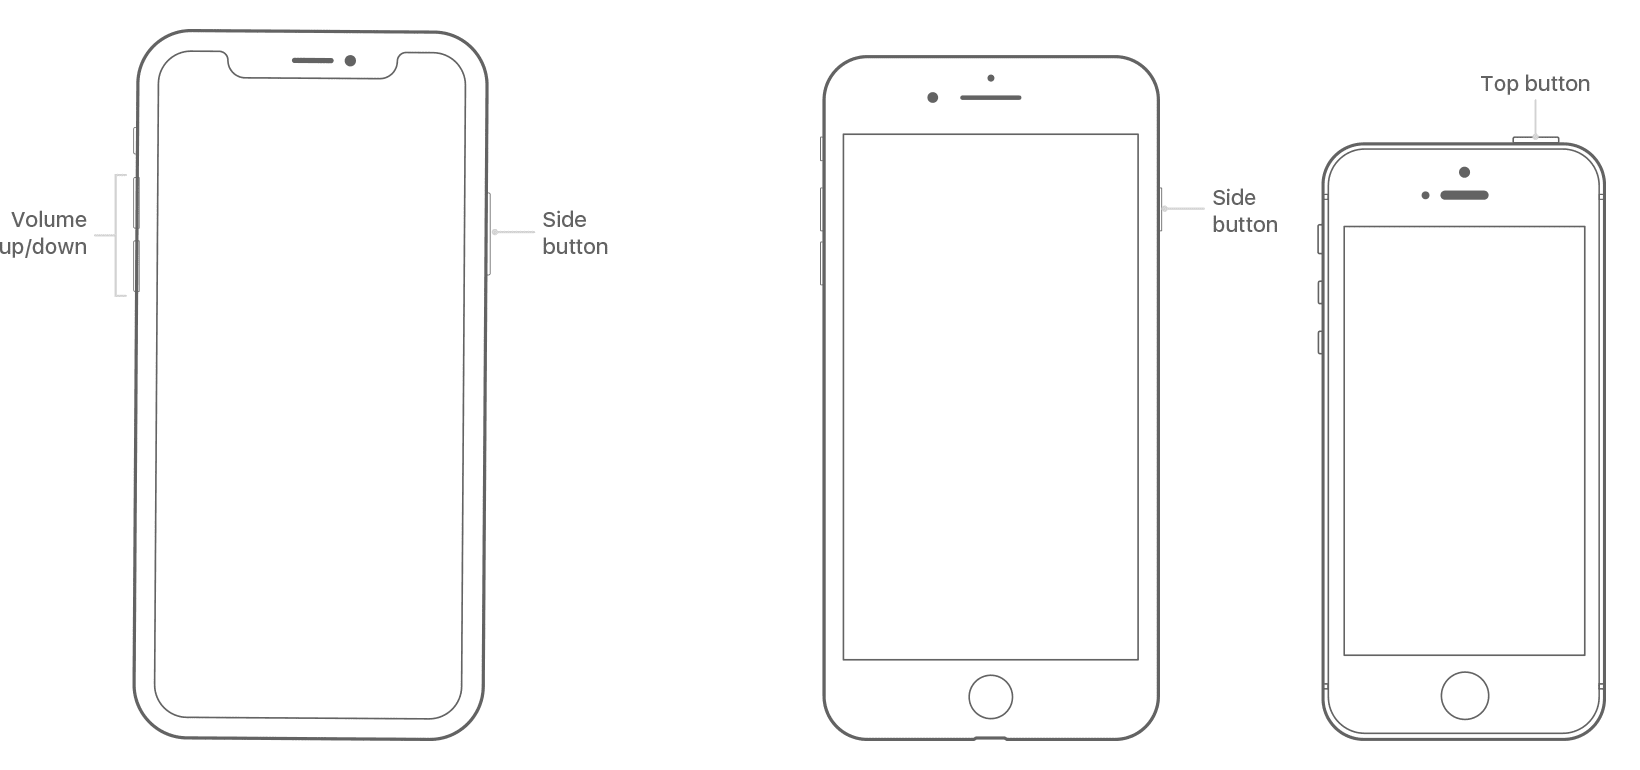
In the case of the iPad or iPhone 8/older, you can restart it by following these steps:
Press and hold the Top (or Side) button until the slider appears.
Drag the slider to turn your device completely off.*
After the device turns off, press and hold the Top (or Side) button again until you see the Apple logo.
If you are having issues with your iPhone X, here is how you can restart it:
Press and hold the Side button and either volume button until the slider appears.
Drag the slider to turn your iPhone X completely off.*
After your iPhone X turns off, press and hold the Side button again until you see the Apple logo.
After your device reboots, simply follow the above instructions in reverse to re-enable notifications in Messages.
Check for updates
The next easiest way for you to try and get your iPad or iPhone back in working order is to check for an update. Apple is notorious for releasing “.1” updates, which fix some issues but can cause others.
In that case, you will want to double check the Software Update section in Settings. Here are the steps:
Open Settings
Select General
Tap Software Update
If there is an update available, you will want to go ahead and download and install the update. From there, you will have to wait until the process is complete, and then see if there are issues with Messages.
Backup and Restore
So you’ve turned off notifications, updated your device, and are still having issues with “phantom badges” appearing. The last step you will need to take is perhaps the most extensive as you will need to restore your device.
Now, with the help of iCloud and iTunes, this can be done pretty easily and is a painless process. But before simply restoring your iPad or iPhone, you will want to perform a backup.
Backup
Open Settings
Tap your Apple ID at the top
Select your iPhone from the list of devices
Tap iCloud Backup
Tap Back Up Now
Turn off ‘Find my iPhone/iPad’
The next step before completing a factory reset is to turn off ‘Find My iPhone’. If you do not turn this off then you will not be able to reset your phone back to factory settings.
Open Settings
Tap your Apple ID at the top
Select your iPhone from the list of devices
Tap Find My iPhone
Toggle Off
Enter Apple ID password
Wipe the slate clean
Now that you have a brand new backup and have turned off Find My iPhone, you can now factory reset your iPhone to its original settings. This will completely wipe everything off of your iPhone and hopefully fix any bugs.
Open Settings
Select General
Scroll down and tap Reset
Tap Erase All Content and Settings
Confirm
It’s important to note that if there is a new software update available, your iPhone will likely download and install it. This is to keep your phone in tip-top shape with the latest version of iOS on board.
Restore from the backup
Whenever you either fire up a device for the first time or are restoring, you are given the option to choose a backup. This is the method that we will want to select so that you don’t lose any of your saved information from before.
It’s pretty simple, as you will need to follow the prompts, select the most recent backup, and let your iPad or iPhone do the rest. After this has been completed, everything will appear on your device as it was before.
If everything goes according to plan, then the Messages app will no longer give you phantom notification badges. Sound off in the comments below and let us know if these steps worked for you!
Andrew Myrick is a freelance writer based on the East Coast of the US. He enjoys everything to do with technology, including tablets, smartphones, and everything in between. Perhaps his favorite past-time is having a never-ending supply of different keyboards and gaming handhelds that end up collecting more dust than the consoles that are being emulated.
All good until I had to press home button to open. My home button doesn’t work, I had the home button on the screen before. Now it’s gone, and I can’t restore!


Well it worked — until I turned notifications back on, and it came back.
All good until I had to press home button to open. My home button doesn’t work, I had the home button on the screen before. Now it’s gone, and I can’t restore!