Backing up your iPhone and other iDevices is critical to maintaining the health of your iPhone–and your peace of mind. Knowing that your information is available, even in worst case scenarios is why we recommend backing up, preferably following our 2X2 rule (2 cloud and 2 local backups.) Backing up regularly makes restoring your iPhone a breeze!
So if your iPhone or other iDevice is experiencing problems, restoring your iDevice just might be your best option to get your iPhone back into shape and good health.
Restoring your iPhone or other iDevice is fairly easy, just follow a few steps and you’re done!
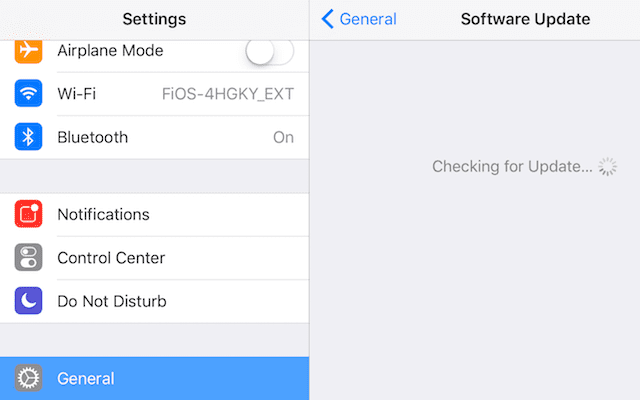
If a newer version of iOS is available, download and install it
Verify Backups
For iOS 10.3 and above
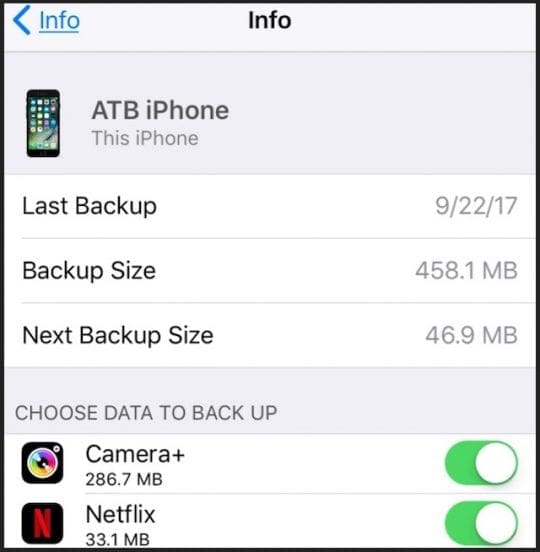
Go to Settings > Apple ID > iCloud > Manage Storage > Backup
Tap your iDevice for all the backup information including size, date, and apps to back up
For iOS 10.2 through iOS 8
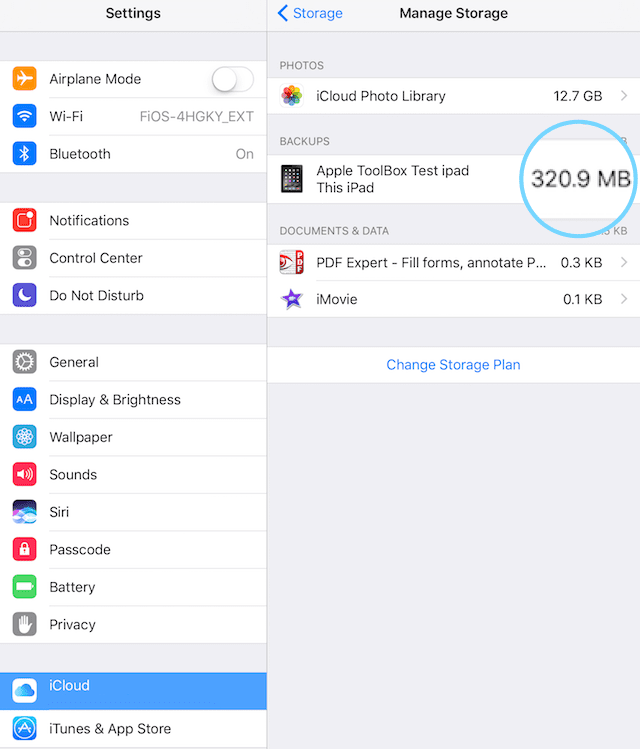
Go to Settings > iCloud > Storage > Manage Storage
Under Backups
Tap your iDevice
Locate your latest backup and check the date and size of its
For iOS 7 and below
Go to Settings > iCloud > Storage & Backup > Manage Storage
Under Backups
Tap your iDevice
Locate your latest backup and check the date and size of its
Perform a Restore
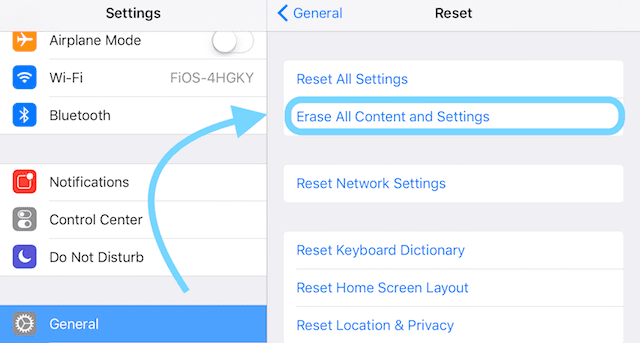
Go to Settings > General > Reset
Tap Erase All Content and Settings
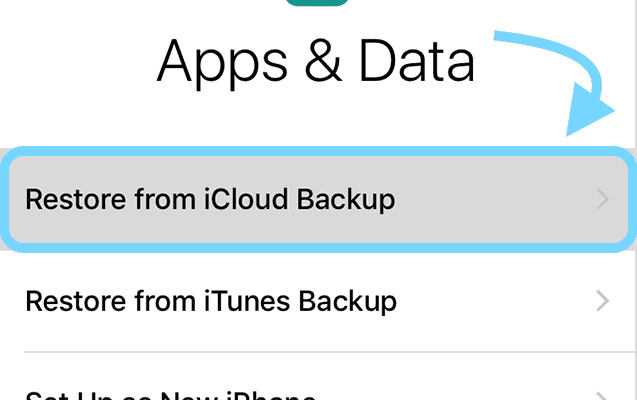
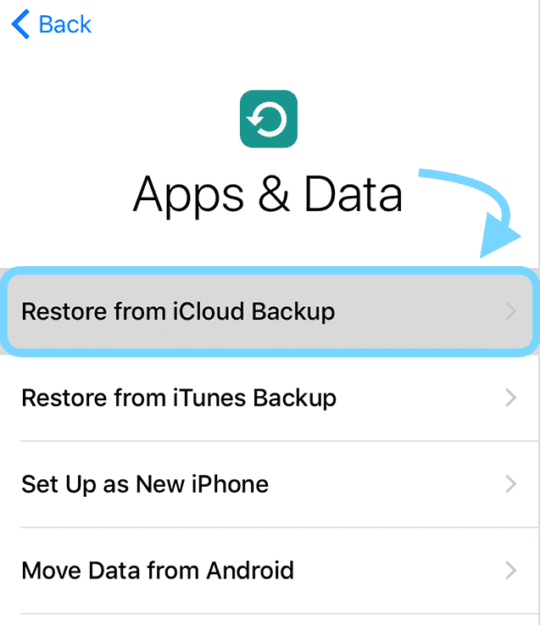
Setup Assistant launches and you see the Hello screen
From the apps Apps & Data screen, tap Restore from iCloud Backup, then sign into iCloud
Tap Choose backup then select your iDevice’s backup from a list of available backups in iCloud
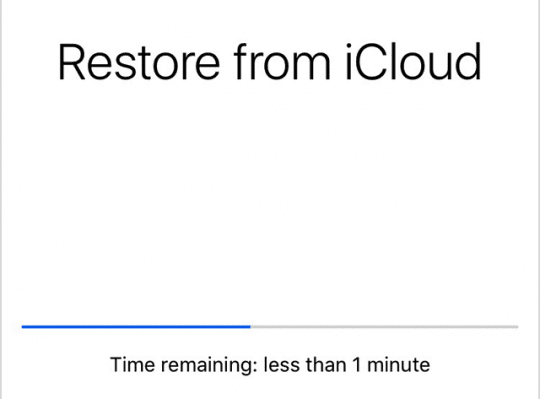
A progress bar appears with time remaining as iCloud restores your data. Stay connected and wait for a progress bar to complete. Depending on the size of the backup and your network’s speed, this could take anywhere from a few minutes to an hour plus to complete. Disconnecting from Wi-Fi causes the progress to pause until you reconnect.
When complete, iCloud starts downloading your apps. Another progress bar indicates your apps download. If you want a specific app, tap its icon to move it ahead.
Once your apps start downloading, you are able to use your iDevice even as content (apps, photos, music, etc) continues to restore. Depending on the amount of information there is, downloading content takes place in the background for hours and possibly days. Follow best practice and connect your iDevice to Wi-Fi AND power to let the process complete.
To verify that the restore is finished, go to Settings> iCloud> Storage & Backup.
You should always set your iCloud to backup automatically. However, there are certain times when you want to perform a backup to iCloud immediately. Fortunately, there are options for backing up NOW.
Go to Settings menu
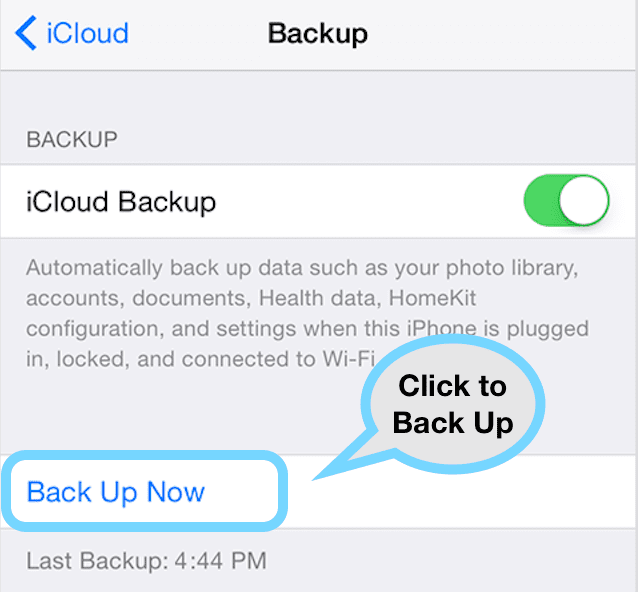
Tap Settings > Apple ID Profile> iCloud Backup
Scroll down and tap Backup
Check that iCloud Backup is on
Tap Back Up Now
When the Back Up Now option is grayed out, check that you are connected to WiFi. If connected via a public internet network, there may be restrictions in place that make iCloud Backup unavailable. When possible, contact a system administrator or IT department for assistance. If that’s not possible, try a different WiFi network or wait until you are connected to a known WiFi network (such as your home or office.)
For most of her professional life, Amanda Elizabeth (Liz for short) trained all sorts of folks on how to use media as a tool to tell their own unique stories. She knows a thing or two about teaching others and creating how-to guides!
Her clients include Edutopia, Scribe Video Center, Third Path Institute, Bracket, The Philadelphia Museum of Art, and the Big Picture Alliance.
Elizabeth received her Master of Fine Arts degree in media making from Temple University, where she also taught undergrads as an adjunct faculty member in their department of Film and Media Arts.
Oh my goodness, that’s is frightful! Have you used iCloud or iTunes to backup your iPhone (or iPad)? If so, your photos and texts should be on that backup—at least up to the date of the last backup.
So if you have an iCloud or iTunes backup, follow the steps in this article to restore from your most recent backup.
Another thing to check is log onto the iCloud website and take a look and see if any of your pictures that are there. If some or all are on the iCloud website, they should download to your iPhone as long as you sign in with that same Apple ID and turn ON iCloud Photo Library.
Hopefully, your pictures are accessible via iCloud. And if you backed up, yout texts too!


I am heartbroken, after my update my son’s name and all our text and pictures are gone and I am just sick…. I have no tears left!
Hi Gege,
Oh my goodness, that’s is frightful! Have you used iCloud or iTunes to backup your iPhone (or iPad)? If so, your photos and texts should be on that backup—at least up to the date of the last backup.
So if you have an iCloud or iTunes backup, follow the steps in this article to restore from your most recent backup.
Another thing to check is log onto the iCloud website and take a look and see if any of your pictures that are there. If some or all are on the iCloud website, they should download to your iPhone as long as you sign in with that same Apple ID and turn ON iCloud Photo Library.
Hopefully, your pictures are accessible via iCloud. And if you backed up, yout texts too!
Keep us posted,
Liz