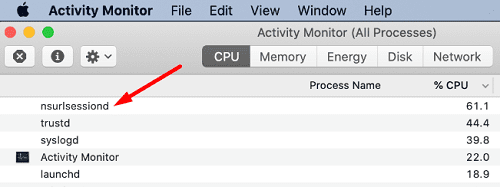
If you’re experiencing massive data usage on your Mac, but you haven’t been able to identify the culprit, we may have a lead for you. Check if nsurlsessiond is causing the problem. Go to Activity Monitor and check if our hunch is correct. Many MacBook users complained the process sometimes uses over 60 percent of the CPU’s capacity and takes up all the data leading to painfully slow connections. Let’s see what you can do to troubleshoot this problem.
Nsurlsessiond is an iCloud-related process that your system uses to communicate with the cloud and sync data. In other words, whenever iCloud data is updating, you can bet that nsurlsessiond is actively running in the background.
The process relies on a dedicated subdirectory to temporarily store data. The problem is that sometimes, the subdirectory is unavailable and the process can’t access it. But that doesn’t stop nsurlsessiond from trying to access the problematic subdirectory over and over again, using a lot of CPU and bandwidth in the process.
How to Stop nsurlsessiond From Using Too Much CPU and Bandwidth
Kill the nsurlsessiond and trustd Processes
Launch the Activity Monitor and stop the nsurlsessiond process. If it returns straight away, end both the nsurlsessiond and trustd processes. Many users confirmed that killing both these processes solved the problem for them. Keep in mind that ending these two processes may cause other issues and glitches on your Mac. If the issue returns after a while, go to the next step.
Delete the Old nsurlsessiond Temporary Directory
Go to Activity Monitor, and locate the trustd process.
Copy its PID from the PID column.
Launch Terminal and run the # sudo kill -9 [trustd PID] command to end the parent trustd process.
Note: Replace [trustd PID] with the PID you just copied.
Run the # ls -la /var/folders/zz | grep nsurlsessiond command to find the specific “randomized name” directory. You’re going to need this information for the next command.
Then, run the # sudo rm -fr /var/folders/zz/[randomized name] command to remove the nsurlsessiond temporary directory.
Note: Replace [randomized name] with the name you previously found.
Additionally, if you’re running out of space, you can also run the /var/log/asl command.
As a quick reminder, the [randomize name] string is actually the name of the subdirectory that nsurlsessiond is trying to access and write data to. High CPU and bandwidth usage is caused by the nsurlsessiond process trying to access the problematic directory. Deleting the nsurlsessiond subdirectory should force macOS to create a new subdirectory.
Conclusion
If the nsurlsessiond process is using too much CPU power on your Mac, launch the Activity Monitor and kill the nsurlsessiond and trustd processes. If the problem persists, delete the subdirectory that the process is trying to access, and restart your Mac. Did these solutions help you fix the problem? Let us know in the comments below.
Madalina has been a Windows fan ever since she got her hands on her first Windows XP computer. She is interested in all things technology, especially emerging technologies — AI and DNA computing in particular.
What a smooth and brilliant feature. An app runs in the background and can fail so it keeps running until you “kill” it or hire a programmer. Wonderful. One comment thanks another for a working workaround solution…. to a failed Apple process.
Update: thing still restarts and chews through data. As one of the other users pointed out you cannot delete the folder no permissions
$ sudo rm -fr /var/folders/zz/zyxvpxvq6csfxvn_n00000y800007k
rm: /var/folders/zz/zyxvpxvq6csfxvn_n00000y800007k/0/com.apple.nsurlsessiond: Operation not permitted
rm: /var/folders/zz/zyxvpxvq6csfxvn_n00000y800007k/0: Operation not permitted
rm: /var/folders/zz/zyxvpxvq6csfxvn_n00000y800007k/T/com.apple.nsurlsessiond/TemporaryItems: Operation not permitted
rm: /var/folders/zz/zyxvpxvq6csfxvn_n00000y800007k/T/com.apple.nsurlsessiond: Directory not empty
rm: /var/folders/zz/zyxvpxvq6csfxvn_n00000y800007k/T: Operation not permitted
rm: /var/folders/zz/zyxvpxvq6csfxvn_n00000y800007k/C: Operation not permitted
rm: /var/folders/zz/zyxvpxvq6csfxvn_n00000y800007k/X: Operation not permitted
rm: /var/folders/zz/zyxvpxvq6csfxvn_n00000y800007k: Operation not permitted
Thanks so much for a real working solution. The nsurlsessiond process starts again … but maybe it has the proper sub directory/new created directory since it no longer seems to use data. I did so many things I am not sure what worked!
Here is my list:
1.) Unchecked all icloud options/ apps using icloud in “apple ID” on system preferences.
2.) Unchecked icloud in “general settings” bottom box.
3.) note that this nsurlsession process only started hogging data after full install of Final Cut Pro X
using the appstore app to install … using about 8GB instead of the promised 4GB size on FCPX specs.
4.)Followed above instructions and commands.
Note a.) Do not need “#” on command lines.
b.) No bracket included ….. [example] means “example” and no brackets.
c.) [randomized name] is in the first txt returned …. as in “drwxr-xr-x@” of the following line for sub directory.
drwxr-xr-x@ 6 _nsurlsessiond _nsurlsessiond 192 Oct 17 23:20 zyxvpxvq6csfxvn_n00000y800007k
5.) I monitor data at all times looking at istat monitoring software bar at top of screen … to notice data flow when not using browser or other known data apps that have my permissions!
6.)Plan to use “little snitch” app if necessary in the future!
7.) Note that when you upgrade or get a new apple computer that apple takes every possible way to hide new icloud options making them default. Both ios and OSX seem to “upgrade” hiding spots!
8.)I will still disconnect wifi on all apple products when not in use. I have seen my macair waking up and giving data or updating before too … after I request to be asked for any updates. This is the only way to not slam through massive data caps.
2020 MacAir M1 8GB SSD + 2T EXT SSD Drive and Final Cut Pro X
Hi, Thank you very much for this clear guide. I keep getting an error saying I don’t have the correct permissions to delete the temp folder. Even when logged in as the root user. How can I get around this? Thanks
Thanks for this guide. It worked perfectly to get rid of the constant data usage that wouldn’t go away. Well, after I figured out how enable the root user so I could go in and fix the “sudoers” file I hosed when I tried to add my normal user name so I wouldn’t have to keep su’ing to the admin acct. 🙂


 Apple Watch Activity With Friends")


What a smooth and brilliant feature. An app runs in the background and can fail so it keeps running until you “kill” it or hire a programmer. Wonderful. One comment thanks another for a working workaround solution…. to a failed Apple process.
Update: thing still restarts and chews through data. As one of the other users pointed out you cannot delete the folder no permissions
$ sudo rm -fr /var/folders/zz/zyxvpxvq6csfxvn_n00000y800007k
rm: /var/folders/zz/zyxvpxvq6csfxvn_n00000y800007k/0/com.apple.nsurlsessiond: Operation not permitted
rm: /var/folders/zz/zyxvpxvq6csfxvn_n00000y800007k/0: Operation not permitted
rm: /var/folders/zz/zyxvpxvq6csfxvn_n00000y800007k/T/com.apple.nsurlsessiond/TemporaryItems: Operation not permitted
rm: /var/folders/zz/zyxvpxvq6csfxvn_n00000y800007k/T/com.apple.nsurlsessiond: Directory not empty
rm: /var/folders/zz/zyxvpxvq6csfxvn_n00000y800007k/T: Operation not permitted
rm: /var/folders/zz/zyxvpxvq6csfxvn_n00000y800007k/C: Operation not permitted
rm: /var/folders/zz/zyxvpxvq6csfxvn_n00000y800007k/X: Operation not permitted
rm: /var/folders/zz/zyxvpxvq6csfxvn_n00000y800007k: Operation not permitted
Worked thank you. Previous 2 days that little application/service had downloaded over 25gb.
Ian
This is not the solution. You should re-nice the process so that it uses less resources.
I’m experiencing the same problem as Sean—I can’t delete the file in step 5.
Hello,
That seems to be ok for me by killing the process
Thanks so much for a real working solution. The nsurlsessiond process starts again … but maybe it has the proper sub directory/new created directory since it no longer seems to use data. I did so many things I am not sure what worked!
Here is my list:
1.) Unchecked all icloud options/ apps using icloud in “apple ID” on system preferences.
2.) Unchecked icloud in “general settings” bottom box.
3.) note that this nsurlsession process only started hogging data after full install of Final Cut Pro X
using the appstore app to install … using about 8GB instead of the promised 4GB size on FCPX specs.
4.)Followed above instructions and commands.
Note a.) Do not need “#” on command lines.
b.) No bracket included ….. [example] means “example” and no brackets.
c.) [randomized name] is in the first txt returned …. as in “drwxr-xr-x@” of the following line for sub directory.
drwxr-xr-x@ 6 _nsurlsessiond _nsurlsessiond 192 Oct 17 23:20 zyxvpxvq6csfxvn_n00000y800007k
5.) I monitor data at all times looking at istat monitoring software bar at top of screen … to notice data flow when not using browser or other known data apps that have my permissions!
6.)Plan to use “little snitch” app if necessary in the future!
7.) Note that when you upgrade or get a new apple computer that apple takes every possible way to hide new icloud options making them default. Both ios and OSX seem to “upgrade” hiding spots!
8.)I will still disconnect wifi on all apple products when not in use. I have seen my macair waking up and giving data or updating before too … after I request to be asked for any updates. This is the only way to not slam through massive data caps.
2020 MacAir M1 8GB SSD + 2T EXT SSD Drive and Final Cut Pro X
Hi, Thank you very much for this clear guide. I keep getting an error saying I don’t have the correct permissions to delete the temp folder. Even when logged in as the root user. How can I get around this? Thanks
Thanks for this guide. It worked perfectly to get rid of the constant data usage that wouldn’t go away. Well, after I figured out how enable the root user so I could go in and fix the “sudoers” file I hosed when I tried to add my normal user name so I wouldn’t have to keep su’ing to the admin acct. 🙂