If you post things on the internet, there’ll probably come a time when you need to censor or redact certain information. And on iOS devices, there is definitely a right and a wrong way to do that.
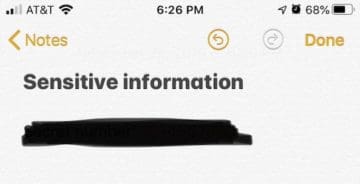
Take the ubiquitous marker tool in the Markup menu. While the Marker looks like it’s covering up your names, phone numbers or license plates, it’s actually probably the worst way to redact snippets of sensitive data within images on your iPhone or iPad.
For many users, the default marker in Markup looks like the right redaction tool for the job.
Looking at the Markup interface, it’s easy to intuitively “reach” for the marker tool. After all, it draws thicker lines so you can more easily cover up text, a license plate, or another piece of information you’d like to redact.
But that would be a mistaken theory. The Marker tool doesn’t draw opaque lines by default, so it’s more of a highlighter. And even if you draw over a piece of sensitive information multiple times, it can still be revealed using Photoshop or just about any other image editor.
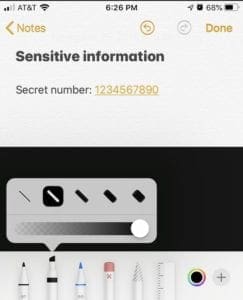
In fact, you can even use the native editing tools in iOS or iPadOS. So, to see why you should not use the Marker tool firsthand, we’ll take a look at how to reveal a snippet of text “redacted” or “censored” with the Marker tool.
With a bit of editing, you can easily reveal information “censored” by the default marker.
Take a screenshot of the image you’d like to reveal.
Go into the Editing interface.
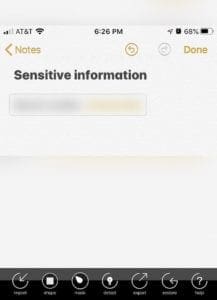
Tweak the Brightness, Brilliance, Contrast and other settings.
If the photo was improperly redacted, then you should now be able to see whatever information was “covered” by the black marker.
What you should do to redact information
So you don’t want to accidentally leak your friend’s phone number or another piece of information. So what should you do?
There are a number of methods that can mitigate any privacy or security issues with the Marker tool or other Markup tools in iOS. Here are a few.
Set the opacity or line thickness
Setting the opacity all the way to the right can foil any attempt to reveal your sensitive data.
The Markup menu is pretty simple. You tap a tool to select it. From there, you can actually tap on it again to bring up additional options.
In this menu, you can actually change a number of things — including the thickness and opacity of the line.
This is useful in a couple of different ways. For one, as long as the Opacity bar is all the way to the right in the Market tool, the method we used above won’t work. Your information will actually be properly redacted.
You can also use a different tool, like the Pen tool, and set the line thickness to be larger. You can then use those tools to censor sensitive information much more easily.
Use a shape instead
Using a shape in Markup is also a much more effective way to redact information.
It’s not very intuitive, but you can actually use shapes to cover up sensitive snippets of data or other information within an image using the Markup menu.
This is the method you can use if you don’t want to mess with line thickness or opacity It effectively redacts information and is extremely simple, but it’s pretty well-hidden in the Markup toolbar. Here’s how to do it.
Go into Markup mode.
Tap on the Plus icon all the way on the right side of the toolbar.
Tap on the Square shape.
From here, you should see a box shape on your image. We’re not done yet.
Tap the Fill icon on the left side of the toolbar. It’s directly to the left of the black color.
Now, tap on the filled-in box on the left side.
Finally, maneuver your new filled-in box shape over the piece of information you’d like to censor.
Go with a third-party app
Additionally, there are some third-party apps that can offer much more professional-looking results.
As you might expect, there are also plenty of third-party apps that are completely focused on redacting images.
The aptly named Redacted was an excellent choice, but is no longer available on the App Store. But Zen.Privee, which is free to use and is currently available, is a good second choice.
Zen.Privee gives you a number of redaction styles, so you aren’t just stuck with black marker or square boxes. That includes pixelation, blur or others.
It’s a good choice that’s extremely simple to use. And if you need to redact anything for business use, Zen.Privee can result in much more professional-looking images than anything in the Markup toolbar.
Mike is a freelance journalist from San Diego, California.
While he primarily covers Apple and consumer technology, he has past experience writing about public safety, local government, and education for a variety of publications.
He’s worn quite a few hats in the journalism field, including writer, editor, and news designer.


“Setting the opacity all the way to the right can foil any attempt to reveal your sensitive data.”
you are wrong, the big marker thing doesn’t work EVEN with blackness set all the way to the right