Mac’s Finder is recognized as a fantastic gateway to accessing apps, downloads, and files. With it, you can locate everything, including Dropbox folders and even desktop wallpaper files. Moreover, it gives you control over how your Mac Finder works and what it displays.
But there is a brand new feature in town that is making Finder even more desirable to all kinds of users. It is known as Stacks, and everyone wants to use it.
With Stacks, a Mac user can automatically organize their desktop. Keeping your computer organized makes it easier to locate anything you want on your desktop. You can even group all of your desktop documents in a single stack and screenshots in another stack.
Just like its name sounds, you can use the feature to organize the Mac desktop into several file-stacks that are classified in various categories. This will keep the desktop beautifully organized whenever you save new files.
Yes, using Stacks, a cluttered desktop becomes a thing of the past.
How to Turn On Stacks in a Mac Finder
You can use the following method to turn Stacks on and make it ready for use:
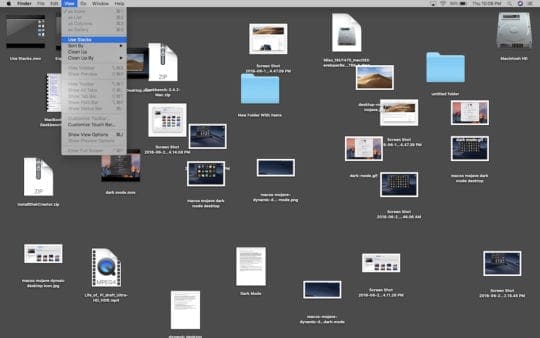
From the Finder menu, select “View.”
Alternatively, “right-click” on any key on the Mac desktop.
Go to the menu for “shortcuts.”
Select “Use Stacks.”
“Turn Stacks on.”
Or:
Click on “Desktop.”
Select “View.”
Press “Control-0” or “Use Stacks.”
As soon as you turn Stacks on, each file will automatically become embedded to the feature, becoming part of it. The only exception is when Stacks happens to be the only file on the desktop. The folders will typically display below Stacks.
How to Group and Organize Stacks in a Mac Finder
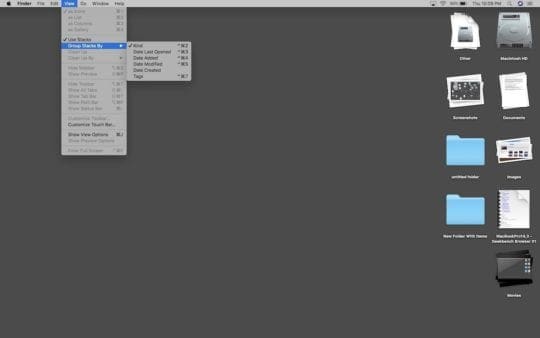
Stacks are generally grouped by default – they are displayed by kind. This includes screenshots, images, presentations, and PDFs. To organize Stacks by tag, the modified date, and similar categories, follow this process:
Go to “View.”
“Menu bar.”
“Group Stacks By.”
(Alternatively, right-click on “Desktop,” go to “Shortcut Menu” and select “Group Stacks”).
How to Use Stacks to Manage Individual Stacks in a Mac Finder
Whenever you’re ready to open or close it, click once on a specific stack. After opening a stack, the files in it will usually display on the desktop. At this point, the icon for the stack will appear as an arrow-like folder.
If you want to view the files contained in a specific stack, just click on it. It will immediately expand and display a small arrow on the name of the stack. This will let you know the stack you are viewing. While the stack is expanded, it will open in any app that is set as the default app for the specific type of file.
Alternatively, to check the items contained in a stack without having to open it, move the pointer to go over a stack. Scroll using the mouse or trackpad and while you scroll, the name of the stack and its icon will automatically change to match with each of the files contained in the stack. On locating the desired file, open it by double-clicking.
Using Stacks, you will find it easy to take any action on specific items contained in a stack. You only need to right-click on a particular stack, go to the shortcut menu, and select the desired action. This way, you can Share, Compress, Rename, or perform any Quick Actions.
How to Browse and Navigate the Stack Files in a Mac Finder
On the selected stack, swipe left or right (you can have two fingers working on the trackpad and one on a Magic Mouse).
Double click to open the file at the top of the stack.
To close a stack or open it, click on the specific stack.
To reopen a stack, double click on a specific file.
To change how the stacks are organized, follow these steps:
Click on “Desktop.”
Select “View.”
Go to “Group Stacks.”
Select a specific option (for example, Date Added).
Do you want to change how the stacks appear on the desktop?
Click on “Desktop.”
Select “View.”
Go to “View Options”
Go to “Change Options.”
Alternatively: Right-click on Desktop, and select “Show View Options.”
Here, you can enlarge the size of the icons, adjust the spacing between them, move the icon labels aside, or display more information (like how many files the stack contains).
Wrapping Up
If you have to deal with lots of files on the desktop, the Stacks feature is beautifully designed to help you organize all the files into neat piles so you can efficiently arrange your desktop.
Stacks ranks an excellent solution to help you avoid the hassles of desktop clutter. You’ll avoid wasted time trying to locate “lost” files. Learn to use Stacks efficiently on the Mac Finder to get ahead of the game.


")


Write a Comment