Having contacts on your mobile phone has been around for decades, but managing these has become incredibly easy as the iPhone has evolved. What started as a simple list feature on these devices has evolved into the backbone of smart communication on iPhones, iPads, and Macs.
Apple continues to update your contact capabilities with all kinds of features to make life easier. Here are some simple tips to help you get the most out of your iPhone contacts.
Siri is maturing with every iOS release and now it works with your Mac as well as your Apple Watch. Sometimes, Siri just needs a little nudge to work more efficiently on your behalf. “Nicknames” are a great feature on your contact cards. Assign a nickname to a contact and Siri knows exactly how to reach that contact. Getting Siri to call your “Doctor” or “Dentist” ’s office is as easy when you designate that nickname in the contact list.
Let’s get started:
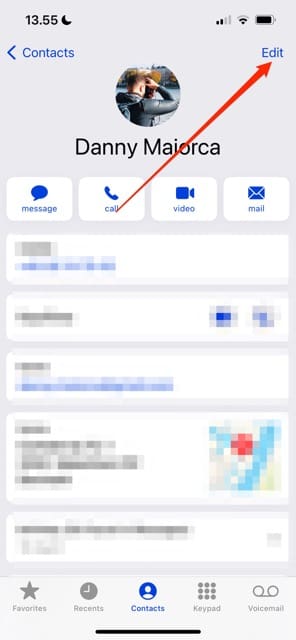
Tap on the Contacts tab in your Phone app. Then, choose a name to add more information for.
Press Edit in the top right-hand corner.
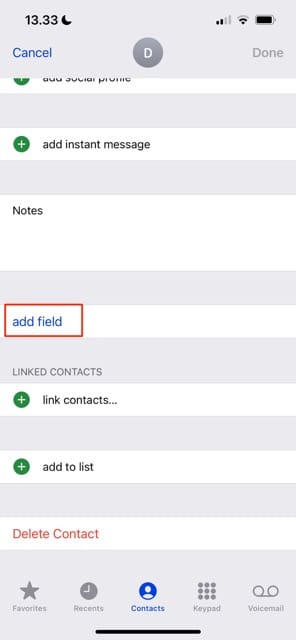
Scroll down and choose add field. This section is towards the bottom of the screen.
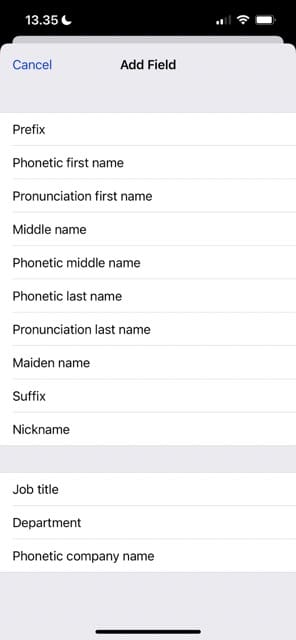
On the Add Field selections screen, you can add as much information as you like to make the contact feature more intelligent. For example, you can choose Nickname if you’re doing this for a friend.
Go back to the main part of the contact card. At the top, you’ll now see a new text box that’ll be named whatever you clicked on. So, in this instance, it’s Nickname. You should see it under the Last name tab.
Type what you want to refer to this contact before selecting Done.
After assigning the new name, start up Siri. Ask “Siri, call [name] please.”
2. Set up ‘Read Receipts’ for Selected Contacts
Sometimes, you might want to choose who can see read receipts for your messages. These are turned off by default, but if you’d like to send them, you can enable them for specific contacts. You do not have to enable this feature for all your contacts.
To enable read receipts on your iPhone for specific contacts:
Open the iMessages app and open up a message.
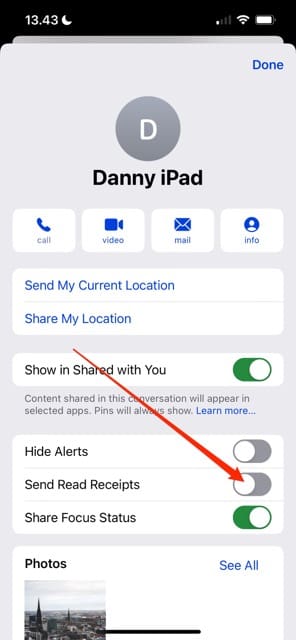
Click on the person’s icon at the top of the conversation.
Scroll down until you see Send Read Receipts. Switch this toggle on so that it’s now green.
If you later want to turn off read receipts for this contact, you can follow these steps in reverse. The toggle will be gray when it’s switched off.
3. Recovering Missing Contacts After an iOS Update
This is a very annoying problem that happens to many people following an iOS update. Your update goes through, but you find that your contacts are missing or duplicated etc. on the list. The best course of action is to use your iCloud and reload the contacts back into your device.
To restore your contacts back into your iPhone or iPad:
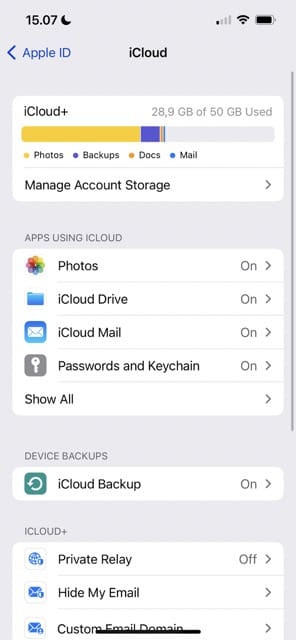
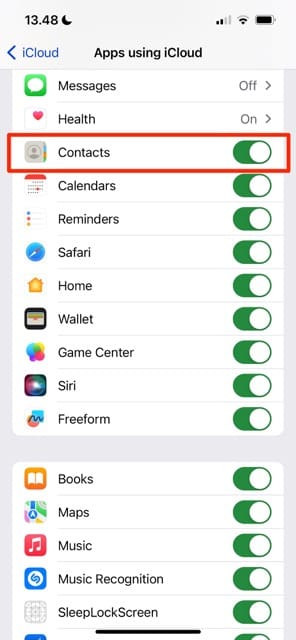
Tap on Settings > Apple ID, followed by iCloud.
Under Apps Using iCloud, select Show All.
Turn on Contacts. If it’s set to on, toggle it back to off and then on again.
If you toggle Contacts off, you’ll be asked whether you want to keep those on your iPhone or delete them. Choose the latter option.
Toggle Contacts back on after doing the above.
It takes a little bit of time to reload your contacts. Go to Phone > Contacts and see if these are now restored.
4. Use Related Names for Defining Relationships in Contacts
Siri Call My Mom is very easy…
If you set up the contacts with appropriate tags. In Tip 1, we showed you how to use the Nicknames field.
You use the Nickname field for contacts that are not your relatives such as your dentist or your doctor. Use the Related Name feature to call your relatives such as your dad, mom, sister, and so on.
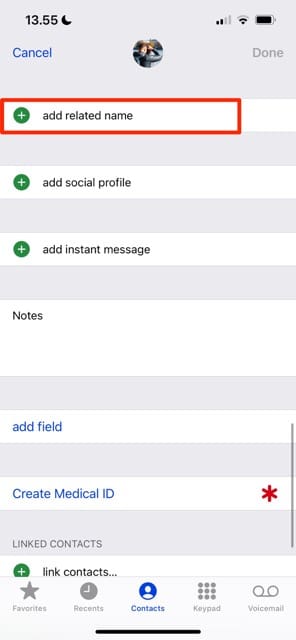
To set up the Related Name, go to your contacts and click on your contact card.
Tap edit in the top right corner. Scroll down and choose add related name.
To choose the relation, tap on the name. If you want to add a label that you don’t see, scroll down to Add Custom Label.
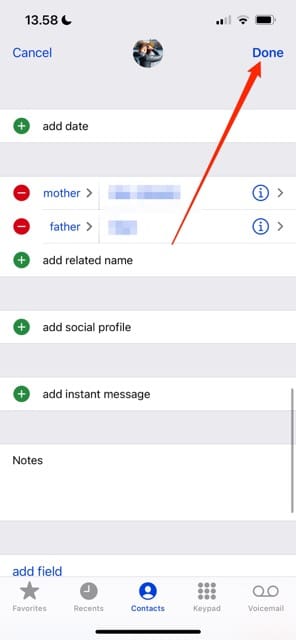
Click on the information (i) icon.
Choose the relative from your list.
Tap Done when you’re finished.
So next time, with Siri on, just say “Siri, Call My Sister, ” and Siri does the rest!
5. Customize Your Favorite Contacts on Your iPhone into Widgets
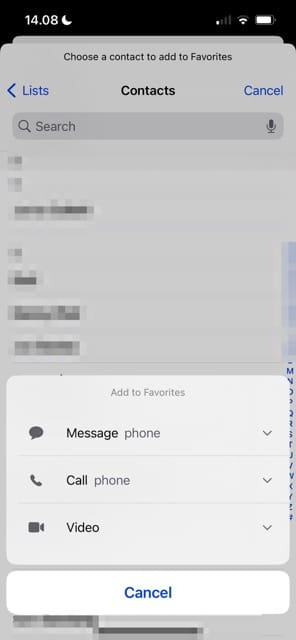
You probably have contacts that you communicate with more frequently than others. With the Favorites feature, you can group these for easier outreach.
Open the Phone app and tap on the Favorites tab.
Tap the + button in the top left-hand corner.
Search for the contact from your list and then add them to your favorites. You can customize here between Mail, Call, Message as your options for the contact so that your preferred mode of communication for that contact is saved into your favorites.
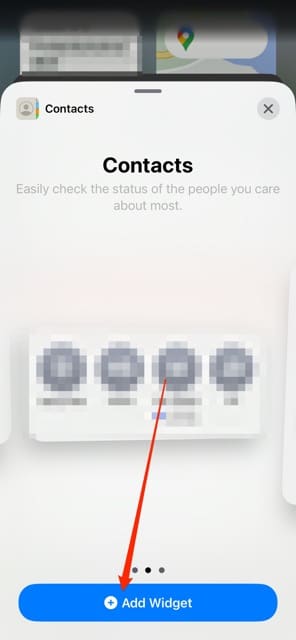
Add Contacts to the Widgets Screen
You can add contacts to your widget screen for easy contacting later. To do this:
Head on over to your widgets screen and scroll down to the bottom and tap on Edit.
Hit the + icon.
Search for Contacts and select this option.
Choose the widget that you want to add.
Select Add Widget when you’ve found the one you want to include.
Hit Done when you’re finished.
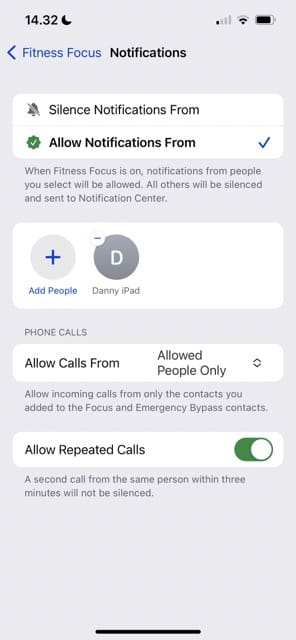
6. Allow People to Contact You When Focus Modes Are Switched On
Focus Modes are an excellent way to stay productive without distractions. You can limit the notifications you receive, along with controlling who is allowed to contact you. If you want to provide people with access to you at all times, you can choose which people are allowed to contact you within each Focus Mode.
Here’s how to do that:
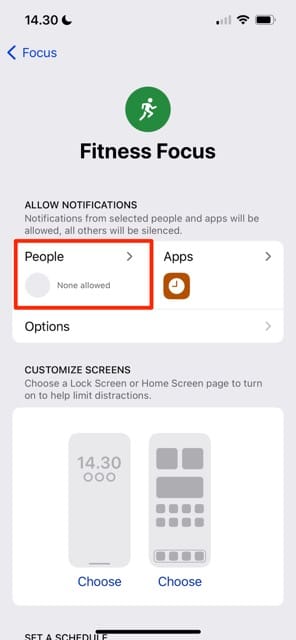
Open the Settings app on your iPhone and go to Focus.
Click on the Focus Mode (or Do Not Disturb) that you want to edit, before selecting People.
Tap on the big blue + icon, which will have the Add People writing underneath it.
Choose the contacts you want to allow to get in touch when you have a particular Focus Mode switched on. Then, tap Done when you’re finished.
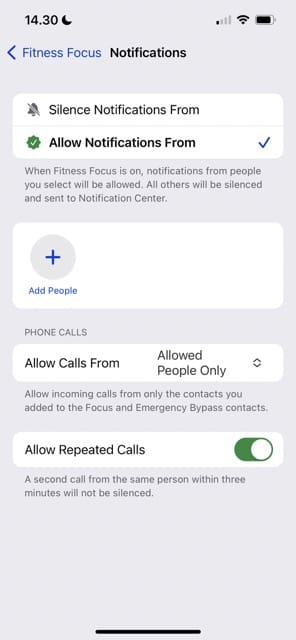
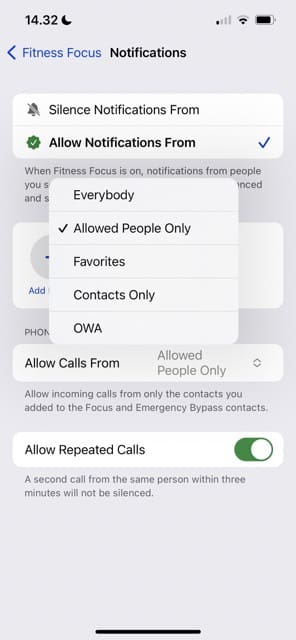
You should also choose whether you want to allow or silence notifications from the people you’ve selected with the two options at the top: Silence Notifications From or Allow Notifications From.
You can also, under iPhone Calls choose who gets in touch with you. After expanding the dropdown menu, you can pick whether you want only your favorites, people in your contact list, and so on. You can also toggle Allow Repeated Calls on or off, which will allow you to choose whether someone is able to get in touch with you after trying to ring you more than once.
Use These Tips to Make the Most of Your iOS Contacts
As you can see, you can customize your iPhone contacts in a whole host of ways. There are plenty of options for choosing who you would prefer to contact you, and it’s also possible to pick whether you want certain people to feature on your favorites or not.
We hope that you found some of these refresher tips useful in making the best out of your iPhone contacts. We would love to hear from you if you would like to share some of your favorite tips that make your iPhone use very productive and easy. Don’t be afraid to experiment and try a combination of the things we’ve mentioned as well!
Obsessed with tech since the early arrival of A/UX on Apple, Sudz (SK) is responsible for the original editorial direction of AppleToolBox. He is based out of Los Angeles, CA.
Sudz specializes in covering all things macOS, having reviewed dozens of OS X and macOS developments over the years.
In a former life, Sudz worked helping Fortune 100 companies with their technology and business transformation aspirations.
I would like to see the Contacts be more versatile. My suggestion is to be able to make subheadings under a contact’s name. For instance, since I travel a lot, I use Rental Car companies. I currently have the following list in my Contacts:
Enterprise DAB (Daytona Beach, FL)
Enterprise Extend Rental
Enterprise Ft Myers (the city in which I had extended business)
Enterprise Road Service
How about making it:
Enterprise
DAB – with the office/work phone number and address
Extend Rental – with its associated phone number
Ft Myers – with the office/work number and address
Road Service – office/work number
It is only ONE Contact on the main list with all the others seen when I click on it.
Here’s another – AAA
AAA (General Membership information)
AAA Customer Response Unit
AAA Dollars (Credit Card)
AAA Dollars Fraud Line
AAA Dollars Tech Support
AAA Hertz
AAA Road Service
Having just one listing, AAA, with these 6 subheadings would clear up my Contact List tremendously.
The same can be applied to Insurance companies. Their Claims line is different then their Policy line, I’m sure you are seeing what I am trying to convey.
I hope you see the benefit and can move this idea forward.