• Skip to primary navigation
  • Skip to main content
  • Skip to primary sidebar
  • Skip to footer

AppleToolBox

Tools and Fixes for Mac, iPad, iPhone & iWatch

Search posts

  • About
  • Contact

CONNECT WITH US

CATEGORIES

  • iPhone
  • iPad
  • iPod
  • Apple Watch
  • Mac/MacBook
  • AirPods
  • Apple TV
  • News
  • Apple Services
  • HomePod
  • Reviews

SITE

  • Home
  • About Us
  • Contact
  • Advertise

Search posts

You are here: Home / iPhone / How to Add Recovery Contacts on iPhone

How to Add Recovery Contacts on iPhone

By Danny Maiorca 0 comments Last updated December 29, 2022

If you’re anything like us, you probably have your iPhone on your person for much of the day. But sometimes, you might risk losing it – and if that happens, it can significantly impact how you do things until you receive a replacement.

Related Reading:

  • How to Use the Shared With You Function in iOS 16
  • How to Share Your Location Via Satellite Using Find My
  • How to Set Up and Use Apple’s Family Sharing on Your iPhone, iPad, and Mac
  • iPhone: How to Use Tap to Share
  • How to Disable Family Sharing on iPhone

When you use your iPhone, you can add contacts that can help you if something goes wrong with your device. And in this article, you’ll learn how to do that.

Contents

  • What’s the Point in Adding a Recovery Contact?
  • How to Add Recovery Contacts on iPhone
  • Add Recovery Contacts to Your iPhone In Case Something Goes Wrong

What’s the Point in Adding a Recovery Contact?

Adding a recovery contact to your iPhone is handy if you want to add an extra layer of security when you forget important login information. You can use the feature to call the person – or people – you’ve added in the case of something going wrong.

Once you’ve added a recovery contact, you will be able to sign back into your account if you find yourself locked out. If you choose not to call them, the individual can also help you sign in again when you meet them in person.

How to Add Recovery Contacts on iPhone

screenshot showing account recovery option on iphone
screenshto showing how to add a recovery contact on ios
screenshot showing how to type in recovery contact name on iphone
screenshot showing how to send a message to recovery contact on iphone

Okay, so you now know a little more about why having recovery contacts on your iPhone is useful. Let’s look at how you can add them to your device.

  1. Open the Settings app on your iPhone.
  2. On the main page of the Settings app, click on your name.
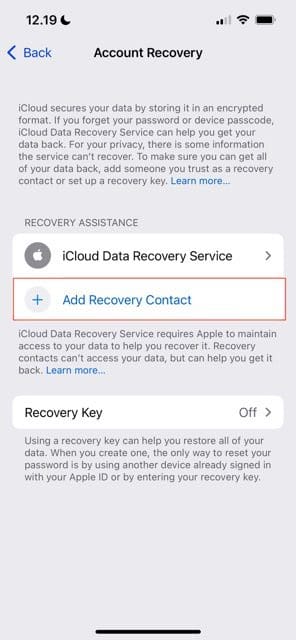
  3. Go to Password & Security > Account Recovery.
  4. Select Add Recovery Contact. On the next screen, you will see another button with the same title; select this as well.
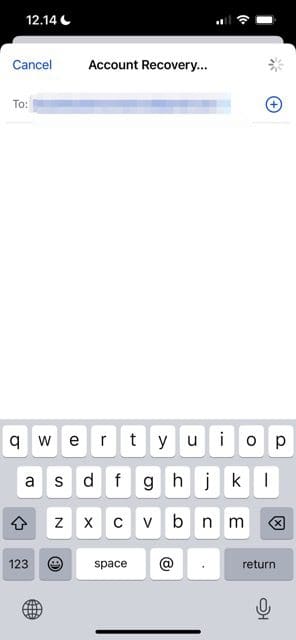
  5. Verify your identity; on many devices, this will be via Face ID. Then, on the next screen, type in the contact you’d like to add as your designated contact.
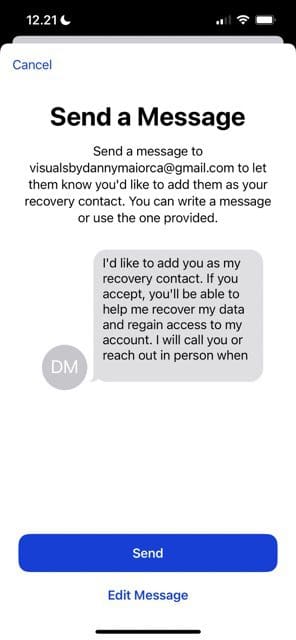
  6. Hit the Add button in the top right. After that, you can send a message to the other person to let them know. They will need to accept before you can have them as your account recovery contact.

Once the recipient has accepted your request, you will see their address appear under the Recovery Assistance tab – without the Request Sent option showing anymore.

Add Recovery Contacts to Your iPhone In Case Something Goes Wrong

Adding a recovery contact to your iPhone is a straightforward process. And if something happens, you might well thank yourself for taking a few minutes to set this feature up. The only things to keep in mind when setting up a recovery contact are that the other person needs to be 13 years old and they need to own an iPhone or another Apple product.

Now that you’ve read this guide, why not make sure you’ve got a backup option for logging in if you forget your details?

Related Posts:

  • photo of an iphone with ios 16 downloaded on it
    iOS 16 Tips and Tricks: The Definitive List
  • pexels-designecologist-1779487
    The Best iPhone And Mac Shortcuts For Beginners
  • sidecar on iPadOS and macOS
    Sidecar not working in iPadOS and macOS? How to fix…
  • iPhone 15 Pro unboxing
    How To Extend Your iPhone Battery Life
  • 2023 Mac Studio lifestyle - 1
    macOS Could Not Be Installed, How-To Fix
  • 2022 Mac Mini with Studio Display and Accessories
    Mac Tips For New Users In 2023
  • iPhone 15 event - iPhone 15 Pro and iPhone 15 Pro Max A17 Pro Video Recording Promo
    iPhone 14 vs. iPhone 15: Should You Upgrade?
  • 0E4A6A0B-65E8-4184-B0C9-16C2179A1256
    The Best Weight Loss Apps For iPhone In 2021
  • How to Find Lost AirPods Pro 2 with Precision Finding - Locate earbud
    I Lost My AirPods! How To Find Your Lost AirPods or…
Danny Maiorca

Danny has been a professional writer since graduating from university in 2016, but he’s been writing online for over a decade. He has been intrigued by Apple products ever since getting an iPod Shuffle in 2008 and particularly enjoys writing about iPhones and iPads. Danny prides himself on making complex topics easy to understand. In his spare time, he’s a keen photographer.

Reader Interactions

Write a Comment Cancel reply

Primary Sidebar

Recent Posts

  • How to Set Up iCloud Passwords on a Windows PC?
  • How to Turn Off Apple Music’s Dark Mode
  • How to Disable Predictive Text in iOS 26
  • How to Stop Sharing Analytics in iOS 26
  • How to Manage Your iPhone Call Log
  • Are Apple’s Safety Precautions Enough for AirTags?

Connect with us

Footer

ABOUT

  • About Us
  • Contact us
  • Advertise
  • Privacy
  • Terms of Use

GUIDES

  • iOS & iPadOS
  • Apple ID
  • iCloud
  • App Store
  • iTunes
  • FaceTime
  • iMessage
  • Siri
  • Books and iBooks
  • Game Center
  • AirPlay

CONNECT

  • Facebook
  • Twitter
  • FeedBurner
  • YouTube

© Copyright 2010-2024 Guiding Tech Media · All Rights Reserved

This site and its content are in no way affiliated or endorsed by Apple, Inc. · Reproduction without explicit permission is prohibited

Last Updated on December 29, 2022 by Mitch Bartlett