Want to retain the location and time of the photo when exporting photos from iPhone to Windows PC? It is quite simple and straightforward.
The important thing to know is that this is only possible with photos taken from your iPhone and not the photos that you received from someone else as the location is only recorded for photos taken with your iPhone’s own camera.
There is no rocket science to this as the location and date are saved with the picture when you transfer it. You do not have to do anything special besides transferring/copying images from iPhone to Windows.
The JPEG files saved on a computer usually have an accompanying file EXIF that contains the coordinates of the location (GPS) and the time stamp.
Unfortunately, Windows PCs do not recognize Apple’s Live Photos. Instead, your Windows machine will identify any Live Photos as movies.
Copying iPhone Images to Windows
For copying images from your iPhone to Windows, connect your iPhone with the computer through the given USB cable
Just connect the iPhone or iDevice with a cable. If you don’t have iTunes installed, Windows downloads and installs any necessary drivers
Once connected you might be prompted by iTunes, and if so, it launches by itself recognizing your iPhone
We are not concerned with iTunes for this particular operation
Launch Windows Explorer from the desktop, Start menu, or taskbar
Or use the Windows key + E shortcut
Click the arrow icon (>) next to This PC (or My Computer) in the left sidebar
Tap on your iPhone’s name to open it and select Internal Storage
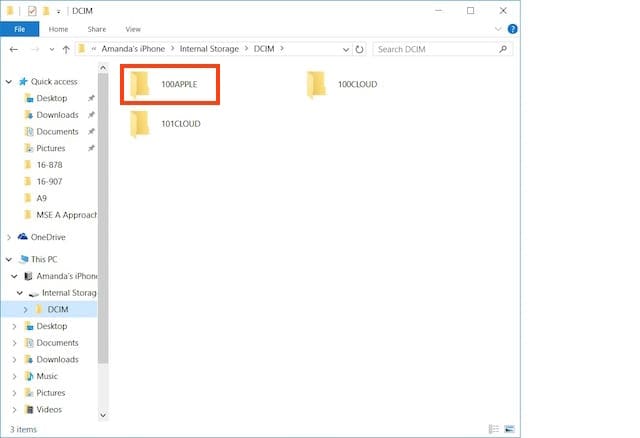
See if your phone connected as a USB device and click on it to see the DCIM folder
Open this DCIM folder, and you see several folders containing images
Double-click to open a folder to see its images
Find the image(s) you want to copy and select them
Right-click and click copy or Press Ctrl+C
Create or go to the folder where you want them copied and paste
Or click Copy to at the top of that window and select Choose Location and pick where you want that image to go, then click Copy to move that image over to its new location
Remember to leave your iPhone (iPad or iPod) connected to your computer for this entire process. Do not unplug your devices.
Using Windows 10 or Above?
If you have a Windows 10+, you can also use the Photos App to transfer your images over.
Here’s How to Transfer Photos Using Windows 10 Photos App
Connect your iPhone to your computer
Make sure the phone is on and unlocked
If you see the Trust this device notification, select Accept
Launch the Photos App from the Start Menu, Desktop, or Taskbar
Select Import from the upper-right corner
Windows selects all new photos automatically by default
Click on any photos you don’t want to import
Tap Continue
If you enabled iCloud on your iDevice, you won’t be able to download your photos or videos, since they then exist on iCloud and not on your device. If you want to import your photos or videos to your PC, do so via the iCloud desktop app.
Finding Location and Timestamp of iPhone image
Choose any image and right click on it. Select properties and a window opens
Click on Details tab, and there you can find the date the picture was taken and the GPS coordinates
On your iPhone, you usually see the name of the location on top of the image along with the date. However, on Windows, you only see coordinates in the details. The default when you copy the photos to a folder, they are sorted according to their date only which is great if you like your photos arranged in their chronology
Choose to change the sort criteria as well by simply clicking Right anywhere besides the picture and then going into Sort By and choosing the parameter you want the photos to be sorted by
You can select size, date or name
If you’re going to organize your photos by the location they were taken in then you need to create folders manually.
Pictures automatically carry timestamp and location coordinates when copied; you do not need any third-party app to get this done.
If you back up your images in iCloud, the location and time are saved with these pictures in the iCloud as well.
Not Seeing the DCIM Folder?
If your iPhone or another iDevice does not show the DCIM folder on Windows 7-10, try taking a photo with your iPhone’s camera while it is connected to your Windows PC.
That trick usually forces your computer to recognize your iPhone’s image folder.
Reader Tips
Just download the OneDrive App to your iPhone and set it to Camera Upload all your pics and videos in settings–forget about iTunes and Windows Photo App! All your photos and videos should appear on your Windows PC with OneDrive installed on your iDevice and your PC
Thanks for your article, very helpful. Kinda bummer that PC doesn’t preserve the location name (vs. coordinates) like it does on the phone. Haven’t tried this, but I’m wondering if you uploaded it back to iCloud would it restore the location info like it shows prior to download/offload?
Also I noticed in MS Photos app if you click the round “i” button at top it does show a map, and if you double click the map it will open up a map window and zoom into the location. But doesn’t show the same detail as iCloud.
I cant download all my pictures to my pc,its so much pain,i am definitely chenge from appel iphone to any other brands,I really hate that i cant use my own picture,its awfull.
This doesn’t work anymore (iOS 15.5 & Win 10). The only way I’ve found to preserve pic file details such as date taken, is to attach the pic to an e-mail from the photos app. If you attach the photo from the e-mail app or copy/paste or drag over: No date taken and other details are lost.
Before I got Windows 10 and a new computer, when I uploaded photos from my iphone to my PC, photos were transferred into folders in File Explorer arranged by dates. This was automatically done. I liked the photos being arranged this way. Now my PC doesn’t do this anymore. Instead it dumps each upload into my “Pictures,” with no organization at all and I have to hunt for pictures. Can you tell me what I can do to make it like it was? Thank you!
Use the “Move to” function under “File” of the Internet Explorer ( Windows 10)
Try it out with a photo you can afford to lose the date stamp.
Works for me.
hjw
This is exactly what I do and my jpeg photos from my iphone are organized by date which how I want them. BUT my iphone videos do not organize by date. Any when I hover over a video, it does not show me date taken. I need to have my life events organized in chronological order. Do you know why this keeps happening? Thanks!
Does this mean that the date of the picture I see in Windows is the actual date the picture was taken no matter from whom I recieved this picture before transferring it to my computer?
Not necessarily. If someone altered the picture via editing tools than the date on the file would reflect when the photo was last edited, not the original shoot date.
I followed your advice precisely and the copied photos just lose their ‘taken by’ date and there is no way that I can do as you suggest on your webpage.


Thanks for your article, very helpful. Kinda bummer that PC doesn’t preserve the location name (vs. coordinates) like it does on the phone. Haven’t tried this, but I’m wondering if you uploaded it back to iCloud would it restore the location info like it shows prior to download/offload?
Also I noticed in MS Photos app if you click the round “i” button at top it does show a map, and if you double click the map it will open up a map window and zoom into the location. But doesn’t show the same detail as iCloud.
Thanks,
Terry
I cant download all my pictures to my pc,its so much pain,i am definitely chenge from appel iphone to any other brands,I really hate that i cant use my own picture,its awfull.
This doesn’t work anymore (iOS 15.5 & Win 10). The only way I’ve found to preserve pic file details such as date taken, is to attach the pic to an e-mail from the photos app. If you attach the photo from the e-mail app or copy/paste or drag over: No date taken and other details are lost.
Before I got Windows 10 and a new computer, when I uploaded photos from my iphone to my PC, photos were transferred into folders in File Explorer arranged by dates. This was automatically done. I liked the photos being arranged this way. Now my PC doesn’t do this anymore. Instead it dumps each upload into my “Pictures,” with no organization at all and I have to hunt for pictures. Can you tell me what I can do to make it like it was? Thank you!
me too … I like Windows 7 the best.
It’s no problem when exporting iPhone JPEGs to the PC. However the MOV files do not get the Timestamp. Do you have any solution for this?
Use the “Move to” function under “File” of the Internet Explorer ( Windows 10)
Try it out with a photo you can afford to lose the date stamp.
Works for me.
hjw
Hi,
This is exactly what I do and my jpeg photos from my iphone are organized by date which how I want them. BUT my iphone videos do not organize by date. Any when I hover over a video, it does not show me date taken. I need to have my life events organized in chronological order. Do you know why this keeps happening? Thanks!
Does this mean that the date of the picture I see in Windows is the actual date the picture was taken no matter from whom I recieved this picture before transferring it to my computer?
Hi Loli,
Not necessarily. If someone altered the picture via editing tools than the date on the file would reflect when the photo was last edited, not the original shoot date.
Is there a way to keep the date on videos/live photos?
Hi Debbie,
Try the tips in this article–they appear to work for some folks but not others! Unfortunately.
Liz
I followed your advice precisely and the copied photos just lose their ‘taken by’ date and there is no way that I can do as you suggest on your webpage.
Hi Raymond,
What windows version are you using?
Sam