Apple’s Mac mini is a machine that’s well-loved by many consumers for its versatility and relatively low price point
Because of that, the Mac mini has become a favorite for people setting up servers, home media hubs, or another secondary device.
Of course, in those use scenarios, it’s not worth connecting a Mac mini to a computer monitor and other accessories all of the time. What you need is a quick, easy way to use your Mac mini without a display.
Luckily, Apple has a couple options that will let you do so — including a handy feature called Screen Sharing.
Basically, Screen Sharing is a simple method baked into macOS that lets users remotely control a Mac from another computer.
When you have Screen Sharing enabled, you can connect to, say, a Mac mini and start up a session on that computer.
From there, the Mac mini’s desktop will become visible and you can use the machine as if it’s actually connected to your monitor.
This, of course, is very handy so you can manage and tweak your Mac mini’s settings without needing to connect it to a mouse, keyboard and display first.
Here’s how to use it.
First, Configure Your Mac
Before you’re able to set up a Mac mini for use without a computer monitor or other peripherals, you’ll need a monitor (and a keyboard and mouse) to set it up.
Just plug all of your peripherals into your new Mac mini. Then, power it on and run through the standard macOS set up process.
How to Enable Screen Sharing
Open System Preferences.
Click on Sharing.
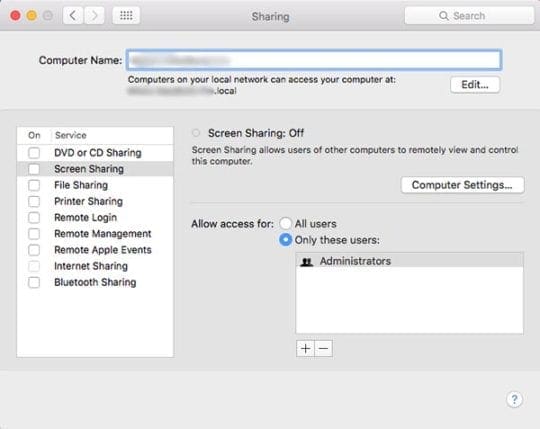
Write down the text next to Computer Name. You’ll need the name to connect remotely to your Mac mini.
You can also take note of the address, for an alternative method of connecting to your Mac mini.
Ensure that Screen Sharing is enabled by clicking on Screen Sharing in the left-hand menu. You should see the toggle in the middle turn green.
If you only want certain users to have access to connect to your Mac mini, look to the Allow access for box.
Either select All Users, or click the box next to Only these users: and add the specified users from there via the + add icon.
You can add users from Users & Groups, which includes users on your Mac.
Network Users or Network Groups includes users and groups with network server accounts.
You can also turn on Anyone may request permission to control screen. This lets another user request permission before Screen Sharing can commence — you have to explicitly accept them, but it doesn’t require a password.
Lastly, if you’d like to remotely connect to your Mac mini from a Windows PC or another non-macOS machine, you’ll need to carry out a few additional steps.
Click on Computer Settings.
Check the box next to VNC Viewers may control screen with a password.
Set a password for a non-Mac machine to use when connecting — be sure to write it down somewhere safe.
When you’re done, click on OK.
From there, you can use a VNC viewer app to remotely access the Mac mini on an iPad or another computer. You just need the password.
Using Screen Sharing
Once it’s configured, you can easily access Screen Sharing through the native Finder app.
Do note that both computers must be on the same Wi-Fi or internet network for this to work. It’s also helpful to have both computers signed into the same Apple ID — otherwise, you’ll need to enter the Apple ID and password of an authorized user.
Open the Finder app.
Under the Locations subheading, click on Network.
Double click on the Computer Name that you took note of or wrote down earlier.
Click on Share Screen.
If prompted, enter your User Name and Password.
Click on Sign In.
Alternatively, you can open Finder, click on Go > Connect to Server, and enter the address of the Mac you’d like to Screen Share.
Adjusting Some Settings
When you’re using Screen Sharing, you can also set various preferences that could be helpful.
On your Mac mini, just click on the Screen Sharing menu in the top bar and select Preferences. You’ll find various options for scaling the shared screen, changing its quality on network conditions, and blocking certain users.
You can find a similar suite of settings on the Mac you’re shared to by clicking on the View tab.
Remote Management: An Alternative Option
It’s worth noting that there’s another system built into macOS that offers similar capabilities: Remote Management.
But Remote Management is aimed at system administrators and IT people because it allows for finer controls and configuring capabilities on several Mac devices from a single point.
While it’s great for that purpose, Screen Sharing is recommended for the average user.
Keep in mind that only one of the two features may be enabled at one time. You’ll have to disable one to turn on another.
Mike is a freelance journalist from San Diego, California.
While he primarily covers Apple and consumer technology, he has past experience writing about public safety, local government, and education for a variety of publications.
He’s worn quite a few hats in the journalism field, including writer, editor, and news designer.


Write a Comment