Almost across the board, iOS is an ingeniously designed operation system. It’s clean, simple and incredibly easy to use. But, as is the case with most things, there are still some aspects of it that can be a bit annoying or troublesome.
Maybe you keep triggering Apple Pay or Shake to Undo, or Siri is randomly speaking up at inappropriate times. Whatever the case may be, here are some commonly critiqued features or settings that you can easily disable or change.
There are a number of touch- and button-based controls that can be a bit cumbersome when you’re trying to navigate iOS. Because of that, it’s useful to know how to turn them off if necessary.
Disable Double-Click to Apple Pay
Do you accidentally toggle Apple Pay whenever you’re out? If you don’t use the feature or you just would rather disable the quick access shortcut, you may consider turning it off.
Open Settings.
Tap Wallet & Apple Pay.
Make sure the toggle next to Double-Click Side Button is disabled. Similarly, on devices with Home buttons, make sure that Double-Click Home Button is disabled.
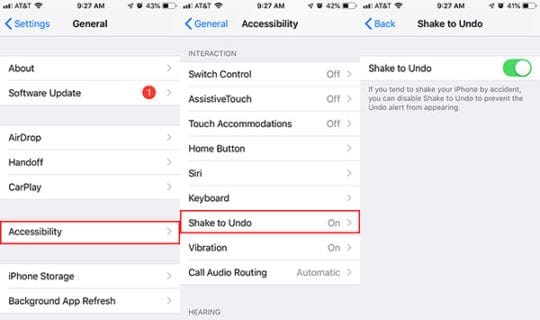
Disable Shake to Undo
Shake to Undo is actually a clever feature, but some users may find that those popups appear a bit too often for their liking. Luckily, the feature can be disabled.
Open Settings.
Tap General.
Tap on Accessibility.
Select Shake to Undo.
Make sure the toggle next to Shake to Undo is disabled. It’ll be on by default, so you’ll want to make sure it’s disabled.
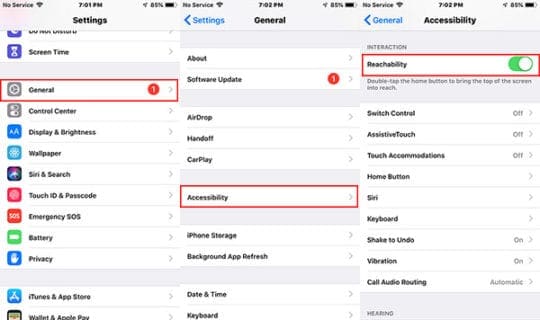
Reachability is one of those features that some users love and others never use. If you fall into the latter camp, or you just keep triggering it accidentally, you can disable it within settings.
Launch Settings.
Tap on General.
Select Accessibility.
Toggle the switch next to Reachability to disable it. It’ll be on by default, so you’ll want to make sure it grayed out/disabled.
Disable Control Center Accessibility
Having ready access to the Control Center is a nice feature, but it can be a bit tiresome if you keep accidentally bringing it up within apps or on the Lock screen.
Here’s how to fix it within apps.
Launch Settings
Tap on Control Center.
Make sure the toggle next to Access Within Apps is disabled.
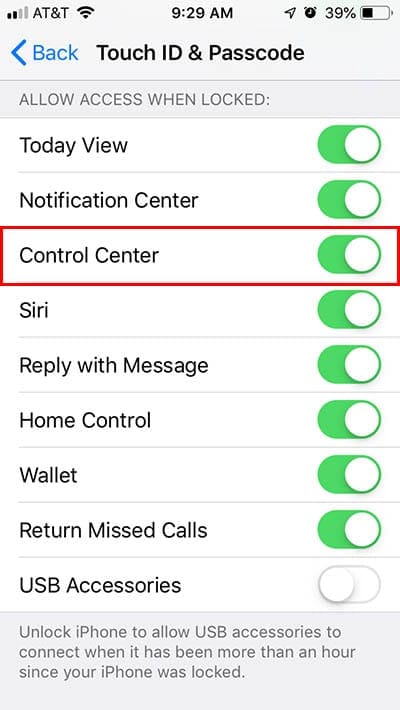
Here’s how to disable access to the Control Center from the Lock screen.
Launch Settings.
Tap on Touch ID & Passcode.
Authenticate with your passcode.
Under Allow Access When Locked, make sure the toggle next to Control Center is disabled.
Visual Tweaks
If you strain to read small text or white content is simply blindingly bright to your eyes, there are a number of visual changes you can make to iOS.
Reduce the White Point
Are bright web pages wreaking havoc on your eyes? If that’s the case, you can actually “turn down” the brightness of some white content in using a handy Accessibility feature.
Launch Settings.
Tap on General.
Select Accessibility.
Tap Display Accommodations.
Find the switch that says Reduce White Point and tap the toggle next to it.
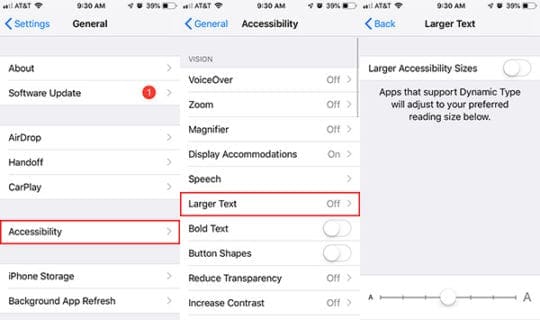
Make Text Bigger
If your eyes strain to read some of the text on your iPhone, you can actually make the system font larger pretty easily.
Launch Settings.
Tap General.
Select Accessibility.
Tap on Larger Text.
From here, you can tap and drag the slider to set the system text to a specific size. If the largest option on the slider just isn’t doing it for you, you can tap the toggle next to Larger Accessibility Sizes.
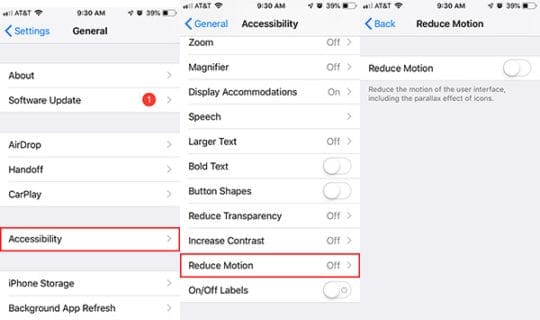
Disable Parallax and App Zooms
Some people have complained about iOS’s “aesthetic” features, like parallax and app zooms, making them sick. If that sounds like you, you can turn those features off.
Launch Settings.
Tap General.
Select Accessibility.
Tap Reduce Motion
Make sure the toggle next to Reduce Motion is switched on. It’s off by default, so you’ll want to switch it on if motion is making you dizzy.
Audio Tweaks
From keeping you notified to providing some type of satisfying tactical feedback, iOS makes quite a few sounds. However, if you don’t like some of them, you can switch them off.
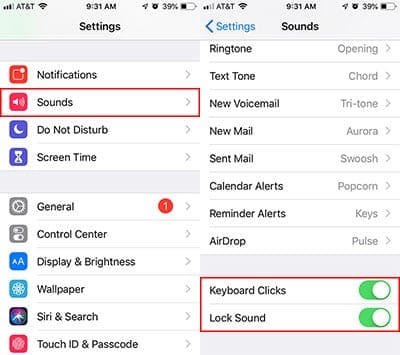
Turn Off All That Clicking
If you want your iPhone’s ringer to be on but you can’t stand all that keyboard clicking, you should know that the two features aren’t mutually exclusive. You can turn off the clicking, as well as Lock screen sounds, in Settings.
Launch Settings.
Tap on Sounds & Haptics.
Scroll down and make sure the toggles next to Keyboard Clicks and Lock Sound are toggled off.
Stop Calls From Blowing Up Your Bluetooth Speaking
Don’t want a call routed to your Bluetooth speaker? While you can set this manually when you answer, you can also set the default behavior governing it.
Launch Settings
Tap on General.
Select Accessibility.
Find and tap on Call Audio Routing.
Tap Speaker or Bluetooth Headset, whichever option you prefer.
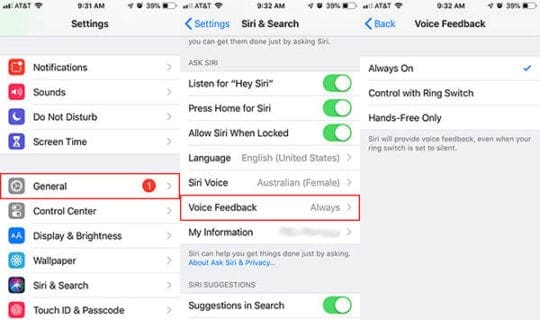
Make Siri Quiet Down a Bit
Sometimes, Siri can be a tad annoying. That’s especially true if you accidentally invoke the digital assistant. Whatever the case may be, you can set whether Siri’s responses are voiced to a couple different options.
Launch Settings.
Tap on Siri & Search.
Select Voice Feedback.
From here, you have a couple of options.
Always On is the default setting. Hence, Siri will always talk to you.
Control with Ring Switch means that Siri will only speak back when your iPhone isn’t muted or if it’s connected to a Bluetooth device.
Hands-Free Only sets Siri so that the digital assistant will only speak to you when you’re connected to a Bluetooth speaker.
We hope that you found these tips useful. Please let us know in the comments below if you have any questions or comments.
Mike is a freelance journalist from San Diego, California.
While he primarily covers Apple and consumer technology, he has past experience writing about public safety, local government, and education for a variety of publications.
He’s worn quite a few hats in the journalism field, including writer, editor, and news designer.


")


")


Write a Comment