Deep within OS X or macOS is a small but critical text document called the Hosts file. Among most users, it’s a pretty unknown feature. But it’s actually a handy alternative to a DNS server.
A DNS server is kind of like an “address book” of the internet. It stores the IP addresses of websites. When you type a domain into your browser, your computer contacts a DNS to translate that domain into a usable IP address.
Just think of the Hosts file as your computer’s personal “address book,” rather than a third-party one. And you can edit it.
There are actually a range of options why you might want to. Here’s what you need to know about it.
There are actually two ways to edit the Mac Hosts file. You can use Terminal or a standard text editor.
The method you use is up to you.
Using the Terminal
The simplest way to edit the Hosts file is by using the built-in UNIX terminal in OS X or macOS.
It may seem a bit intimating if you’re aren’t used to typing in code, but it’s quite a bit simpler than it looks.
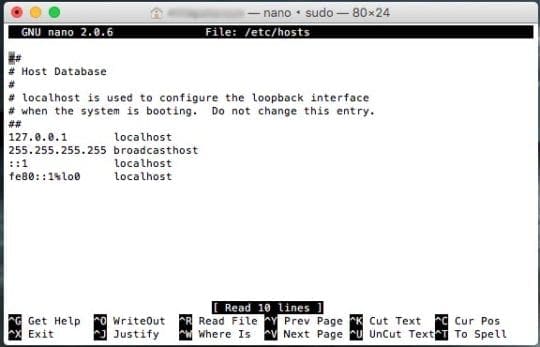
Hosts File in Nano Editor
Open the Terminal application on your Mac. Use Spotlight, the Launchpad, or find it under Applications in a Finder window.
You’ll need to access the Hosts file in the Nano text editor. You can do so by typing this in the terminal: sudo nano /etc/hosts
You’ll be prompted to enter an administrator password. Input it and proceed.
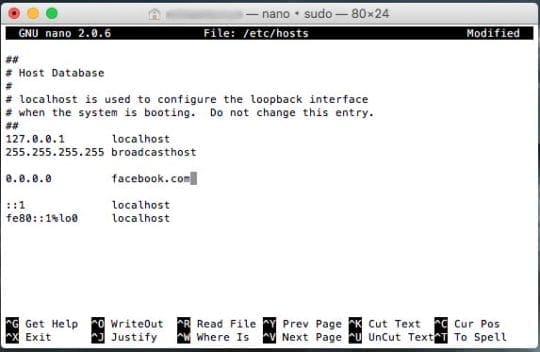
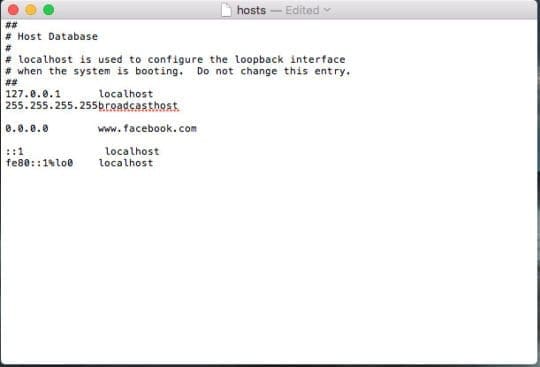
From here, use your arrow keys to move the cursor to below “broadcasthost.” This is where you’ll input your domains and IP addresses.
Just type in the domain name you want to assign an address to. Then, hit Tab and type in the domain name itself.
Save changes by pressing Control + O to overwrite and your changes, and then Control + X to exit the Terminal.
Using the Text Editor
You can also edit the Hosts file using a standard text editor. However, since the file itself is protected, you won’t be able to simply double-click and edit it.
You’ll need to copy the file elsewhere, make your changes, and then copy the edited file back into the proper location to overwrite the default file.
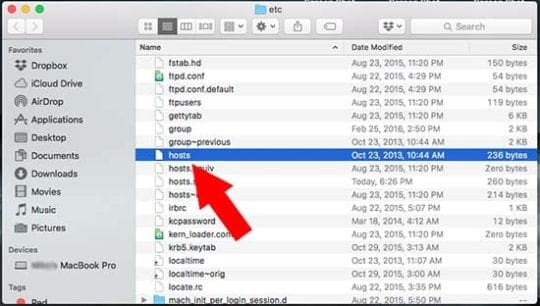
Open Finder and select Go > Go to Folder.
Type the following into the box: /private/etc/hosts
Locate the Hosts file and drag it to the desktop.
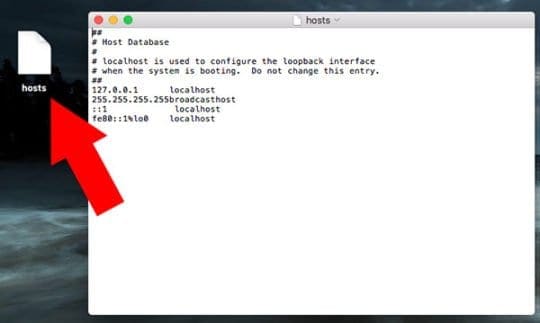
Double-click the Hosts file on your desktop.
Like editing Hosts in Nano, this will allow you to make changes to the file. You can try a similar step with the Facebook domain and IP address to test it out.
Again, type in the IP address. Hit Tab. Then, type in the domain name. After you’re done, follow the steps below.
Save the edited file.
Go back to Finder and navigate to the /private/etc/hosts location.
Drop the edited Hosts file into this folder and macOS will ask you what to do with the original.
Choose Replace and authenticate with your administrator password.
Not Working? Flush the DNS Cache
If you notice that your domain mappings aren’t working correctly, you might need to flush your Mac’s DNS cache.
You can do so using Terminal. Just open it with Spotlight or by finding it in Applications. Then, type in one of the following commands.
For OS X Mavericks and later, use this: sudo killall -HUP mDNSResponder
For OS X Mountain Lion and earlier, use this: dscacheutil -flushcache; sudo killall -HUP mDNSResponder
Just authenticate with your administrator password and you’ll be good.
How to Restore the Default Hosts File
Of course, messing around with a system file like Hosts can have unintended side effects on your computer.
Similarly, you might be done with whatever goal you wanted to achieve by editing it.
Whatever the case may be, you can restore the default Hosts file by using one of the methods above.
Then, just enter the following information below into the text or Nano editor — this is the Hosts file as it normally appears on most Macs.
##
# Host Database
#
# localhost is used to configure the loopback interface
# when the system is booting. Do not change this entry.
##
127.0.0.1 localhost
255.255.255.255 broadcasthost
::1 localhost
fe80::1%lo0 localhost
Why Should You Edit Your Hosts File?
Browser Speed Boost
If a DNS is like an internet address book, you can think of your Mac’s Hosts file as a localized version of it.
Because your computer won’t have to contact a DNS server to translate a domain name into an IP address, using the Mac Hosts file could nominally speed up your internet browsing.
For example, if you have a site you visit often, just use a service like IP Checker to figure out its IP address. (Type the domain name into the box on the site.)
When you’re editing the Hosts file, just assign that IP address to that domain name. It isn’t readily clear just how much this will speed up your browsing, but it’s worth a shot if you’re serious about loading certain sites quickly.
Blocking Malicious Webpages
If you’re tired of adware or malicious webpages opening up when you’re navigating through the internet, editing the Hosts file can help.
Just note the next time a site pops up without your intention — and write down the domain name.
Follow either of the above methods and add a bogus IP address to it. The next time a site tries to reroute your browser, the page will fail to load.
This is also a great way to block sites for parental controls. Just edit a site you don’t want your child visiting and give it a bogus IP address.
They won’t be able to visit the site, no matter what they do (unless they figure out the Hosts file method).
Productivity & Focus
This may be a drastic measure, but clever editing of the Hosts file can do wonders for your productivity and focus.
If you’re working on a report, novel or another long project, but you just don’t seem to stop yourself from browsing social media, this could come in handy.
Just type in the domain names into the Mac Hosts file and assign them an invalid IP address (like we demonstrated in the above steps).
The next time you try to open Facebook, Reddit or some other social media, your browser won’t be able to.
Alternatively, you can assign the site to an actual domain address. For example, mapping the Facebook domain to the IP address for the New York Times.
Network Testing
Editing the Mac Hosts file is a great way to test out new web servers or networks.
Network developers, for example, can reroute a domain name to a site in development. This allows them to see a site how an actual user or visitor will.
Of course, because server and network testing are likely only being done by those who are already “in the know,” we won’t expand too much on this entry.
Mike is a freelance journalist from San Diego, California.
While he primarily covers Apple and consumer technology, he has past experience writing about public safety, local government, and education for a variety of publications.
He’s worn quite a few hats in the journalism field, including writer, editor, and news designer.


Write a Comment