Not all photos are meant to be seen by everyone. And if you let your child use your iPad or your friend borrow your Mac, keeping pictures that should be private tucked away is a smart idea. You just never know when someone might pop open that Photos app by mistake, right?
While you can search the App Store for apps that hide your photos with passwords, and there are plenty of them, you should check out the built-in feature in the Photos app first.
Here we’ll show you how hide photos on your iPhone, iPad, and Mac as well as view and unhide them later.
Open the Photos app and navigate to where the pictures are that you want to hide. They can be in an album, in the For You section, or just on the Photos tab.
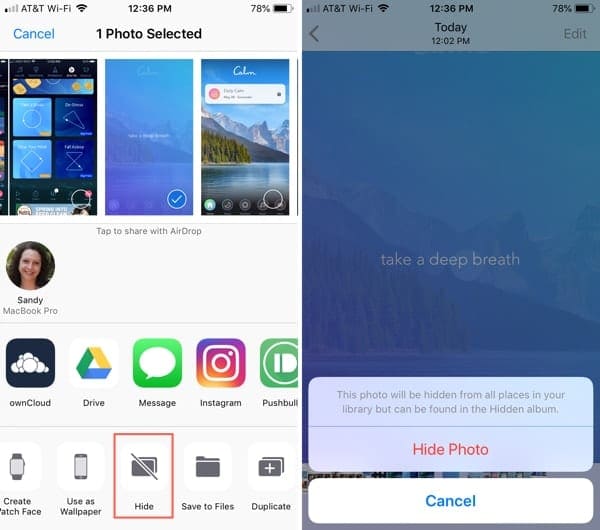
Select one photo at a time by tapping it or tap Select on the top right to choose multiple photos.
Tap the Sharing button on the bottom left.
Choose Hide.
Confirm that you want to hide the photo by tapping Hide Photo(s).
Tap to hide a photo on iPhone
View hidden pictures on iPhone and iPad
When you’re ready to see those photos, you can view and unhide them if you like.
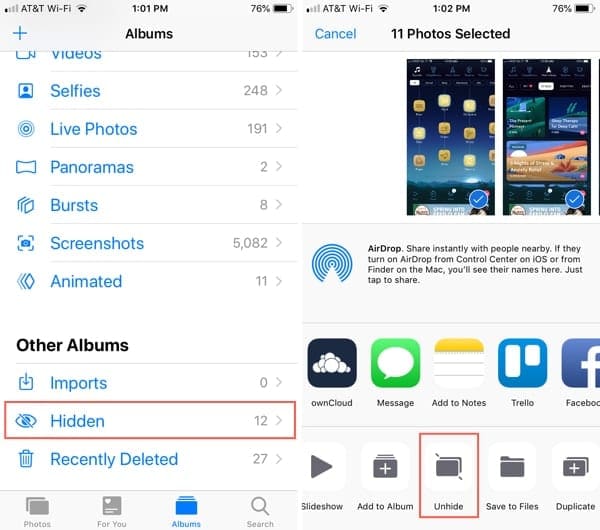
Tap Albums in the Photos
Scroll to the bottom under Other Albums and tap Hidden.
If you want to unhide a photo, select it, tap the Sharing button, and pick Unhide.
View your Hidden album and unhide photos on iPhone
How to hide photos on Mac
You can hide pictures just as easily on Mac as on iOS. Open the Photos app and then follow these steps to hide photos.
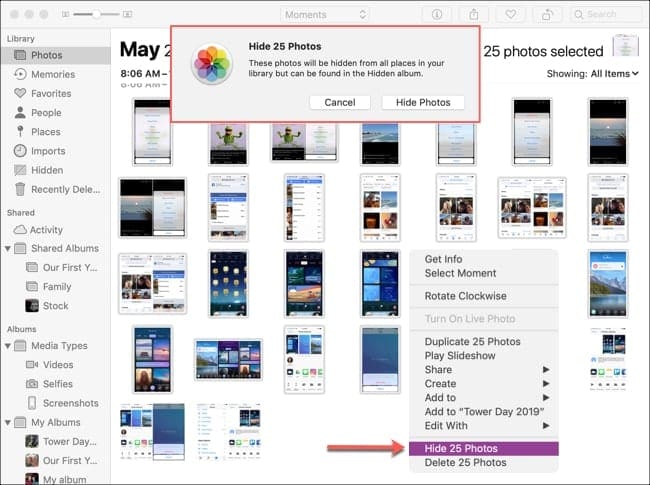
Select one photo at a time by clicking it. For multiple photos, hold the Shift key for the first and last photo to select a range or hold Command and click each picture individually.
Right-click or hold Control and click the photo(s).
Select Hide Photo(s) from the context menu. You can also click Image > Hide Photo(s) from the menu bar.
Confirm that you want to hide the photo by clicking Hide Photos.
Click to hide photos on Mac and confirm
View hidden pictures on Mac
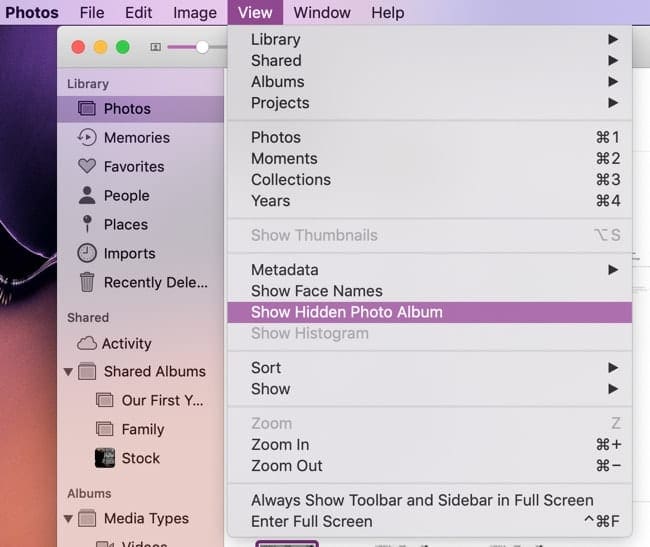
If you do not see the Hidden folder under Library in the Photos app on Mac, click View > Show Hidden Photo Album from the menu bar. The album will then appear in your Library on the left.
View the Hidden photo album on Mac
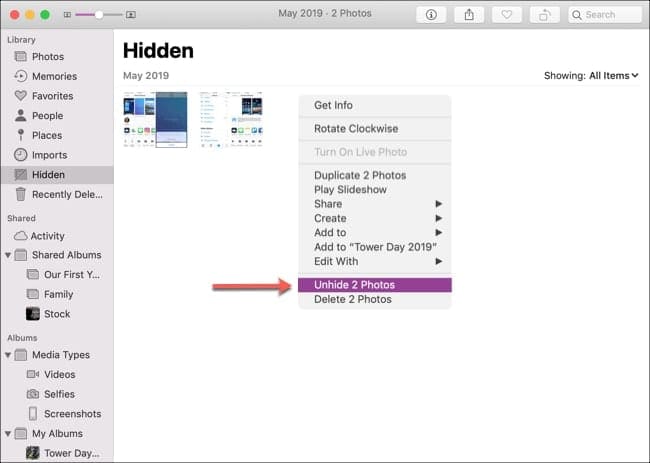
If you want to unhide a photo, right-click or hold Control and click the photo(s). Select Unhide Photo(s) from the context menu. You can also click Image > Unhide Photo(s) from the menu bar.
Click to unhide photos on Mac
Keep your photos to yourself
The hide feature in the Photos app does not provide any extra security, but it does take those pictures out of the main view and put them into the Hidden album. And this might be just the right thing for the photos you want to hide.
Are you going to use this feature to keep your photos to yourself? Or do you need more protection for your photos like a third-party app? Leave a comment below or visit us on Twitter!
Sandy worked for many years in the IT industry as a project manager, department manager, and PMO Lead. She then decided to follow her dream and now writes about technology full-time. Sandy holds a Bachelors of Science in Information Technology.
She loves technology– specifically – terrific games and apps for iOS, software that makes your life easier, and productivity tools that you can use every day, in both work and home environments.
Her articles have regularly been featured at MakeUseOf, iDownloadBlog and many other leading tech publications.
Tap Albums from the Photos app bottom tabs. Then scroll all the way down to Other Albums, you should find Hidden there. Tap it to open and select the share button. Scroll down the list of share sheet and locate Unhide. Tap that and that photos shows up again!


Can you put a password on you hidden photos album on the iPhone 11
How do you unhide your photos from the new update on the 13.1.2 on iPhone 6s
HI Jade,
Tap Albums from the Photos app bottom tabs. Then scroll all the way down to Other Albums, you should find Hidden there. Tap it to open and select the share button. Scroll down the list of share sheet and locate Unhide. Tap that and that photos shows up again!