Local storage is one of the most important things to manage on your Mac. And generally, it’s pretty easy. But how do you go about clearing out storage that’s “purgeable”?
Based on the name, you may think that purgeable space is simple to get rid of. But Apple doesn’t make it very easy. As a workaround, it could require some technical tweaking. In any case, here’s everything you need to know about purgeable storage on your Mac.
In a nutshell, purgeable storage refers to files or documents on your disk that macOS can remove if more space is needed. Don’t worry, macOS isn’t going to delete any of your important files — the files in purgeable space are actually more of a redundancy feature.
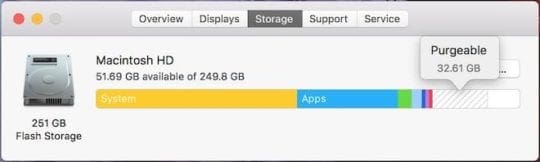
To see how much purgeable space is on your Mac, you can head to Apple menu —> About This Mac —> Storage. Purgeable space shows up as white space with a diagonal gray pattern over the top (see above).
But what files or documents does the purgeable storage category actually refer to? Well, there are a couple of things that fall into it, including the following:
Locally stored copies of files that you have stored in iCloud. This helps speed up opening those files if you need them.
Full-resolution versions of photos stored in iCloud (that can be downsampled if needed).
Various cached data and temporary system files that macOS can delete if necessary.
Large font files that you rarely use, or may never use.
Dictionaries that you haven’t used or accessed in a while.
Movies and TV shows that you’ve already watched. (And, if deleted, can easily be re-downloaded from iTunes.)
Locally stored Time Machine data, which is separate from the backups on your Time Machine drive.
There are also reports that data sent to Trash but not deleted immediately will show up as purgeable space.
As you might notice, there’s another element to purgeable storage: guesswork. For many of the data categories, macOS is making an educated guess as to whether or not you’ll actually need or access those files anytime soon.
While macOS will theoretically clear out purgeable space as needed, there are some instances when it may not do so. If you’re trying to partition your drive, download a major software update or install a large app, you may run into a brick wall. That’s because purgeable space is technically still “allocated” system storage.
How to clear out Purgeable Space
So purgeable space is space that isn’t necessary, so you can go about safely clearing it out, right? Theoretically, yes. But the problem is that the fact that Apple doesn’t allow users to clear out purgeable space manually.
There are a few other options and workarounds for clearing out additional space on your Mac’s drive, including purgeable storage, however. Here are a few that work.
Method 1: Optimize Mac Storage
Applying some of these storage-saving settings to your Mac may clear out purgeable files.
Apple first introduced the idea of purgeable space back in macOS Sierra, when it also debuted a new Optimized Storage feature to the Mac ecosystem.
There are conflicting reports about whether Optimize Storage actually causes purgeable space or whether it can help clear it out. But while your own mileage may vary, heading to Optimize Storage and trying out some of the options are worth a shot.
Click on the Apple icon in the top menu bar.
Click About This Mac.
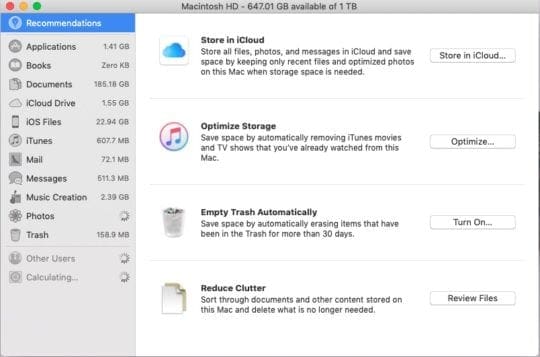
In the window that pops up, click on Storage to bring up the storage pane.
Click the Manage button.
From here, you should see a number of options that could help clear out the storage space on your Mac. That includes storing files and photos in iCloud, optimizing storage by clearing out email attachments and media content, emptying the trash automatically and reducing clutter.
Try these out and see if it makes a difference on your purgeable storage.
Method 2: Open up that Terminal
Sure, the Terminal is a bit scary. But using it to clean out purgeable storage is effective — and free.
You can also “force” macOS to clear out purgeable storage by attempting to download or install a large file. It can be hard to find a file large enough to fill your Mac’s disk, but you can just create one yourself.
This method relies on using the Terminal, so you may want to skip it if you aren’t comfortable with Terminal commands. In any case, it’s effective (as noted by its creator, software engineer Brian Ambielli.)
Note: System commands like these can be dangerous. Make sure to copy and paste the following commands or type them exactly as they appear.
Open the Terminal app by typing that into the Spotlight search bar.
Type the following command into the Terminal window: mkdir ~/largefiles
Hit Return.
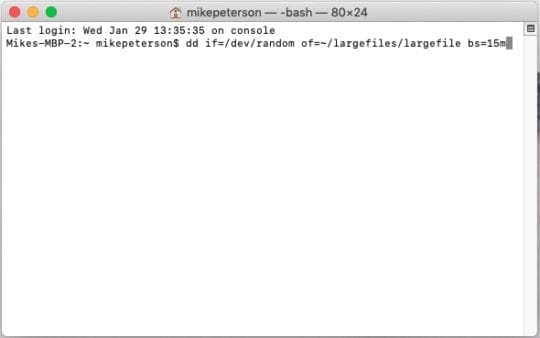
Now, type in this command: dd if=/dev/random of=~/largefiles/largefile bs=15m (It’s normal for your Terminal to look like it’s frozen. That’s just the command at work.)
After about five minutes or so, hit Control + C in Terminal to stop the previous command.
Now, type in this command: cp ~/largefiles/largefile ~/largefiles/largefile2
Once that’s done, type the same command in, but change the last number to “3.” After it runs, change the last number to “4,” and so on.
You’ll want to continue this cycle until you see a macOS message appear that says “disk is critically low.”
Once you do, type in and execute this command: rm -rf ~/largefiles/
Head to the Trash Bin and empty it.
Essentially, what this is doing is creating a single large file and storing it in a system folder called “largefiles.” Then, using the third terminal command, you’re actually copying the large file in its entirety over and over again.
The last command will delete all of the large files. (Though they’ll keep taking up storage until you clear out the Trash Bin.)
Note that you won’t be able to achieve similar results by just copying a large file over and over again in Finder. That’s because if you just use copy/paste or Command + D, macOS actually just creates a reference to the old file instead of creating a brand new file.
Method 3: A Third-Party App
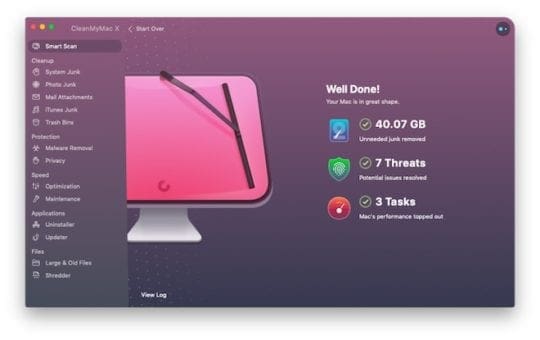
Third-party apps like CleanMyMac can help clear out purgeable storage. But they aren’t free.
There are also third-party apps, like CleanMyMac, that can help you achieve similar results. It’s an option, but we recommend it the least out of the options on this list.
For the most part, many of these apps are bloated and contain unnecessary features. And, unless you’re careful about the app you download and the permission you give it, there’s a risk of malicious activity, too.
The kicker is that most of these apps aren’t free. Or, if they are, they’ll only let you perform certain activities without paying for a premium membership.
Of course, if Optimize Storage isn’t helping and you’re 100% not comfortable with Terminal, then a third-party app may be your best bet.
Mike is a freelance journalist from San Diego, California.
While he primarily covers Apple and consumer technology, he has past experience writing about public safety, local government, and education for a variety of publications.
He’s worn quite a few hats in the journalism field, including writer, editor, and news designer.
What I did: (Ventura M1 Mac Mini)
1 – Open up Macintosh HD Info
Now it specifies Available xx Gb (YY Gb purgeable)
2- Copy 1 or 2 files to fill up the space to xx Gb. In my case I took some MKV files from the NAS.
3.- Once Copy starts, you see the purgeable amount drop within minutes. In my case 30Gb > 2 Gb
4. When the drop is significant enough, cancel the copy of the file(s).
5. Now your space is available again!
Finally could install Native Instruments Komplete parts one by one this way.
I think the methods here are unnecessary. I turned off Time Machine automatic backups then quit the TM preferences and that deletes the local snapshots that are stored for 24 hrs. It is not an instant process, the free space starts growing over several minutes and is in progress as I type this comment (from 29GB to 153GB).
Option 2 is the only way to go. It took like 15 mins (plus the 3 hours to actually find this method!). It helped that I understood basic Unix commands, so I could do a directory list ( ls -l ) and understand it was working as expected. I also had a “Get Info” window up so I could see the available disk space drop and then come back.
I now have 128 bytes purgeable and 220 GB available 🙂
Now Native Instruments will install without issue.
The Terminal App method worked great, but note that typing in the final command deleted the entire largefiles folder without sending the files to Trash, so you can eliminate that step in your instructions.
The “/dev/random” is slow, be aware. I ran it for 1 minute and it only created ~100MB. As I needed to purge over 35GB this would take too long. I wrote a Perl script that would 20GB or more in a few minutes.
What I found, Open the ‘Get Info’ for the drive. Look at Available vs Purgeable. As the file(s) are created watch the two when Available = Purgeable then purge space will be cleared. I my case it was abrupt. Purgeable suddenly dropped from 80GB to 7GB. Then ‘rm’ the files and the true free space will still be there.
Just did this with my Macbook Pro under Mojave. The cp command failed on the ninth iteration “No space left on device” so I then executed the rm command.
I still see a large purgeable space:
Available: 248.38 GB (179.76 GB purgeable).
Any thoughts?
I don’t know if it matters, but I have a 1TB NVMe drive, not the stock 240 GB SSD that was OEM.
Yes, I’m experiencing the exact same thing, Eric. This technique doesn’t allow me to clear purgeable memory. It only allows me to fill up the already free space. 🙁
I don’t know what happened in Terminal. I repeated until the last digit was 9, then I executed the last command. Nothing ever showed up in Trash and I searched in This Mac for anything named Large or Largefiles. I’m perplexed. Thank you.
Following the instructions, typed mkdir ~/largefiles, and after each subsequent line command I receive “No such file or directory”
2019 MacBook Pro running Catalina
Exact same machine and OS here and the same result here. After typing “dd if=/dev/random of=~/largefiles/largefile bs=15m” in Terminal I get this result instantly.
dd: ~/largefiles/largefile: No such file or directory
Why “/dev/random” and not “/dev/zero”? “/dev/random” consumes much more CPU.
The second thing, why empty “Trash” since you’re erasing the file from terminal? “rm” command does not move the files to “Trash”, but completely erase them from your drive…
You could’ve simply said to run this: “dd if=/dev/zero of=I_AM_FAT bs=512m; rm -f I_AM_FAT” instead of writing 4 pages for a “one-liner”.
While I don’t know enough about Terminal commands to know why PauR referred to the -n option instead of “zero” (-n doesn’t appear in the Terminal method above, nor in the one at the link I provided) maybe the reason for using “random” is similar.
OK. I’ve just tried it again WITHOUT hitting return and it doesn’t work. So that’s answered that. I’ve just tried it all again for a third time (hitting return/executing every time) and again the Trash Bin was empty but this time I haven’t been able to get rid of anymore of the purgeable space. I still have 7 GB of purgeable space left. Can you please offer any help here? Thank you.
Thank you for this. I do apologise if I’m being dumb here but with the Terminal method, on your third bullet point you say to “Hit Return”. Do I have to “Hit Return” after all the other commands have been typed/copied in? I’ve tried the whole thing once, hitting return after every command and DID actually manage to recover 3 GB of the 10 GB purgeable BUT there wasn’t anything in the Trash Bin to delete, it was empty. The 3 GB just came back after I typed in and executed the last command. I only ask about the “Hit Return” thing because you say it at the beginning then again on the last command by saying “executed” but not with the middle lot of commands. I know you must be thinking “anyone who has to ask this question shouldn’t be using Terminal in the first place”!!! It’s just my OCD screaming at me. Thank you.
Excellent article! You saved me from a huge headache! The Music App on my 7 year old MacBook (w/ Catalina) wasn’t recognizing I had enough disk space (due to purgeable space). Long story short, I spent hours with Apple support trying to figure out why my disk space was being reported differently in 3 different places (About, Info and Disk Utility). Finally I was escalated to level-2 support only to be told my Mac Hardware is obsolete and they are not “authorized” to help me. I flipped – these things cost $2500 and last 10+ years. I even offered to pay them. Nope ..
Anyway, after reading several articles that offered the basic suggestions (clear your trash, duh!) I stumbled on yours! Dang! Yes! Use the terminal! Thank you! You saved me buying a new computer or suing Apple (lol!)


What I did: (Ventura M1 Mac Mini)
1 – Open up Macintosh HD Info
Now it specifies Available xx Gb (YY Gb purgeable)
2- Copy 1 or 2 files to fill up the space to xx Gb. In my case I took some MKV files from the NAS.
3.- Once Copy starts, you see the purgeable amount drop within minutes. In my case 30Gb > 2 Gb
4. When the drop is significant enough, cancel the copy of the file(s).
5. Now your space is available again!
Finally could install Native Instruments Komplete parts one by one this way.
No need for terminal commands in my case.
I think the methods here are unnecessary. I turned off Time Machine automatic backups then quit the TM preferences and that deletes the local snapshots that are stored for 24 hrs. It is not an instant process, the free space starts growing over several minutes and is in progress as I type this comment (from 29GB to 153GB).
Jim@Mac-M1-Mini ~ % mkdir ~/largefiles
Jim@Mac-M1-Mini ~ % dd if=/dev/random of=~/largefiles/largefile bs=15m
dd: ~/largefiles/largefile: No such file or directory
Fails at step 2 on an M1 Mini running Monterey 12.2.1
Worked a treat! Thanks so much! I was searching for hours and this did it!
I CANNOT THANK YOU ENOUGH
Will the terminal option work with Catalina?
Thanks
Option 2 is the only way to go. It took like 15 mins (plus the 3 hours to actually find this method!). It helped that I understood basic Unix commands, so I could do a directory list ( ls -l ) and understand it was working as expected. I also had a “Get Info” window up so I could see the available disk space drop and then come back.
I now have 128 bytes purgeable and 220 GB available 🙂
Now Native Instruments will install without issue.
Very grateful for the info.
The Terminal App method worked great, but note that typing in the final command deleted the entire largefiles folder without sending the files to Trash, so you can eliminate that step in your instructions.
Thanks!
Wow this is so simple and worked great . I struggled with this for several hours until i found your article . this worked perfect. Thank you so much!!
The “/dev/random” is slow, be aware. I ran it for 1 minute and it only created ~100MB. As I needed to purge over 35GB this would take too long. I wrote a Perl script that would 20GB or more in a few minutes.
What I found, Open the ‘Get Info’ for the drive. Look at Available vs Purgeable. As the file(s) are created watch the two when Available = Purgeable then purge space will be cleared. I my case it was abrupt. Purgeable suddenly dropped from 80GB to 7GB. Then ‘rm’ the files and the true free space will still be there.
Just did this with my Macbook Pro under Mojave. The cp command failed on the ninth iteration “No space left on device” so I then executed the rm command.
I still see a large purgeable space:
Available: 248.38 GB (179.76 GB purgeable).
Any thoughts?
I don’t know if it matters, but I have a 1TB NVMe drive, not the stock 240 GB SSD that was OEM.
Yes, I’m experiencing the exact same thing, Eric. This technique doesn’t allow me to clear purgeable memory. It only allows me to fill up the already free space. 🙁
I don’t know what happened in Terminal. I repeated until the last digit was 9, then I executed the last command. Nothing ever showed up in Trash and I searched in This Mac for anything named Large or Largefiles. I’m perplexed. Thank you.
Following the instructions, typed mkdir ~/largefiles, and after each subsequent line command I receive “No such file or directory”
2019 MacBook Pro running Catalina
Exact same machine and OS here and the same result here. After typing “dd if=/dev/random of=~/largefiles/largefile bs=15m” in Terminal I get this result instantly.
dd: ~/largefiles/largefile: No such file or directory
Why “/dev/random” and not “/dev/zero”? “/dev/random” consumes much more CPU.
The second thing, why empty “Trash” since you’re erasing the file from terminal? “rm” command does not move the files to “Trash”, but completely erase them from your drive…
You could’ve simply said to run this: “dd if=/dev/zero of=I_AM_FAT bs=512m; rm -f I_AM_FAT” instead of writing 4 pages for a “one-liner”.
Regarding the use of the “random” command instead of “zero”: There’s a comment by PaulR at https://apple.stackexchange.com/questions/254676/how-do-i-clear-the-purgeable-area-on-my-disk, in which he says “On APFS you can’t use the -n option b/c it’s smart about not needing to store a file full of zeros…”
While I don’t know enough about Terminal commands to know why PauR referred to the -n option instead of “zero” (-n doesn’t appear in the Terminal method above, nor in the one at the link I provided) maybe the reason for using “random” is similar.
Excellent, It works and saved me 252 GB and $$ in purchasing software apps.
OK. I’ve just tried it again WITHOUT hitting return and it doesn’t work. So that’s answered that. I’ve just tried it all again for a third time (hitting return/executing every time) and again the Trash Bin was empty but this time I haven’t been able to get rid of anymore of the purgeable space. I still have 7 GB of purgeable space left. Can you please offer any help here? Thank you.
Thank you for this. I do apologise if I’m being dumb here but with the Terminal method, on your third bullet point you say to “Hit Return”. Do I have to “Hit Return” after all the other commands have been typed/copied in? I’ve tried the whole thing once, hitting return after every command and DID actually manage to recover 3 GB of the 10 GB purgeable BUT there wasn’t anything in the Trash Bin to delete, it was empty. The 3 GB just came back after I typed in and executed the last command. I only ask about the “Hit Return” thing because you say it at the beginning then again on the last command by saying “executed” but not with the middle lot of commands. I know you must be thinking “anyone who has to ask this question shouldn’t be using Terminal in the first place”!!! It’s just my OCD screaming at me. Thank you.
Excellent article! You saved me from a huge headache! The Music App on my 7 year old MacBook (w/ Catalina) wasn’t recognizing I had enough disk space (due to purgeable space). Long story short, I spent hours with Apple support trying to figure out why my disk space was being reported differently in 3 different places (About, Info and Disk Utility). Finally I was escalated to level-2 support only to be told my Mac Hardware is obsolete and they are not “authorized” to help me. I flipped – these things cost $2500 and last 10+ years. I even offered to pay them. Nope ..
Anyway, after reading several articles that offered the basic suggestions (clear your trash, duh!) I stumbled on yours! Dang! Yes! Use the terminal! Thank you! You saved me buying a new computer or suing Apple (lol!)