In a recent post, I covered some of the best Homebrew apps available on Mac and how to install them. That post is only helpful, though, if you have Homebrew installed on your Mac. So in this post, I’m going to show you how to install Homebrew on Mac.
It’s a pretty simple process, so feel free to skip down, follow the steps, and leave this post. If you wanna stick around, I’ll also be covering things like updating Homebrew, upgrading and removing Homebrew apps, and more.
Before you install Homebrew on Mac, you’ll need to make sure you have the following:
A 64-bit Intel CPU or an Apple Silicon CPU (i.e., an M1 Mac)
You can check if you have a compatible Mac by pressing cmd + spacebar, typing “About This Mac”, pressing return, and then checking the Processor. Any M1 Mac or later will work. These are all of the 64-bit Intel processors that Apple has used:
Core 2 Duo
Dual-core Xeon
Quad-core Xeon
Core i3
Core i5
Core i7
If you have one of the above processors, you’re all set!
macOS Mojave (10.14) or later (you can check this using About This Mac as well)
Command Line Tools for Xcode (type xcode-select --install into your terminal and press return)
A Bourne-compatible shell for installation (i.e., bash or zsh)
You can check if you have a bash or zsh shell by opening the terminal and looking at the top of the terminal window
And, finally, you need an internet connection
Install Homebrew on Mac in one step
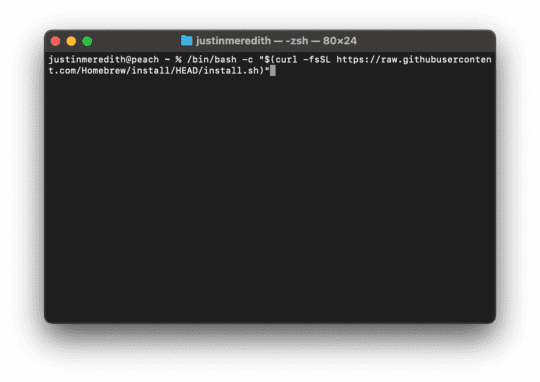
As advertised, this method only takes one step. To get started, open the terminal on your Mac. You can do this by pressing cmd + spacebar, typing “Terminal”, and pressing return.
Once opened, paste the following in the Mac terminal and press return:
This will start the installation process. Like any non-App-Store installation, you’ll be asked for confirmation at a few different steps. Press return to continue installing when these prompts come up, or if you want to stop, press any other key on your keyboard.
You’ll also be asked to enter your macOS password. This will need to be the administrator password. A few seconds after inputting this, Homebrew should be successfully installed on your Mac.
In total, this generally takes less than one minute. You can then start using Homebrew right away. Read here for some great apps to get started.
How to update Homebrew on Mac
Alright, now that you know how to install Homebrew on Mac, let’s cover some other stuff, starting with updating. Like any app, Homebrew gets updates just like any other app. These improve its compatibility, security, and occasionally add features as well as improve its performance.
Sometimes, if you’re using an outdated version of Homebrew, you’ll run into errors when running certain Homebrew apps or trying to install certain packages. 9/10, updating Homebrew will solve this problem.
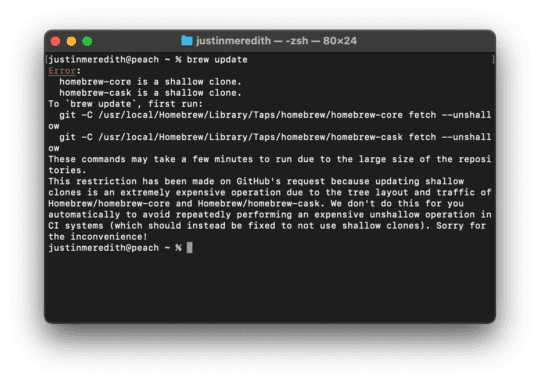
To update Homebrew on Mac, paste the following into your terminal and press return:
brew update
You may get an error that looks like this:
If you’re a user, feel free to ignore it; this won’t affect your ability to update or use Homebrew. If you’re a developer, click here to learn more about these “errors”.
How to upgrade Homebrew apps on Mac (a.k.a. packages)
Another useful thing to know after you install Homebrew on Mac is how to upgrade Homebrew apps. This is basically the same as updating Homebrew itself. It’s just called “upgrading” to distinguish between the two commands.
To upgrade all of your Homebrew apps (or packages, as they’re often called) at the same time, just paste this into your terminal and press return:
brew upgrade
To upgrade a specific Homebrew app, paste the following into your terminal, replace <formula> with the app you want to upgrade, and press return:
brew upgrade <formula>
As a fun bonus, you can check which of your Homebrew apps need to be upgraded by pasting this into your terminal:
brew outdated
This will give you a list of everything that needs to be upgraded.
How to downgrade Homebrew apps on Mac
Now, let’s say that for some reason, you wanted to downgrade a particular Homebrew app. Generally, you don’t want to do this if you’re a user. And even if you’re a developer, this is something you’ll only want to do on the odd occasion. This isn’t too difficult, but there are a few extra steps you’ll need to take.
First, you’ll want to use the following command, replacing <formula> with the Homebrew app you want to downgrade:
brew search <formula>
This will create a list of the current version of the app that you’re using (marked with a checkmark) and all of the other outdated versions of that app. Here’s an example with the youtube-dl package:
Next, decide which outdated version of the package you want to downgrade to and use the following command:
brew install <outdated_formula>
For example, to downgrade from youtube-dl to youtube-dlc, I would use the command brew install youtube-dlc.
You’re almost done. There’s still one problem, though; whenever you run commands with this app, Homebrew is still going to use the most up-to-date version of the app. That’s because this version is linked. To unlink it, run this command:
brew unlink <formula>
Lastly, link the outdated version you just installed using this command:
brew link <outdated_formula>
And that’s it!
How to remove Homebrew apps
Before we close this post out, I’m also going to cover uninstalling Homebrew apps/packages. We’ve come full-circle from learning to install Homebrew on Mac.
To uninstall a Homebrew app, use the following command in your Mac terminal:
brew uninstall <formula>
Of course, when you use the above command, you’ll want to replace <formula> with the app you’re trying to uninstall.
To finish up, run brew cleanup to remove any unnecessary files and directories that are left over from uninstalls.
After you install Homebrew on Mac…
You’ve done it! You now know how to install Homebrew on your Mac and have a bunch of other know-how when it comes to managing your version of Homebrew and your packages.
After that, you’re ready to start learning more about Homebrew and the terminal. You can start with this tutorial I wrote recently, or you could just read through the rest of the AppleToolBox blog.


Write a Comment