Part of the fun of having an iOS device is playing around with the settings to truly customize your experience. Some may immerse themselves in their Settings application only to lose themselves in the chaos of not knowing how to go back to a certain menu. Luckily, there’s a new-ish feature on iOS called the Settings Navigation History, which shows you the menu screens you’ve visited. This feature is similar to when you hold down the back button in your web browser when on a computer. In both cases, you can easily navigate to a previously visited page. If you feel like you could benefit from seeing the Settings application’s page hierarchy when you navigate through it, read on to learn more about the Settings Navigation History feature on your iOS device.
How to Use Settings Navigation History on iPhone or iPad
You don’t need to toggle any specific settings to enable the Settings Navigation History feature — newer iOS versions automatically enable it as a quality-of-life update. To use the feature, simply hold down the back button when you’re on any Settings page, and you’ll see the hierarchy of pages you’ve visited previously. What’s great about this feature, though, is that it’s actually not just limited to the Settings application. You can hold the back button on any Apple-developed apps, such as the App Store, Apple Music, or other similar applications, and you’ll be able to see the previous pages you’ve visited. This isn’t well known among casual users, and it can definitely help you if you get confused when navigating your iOS device or want to streamline your device usage.
Other iOS Settings Tricks Like Settings Navigation History
If you’re interested in making more changes and customizations to your phone after learning about the Settings Navigation History function, here are some cool tips you can play around with.
Take Screenshots of Entire Webpages
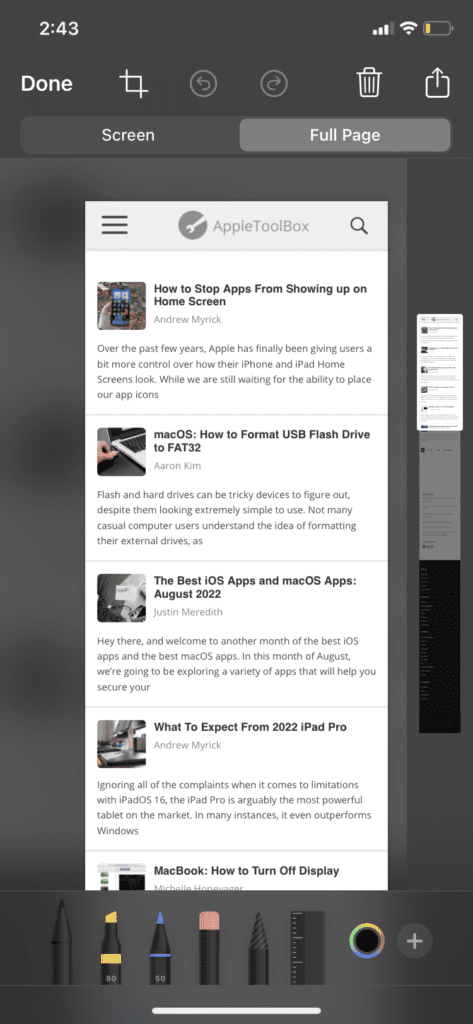
Screenshotting is a well-known function for iOS users, but not many know how flexible it can be. Once you take a screenshot on newer iOS versions, you’ll see a little snapshot of it in the bottom left corner of your screen. If you click on it, you’ll get a whole host of options available to you. If you take a screenshot on Safari specifically and click on that screenshot editing screen, you’ll see a “Full Page” tab. Once you enter that tab, you can see a slider that shows you a screenshot of the whole page. While taking screenshots of an entire webpage is quite a niche thing, it introduces people to the idea of editing screenshots.
Add a Screen Recording Widget
The screen recording function isn’t activated by default on iOS devices, and you’ll have to enable it manually by making it into a widget on your control center. Follow these steps to put a screen recording shortcut on your control center to make recordings easily.
Open your Settings app.
Tap on Control Center.
Scroll down to the More Controls section, where you’ll find multiple widgets you can add to your control center.
Tap on the plus button next to Screen Recording.
Head over to your control center and tap on the Screen Recording widget to start recording!
Silence Unknown Callers
If you receive a bunch of robocalls or are annoyed by unknown numbers constantly calling you, you can silence all unknown numbers in your settings. Most may not recommend this, as you may receive calls from your doctor’s office, a family member who may have lost their phone, or even from the IRS. But if you’re confident in silencing all unknown callers (numbers you don’t have saved in your contacts or those that Siri doesn’t recognize from your call history), then follow these simple steps.
Open your Settings app.
Navigate to the Phone tab.
Scroll down until you get to Silence Unknown Callers.


Write a Comment