Are you disappointed with your iPhone being stuck in Do Not Disturb mode? Don’t worry! In this article, I’ll take you through effective ways to troubleshoot and resolve this problem, ensuring that you regain control over your device’s notifications and restore its normal functionality.
The most effortless way to fix the “iPhone stuck on Do Not Disturb” mode issue is to restart your iPhone. It is possible that conflicts and bugs are causing your iPhone to be stuck on the Do Not Disturb error. To restart your iPhone, follow the steps provided below based on your iPhone model:
For iPhone X and later models:
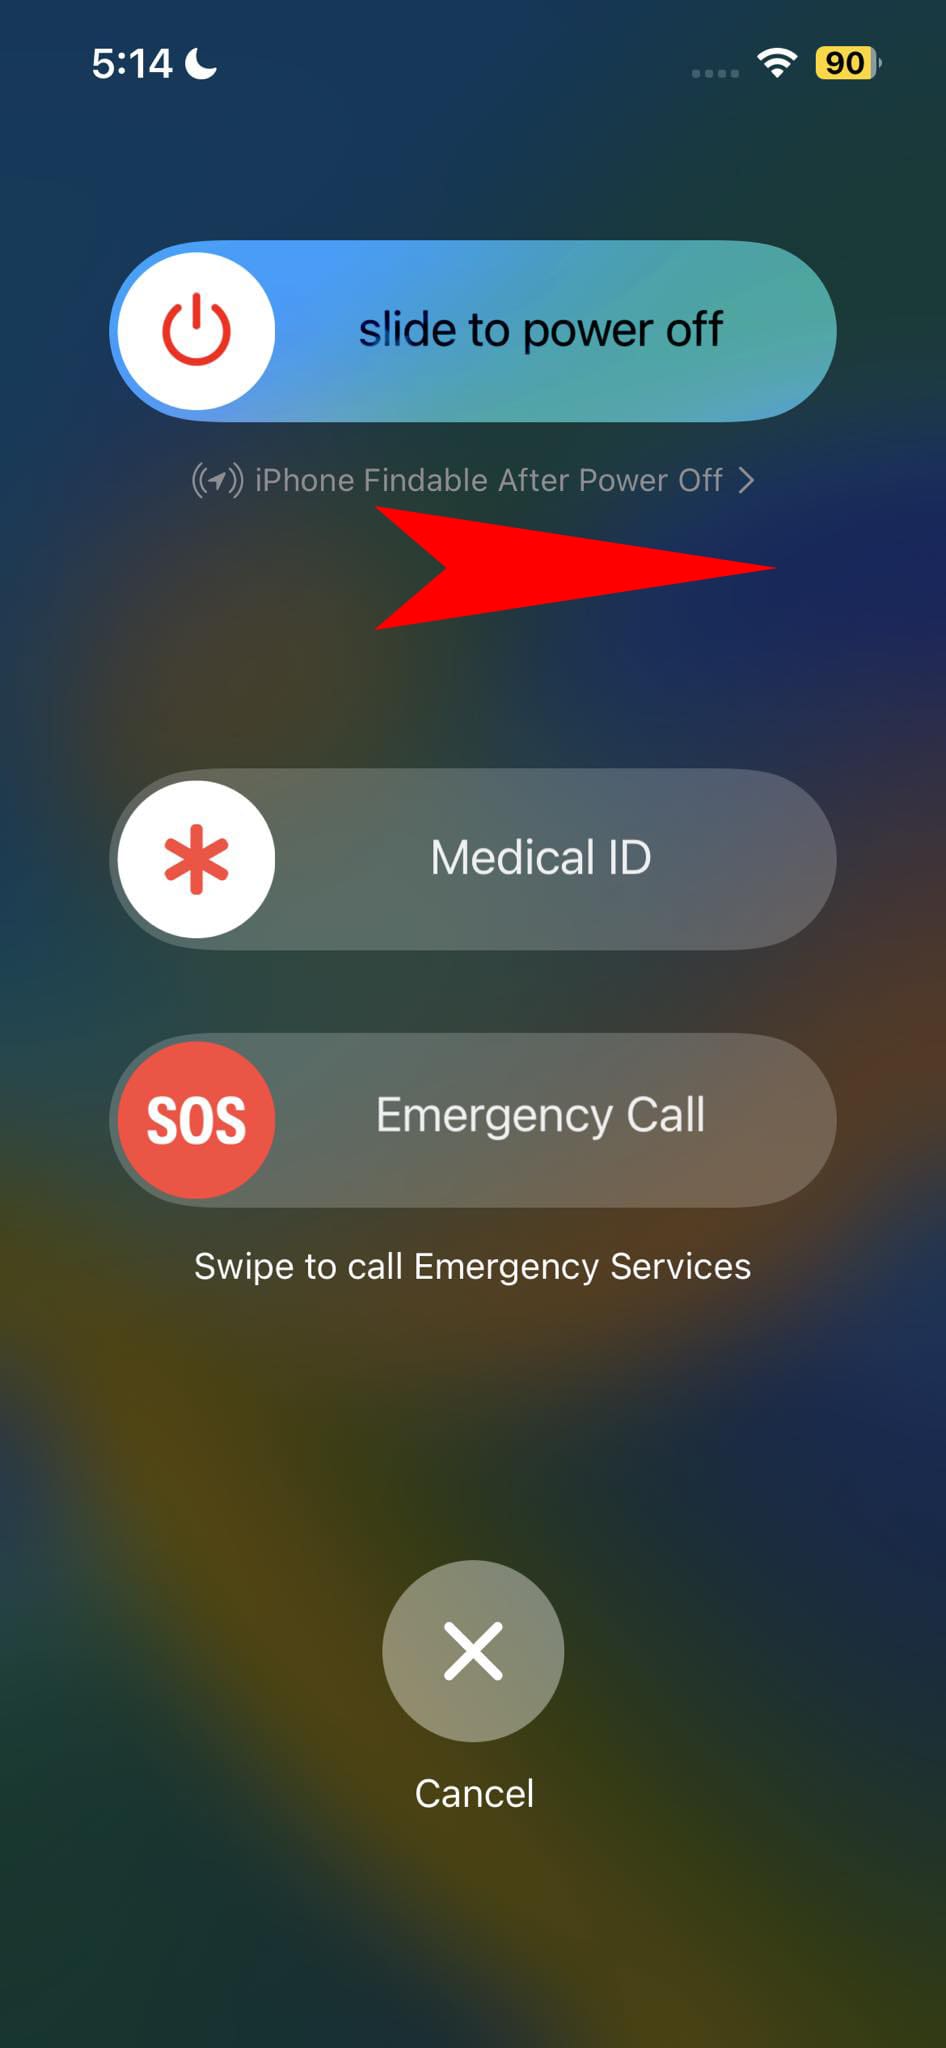
Press and hold the Power and the Volume Down buttons together and wait till the power-off slider appears on the screen.
Drag the slider to the right to power off your device.
Once your iPhone is turned off, press the Power button to turn it back on.
For other iPhone models:
Press and hold the Power button on your iPhone. Continue holding the button until the Power Off slider appears on the screen.
Slide the power-off slider to the right to shut down your device.
Press the Power button again to turn it on.
Method 2: Turn Off Do Not Disturb
If your iPhone stuck on Do Not Disturb mode, an important step is to verify if you have enabled this feature unintentionally. It could be the underlying cause of the issue you’re experiencing. Follow the steps below to manually disable this feature:
Pull down the iOS Control Center from the top-right corner of the screen.
If you see a solid dark eclipse with solid white background, DND is active.
Tap the icon to deactivate DND.
Method 3: Disable Sleep Mode
Sleep Mode on your iPhone is designed to minimize distractions by simplifying the lock screen, dimming the display, and enabling Do Not Disturb automatically. However, if your iPhone is stuck on DND, you can try disabling Sleep Mode to resolve the issue. Follow the steps below:
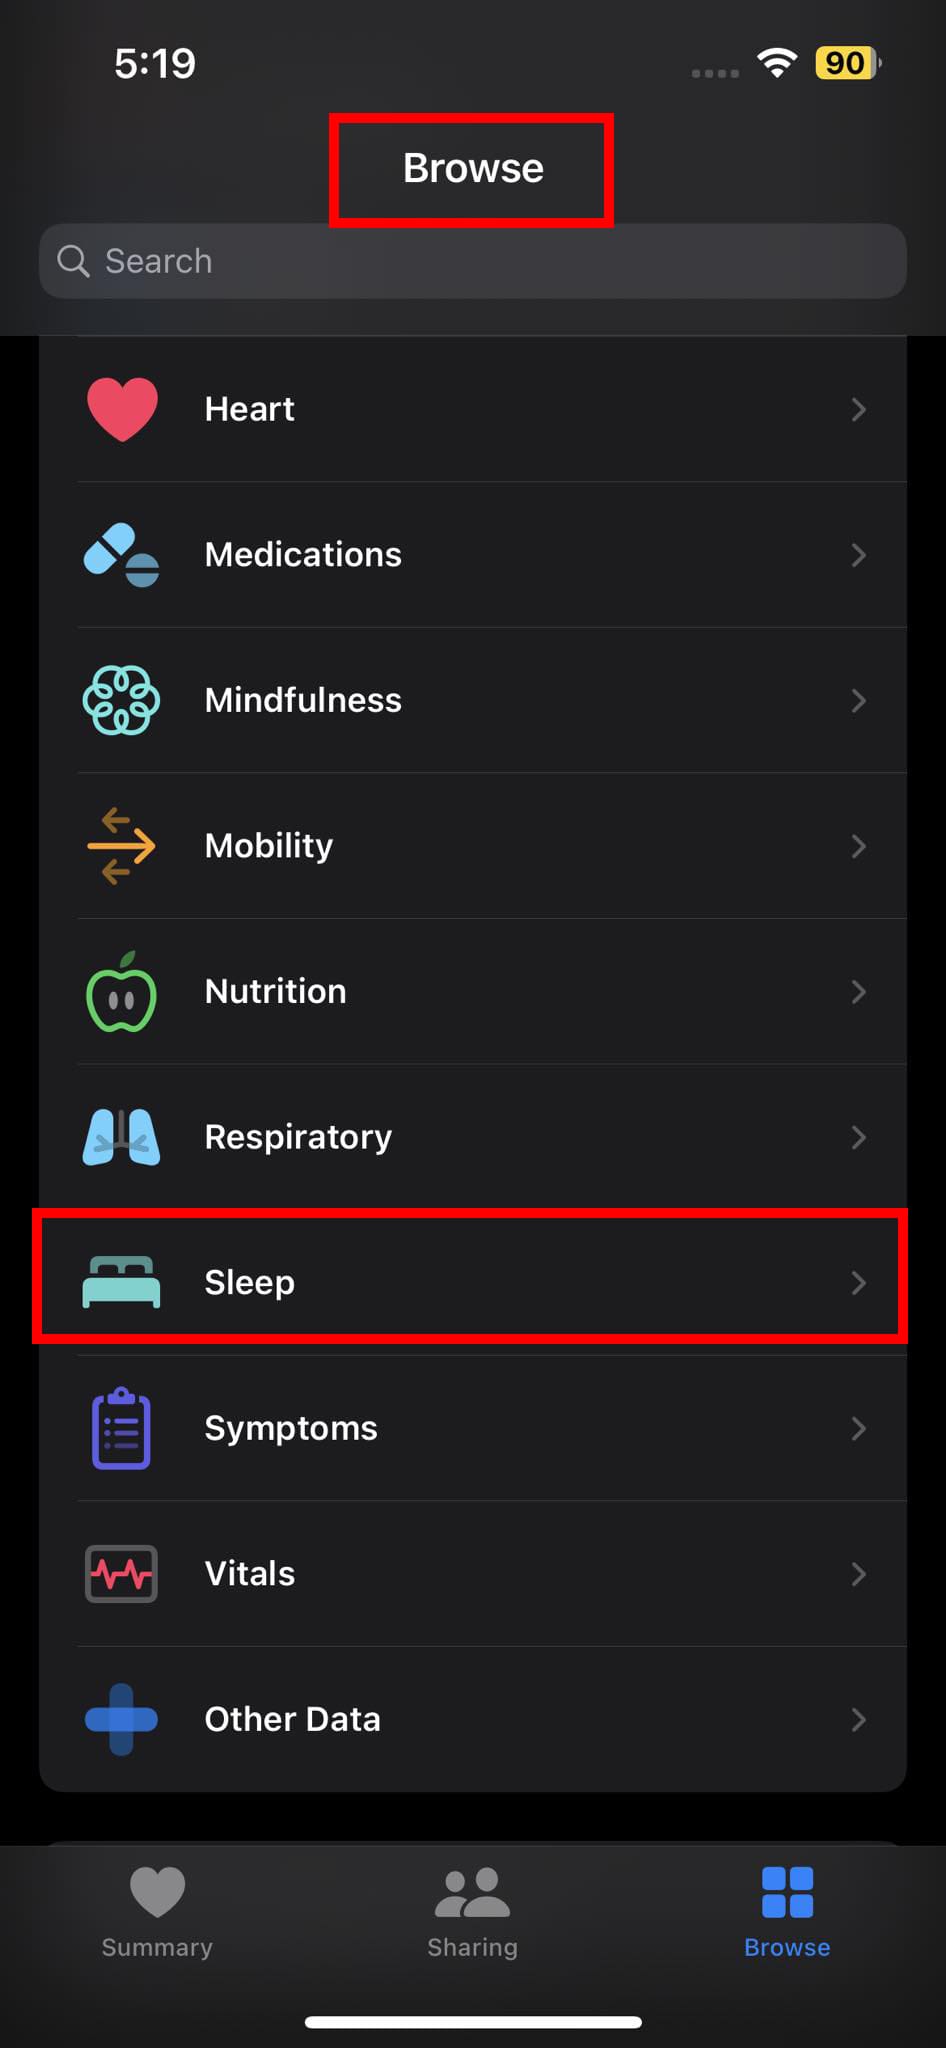
Open the iPhone Health app.
Tap on Browse and select Sleep.
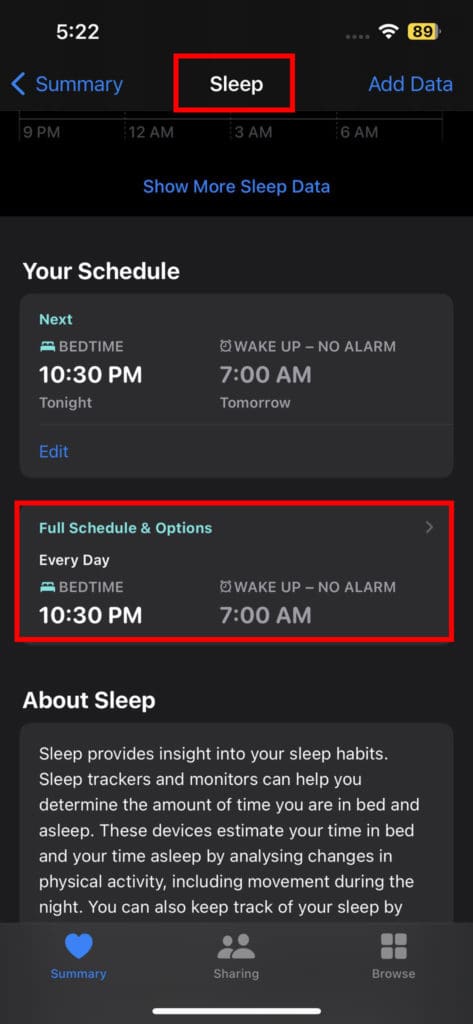
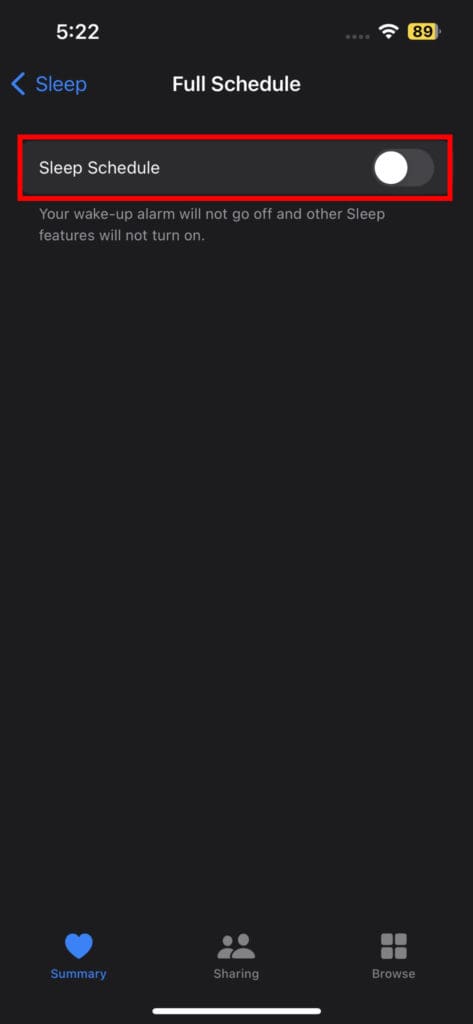
On the Sleep menu, tap Full Schedule & Options and toggle off Sleep Schedule.
Method 4: Disable Do Not Disturb While Driving
If your iPhone stuck on Do Not Disturb mode, it may be because of certain restrictions that limit regular device usage. Follow these steps to resolve the problem:
Open the Settings app on your iPhone.
Tap on Focus to access the Focus settings.
Select the Driving option.
Scroll down to find the While Driving option and tap on it.
Resetting all settings on your iPhone can be a helpful solution to exit the Do Not Disturb mode. This process refreshes your device by restoring the default settings and can assist in resolving various iPhone issues. Fortunately, resetting your iPhone settings does not result in data loss, although it will erase all personalized settings. Here is how you can reset the iPhone settings:
Open the Settings app on your iPhone.
Tap on the General option.
Navigate to Transfer or Reset iPhone > Reset > Reset All Settings.
By following these steps, you can initiate the reset process and restore your iPhone’s settings to their default configuration. It may help resolve the issue of being stuck in Do Not Disturb mode. Remember that this action does not affect your data, but it resets all personalized settings to their original state. You’ll lose Wi-Fi network passwords, so write those down before resetting the iPhone.
Method 6: Remove Siri Shortcut for Do Not Disturb
DND is a feature derived from the new Focus interface introduced in iOS 16. Its purpose is to prevent unwanted calls, messages, or notifications from disrupting your focus. Many third-party or customized Siri shortcuts exist that can enhance this feature according to your specific requirements.
It’s possible that you have installed third-party Siri shortcuts that automatically activate the Do Not Disturb feature when you disable it manually. You must disable or delete these Siri shortcuts by accessing the Siri Shortcuts app to fix the “iPhone Stuck on Do Not Disturb” issue.
To remove Siri shortcuts related to Do Not Disturb, follow these steps:
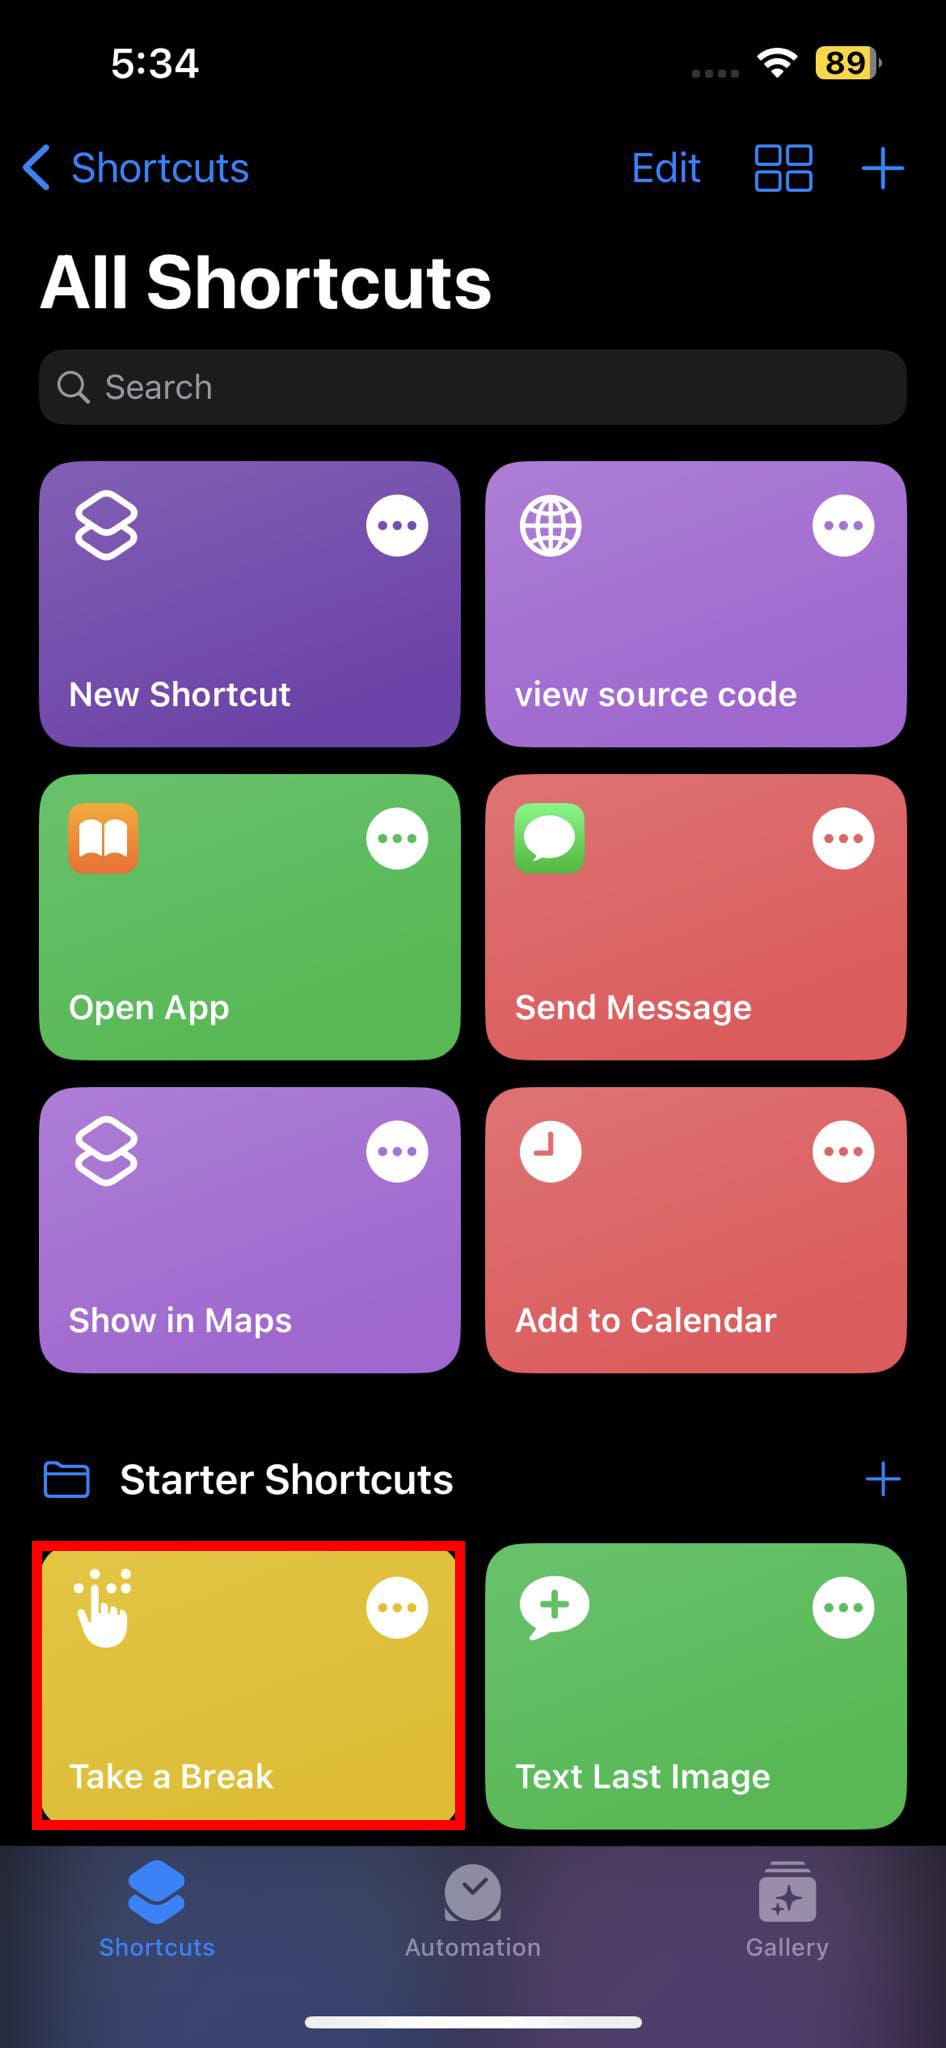
Open the Shortcuts app on your iPhone.
Look for any shortcuts associated with Do Not Disturb or similar features.
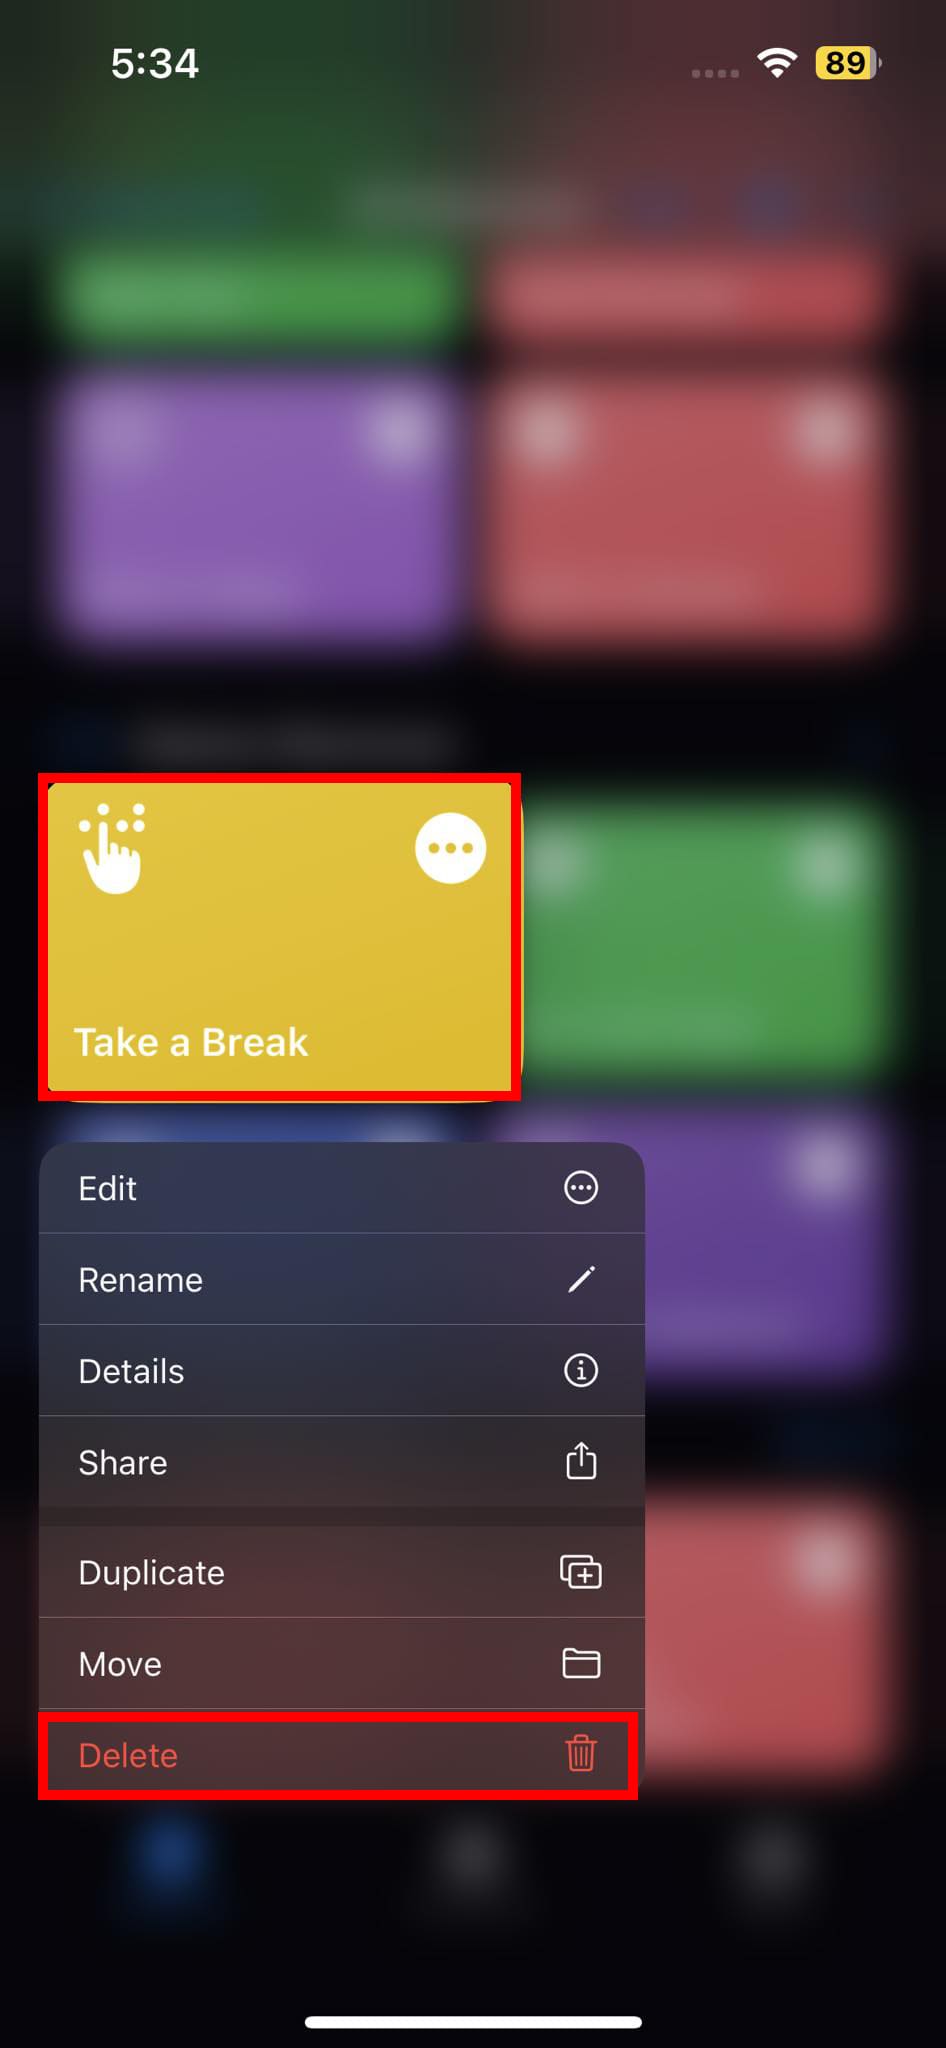
Disable or delete the specific Siri shortcuts related to Do Not Disturb as per your preference.
By performing these steps, you can disable or remove any third-party Siri shortcuts that might be causing the automatic activation of Do Not Disturb. This can help resolve the issue you’re facing and allow you to regain control over the Do Not Disturb feature.
Method 7: Restore iPhone via iTunes
If you’re encountering ongoing issues with Do Not Disturb and other settings, you can restore your iPhone to its factory settings using iTunes. This process sets your device as if it were new, erasing all content and settings, including Do Not Disturb.
Note that restoring your iPhone via iTunes will erase all data and settings. Hence, you must have a backup of your important information before proceeding. After the restoration, your iPhone go back to its factory settings, resolving any persistent issues with Do Not Disturb.
Open iTunes on your PC or Mac (for macOS Mojave or earlier) and connect it to the iPhone using a compatible cable.
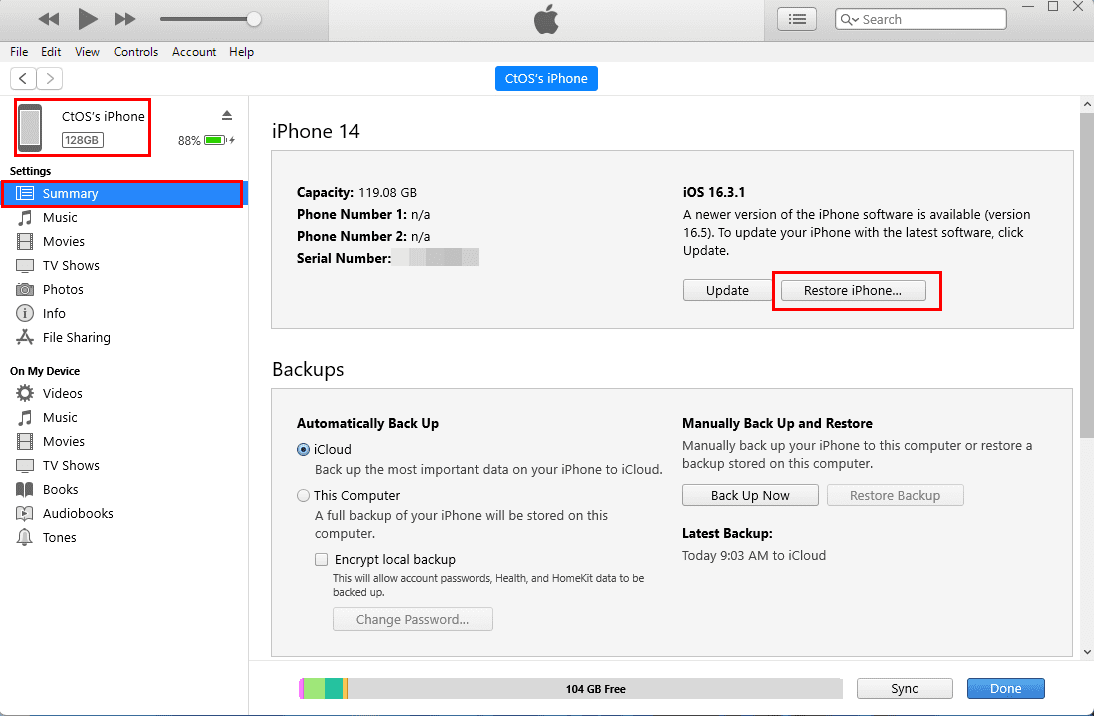
iTunes will automatically detect your iPhone, and you should see its device icon. Click on it to select your device.
Navigate to the Summary tab in iTunes, and locate the Restore iPhone option. Click on it to initiate the process of factory resetting your device.
If you’re using a Mac running macOS Catalina or later, you can perform all the above steps on the Finder app. No need to get the iTunes app for the latest Mac devices.
Method 8: Update Your iPhone
At times, resolving hidden issues on your iPhone can be as simple as installing the latest software update. If an update is available for your device, you can follow these steps:
Open the Settings app on your iPhone.
Scroll down and select General.
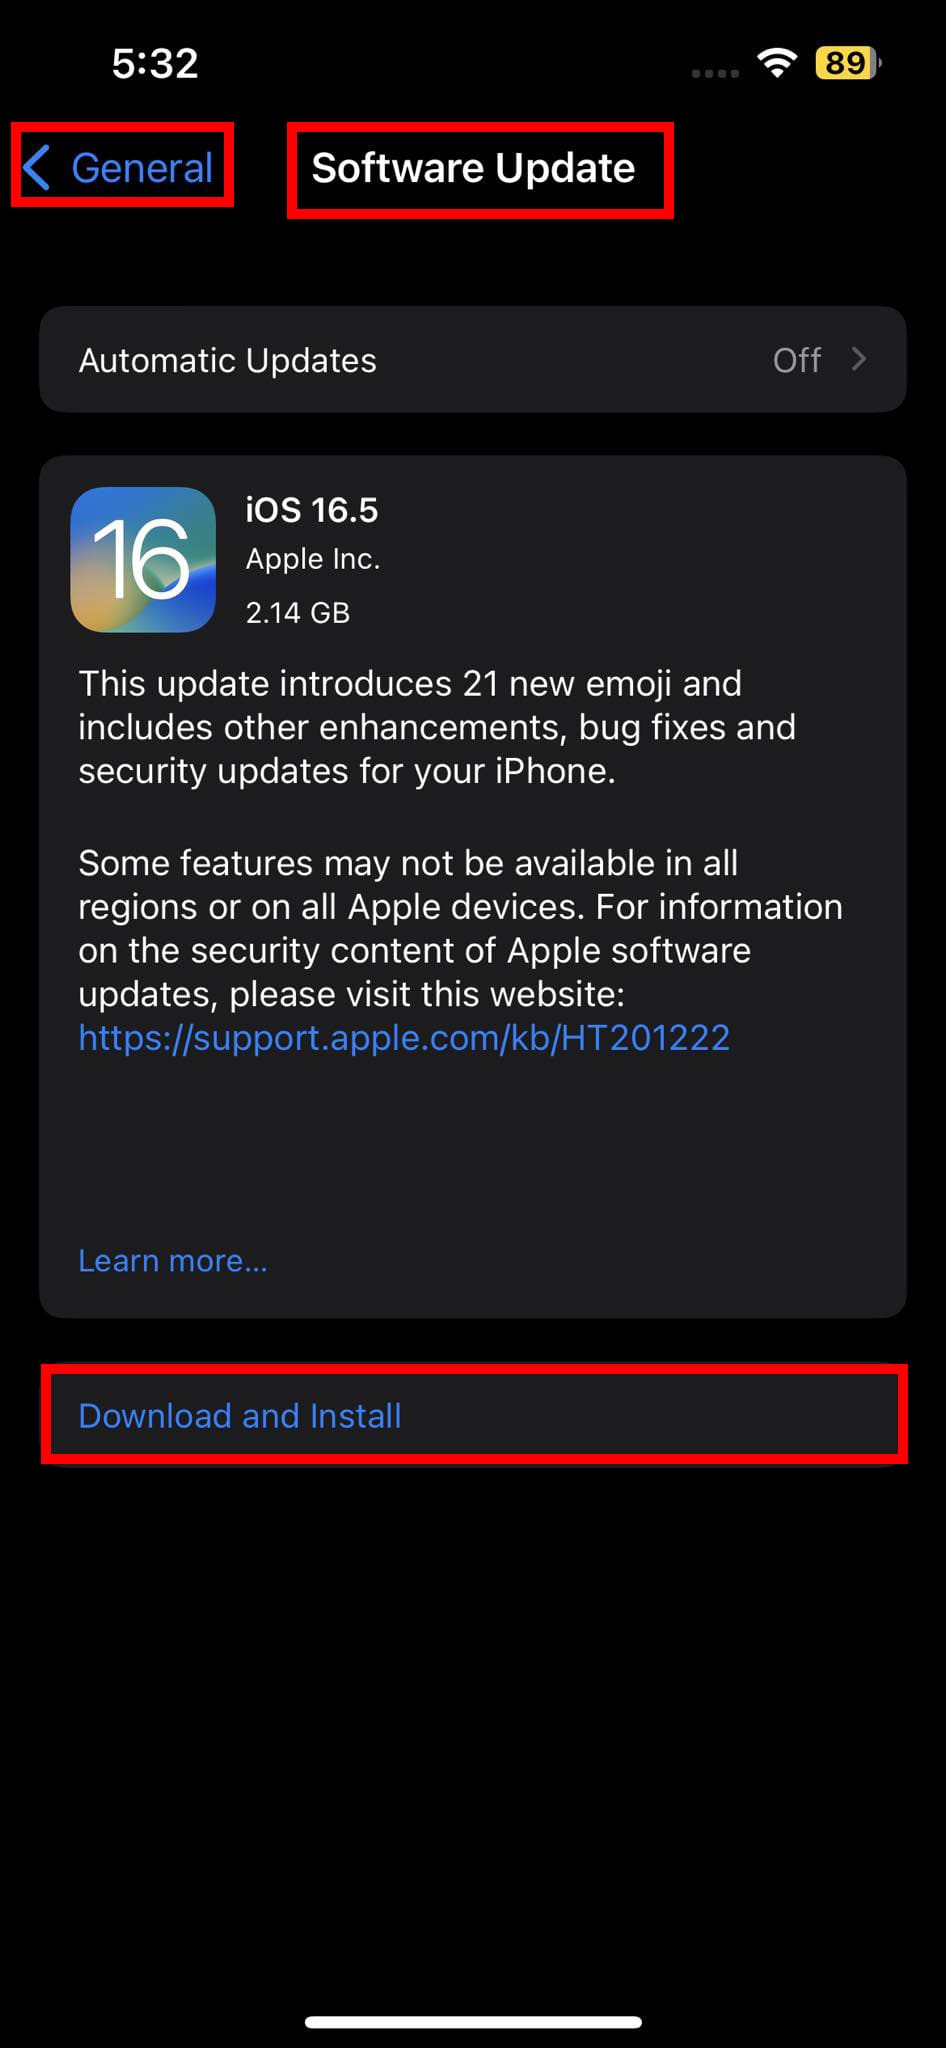
Tap on Software Update to check for and install a new iOS version.
By following these steps, you can access the Software Update section in the General settings of your iPhone and install the available update. Updating to the latest iOS version can often fix underlying issues and improve overall performance, potentially resolving any problems you may be experiencing, including issues related to Do Not Disturb.
Conclusion
By following the methods outlined in this guide, you can overcome the challenge of an iPhone stuck on Do Not Disturb mode and enjoy a seamless user experience. Share this with your family and friends and tell your experience in the comment section.
IOS 15 is not intuitiive, a person would need a fill time computer technician to decipher all the settings you have to go through just to have your phone behave as it did in IOS 16. I hate hate hate Siri, yet you have made that the default on predictive text. I know what i want to say, i don’t need an escapee from 1984 telling me what i mean. I have been watching this since i have had to go back and correct this “predictive text”. Seen where i have typed something totally different changed before my eyes. You say this is better, will mean less people coming into genius bar for help. I say poppycock, it is a nightmare and seriously makes me consider different brand on all of my devices. I have been an avid Apple fan since iPod as all the way through ipads until now


IOS 15 is not intuitiive, a person would need a fill time computer technician to decipher all the settings you have to go through just to have your phone behave as it did in IOS 16. I hate hate hate Siri, yet you have made that the default on predictive text. I know what i want to say, i don’t need an escapee from 1984 telling me what i mean. I have been watching this since i have had to go back and correct this “predictive text”. Seen where i have typed something totally different changed before my eyes. You say this is better, will mean less people coming into genius bar for help. I say poppycock, it is a nightmare and seriously makes me consider different brand on all of my devices. I have been an avid Apple fan since iPod as all the way through ipads until now