Over the last few years, Apple has hammered it into consumers’ heads that they are the privacy-centric tech company. We won’t go into how true this really is as we just covered it in a previous article, but suffice to say that many people purchase Apple products as a means of keeping their data more secure.
While buying an iPhone over an Android will give you a slight edge in privacy, that alone is just the beginning. In this post, we’ll go through all of the latest privacy features Apple has to offer (including in iOS 14) so that you can start to remove your digital footprint and enjoy greater peace of mind.
To kick things off, we’re going to start with five simple things you can do on any Apple device that will immediately reduce your digital footprint. None of these requires any tech-savviness, we’re just going to break down some simple features you may not be taking advantage of.
Also, as a side note, you’ll notice that throughout this article we won’t suggest third-party solutions such as Firefox or DuckDuckGo. In this article, we’re just going to stick to features offered by Apple. We’ll cover third-party services and external solutions in a future post.
1. Sign in with Apple
This is a straightforward feature that Apple announced in 2019’s WWDC and it’s a super simple way to boost your privacy. A “Sign in with” feature is used when you go to create an account with an app or website and they offer to link your account to Google or Facebook.
While many of these solutions are convenient, they’re also less than private. They’re generally used to build up a profile of your internet usage by linking the data from your accounts to one another.
Sign in with Apple was designed to do just the opposite. Not only does Apple not track data through Sign in with Apple, but they also allow you to use a randomly generated email with each account. By hiding your email, companies and data scavengers won’t be able to associate your accounts with you, increasing your privacy.
To use Sign in with Apple, simply choose it whenever you see it as an available option.
2. Store your passwords in Keychain
You may not think of passwords as being part of your digital footprint. However, if you’re reusing the same password over and over again, then your password is most certainly a part of your digital footprint. Anyone who uncovers your password on one website will then have access to your password on every other site you visit.
Luckily, this is an extremely simple thing to fix if you’re an Apple user. Keychain is Apple’s built-in password manager, available on every Apple device. It stores all of your passwords and suggests randomly generated ones for you that are near unhackable.
Because Keychain stores these passwords for you, you don’t have to memorize them. Keychain will automatically enter them in for you when you use an Apple device. When you’re not using an Apple device, you can easily search for a password in Keychain, which is located in the Settings app of your iPhone.
3. Limit your ad tracking
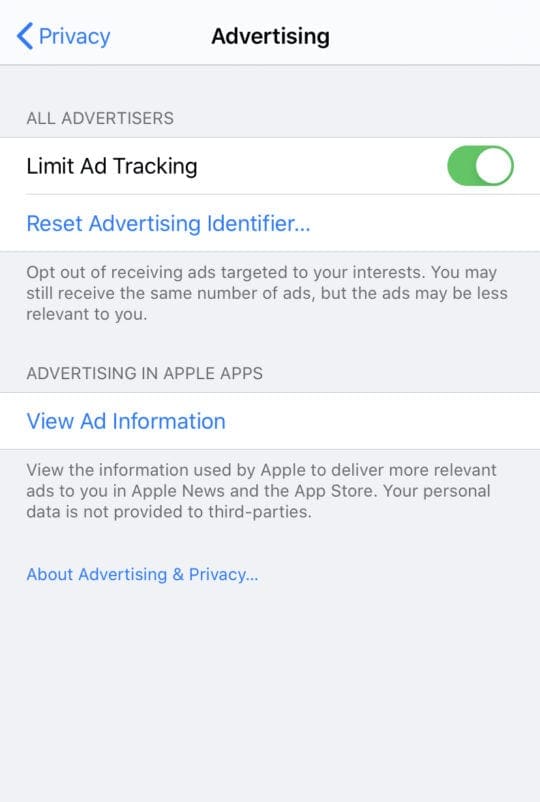
Speaking of the Settings app, there’s a relatively unknown feature nestled in iOS and macOS called Limit Ad Tracking. When enabled, this feature reduces the amount of tracking done on you to serve tailored ads to you by Apple.
It’s important to note that this only affects ads within Apple’s ecosystem, like when playing a mobile game. It will not affect the ads you see in an app like YouTube or Facebook.
To turn this setting on, open your Settings app, tap Privacy, then Advertising, and then turn on the Limit Ad Tracking switch so that it’s green.
This resets your advertising identifier to 00000000-0000-0000-0000-000000000000. Normally, this would be a number unique to you. When reset, however, it’s much more difficult for apps that advertise through Apple to track and target you.
4. Switch to Apple’s default apps
Many Apple users use third-party services like Spotify for their music, Google Chrome for the internet browser, Amazon to store their photos, or Google Maps as their GPS. The problem with using third-party apps like this is that many of them are tracking and using your data to further monetize users like you.
Apple, on the other hand, makes the majority of its revenue from selling products. Apple’s default apps, like Safari, Maps, Mail, Apple Music, and Photos, use limited tracking that stays on your device, so your data isn’t abused or monetized. Making the switch to Apple’s default apps will add an extra layer of privacy to your app usage.
5. Choose Apple Pay
Last but not least, you should set up and start using Apple Pay anywhere you can. Apple Pay doesn’t share your credit card information when you make purchases with it. On top of protecting your privacy from that merchant, this also protects you if that merchant is hacked, which is a fairly common occurrence. Apple Pay is a simple and convenient way to start removing your digital footprint.
The Next Level
Now it’s time to get into some data privacy solutions that are a bit more advanced. While the above will have a minimal impact on the way you use your devices, the following features aim to change your data habits a bit and increase your knowledge over how your data is used. So, for those who want to take their privacy to the next level, let’s get started.
1. Change all duplicate passwords in Keychain
In the previous section, we mentioned that you should start using randomly generated Keychain passwords. However, you probably already have tens if not hundreds of online accounts that aren’t currently using a unique password. Luckily, Keychain makes this easy to fix. All you need is for your passwords to be saved to Keychain, which should naturally happen over time.
On an iPhone or iPad, open the Settings apps, tap Passwords & Accounts, then tap Website & App Passwords. You will be asked for FaceID, TouchID, or passcode identification to see the list of your passwords. On this screen, you will see a searchable, alphabetized list of every password you’ve ever saved in Keychain.
As you scroll through, you might notice that some of these passwords have a “⚠” symbol next to them. This means that you use the same password for this website as you have for others.
By clicking on the password, you can view a list of the other websites using that password. You can also tap Change Password on Website to quickly change the password.
We recommend going through all of your Keychain passwords and changing them until there are no duplicates left.
2. Turn off Precise Location in iOS 14
For those concerned about their digital footprint, one of the most disconcerting aspects of data privacy is location tracking. Several apps have features that only work by allowing that app to know where you are. Thankfully, Apple agrees that this is a problem. In iOS 14, they’ve added a way to better protect your location while still giving you access to apps that need to know where you are.
This is done through Precise Location in iOS 14. Apple has come up with a way to give apps an approximate idea of where you are without telling those apps your exact location.
In iOS 14, open the Settings app, tap Privacy, then tap Location Services. On this page, you will see a list of apps that have asked to use your location. When you click on some of them, you will see a toggle switch that says Precise Location. Turning this switch off will prevent apps from being able to see exactly where you are.
Just make sure that you don’t turn Precise Location off for GPS apps like Apple Maps or Lyft, or else you’ll have a hard time finding your way around!
3. Make your WiFi connection private in iOS 14
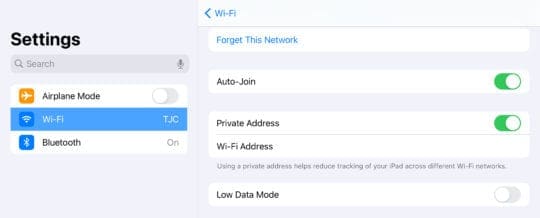
Another useful setting in iOS 14 is the option to make your WiFi address private. This makes it harder for companies to track you across the various WiFi networks you connect to throughout your day. To turn this switch on, go to Settings, Wi-Fi, and tap the “i” icon next to the network you are currently connected to.
On the next screen, you should see a toggle switch labeled Private Address. Just turn this switch on if it isn’t already. You might also see some other tips on improving your WiFi security if you are using an insecure WiFi configuration.
4. Limit access to your Photos library in iOS 14
Alongside location tracking, invasion of photo libraries is a pretty unsettling aspect of data privacy. In iOS 14, you can mitigate this by only sharing select photos with an app rather than your entire Photos library. This means that if you wanted to post a picture of a sunset to Instagram, you could do so without Instagram seeing any of your photos except for the sunset.
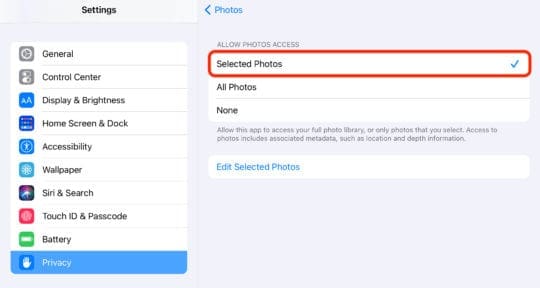
To turn this setting on in iOS 14, open the Settings app, tap Privacy, then tap Photos. You should see a list of apps that have requested access to your Photos library. To change each one from All Photos to Selected Photos, tap on them one by one.
On the next screen, tap Selected Photos and choose which photos you want this app to be able to access. You can change these photos at any time by tapping Edit Selected Photos. This is also a good time to see if any apps are using your photos that shouldn’t be!
5. Turn off cross-app tracking in iOS 14
Last but not least, the most talked-about security feature of iOS 14 is the new app tracking controls. Many apps are designed to track your usage across applications, even if those applications aren’t developed by them. To prevent this, Apple has added a popup in iOS 14 that allows you to deny this activity every time it takes place.
However, you can skip the popup altogether and simply turn off cross-app tracking by default in iOS 14. As we’ve done countless times today, open the Settings app and tap Privacy. On the next screen, tap Tracking and turn off Allow Apps to Request to Track.
Once disabled, not only will apps not ask you before tracking your cross-app activity, they won’t even be able to do it at all.
Remove your digital footprint in iOS 14
Apple has been a proponent of data privacy for several years now. It’s safe to say that iOS 14 is the biggest step forward for the company when it comes to privacy in a long time. Even if you aren’t using iOS 14 yet, the general release should be available by the end of September. Until then, you can try out the rest of the tools included in this article to shrink your digital footprint and secure your privacy.


These are very informative and straight forward guide to a much safer and private apple using experience not other mac sites will publish, thank you!