Digital Photos have evolved over several years and the new cameras on the iPhone and iPad Pro do a wonderful job in taking some of the finest photos. One of the problems is that some of this Digital photos can be enormous in size and could probably choke up your email bandwidth when you send these out via your mail.
If you are not planning on sending these photos and files for your latest exhibit in Paris, you can always afford to send out a less than full resolution original as an attachment in your Mail App.
Just think about the person receiving it on the other side. If he or she were to download this cute cat pic of gigantic proportions on his iPhone using a slow internet connection, that is sure to make it a little frustrating! Moreover, by choosing to save the photo on his or her’s iPhone it will also eat into their precious storage on the device, unless they save it to iCloud or choose to delete it.
Since I was recently on the receiving side of one of these emails, I figured I needed to share a simple tip with ya’ll.
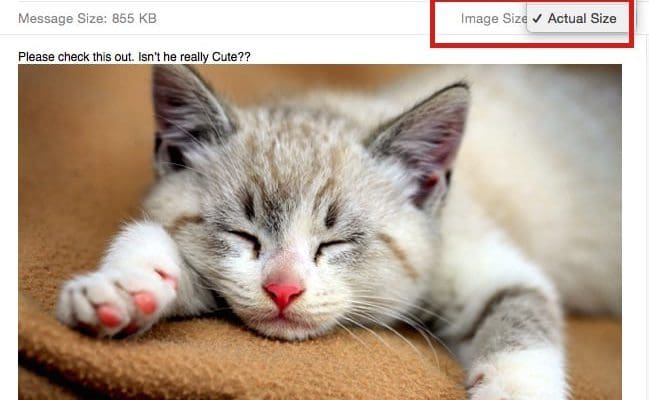
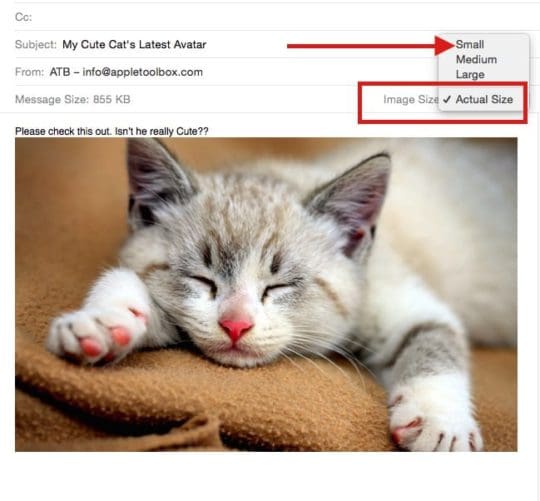
Apple provides a real easy way for you to shrink these media files while attaching them to your emails.Attach your files into the draft email message and then use the drop down arrow at the right of your email to select a smaller image size.
And What if you really wanted each of Mr Whisker’s whiskers to stand out in the finest resolution? With iOS 9.2 and up, Apple provides you with a nice feature called Mail Drop.
If you want to attach files that are too large to send in email, you can use Mail Drop. It lets you upload attachments up to 5 GB and send a link or preview to your recipients. You can send these attachments from iCloud.com or from the Mail app on your iOS device (iOS 9.2 or later) or Mac (OS X v10.11 or later).
Recipients can download Mr. Whisker attachments for 30 days after they’re sent.
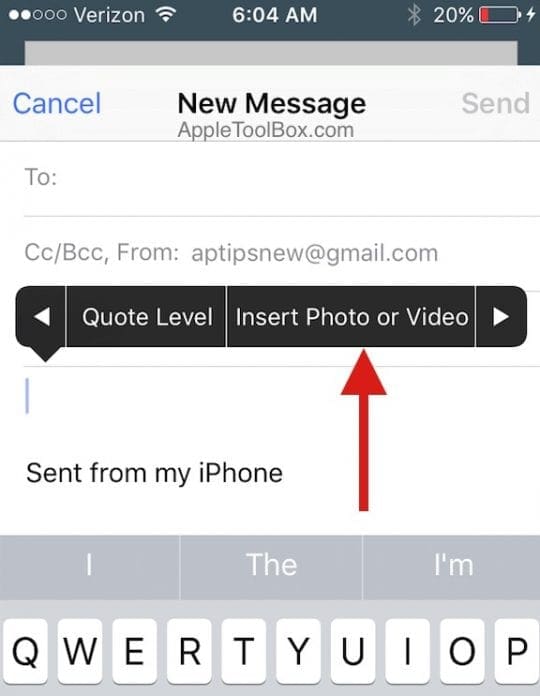
While writing a new email message, click the Attach button at the top of the message window. On iPhone or iPad, simply tap on the message window and choose “Insert Photo or Video”. If your photo or video is stored on your icloud drive, you can choose “attachment” instead as shown in the images below.
OR
Select the files you want to attach, then click the Choose button to begin uploading the files.
If your attachments are too large to send in email, iCloud Mail asks if you want to deliver the attachments using Mail Drop. If you agree, Mail Drop uploads the attachments to iCloud. When the recipient receives the email, he or she can choose to download the photo made available by a link.
We hope that you save this cute cat’s pic as a reminder for this tip. This is a new feature that was made available with iOS 9.2. Please avail yourself of the free icloud drive and take this feature out for a spin and let us know your thoughts.
Moreover it is halfway through the week so we are hoping that Mr. Whisker does cheer you up.
Please feel free to share some of your favorite tips when it comes to sending large attachments via email to your friends or family.
Obsessed with tech since the early arrival of A/UX on Apple, Sudz (SK) is responsible for the original editorial direction of AppleToolBox. He is based out of Los Angeles, CA.
Sudz specializes in covering all things macOS, having reviewed dozens of OS X and macOS developments over the years.
In a former life, Sudz worked helping Fortune 100 companies with their technology and business transformation aspirations.
 at the top of the message window. On iPhone or iPad, simply tap on the message window and choose “Insert Photo or Video”. If your photo or video is stored on your icloud drive, you can choose “attachment” instead as shown in the images below.
 OR
OR


Write a Comment