5 GB of Free Storage can be real handy when used appropriately. Apple’s iCloud drive has proven itself very useful over the past few years. Ability to keep all the files and folders up to date across all devices as well as being able to work on the same file across multiple apps is real helpful.
iCloud Drive lets you securely access all of your documents from your iOS device, Mac, and Windows PC. So no matter which device you’re using, you’ll always have the most up to date documents when you need them.
Since I have been using dropbox for a long time now, I had never dabbled much with the iCloud drive. On the new Mac, I realized that the iCloud drive is turned on automatically on your machine. Apparently, according to Apple, You can’t use iCloud Drive on your devices until you update your iPhone, iPad, and iPod touch to the latest version of iOS, and your Mac to the latest version of OS X.
Here is a Step by Step Guide that I would like to share with you around getting the most out of your free iCloud Drive. Please feel free to read along even if you have not yet set up your iCloud drive. The objective is to get you situated so that you can use this freebie from Apple.
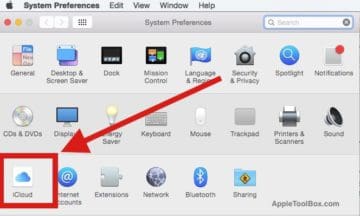
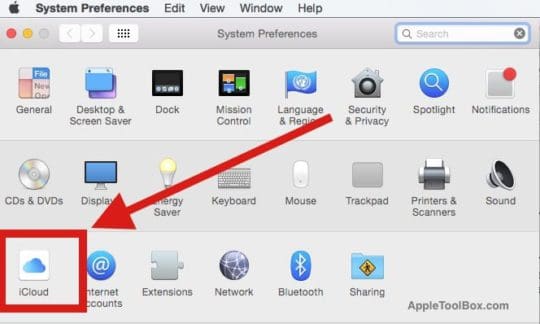
Lets get you started. On your Mac, you can sign in to your iCloud account from System Preferences via the menu.
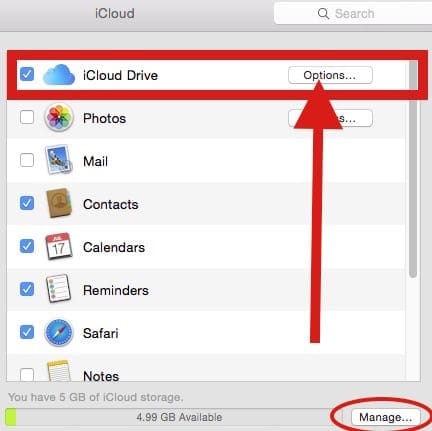
Click on the iCloud icon and you should find the iCloud Drive as the first option on the next screen as shown below. Check the box next to iCloud Drive and enter your credentials when asked.
Check the available apps
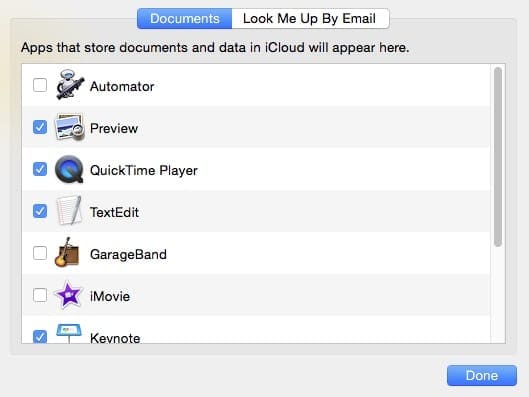
Now that you have turned on your iCloud Drive on your Mac, click on the Options button next to it to see the list of apps that are supported in iCloud Drive. Essentially, your icloud account provides 5GB of space for free and you can use this space not only to store your documents but also use it as storage for any of these available apps.
Unticking a box here will remove any folder an app has created at the top of the Drive. I for one do not intend on using Garageband or imovie so I have unchecked these apps as shown below. All you are doing here is suggesting that when you are on any one of those apps that you have selected, you can choose the app’s files onto iCloud drive instead of your local drive.
Manage the available Storage
Now that we have set up the iCloud Drive preferences, lets access the iCloud drive. Two easy ways to access your iCloud drive.
Option 1:Open your Finder app on your Mac and you should now see the iCloud drive as a folder on the left hand section of the panel along with other cloud storage such as Dropbox.
Option 2:At any point on your Mac go to your desktop and Just press the Command + I + Shift Keys and it will bring up your iCloud Drive. The key combination does not work when you are doing other things such as editing a doc in Microsoft word.
Much like using your local drives, you can create a folder structure on your iCloud drive to manage your documents. Right click to access Create New Folder as shown below.
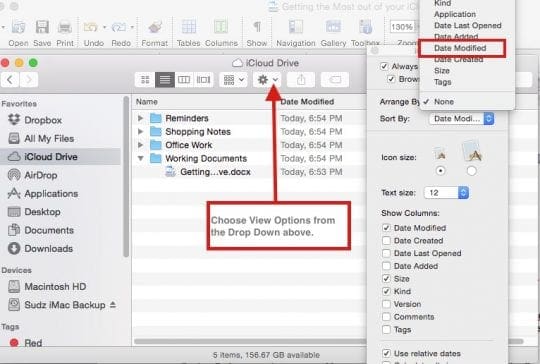
You can customize your iCloud Storage folder views much like any other folder. Click on the Settings icon and choose “View options”. Select Arrange By options to customize your view. I like the option last modified so that it always shows my work in progress files at the top of the folder. You can also use Tags to set up an easy searchable structure for yourself.
Syncing documents across iCloud Drive is pretty straightforward. When you are editing documents on the move, it is important to remember that the contents of the iCloud drive are automatically synced between all of your devices. You will however need to make sure that the device from which you make changes to a file is online so that those changes can propagate to the other devices. Otherwise you will find that the latest changes will fail to appear on your other devices.
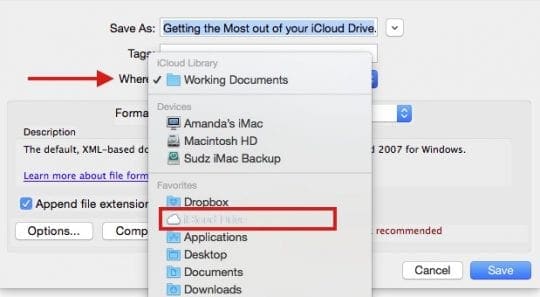
In order to save a document directly into your iCloud Drive, click on file save as and on the screen where you see the field “Where”, open the drop down to access your iCloud Drive. That’s it! You can now very easily save your documents directly to iCloud Drive.
When you save a new or modified document, it usually takes a moment to upload to iCloud drive. When you browse to its location in finder you may see a progress bar icon until its synced to Drive. If you plan on opening this document on your iphone or iPad to work on, make sure that the sync is complete on your Mac.
Accessing iCloud Drive from your iOS devices
One of the best ways to access your iCloud Drive on your iPhone is to save the drive to your home screen. If your iPhone or iPad is running iOS 9 and higher, you can very easily do this by going to your Settings >iCloud >iCloud Drive and switch on the option for “Show on Home Screen”.
If you have not used iCloud Drive on your iphone or ipad before, chances are that you may need to set it up. Tap on Settings >iCloud and signin with your Apple ID. Tap iCloud Drive followed by tap on upgrade to iCloud drive. That should get you going and you should be able to access files between your Mac and your iOS device.
How do I upgrade my iCloud Storage from 5GB
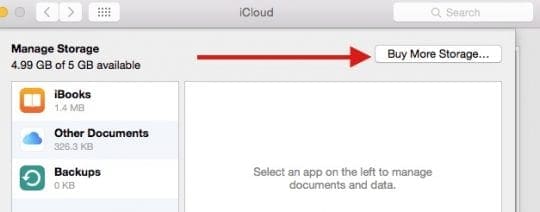
It is easy to upgrade from the free 5GB plan at any point. Open your iCloud Drive by using > System Preferences >iCloud > iCloud Drive and click on Manage at the bottom of the screen. On the next screen, click on Buy more Storage and you will be able to add on additional storage capacity to your iCloud Drive.
A 50GB storage starts at $0.99 cents a month and you can buy upto 1 TB worth of storage for $9.99 a month. If you plan on saving photos and other media files, you may want to explore this option of getting additional storage. For Regular document management and email attachment type work, the free 5GB is sufficient to start with.
We are hoping that this basic primer provides you with easy steps to set up and start using your free 5GB icloud drive. It is definitely a handy tool when it comes to storing your large email attachments and other documents.
This is especially helpful If you happen to own an iPhone with 16GB space and you are always trying to manage the storage on your device, please consider using this free storage to optimize your iPhone or iPad. Between the free 5GB here and the free storage available from Dropbox, you can get by easily for a while without spending more to upgrade your storage or your device.
Please let us know in the comments below if you have any questions or if you get stuck on any of these steps and we will be happy to answer your questions.
Obsessed with tech since the early arrival of A/UX on Apple, Sudz (SK) is responsible for the original editorial direction of AppleToolBox. He is based out of Los Angeles, CA.
Sudz specializes in covering all things macOS, having reviewed dozens of OS X and macOS developments over the years.
In a former life, Sudz worked helping Fortune 100 companies with their technology and business transformation aspirations.
Usually, yes. But it depends on how you set-up iCloud on your Mac.
Apple designed iCloud Drive for Mac to store a local copy of your iCloud Drive folder. It’s found here:
User > Library > Mobile Documents (these folders should mirror your iCloud Drive’s contents)
You can tell iCloud to not store certain types of files and apps in the Cloud via selections made in System Preferences > iCloud > iCloud Drive Options and un-checking any items you don’t want to store in iCloud.
Additionally, there’s an option to Optimize Mac Storage for folks that have smaller hard drives and want older documents stored in iCloud only and NOT on the Mac.
If you want to completely disable iCloud Drive on your Mac, first uncheck iCloud Drive from System Preferences > iCloud. You’ll see a message that when you turn off iCloud Drive, it removes all documents stored on your Mac. Choose to Keep a Copy to retain those documents on your Mac or if you want them on iCloud Drive only, choose Remove from Mac.
Then, manually upload any documents you want on your iCloud Drive via the iCloud website
To Upload files
Go to your iCloud Drive on iCloud.com–sign in with your Apple ID
Drag files from your desktop or a folder on your computer to the iCloud Drive window or a folder icon in the iCloud Drive window
If you drag to a folder icon, it becomes highlighted to confirm that the item you’re dragging will go into the folder
Click the Upload button in the iCloud Drive toolbar, select the files you want to upload, then click Choose
When you delete iCloud Drive from your Mac, you lose the automatic syncing of documents and data to iCloud.


Are the files saved to iCloud Drive also saved on the computer using up space on the computer as well as on icloud?
Hi Graham,
Usually, yes. But it depends on how you set-up iCloud on your Mac.
Apple designed iCloud Drive for Mac to store a local copy of your iCloud Drive folder. It’s found here:
User > Library > Mobile Documents (these folders should mirror your iCloud Drive’s contents)
You can tell iCloud to not store certain types of files and apps in the Cloud via selections made in System Preferences > iCloud > iCloud Drive Options and un-checking any items you don’t want to store in iCloud.
Additionally, there’s an option to Optimize Mac Storage for folks that have smaller hard drives and want older documents stored in iCloud only and NOT on the Mac.
If you want to completely disable iCloud Drive on your Mac, first uncheck iCloud Drive from System Preferences > iCloud. You’ll see a message that when you turn off iCloud Drive, it removes all documents stored on your Mac. Choose to Keep a Copy to retain those documents on your Mac or if you want them on iCloud Drive only, choose Remove from Mac.
Then, manually upload any documents you want on your iCloud Drive via the iCloud website
To Upload files
Go to your iCloud Drive on iCloud.com–sign in with your Apple ID
Drag files from your desktop or a folder on your computer to the iCloud Drive window or a folder icon in the iCloud Drive window
If you drag to a folder icon, it becomes highlighted to confirm that the item you’re dragging will go into the folder
Click the Upload button in the iCloud Drive toolbar, select the files you want to upload, then click Choose
When you delete iCloud Drive from your Mac, you lose the automatic syncing of documents and data to iCloud.
Sam