As a parent, my iPhone is vital. It keeps me in contact with my kids, their schools, other parents, and even my ex-spouse. But the single most important thing my iPhone does is take pictures and videos of my kids (and my dog.)
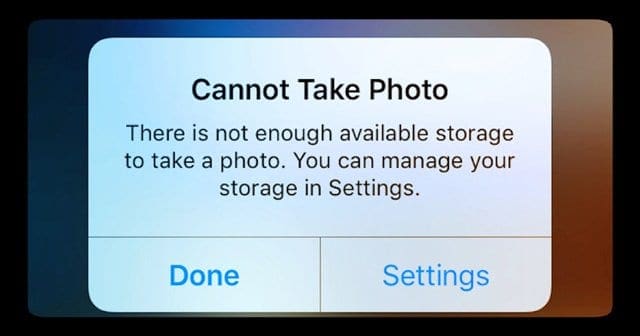
And I use it for all our family, social, and school events. So when it says “cannot take photo There is not enough available storage to take a photo. You can manage your storage in Settings” or something similar, it’s a big (I mean BIG) problem. I’d love to upgrade my 16GB iPhone 6S, but right now, money is tight, and that’s an update I just cannot afford.
Over the past few weeks, I’ve used my iPhone’s camera to capture all my kids at School and Summer Camp–a performance one night and an athletic event the next day. These memories are precious and something I want to keep for when my kids get older…and for their kids when they become parents.
But last night, as the curtain drew and my kids joined the stage, my camera failed. No matter what I did or how I framed it, I continued to see the Cannot Take Photo Message.
Looking around the room, it seemed like all the other parents had this same issue. Everyone was trying, but no one seemed to have the space to take those pictures last night!
My iPhone storage is full, but it’s not!!!
So yeah, my iPhone is telling me that my storage is full. But when I add up all my apps, it seems that I should have at least 2-3GB of free space. This happened with my last phone too. And I know for sure that I am not alone in my 16GB iPhone 6 telling me that my storage is full.
And it seems no matter how much I delete by managing my Storage in Settings, and I still get this Storage Almost Full Message. It’s super frustrating!!!
So I decided to take a closer look.
After deleting a bunch of apps, photos, even my daughter’s two favorite videos–overall storage didn’t budge!
What the heck?
So when digging a little deeper, I added up all my apps AND all their data, and wouldn’t you know that I should have at least 3GB of free space. That’s a lot of photos I should be able to take.
Even after performing a hard reset, nothing much changed. A little additional space freed up.
And then, after taking just a couple more photos, my iPhone quickly became full again. What gives????
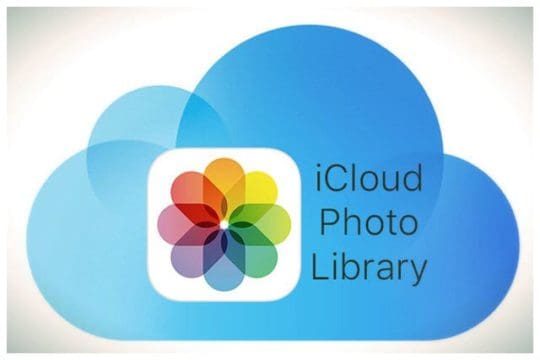
Your iCloud Photo Library Explained!
Your iCloud Photo Library is a backup AND a photo-sync service. That’s why when you delete a photo in one place, it removes that photo from all devices using the same Apple ID. But storing all those photos often takes up a lot of your iDevice’s Storage.
With iOS 10+, Apple designed a solution called Optimize Storage to better manage your photo storage for you.
Find it under Settings > Apple ID Profile > iCloud > Photos or Settings > Photos >Optimize Storage.
When you have sufficient local on-device storage, photos remain “as-is” on your device. BUT, when your iPhone (or another iDevice) needs space, Apple moves all the high-resolution versions of your photos to your iCloud account, freeing up storage on your device.
Once you move those photos to iCloud, all that is kept on your iPhone are compressed thumbnails, until you open a photo again.
When you open a photo, your device downloads a device-optimized version of that photo from iCloud. The full-resolution version remains on iCloud and isn’t downloaded until you edit or share the photo.
So, How Do I Get More Storage Space on My iPhone?
Deleting Photos Is Really a 30-Day Notice of Deletion
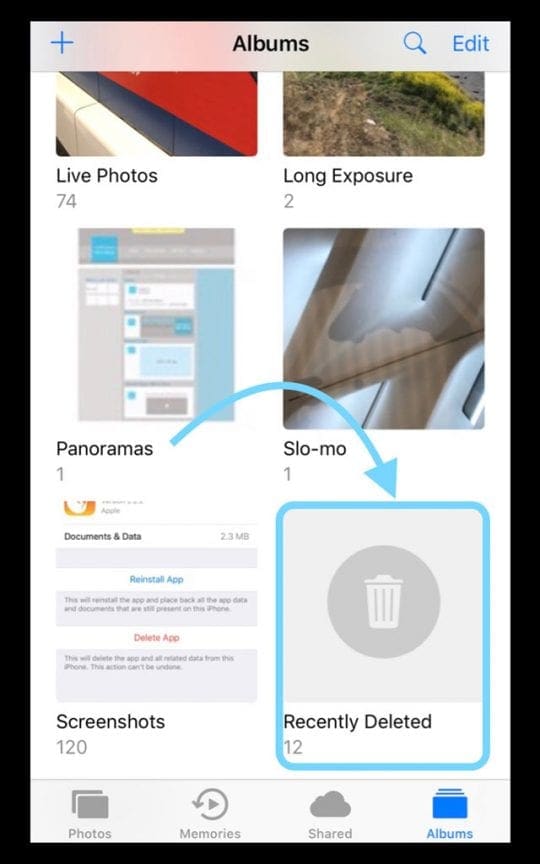
The first thing I discovered is that all those photos I deleted aren’t really deleted until 30-40 days after I initially removed them.
So I freed up a bit more space by deleting all those photos in my Recently Deleted folder in the Photos App
To do this, open the Photos App > Albums > Recently Deleted
Select your photos/videos and press Delete
Since you already deleted those photos, it’s probably a good practice to press Delete All
When Storage is Full, Update Your iOS
If you haven’t already updated your iPhone to the latest iOS, it’s a great time to do this upgrade after freeing up some space by actually deleting your photos.
Newer iOS versions like iOS12 and iOS13 are streamlined, so you get more storage for your apps, music, photos, and videos–so it’s a great idea to update your iOS if you can.
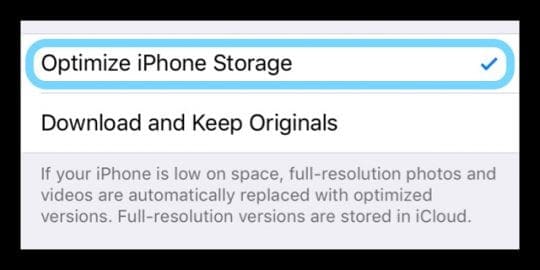
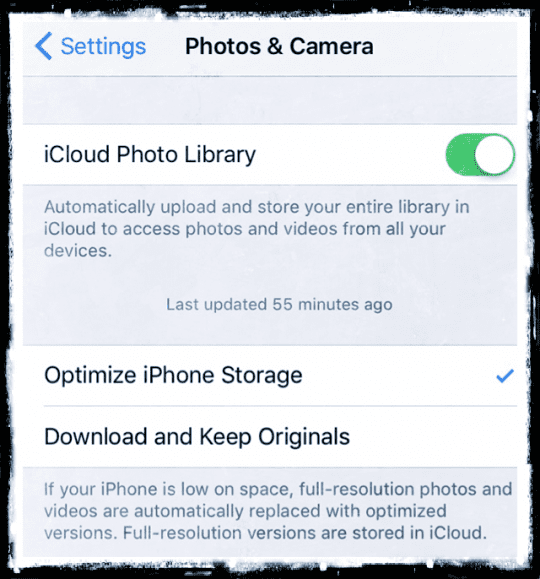
Starting with iOS 10, there’s a great new iCloud feature for Photos called Optimize iPhone Storage
With this feature selected, when your storage gets low, your iPhone keeps full-resolution versions of your photos in your iCloud account and places smaller, compressed versions on your iPhone
By storing smaller versions on your phone, storage is freed up, allowing you to take more photos, download apps, movies, music, and even update your iOS
Turn Optimize iPhone Storage for Photos by going to Settings > Photos (or Photos & Camera) > Toggle ON iCloud Photo Library > Select Optimize iPhone Storage
Another way to make this update is via your iCloud Settings: go to Settings > Apple ID Profile > iCloud > Photos > Choose to Optimize iPhone Storage
iCloud Photo Library
The only downside is that you’re using your iCloud account to store the full-resolution images.
So if you have a lot of images, that free 5GB iCloud account won’t last very long.
The bright side is that upgrading to a paid plan starts at just USD .99/month for 50GB. For most of us, that’s plenty of storage for all our photos, backups, and other iPhone media.
Even the larger 200GB plan costs just a few dollars per month (USD 2.99) so if you take a lot of photos and videos (especially at 4K), consider opting for these larger plans.
Be aware that with iCloud Photo Library, when you delete a photo from one device, it removes that same photo from all devices including computers–pretty much any device that has iCloud Photo Library enabled and is connected to the same Apple ID.
Check Your Storage
If the three previous steps (deleting the recently deleted folder in Photos, updating your iOS, & possibly turning on iCloud Photo Library with Optimized Photos) did not move your storage in the right direction, then it’s time to take a close look at how your iPhone is using storage.
There are two ways to do this: via the Settings app and with iTunes on a computer (Mac or Windows.)
How to check your iPhone or iPad storage with iTunes
A great way to see what’s going on with your iPhone’s or other iDevice’s storage is via iTunes, on a Mac or Windows PC.
Open iTunes, connect your device and then select it.
A bar graph shows how much storage your iOS content uses, divided by content type. To inspect, move your mouse over the graph on each content type, like Apps, Music, Podcasts, Documents & Data, and so forth, to find more information.
Types of content on your iDevice and what each type includes
Audio: Songs, audio podcasts, audiobooks, voice memos, and ringtones
Video: Movies, music videos, and TV shows
Photos: Camera Roll content, Photo Stream, and Photo Library
Apps: Installed apps. The content of the apps is listed under Documents & Data. (Discontinued in iTunes 12.7)
Books: Apple Books books, audio books, and PDF files (Discontinued in iTunes 12.7)
Documents & Data: Safari Offline Reading List, files stored within installed apps, and app content like contacts, calendars, messages, and emails (and their attachments)
Other: Settings, Siri voices, system data, and cached files
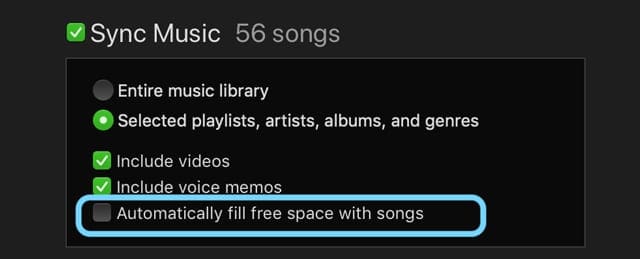
Stop your iPhone or iPad from automatically filling your device’s storage
Connect your device to your computer
Open iTunes
Select your device and select Music
Uncheck Automatically fill free space with songs
Select Sync
If every time you plug your iPhone into your Mac or PC, iTunes tries to sync hundreds of songs to your phone and that uses up all your device’s available storage, you need to turn off automatic syncing.
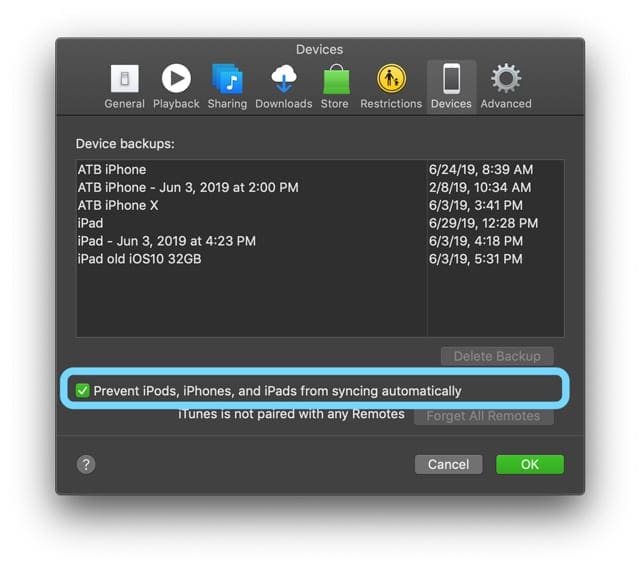
Stop iTunes from syncing with your iPhone or iPad
Launch iTunes
Go to iTunes > Preferences
Select the Devices tab
Check the box to Prevent iPods, iPhones, and iPads from syncing automatically
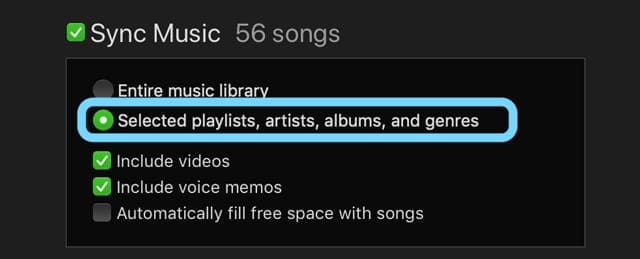
After you turn off automatic syncing, manually choose which songs transfer to your device instead.
Connect your phone to your computer
Launch iTunes
Wait for the phone icon to appear
Select Music from the left sidebar
Choose Selected playlists, artists,albums, and genres
Then tick the box for Sync Music
How to check your iPhone or iPad storage with the Settings app
Go to Settings > General > iPhone Storage (> Storage & iCloud Usage > Manage Storage for older iOS).
This menu shows you how and where you use your iPhone’s storage.
You see a list or graph of how much space is used and what’s available. Below that, you find a list of all the apps in order of space currently used.
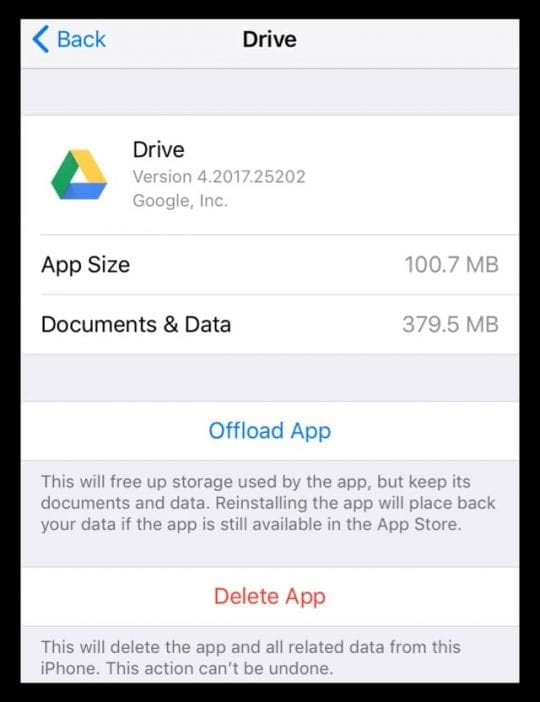
Take a look at the apps with the most storage and delete some or all of its data or even the app. Peek inside each app by tapping it and looking at two variables: App Size and Documents & Data.
App Size is the actual app software needed to run an app
Documents & Data is all the log info, cookies, caches, downloaded images and other types of files created while using an app
Certain apps offer you a method to clear caches, browsing history or downloads to remove some of those “Documents & Data” files
This list includes apps like Messages (ios11+), Music, videos via the TV app, and some other app data–all deleted inside this Storage menu
But for most apps, deleting data means going into the app itself and removing things from there.
And don’t forget to check any large videos and podcasts as these take up a lot of storage and can be deleted because you can usually download them again when you want to view them.
Streamline Storage with Great iOS 11+ features!
If you haven’t updated to iOS 11 or above, consider it now.
iOS 11+ offers some very handy tools for streamlining storage.
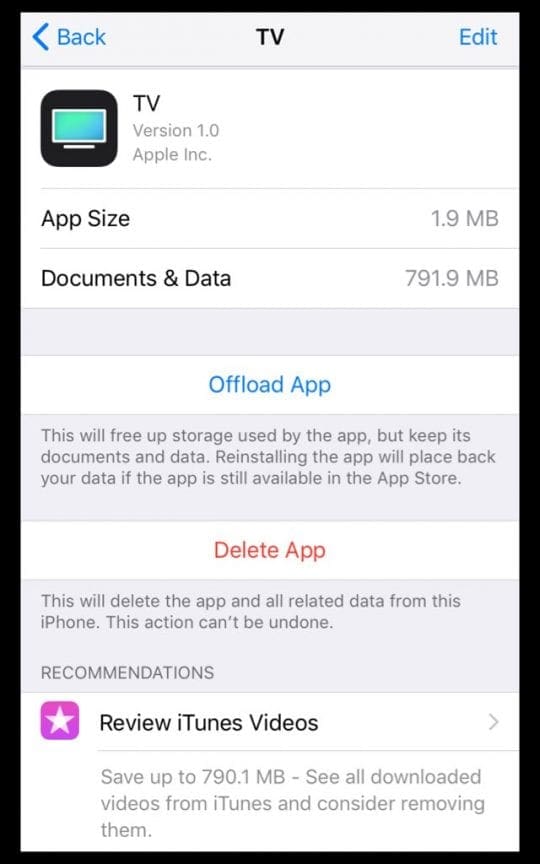
These include recommendations for things like deleting old conversations, reviewing large attachments, offloading unused apps, and reviewing iTunes videos.
You’ll even find individual app recommendations when tapping on apps in the list of apps in Settings > General > iPhone Storage.
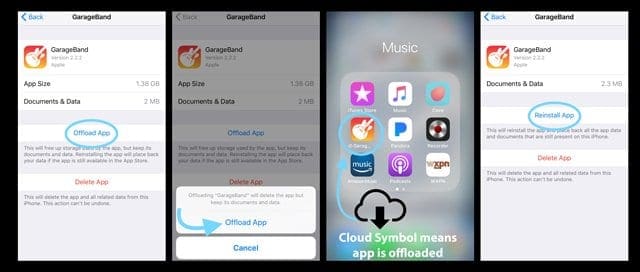
One of the best iOS 11+ storage features is Offload App.
It’s a fantastic feature to use when you’re running low on storage.
Offload App lets you delete an app BUT keep all the app’s documents & data. All you need to do is tap on the deleted app’s icon (shows a cloud icon next to its name), and your iPhone restores it with all your data intact!
So for apps where you need to keep data, like games, this option is very welcome indeed!
Even use it with heavy hitters like iMovie and GarageBand that tend to take up a lot of space just for the App Data. It’s available for almost any app–but not Photos or Safari.
There are two ways to offload apps in iOS11+
Enable Offload Unused Apps and your iDevice offloads automatically when it detects your storage is low
Manually offload apps by picking and choosing which apps offload
Open Settings > General > iPhone Storage and scroll down to the list of apps
Tap into an app and select Offload App
Once offloaded, the app remains in place but has a cloud icon next to its name
Reinstall by tapping the app icon or going to Settings > General > iPhone Storage > App > Reinstall App
Easy Tip–Delete Apps and then Reinstall!
Over time, many apps accumulate a lot of data in their caches. Although Apple encourages iOS app developers to build apps that have a self-cleaning cache function, quite a few developers do not this!
One simple way to clear out old cached app data is to delete the app and then download it again
A lot of the info stored in an app’s Documents & Data is ancient history that you don’t need.
And many apps don’t offer a feature to dump this data.
So the easiest way to clear out all that junk is to remove the app and then download it again.
Do this for apps where you don’t need your history–things like news apps, music streaming apps, and many social media apps. It’s surprising how clogged app data gets!
Take a Look At App Documents & Data
Go to Settings > General > iPhone Storage ( > Manage Storage for older iOS)
Select an app that’s listed at the top for using data
Look at App Size Versus Documents & Data
If Documents & Data far exceeds app size consider deleting that app if you don’t need that data or if that data is stored elsewhere (like the cloud or app servers)
Remember app like Facebook, Google Drive, Dropbox, etc. always store data on their servers, that’s why you see the same data from any device or browser
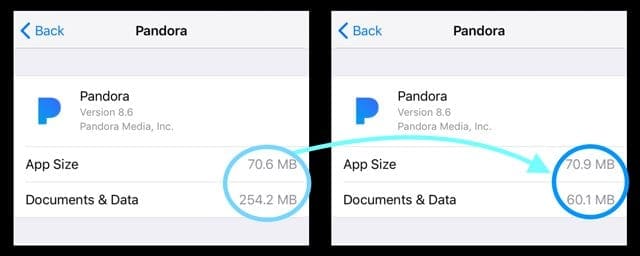
Looking at an example, I noticed that the music streaming app Pandora is 70.6 MB for the App Size and 254.2 MB for its Documents & Data. That seemed like a lot for a music streaming app, so I deleted it and then reinstalled.
After that process which took about 2 minutes total, the App Size is now 70.9 MB and its Documents & Data 60.1 MB. That’s a quick saving of almost 200 MB! For folks with 16GB phones, that’s a fair amount.
Manage Your Message App Data!
Now that Messages and in particular, iMessage, include a lot of additional features, like stickers, photos, videos, and drop and drag content.
All these Messages, Facebook Messenger or WhatsApp potentially add up to a ton of photos, video, and chat messages. Over time, even a single chat thread can build up to over 1GB of space, possibly even more if there’s a lot of videos.
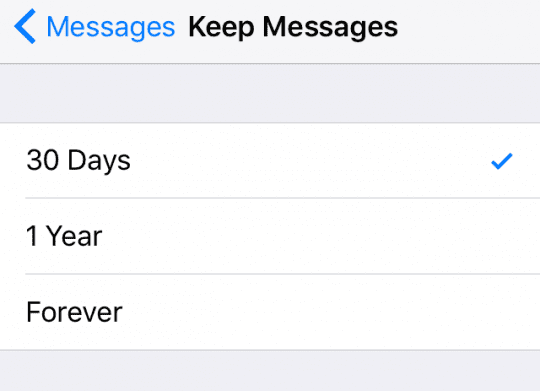
By far, the easiest way to manage your Messages is to change how long your iDevice stores them!
Go to Settings > Messages > Keep Message and update the time frame here from Forever to 30 days. This does exactly what it says, deleting messages after they’ve been on your device for over 30 days.
BUT if you have certain messages that you can’t bear to part with, check out our in-depth article on managing iMessage Data and learn some great tips on how to preserve those texts indefinitely.
Third-party apps like WhatsApp even offer their own method of backing up your messages, so check out your favorite messaging app to see if it offers an in-app backup.
iOS 11+ also includes a great Message management system that allows you to delete its documents & data by category, including conversations, photos, videos, GIFs and stickers, and even other types of data.
For those of you that really love using and keeping Messages, this Message storage management tool is for you!
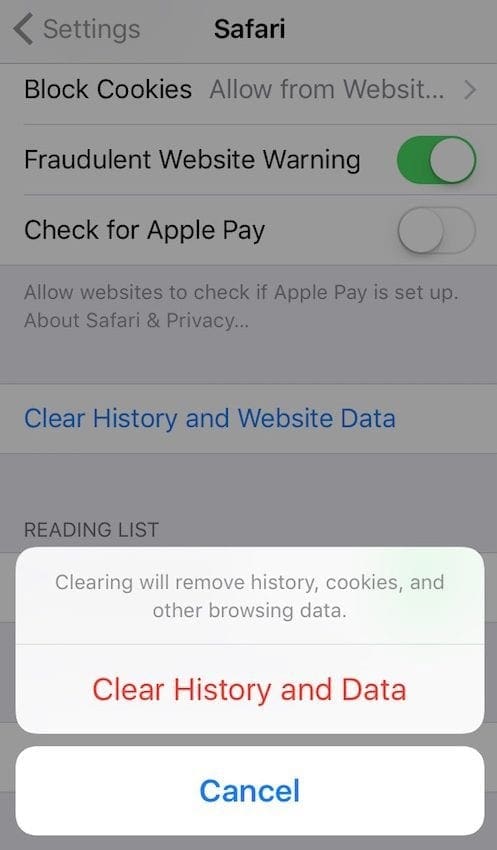
Delete Safari’s Cache
Often, it’s Safari that’s the storage hog.
So, if you use Safari for most or all of your web browsing, it’s good practice to clear out your cache, history, and cookies to free up space.
FYI, Safari caches data to cut down time spent accessing frequently visited sites. Over time, this cache grows larger and larger. So let’s see if we can free up some space by deleting that Safari cache today.
Go to Settings > Safari > Clear History and Website Data
This clear data from all iCloud connected devices
Next, go to Advanced > Website Data and clear anything listed there
It’s sometimes empty, so don’t worry if you don’t see anything. That’s actually good news
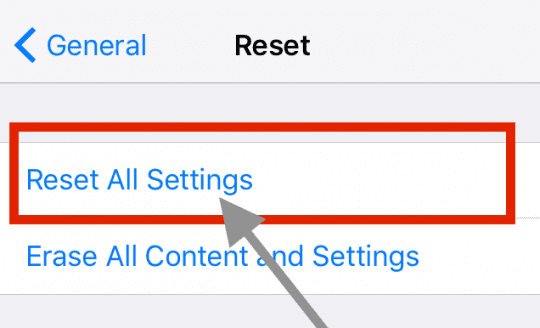
All your iOS system data takes up space–this includes things like device settings, Siri voices, VoiceOver voices, system data including some native apps, temporary files, and cached files.
These things often add up to quite a bit of data.
The good news is that cleaning your cache and temporary files are relatively painless. Using this feature does reset all your personalized iPhone’s settings. All your apps and data is still there but resets any setting preferences, like ringtones, wallpapers, sound settings, display settings, and network settings (Cellular and WiFi settings.)
Use Reset All Settings in Settings > General > Reset All Settings to clean up a lot of your temporary and cached files
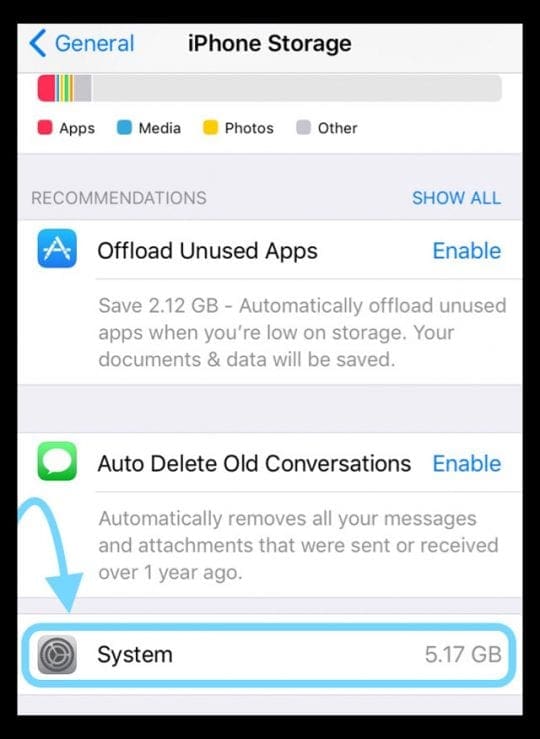
System Stats for iOS 11 and above
For folks using iOS 11+, there’s a great addition to your iPhone Storage details, your System details!
Finally, Apple lets us actually see how much memory our iOS system files take up.
These are not deletable, but it’s good to know where all your memory is going, whether to apps, app data, or to the iOS operating system itself.
To find out how much memory iOS takes up, go to Settings > General > iPhone Storage, and scroll all the way down, past all apps.
At the bottom you find System. So if the numbers aren’t adding up, make sure you account for your iOS system files first.
Update Some iPhone Photo & Video Settings
Limit Photo and Video Settings
If you’re anything like me, you take a lot of photos and videos (or try to take.)
Most of the time, we don’t need the best our iPhone camera’s offer to capture the moment.
Adjusting our camera’s resolution goes a long way in saving that precious data for other things, so let’s adjust some camera settings, so we find a middle ground of great photos AND storage savings.
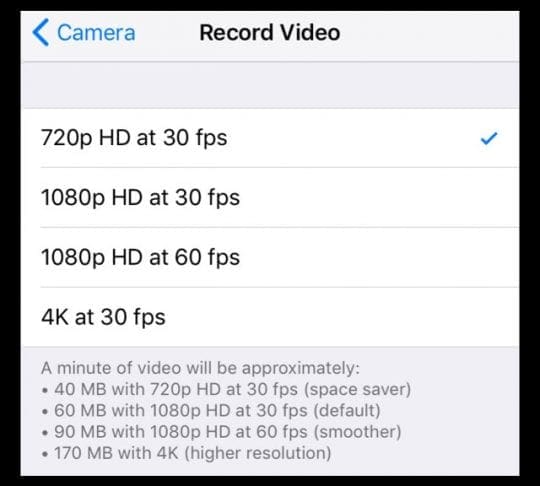
Video Recordings
Visit your camera’s settings by going to Settings > Camera (iOS 11+) or Settings > Photos & Camera.
Locate the items labeled Record Video and Record Slo-mo (not all iPhones offer Slo-mo, so if you don’t see this option, don’t worry)
Change these video recording settings to either 720p HD or 1080 HD–the lower the number, the greater the space savings
Avoid setting Record Video at 4K unless you have a compelling reason, like recording something extraordinary where you need that level of detail. For most things, either 1080 or 720 work just fine!
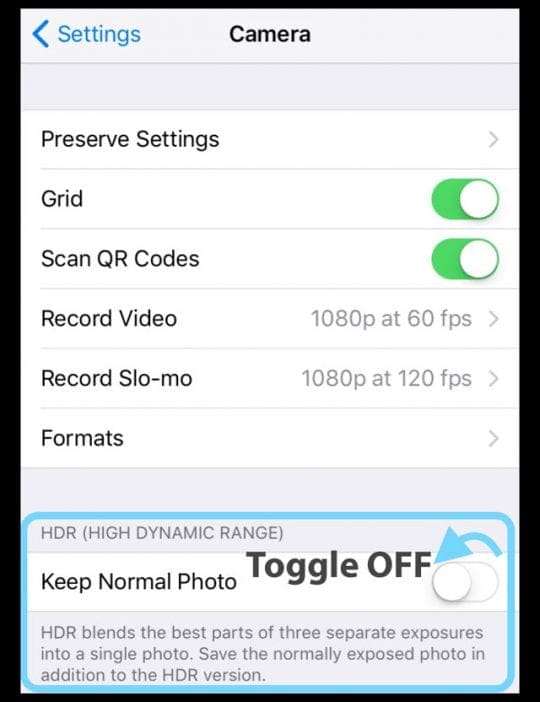
HDR Photos
Next, return to your Camera settings and look for the item Keep Normal Photo.
We recommend that you toggle this setting OFF. When ON, whenever you take an HDR photo, your iPhone automatically saves multiple copies of that same photo.
Saving copies means your photos take up more storage on your iPhone. If you always review your pictures and delete the version you don’t want to keep; it’s not an issue. But most of us don’t routinely review all our photos, so it’s best to turn this setting OFF.
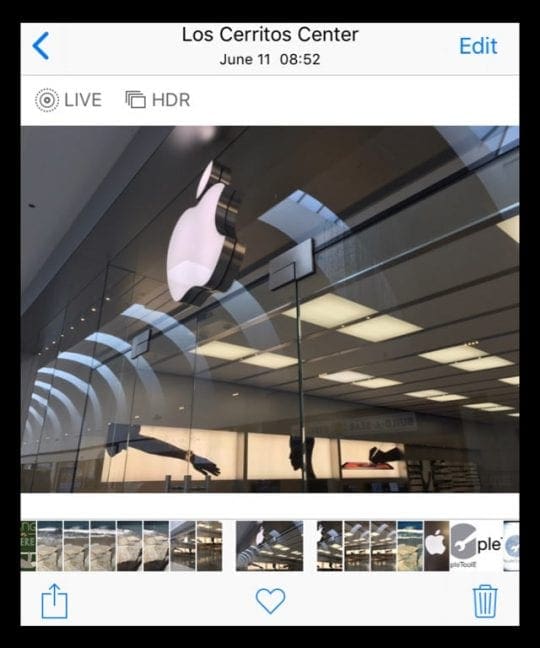
Your iPhone automatically creates HDR or high dynamic range photos for you when it thinks it’s appropriate.
Basically, your iPhone takes three different versions of every photo you snap in rapid succession–one for the shadowy parts, one for mid-tones, and one for the bright parts.
Then, your phone merges the best parts of the three photos together into the single image you see. Usually, HDR gives you a better picture with some exceptions: motion and silhouettes.
Turning HDR ON or OFF
Luckily, it’s easy to turn HDR on or off via your Camera App. The default setting is Auto, meaning your iPhone determines when it’s appropriate.
But if you want greater control, look for the HDR button at the top of your Camera App. Tap it and select Auto, On, or Off. Your iPhone highlights your particular selection. When HDR is off, HDR is crossed out. And when HDR is on, you’ll see HDR in yellow.
Remember that with the Auto HDR setting enabled, your iPhone chooses when it use this feature. Not all photos are HDR. Photos that are HDR say so in the top left corner of the preview, next to other photo indicators like Live, Long Exposure, and so forth.
Avoid Burst Mode
Unfortunately, a lot of us take burst mode photos without even realizing it!
That’s because our iPhones currently don’t have a button or toggle for enabling burst mode. Burst Mode takes a series of photos in quick succession. It’s great for action shots but not so good for regular photo taking.
To my chagrin, burst mode turns on when you let your finger linger a little too long on the shutter button. And since there’s no way to turn this feature off, even in accessibility, those of us with slow fingers often get stuck with a series of photos when we only wanted one! Talk about storage hogs.
To workaround, use your volume up button to take photos instead of the on-screen shutter button. Using volume up always takes a single photo, only eliminating the risk of a burst mode photo series!
If you accidentally took a photo burst series, it’s a few steps to choose one photo and delete the others.
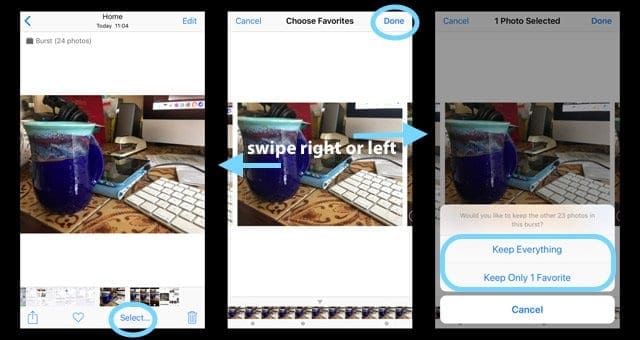
Open the Photos app and find your burst photos–look for a photo icon resembling stacked folders
You’ll see your photo identified as a Burst in the top left. It also lists the number of pictures in the burst series
Tap Select at the bottom of the screen to see all the photos
Swipe left and right to see all the burst photos
Tap the photo(s) you want to keep and press Done
Select either Keep Everything or select Keep Only Favorites, your selected photo(s)
Unselected burst photos move to your Recently Deleted Album
Don’t forget to delete these one more time to clear it out of your iPhone’s storage
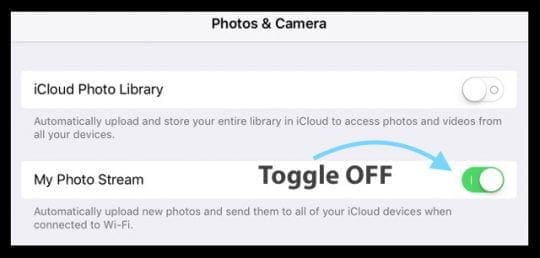
Turn Off Photo Stream If You Own Multiple Devices
If you own multiple iDevices or Macs that use the same Apple ID, turning off Upload to My Photo Stream should help keep some space free.
Photo Stream automatically uploads and then downloads new photos (within 30 days to a maximum of 1000 images) to all your Apple ID connected devices when that device is connected to WiFi.
So any pictures you take with your iPad automatically download to your iPhone and vice-versa. For that reason, we recommend turning OFF your Photo Stream for iFolks with lots of devices.
To disable My Photo Stream, go to Settings > Photos > and toggle OFF Upload to My Photo Stream (or My Photo Stream.)
Turning this feature off also deletes all photos currently in the stream–these should be on your other devices but confirm this before tapping Delete.
Once you choose Delete, Apple deletes all the photos previously downloaded from your Photo Stream.
When you delete pictures from My Photo Stream on your iPhone (or any iDevice), they are removed from BOTH that particular iPhone (or device) and iCloud.
BUT, the photos you import from My Photo Stream to your other devices won’t be deleted. Yeah, it’s confusing!!!!
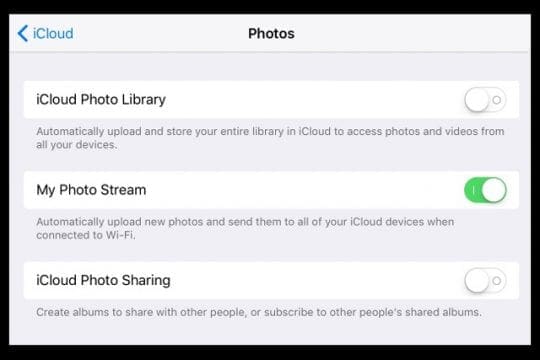
But Wait, Sometimes My Photo Stream Makes Sense!
If you own only one iDevice and a computer (Windows or Mac) OR if you use different Apple ID accounts for your devices, then keeping (or turning on) My Photo Stream might be a good choice.
In particular, for iFolks who do NOT use iCloud Photo Library using My Photo Stream is a great way to archive your photos on your much larger computer.
One caveat, My Photo Stream supports JPEG, PNG, and TIFF formats and only works with Photos, not Videos or Live Photos.
The idea here is to use My Photo Stream as a vehicle to get your photos to your computer, which generally has a much larger storage capacity.
Consequently, it makes sense that your computer is where you maintain your long-term photo collection and archive. To work, you must have My Photo Stream enabled on both your iPhone (or iDevice) AND your computer.
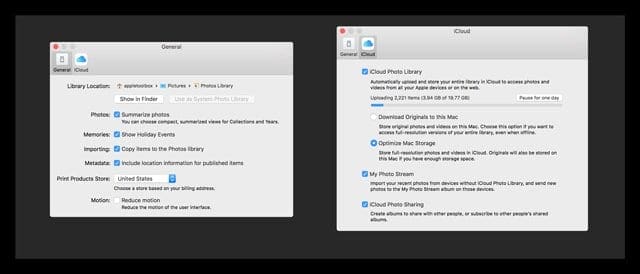
On your iDevice, go to Settings > Apple ID Profile > iCloud > Photos and turn ON Upload to My Photo Stream.
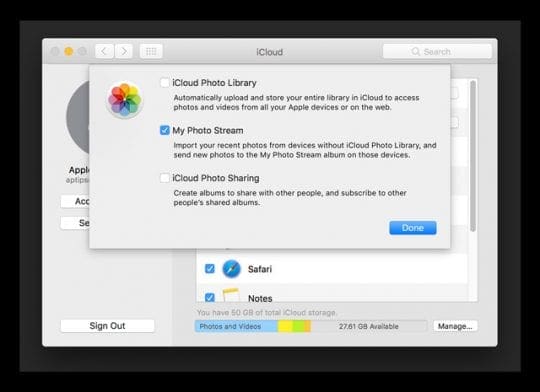
Turn On My Photo Stream On Your Mac
From the Apple menu, choose System Preferences
Click iCloud. And select Photos
Click the Options button and turn on My Photo Stream
Open Photos
Go to Photos > Preferences
Select General and tick the box for Importing: Copy Items to the Photos Library
Next to Photos, click Options and select My Photo Stream & Download New Photos and Videos to My PC
Click Done, then click Apply
When you turn on Photos, iCloud for Windows creates a Photos folder in File Explorer called iCloud Photos. My Photo Stream automatically downloads any new photos that you take on your iDevices to that Downloads folder.
Don’t forget to backup your iPhone and computer too!
If using My Photo Stream and not iCloud Photo Library, please make sure you backup your iDevice and computer regularly. My Photo Stream only saves photos for 30 days with a maximum of 1000 photos at any given time to the cloud.
So if your computer fails, you lose not only all your other applications, documents, and files, but also your entire photo collection! So be smart and back it up, at least once per week.
For Mac users, the easiest backup method is Time Machine, which backs up automatically, when the computer is on. And for iPhones, take a look at our detailed iOS Backup article.
Do It Old-School–How to Manually Import Photos & Video
If you don’t like the idea of the cloud or its cousin, My Photo Stream, there’s still the old-fashioned way of moving photos from your iDevices to your computer. Yes, it’s time intensive. And yes, it is often a pain.
But on the plus side, you get a chance to revisit all those memories–and delete a few along the way. Sometimes what happens on your iPhone should indeed stay on your iPhone…or disappear altogether!
For Macs
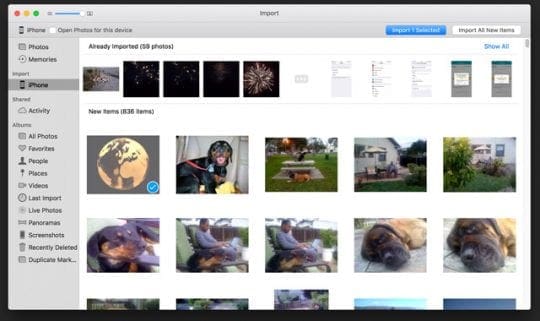
Connect your iDevice to your Mac with your lightning cable
If needed, unlock your iDevice with your passcode
If you see a prompt asking you to Trust This Computer. Tap Trust
On your Mac, the Photos app automatically opens
If not, open the Photos app manually
An Import screen appears with all the photos and videos that are on your iDevice
If the Import screen doesn’t appear, click the Import tab or click the device name in the sidebar
Click Import All New Photos or choose the images you want, then click Import Selected
When the import is complete, you might see a message asking if you want to delete or keep the photos on your iDevice
Click Delete Items to remove the pictures or select Keep Items, so they remain on the device
When you select Keep Items, you’ll need to delete them manually from your iDevice
That’s it! Now safely disconnect your iDevice from your Mac
For Windows
Install the latest iTunes version. Importing photos to your Windows PC requires iTunes 12.5.1 or later
Connect your iDevice to your PC and open the Photos app
Right-Click or swipe up from the bottom edge to see the app commands
Select Import
Choose your iDevice
The app automatically searches for all photos and videos that it hasn’t imported before and selects them. Alternatively, click or swipe down on each photo and video you want to import or chooseSelect All
Select Import
Your photos and videos are saved in the Pictures folder in a subfolder named with today’s date
If you stream a lot of videos via iTunes, your phone might just get a little confused with all that data coming in.
Sign out of iTunes on your phone, restart the phone, and then sign back into iTunes on the phone. Now see if your storage goes up.
Wrap Up
So after all this effort here’s my result!
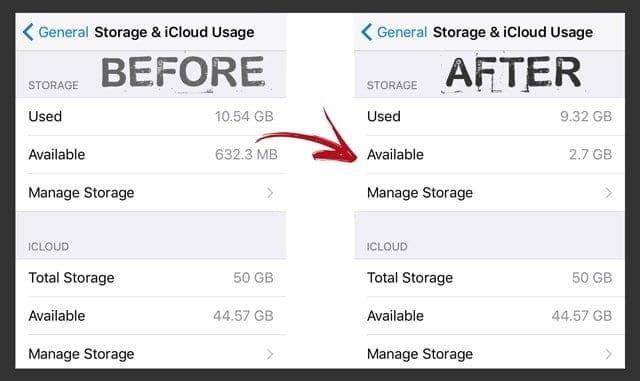
I saved a whopping 2 GB of data by following the steps listed above. I think that’s pretty awesome AND now I can take all the photos of my kids, family, vacation, and anything else that comes to mind.
Best of all, with these tips in hand, I’ll better manage my iPhone storage in the future. So no more Cannot Take Photo and Storage Almost Full messages. And that, my friends, is welcome news indeed.
For most of her professional life, Amanda Elizabeth (Liz for short) trained all sorts of folks on how to use media as a tool to tell their own unique stories. She knows a thing or two about teaching others and creating how-to guides!
Her clients include Edutopia, Scribe Video Center, Third Path Institute, Bracket, The Philadelphia Museum of Art, and the Big Picture Alliance.
Elizabeth received her Master of Fine Arts degree in media making from Temple University, where she also taught undergrads as an adjunct faculty member in their department of Film and Media Arts.
If you cannot backup to iCloud because it is full you have to move files (usually photos) off to a backup hard drive.
Then you can go manage the memory but iCloud will still not let you back up saying it is full. Yes full with copies of all the stuff you just deleted from your phone. So it seems like iCloud is broken… but it is not.
The deleted files are still on your phone until you go to the last album called Deleted files: empty all.
Then the memory is freed on your phone. iCloud will not do anything yet. You must go to iTunes and SYNC with your phone.
It will then reflect the new reality in your phone.
Then you can get the backup protection you are paying Apple for, instead of going up to a higher level of iCloud storage (payment $10/month) Yes the protection for deleted files is nice BUT beware!!! If you are unable to back up because iCloud says it is full then anything you delete will be gone forever without being in the deleted folder. There is a warning message saying that in light gray and it is telling you the truth. They’re gone.
So back up the files (unencrypted) and just as they appear on your phone to a hard drive so you can see what they are called, can see the images and can move them as you want to.
Then do the rest and you will find satisfaction. Another storage solution is to store them to your google drive as you get them keeping your phone clean and available for the next big event!
Thanks, Elizabeth, this is super helpful! I tried most of these tips on my previous phone, a 16 GB iPhone 5S, and I was able to free up a few extra GB, but they quickly fill up again. What I started doing is I keep my photo library lean and remove the photos I don’t need right away. If you take pictures of people (kids especially) you take like 4 pictures every time to get a good shot where everybody’s got their eyes open, etc., so if you make it a habit to keep only the good shots, Photos doesn’t get as bloated as fast.
Thanks for sharing your tips on keeping the iPhone clutter at bay. Yes, it’s always best to immediately review your pictures and keep the good, get rid of the bad (and ugly.)
Wow Liz! Thank you for all that information. I’m constantly having this issue with my iPhone. Maybe I wont need to upgrade my phone this year after all.


If you cannot backup to iCloud because it is full you have to move files (usually photos) off to a backup hard drive.
Then you can go manage the memory but iCloud will still not let you back up saying it is full. Yes full with copies of all the stuff you just deleted from your phone. So it seems like iCloud is broken… but it is not.
The deleted files are still on your phone until you go to the last album called Deleted files: empty all.
Then the memory is freed on your phone. iCloud will not do anything yet. You must go to iTunes and SYNC with your phone.
It will then reflect the new reality in your phone.
Then you can get the backup protection you are paying Apple for, instead of going up to a higher level of iCloud storage (payment $10/month) Yes the protection for deleted files is nice BUT beware!!! If you are unable to back up because iCloud says it is full then anything you delete will be gone forever without being in the deleted folder. There is a warning message saying that in light gray and it is telling you the truth. They’re gone.
So back up the files (unencrypted) and just as they appear on your phone to a hard drive so you can see what they are called, can see the images and can move them as you want to.
Then do the rest and you will find satisfaction. Another storage solution is to store them to your google drive as you get them keeping your phone clean and available for the next big event!
My phone has been telling me that my phone is full.
I checked in settings to see what was taking up most of my storage.
It said that I still have 5GB of storage left.
I started deleting unwanted photos and videos and my phone still says that it is full.
I went to settings> password and app accounts > iCloud > iCloud drive and turned it off and I was immediately able to take photos again!
Thanks, Elizabeth, this is super helpful! I tried most of these tips on my previous phone, a 16 GB iPhone 5S, and I was able to free up a few extra GB, but they quickly fill up again. What I started doing is I keep my photo library lean and remove the photos I don’t need right away. If you take pictures of people (kids especially) you take like 4 pictures every time to get a good shot where everybody’s got their eyes open, etc., so if you make it a habit to keep only the good shots, Photos doesn’t get as bloated as fast.
Hi Brenda,
Thanks for sharing your tips on keeping the iPhone clutter at bay. Yes, it’s always best to immediately review your pictures and keep the good, get rid of the bad (and ugly.)
SK
Wow Liz! Thank you for all that information. I’m constantly having this issue with my iPhone. Maybe I wont need to upgrade my phone this year after all.
Thanks again!