It’s Spring Time—flowers are blooming, trees are budding, and the stagnation of Winter is finally dissipating. It’s the perfect time to clean and declutter our lives, including our digital lives. Time to remove all those old junk files, recover storage space, and empty the cache. Not only will we feel good but our iDevices will thank us in functioning efficiently and running faster than ever (just in time for Summer Vacation fun). Yes, it’s time to have a clutter free iPhone and iDevice life.
So let’s get rid of all those memory hogs, unwanted cache clogs, and delete those junk files that iOS accumulates over time and slows our iDevices down. In the spirit of Spring, let’s renew.
Related Articles
- Back Up All Your iDevice Data
- Tips for a Clutter-Free iTunes
- 5 Apps to Clean Your Mac of Unwanted Files
- Manage iOS iMessage Data
Contents
- Spring is Reflection and Renewal
- Where To Look?
- How to clean out your iPhone/iPad’s memory by deleting the browser cache
- How to delete unused or unwanted apps from your iPhone/iPad’s
- How to remove app data from your iPhone/iPads’ memory
- Streamline Your Photos
- Minimize Your Music
- Manage Your Messages!
- How to get more memory space out of your iPhone/iPad
- Summary
Spring is Reflection and Renewal
Our Spring Cleaning will not only get rid of all those unwanted files; it improves us. How? An iOS Spring Cleaning facilitates taking a closer look at our environment—are we really using all those apps or are they just vestiges of times past? Let’s take this Spring Cleaning as an opportunity to focus on what we use and what we no longer (or never) use.
Take some time to look closely at your iDevice’s apps. If you no longer use an app, haven’t used it for 3+ months, or never used it, remove it! Let’s get your device to its optimal state for YOU—how you use it and make it work best for you.
The good news is that this Spring Cleaning works for both older and newer models—in fact, the older models should see a lot of improvement in performance because like us humans, time brings clutter. A good cleaning reaps the rewards for all generations, young and old, so we can all run at optimal speed and efficiency.
So let’s get to it!
Where To Look?
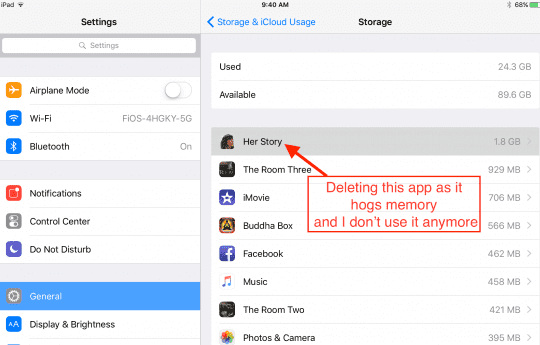
First, let’s find out what’s eating up the most storage space on your iDevice. So head over to Settings to get a snapshot of your current storage use. So open Settings > General > Storage (for older iOS Storage & iCloud Usage > and underneath the Storage section, choose Manage Storage.) This action opens that quick look into where you are currently using data. A top section summarizes how much space you are using and how much is available. Below that are details on how much data each app is taking. Tapping on an app in the list provides more details on exactly what information you are storing in this particular app.
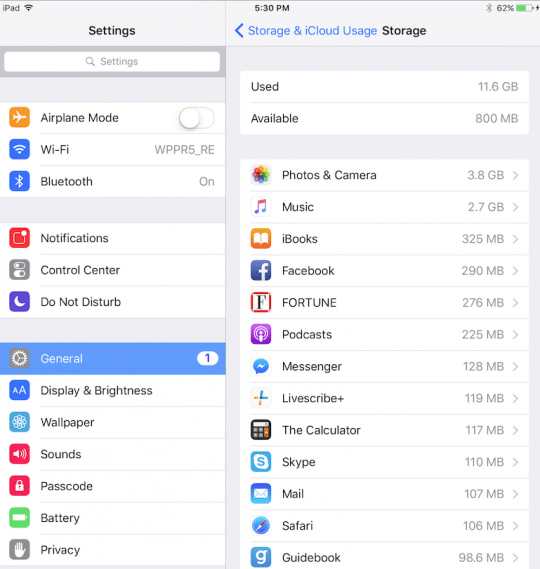
iOS 11 Awesome’s Storage Management
This iOS version includes a graph view of your storage use along with some automatic storage tools and recommendations, such as Offload Unused Apps, Auto Delete Old Conversation, and Review Large Attachments (or iTunes Videos) and so forth. These recommendations are individualized for you–so you may see these recommendations or others, dependent on how you use your iDevice! Plus, iOS 11 includes a bunch of different ways to delete data without deleting apps!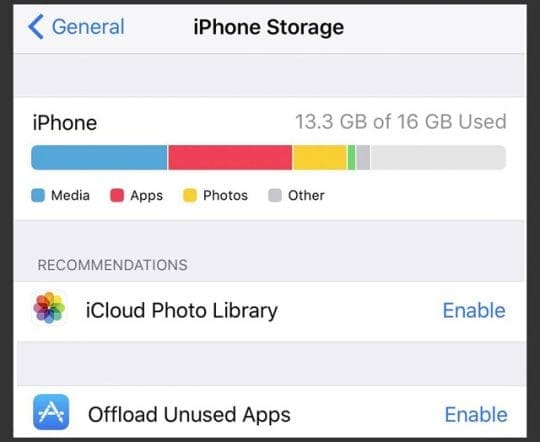
Find Your Space Hogs!
Usually, your biggest hogs are your Photos, Music, Mail, Messages, and the large third-party apps like you regularly use (like Facebook, Chrome, WhatsApp, Waze, and so forth.) So take a note of what apps are listed at the top and then see if you can trim some of that fat. This moment is also an excellent time to review that list of apps to see if there are any apps that you don’t use or never used. Time to chuck out the dead weight of non-used apps! 
How to clean out your iPhone/iPad’s memory by deleting the browser cache
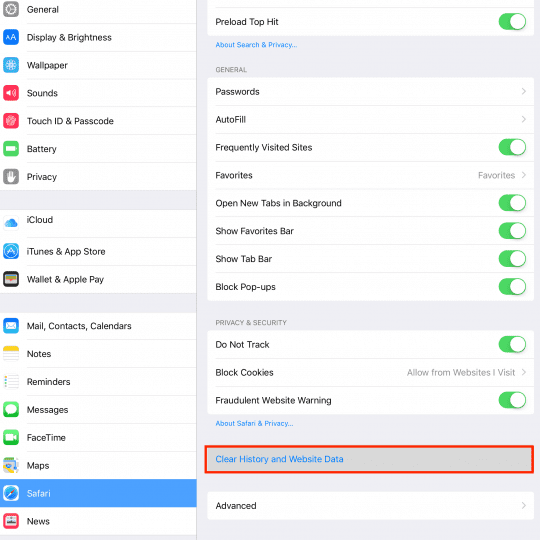
Next, let’s clean out the Safari caches on our iPhones/iPads. Please remember that this may log you out of any websites you’re signed into so make sure you take note of all your user IDs and passwords before performing the following steps (you will need to log in again).
Follow these steps to clean out the Safari cache:
- Tap Settings > Safari.
- Scroll down and tap Clear History and Website Data.
- Tap Clear History and Data.

If you have another browser installed like Chrome or Firefox, perform the same actions as Safari by clearing out the cache of each browser. Remember that this action may result in clearing out of all usernames and passwords so make sure you take note of all those IDs and passwords in advance.
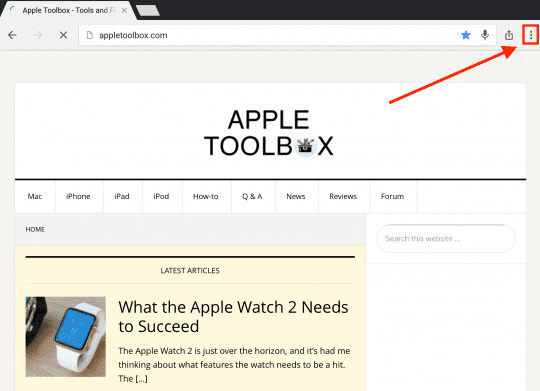
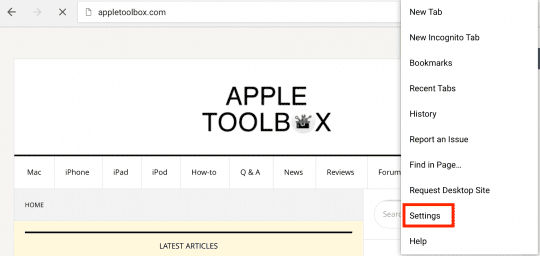
For Chrome:
- Open the Chrome App
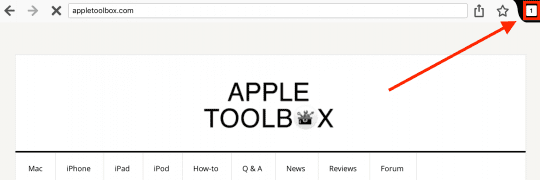
- Tap the Options Box on the top right of the screen

- Choose Settings

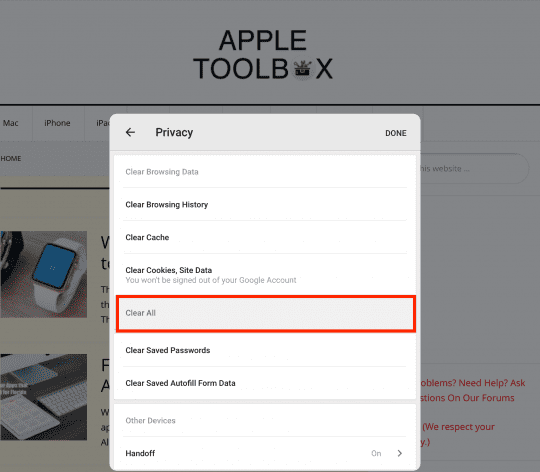
- Tap Privacy
- Select Clear Cache to clean just the cache
- Tap Clear Browsing History to clear only your history
- Choose Clear All to wipe everything (cache, browsing history, cookies)

For Firefox:
- Open Firefox App
- Tap Tab Button on Upper Right

- Select the Settings CogWheel on Upper Left

- Choose Clear Private Data
- Select which Data you want to clear (Browsing History, Cache, Cookies, Offline Website Date)
- Tap Clear Private Data

That’s a good start and should free up some memory. Let’s focus next on removing old, unwanted, and no longer or never used apps.
How to delete unused or unwanted apps from your iPhone/iPad’s
The simple method to delete apps on your iPhone/iPad:
- Tap and Hold the unwanted app’s icon on your home screen until all your iDevice’s app icons begin to jiggle.
- Tap the small “x” on the upper corner of the app. A prompt will appear with an option to delete the app and its data. It warns you “deleting this app will also delete its data.”

- Select the Delete button in the prompt.
The sophisticated method to delete apps on your iPhone/iPad:
- Tap Settings > General > Storage
- For Older iOS, tap Storage > Manage Storage
- Select an app from the list of your device’s apps and tap it

- Tap Delete App. A Prompt appears letting you know “Deleting will also delete all of its documents & data.”
- Select Delete App
Sometimes, though, this doesn’t get rid of the unwanted app for good. If you connect your iPhone/iPad to your computer to sync with iTunes, often the app mysteriously reappears on your iDevice.
To get rid of the app FOR GOOD, use iTunes (if version allows App Management
- Open iTunes on your computer BEFORE you connect your iDevice
- Requires iTunes 12.6 versions or earlier
- DOES NOT WORK with iTunes 12.7 and higher
- Select Apps from iTunes menu (upper left corner icons)
- Find the app you want to delete and select it
- Once selected, press the delete key or use the delete function from the Edit menu
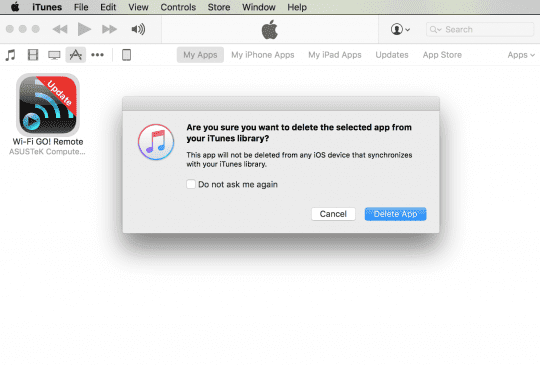
- You get a prompt asking “are you sure you want to delete the selected app from your iTunes library?”

- Press Delete App button (should be highlighted)
- You get another prompt asking “Do you want to move the selected app to the Trash, or keep it in the Mobile Applications folder?”
- Press the Move to Trash button
Following these steps ensures that the app doesn’t find its way back to your iPhone/iPad the next time you sync your device with your computer.
How to remove app data from your iPhone/iPads’ memory
Data is stored by apps in each app’s Documents and Data. Apple has not made cleaning this data very easy, so we still need to clean this type of data app by app. I hope in future releases that Apple lets us do this through the Storage and iCloud Usage option in Settings. For now, though, we have to do this “by hand.”
Follow these steps to clean out unwanted data from your iOS apps:
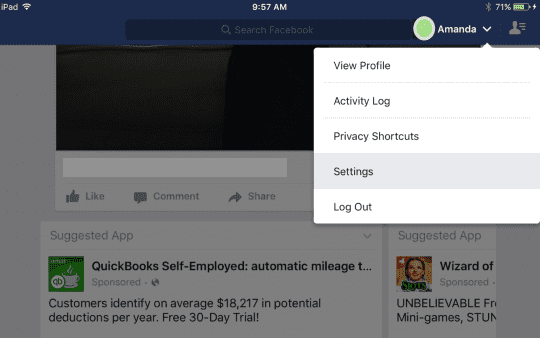
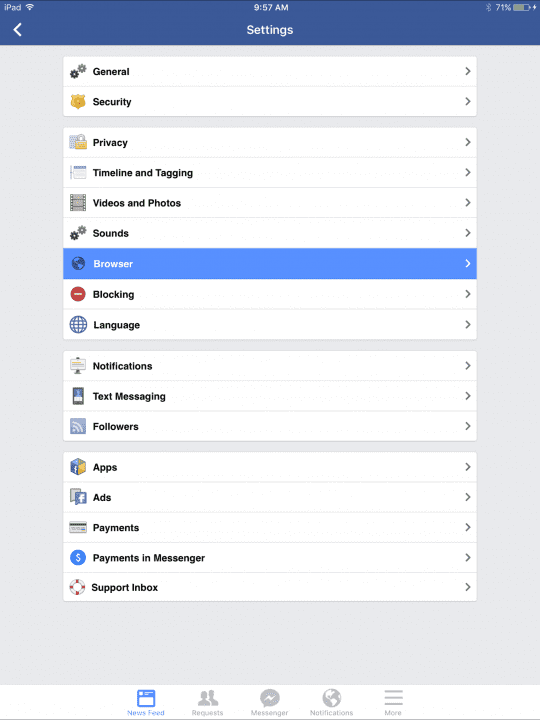
- Open the app you want to clear (I’m going to use Facebook as an example)
- Find the Settings Button (for iPhones, tap the More button and scroll down to Settings)

- Tap Settings (for iPhones, tap Settings > Account Settings)
- Select Browser

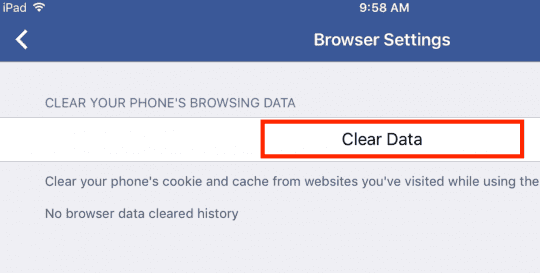
- Tap Clear Data

Uninstall My Favorite App? Are you crazy?
Sometimes, it’s easier to uninstall and reinstall your app to conserve memory. It doesn’t feel like the best option I know, but at times, it’s the only alternative we have. If you have IDs and passwords associated with that app, make sure you note these before uninstalling and reinstalling, they will not migrate.
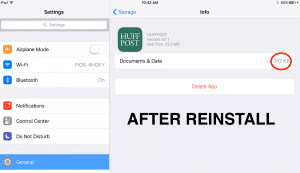
Follow the same steps as deleting an app (from above) and then reinstall that same app through the app store. We tested this method by uninstalling and then reinstalling HuffPost, showing a decrease from 228 MB to 312 KB—big difference!

Streamline Your Photos
Photos and videos are often the biggest data hogs on your iDevice (and maybe your Mac too.) Luckily, Apple recognizes this and provides a setting called Optimize Storage to help control the potentially HUGE storage that photos (and home videos) take on your iDevices. Turning this feature ON requires an iCloud account, so if you don’t have one consider signing up for at least the free 5GB account.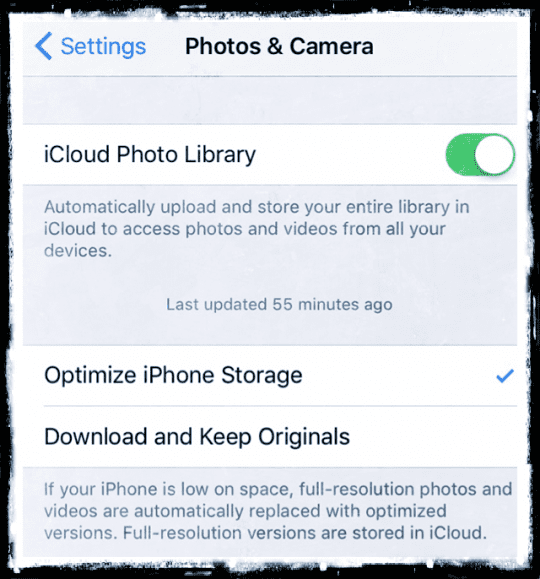
Go to Settings > Photos > and Select Optimize iPhone (or iPad etc.) Storage. A checkmark appears beside this option. This feature stores your full-resolution photos and videos in your iCloud account while saving lower resolution copies on your iDevice, thereby freeing storage space. Your iDevice only starts this process when your iPhone or iPad reaches a set low-point of remaining available storage.
Minimize Your Music
Music is the one thing we love to store on our iDevices. Considering that our iPhones birthed out of the iPod Music Player, it makes sense that music is an essential function of your iPhone or another iDevice experience. But boy can music clog up the data pipes! Luckily, there are some great and consistent alternatives so that the music is always playing when you want it.
If you have an Apple Music subscription, there are options to download or play music from the cloud. So considering storing only a few favorites locally on your iDevice and streaming the rest. Apple gives you easy options to delete songs from your phone by going to Settings > General > Storage and then selecting on the Music App. From there, you can delete an entire artist, a particular album, or even a single song. And best of all, your music is NOT removed from your library. You now stream that same music instead of playing from your local copy. And if you want that music back on your iDevice, just download it again.

If you don’t have an Apple Music subscription, the same holds true for any music purchased via the iTunes store. You can delete the local copies and instead stream your iTunes purchased music. When and if you decide you want to save the music on your device, just navigate to the artist and album and download that music again.
Manage Your Messages!
With all the rich features Messages and similar texting apps now offer, there is a price to pay: DATA. When you use Messages, FaceBook Messenger or WhatsApp for a long time, you accumulate a ton of photos, video, and chat messages which take up a lot of iDevice space. Over time, a single chat thread can build up to over 1GB of space, possibly even more if there’s a lot of videos.
If you’ve never looked at how much storage your Message apps take up, now’s the time. I have no doubt that you’ll be surprised by the result. To review how much storage your Message Apps are taking up, go to Settings > General > Storage > and select your message app. 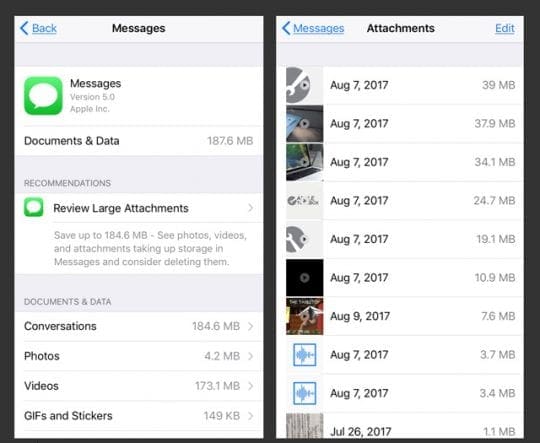
The easiest way to manage your Messages is to change how long your iDevice stores them! Go to Settings > Messages > Keep Message and update the timeframe here from Forever to 30 days (or 1 year, if you prefer.)
Have Messages that you can’t bear to part with? If so, check out our in-depth articles on Managing iOS 11 Messages & iMessage Data (or for iOS 10, this article on managing iOS 10 iMessage Data. Learn some great tips on how to preserve those texts indefinitely. Third-party apps like WhatsApp even offer their own method of backing up your messages, so check out your favorite messaging app to see if it provides an in-app backup.
How to get more memory space out of your iPhone/iPad
Apple iOS manages your memory quite effectively. Apps that run in the background should ideally NOT take up memory. But as in life, the reality is not often the ideal. To help our iPhones/iPads get more towards that ideal, your best bet is to restart the device. Restarting an iPhone/iPad clears all the memory and ensures that the apps we need right now have enough memory to run smoothly.
To restart your iPhone/iPad:
- Hold down the Sleep/Wake button until “slide to power off” appears.
- Slide the power off switch and turn off the iPhone/iPad.
- Wait until it has fully powered down then press the Sleep/Wake button to turn the iPhone/iPad back on.
Restarting your iPhone/iPad on a regular basis ensures that your iDevice is working on the apps you want it to. My suggestion is to power down your iDevice when you power down for your daily sleep. Then, when you wake up, you also wake up your iDevices. That’s what I do, and it’s easy to remember!
Summary
Springtime is a great time to clean your digital house. Take a moment and reflect on the apps that really matter to you, that you consistently use. What are the apps you love and cannot live without? Use those as your guide—these are the apps that stay. All others should go away via deletion. Your iPhone or iPad will love you for it by performing better, and you will love yourself for decluttering your digital world and simplifying. Purging feels soooo good. So let’s get cleaning!

For most of her professional life, Amanda Elizabeth (Liz for short) trained all sorts of folks on how to use media as a tool to tell their own unique stories. She knows a thing or two about teaching others and creating how-to guides!
Her clients include Edutopia, Scribe Video Center, Third Path Institute, Bracket, The Philadelphia Museum of Art, and the Big Picture Alliance.
Elizabeth received her Master of Fine Arts degree in media making from Temple University, where she also taught undergrads as an adjunct faculty member in their department of Film and Media Arts.







This totally worked for Safari crashes. It also sped up some other applications that were hanging, also. Thank you thank you thank you!
My biggest challenge is managing “email.” Nothing advises me of which folders contain the largest files or folders. Or do they?