It’s been a few months since iOS 14 was released, which means that it’s been long enough that the update should feel “normal” to most people. You might be feeling that you’ve already got the hang of widgets, the App Library, and a redesigned Siri.
If you’re feeling that iOS 14 has lost the luster of when it was first released, you’re in luck. Alongside a handful of other hidden features in this update (such as sound recognition) is the ability to turn the back of your iPhone into a button.
This new feature, known as “back-tap”, allows you to double-tap the back of your iPhone to run a shortcut. This includes things like scrolling up or down, lowering or increasing your volume, and opening your favorite app.
In this tutorial, we’ll show you how to enable this feature and answer some of the most common questions surrounding it.
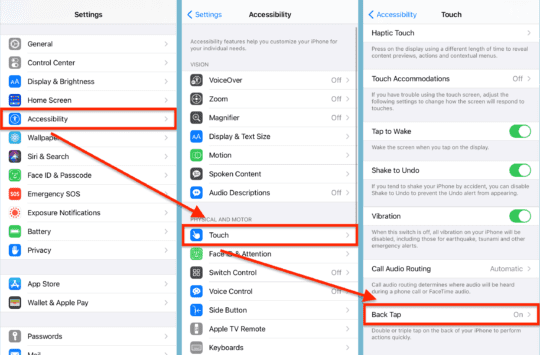
First things first, you’ll want to open the Settings app on your iPhone. Once opened, scroll down and tap Accessibility, then Touch, scroll down again, and tap Back Tap.
On this next screen, you’ll see options for Double Tap and Triple Tap. As these names subtly imply, these allow you to map shortcuts to both a double tap on the back of your iPhone and a triple tap.
The options are the same for each of these, so feel free to set either one how you want. You could even map them to the same shortcut if you so desired.
Once you’ve chosen a setting for both (or for just one) you can immediately tap the back of your iPhone to see this in action.
And that’s it!
How does back-tap work?
Back-tap uses the accelerometer in your iPhone to detect when you double- or triple-tap your iPhone. For those who don’t know, the accelerometer in your iPhone is what detects motion. For example, the accelerometer is what detects when you rotate your iPhone.
Which iPhones can use back-tap?
While every iPhone has an accelerometer, only iPhones 8 and newer can take advantage of back-tap. It’s not exactly clear why Apple has made this decision, though I suspect it’s for the same reason that you aren’t able to use tap-to-wake on earlier iPhones either. It’s most likely related to battery consumption. Regardless, you’ll need an iPhone from at least 2017 to use back-tap.
What can you use back-tap on iPhone for?
Though I’ve known about back-tap for a while, I was surprised to see just how many uses Apple incorporated into this extra feature. It includes some of the basics, such as returning to the Home Screen, triggering Spotlight search, and activating Siri.
However, it also includes some really neat features that might change the way you use your iPhone. For instance, you could map the volume controls to your double and triple taps, allowing you to replace those buttons or change the volume without needing to grip your phone. I recommend going through the full list of options to find a combination that speaks to you.
Can you use back-tap on iPhone with the Shortcuts app?
In my opinion, the coolest thing you can map to the back-tap feature is shortcuts from the Shortcuts app. If you’ve never used the Shortcuts app before, it’s an Apple app for iPhone that allows you to create integrated automations on your iPhone. For instance, you might tap a shortcut that creates a playlist of the ten songs you listened to most last week.
In iOS 14, you can map these shortcuts to widgets on your Home Screen, Siri, and now the back-tap function. This allows you to do virtually anything on your iPhone by simply tapping the back of your device. I have mine mapped to a shortcut that Shazams whatever song is playing nearby and another that brings up my itinerary.
You can browse the Shortcuts app for great ideas or create your own custom automations after a bit of practice. If you’ve never checked this app out, you now have a great excuse to do so.
Do you have to tap the back of your iPhone for back-tap to work?
It occurred to me to test the limits of back-tap while writing this review, and I am pleased to announce that no, you do not need to tap the back of your iPhone to trigger back-tap. That said, you’ll probably still want to.
I first tried tapping my iPhone on the front of the screen. This doesn’t work, however, because the screen detects your finger and knows that you’re tapping the front of the device.
Then I tried tapping the side of the iPhone, which did trigger back-tap. So if your iPhone is ever sitting on a table and you’re unable (or simply too lazy) to pick it up, you can just tap the side of your phone to get the shortcut to run.
I also tried tapping the back of the iPhone while it was face down. This didn’t work, which leads me to believe that Apple is using the proximity detector and accelerometer to prevent you from using back-tap in this way. It also doesn’t look like back-tap works while your iPhone is locked, which makes sense.
Keep exploring iOS 14!
This is only one of the more interesting, hidden features in iOS 14. There are a plethora of others, so don’t hesitate to scroll through the Settings app and see what else you can find.


Write a Comment